Twitter social login guide

Twitter is a social news and networking site with more than 300 million active users each month.
Before you begin
To use Twitter for social login you must:
-
Obtain a Twitter developer’ s account from https: //developer.twitter.com.
-
Do one of the following:
- Open a previously-created Twitter app, and copy the consumer key (API key) and consumer secret (API secret).
- Create a new Twitter app and copy the consumer key and consumer secret.
-
Use the Social Login Dashboard and the Twitter consumer key and consumer secret to configure Twitter as a social login provider.
Note that the Twitter Developer Portal is located at https: //developer.twitter.com. Note that, when you log in to the Developer Portal, you’re automatically taken to your actual Twitter feed:

That might be a bit confusing at first. But don’ t worry: after you’ve logged on, enter the Developer Portal URL (https: //developer.twitter.com) in your browser’s address bar and then press ENTER. That takes you to the Developer Portal where you can access your projects and apps:
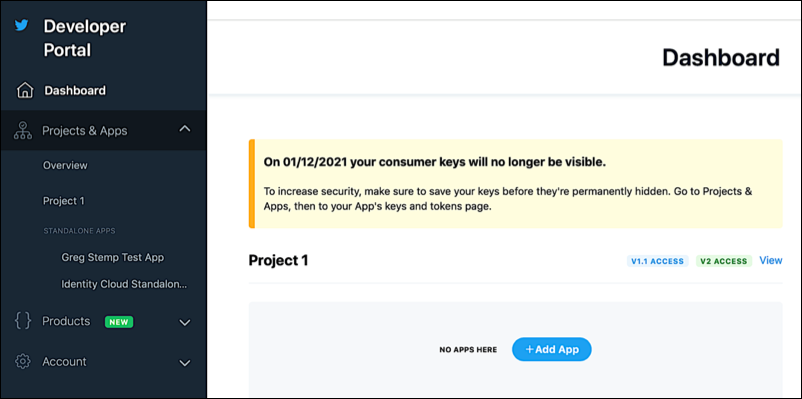
Create a Twitter app for social login
In August 2020, Twitter introduced the concept of a Twitter project, a new way to organize your Twitter apps and to provide access to the v2 version of the Twitter APIs. If you haven't logged on to Twitter’ s Developer Portal since August 1, 2020, you’ll likely see a dialog box similar to this one the next time do log on:
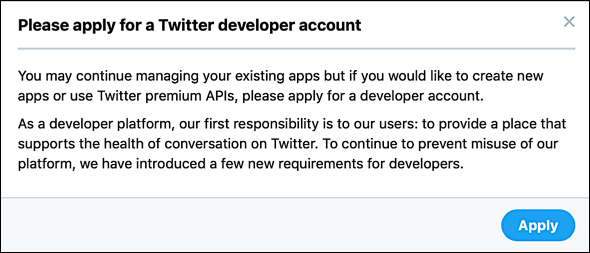
If you want to create a Twitter project, you must first apply for a Twitter development account; that process consists of answering a few questions about what your project/app is intended to do and what type of user data you want to access. Depending on your answers to these questions, your application could be approved immediately, or you might have to wait a few days for Twitter to make a decision.
That said, however, you don’t necessarily need to apply for a developer account nor do you need to create a project in order to use Twitter for social login. Any apps you created prior to August 2020 will still be available to you: you can still manage those apps and still use them for social logins . However, you will not be able to create new apps without a developer account.
In other words, if you’ re new to Twitter development or if you need to create a social login new app then you’ll have to get a developer account.
It’ s worth reiterating that only newly-created apps can access the Twitter v2 APIs. However, the v2 APIs are not required in order to use Twitter for social login.
In this documentation, we’ll show you how to create a Twitter project (and app) that can be used for social login. We’ll also show you how to create a “ standalone app” (i.e., an app not associated with a project) that can be also used for social login.
Create a Twitter project and a social login app
Assuming your developer account is approved, the next time you log on to the Twitter Developer Portal your Dashboard will look similar to this:

In other words, you’ll have a default project (Project 1) but not apps. Your first course of action is to add an app to that project.
To create an app, click Add App to display the Add your App page:
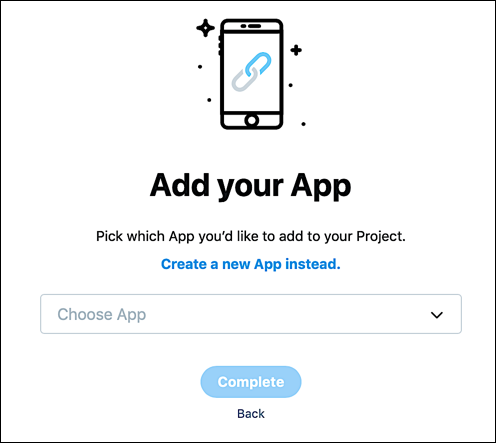
If you prefer, you can click the Choose App dropdown list and add one of your existing apps to your new project. For this example, however, we’ll click Create a new App instead. When the Name your App page appears, type a unique name (unique across all of Twitter) for your app in the App name field and then click Complete:

That creates your new app and displays the default app details:

In order to use your new Twitter app for social logins you must next enable 3rd party authentication. To do that, locate the Authentication settings section and complete the following procedure:
-
Click Edit.
-
When the authentication settings appear, select Enable 3rd party authentication:

-
If you want to return a user’ s email address after that yes has logged on, select Request email address from users:

Note that this is optional; you can use Twitter for social login without returning the user’ s email address.
-
Enter your callback URI in the Callback URLs field, and enter the URL of your website in the Website URL field:
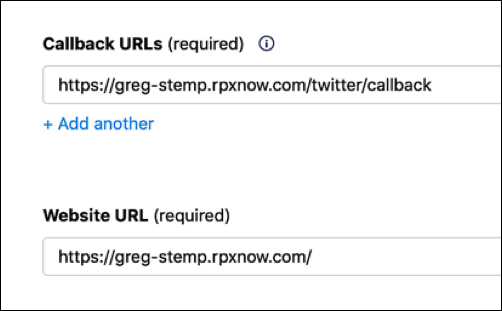
Your callback URI will typically be your social login URL (e.g., http: //greg-stemp.rpxnow.com) plus /twitter/callback. For example:
http: //greg-stemp.rpxnow.com/twitter/callback
-
Enter a friendly name for your website in the Organization name field:

The organization name is displayed beneath your company logo on Twitter’ s sign-in screen:

-
If you are returning user email addresses in your social login response then you must enter the URL to your terms of service in the Terms of service field, and the URL to your privacy policy in the Privacy policy field:
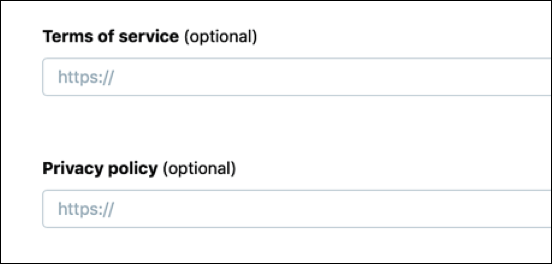
If you didn’t enable the Request email address from users setting then you can leave these two fields blank.
-
Click Save to save your new app. The Authentication settings section should now look something like this:
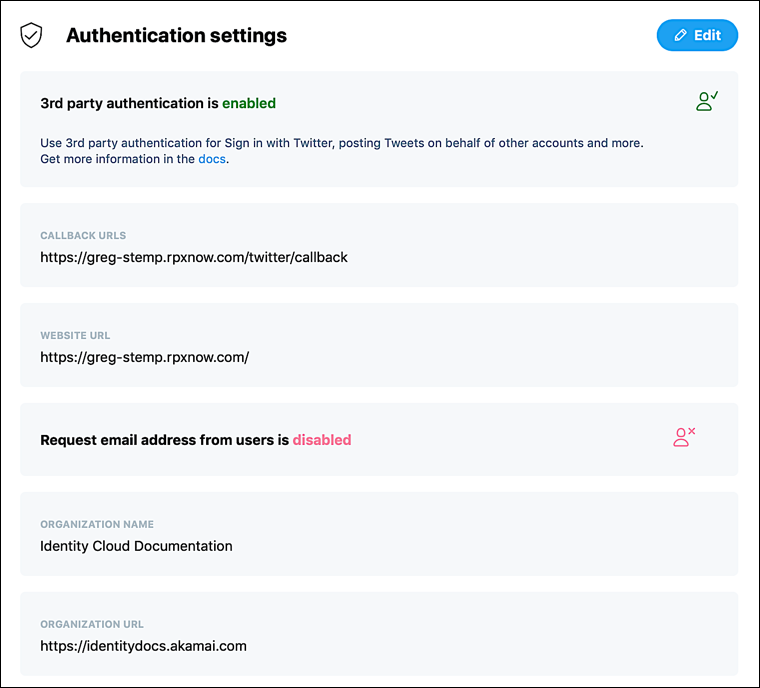
-
If you’ d like to change your app name, app icon, or your app description, then, in the App Details section, click Edit:
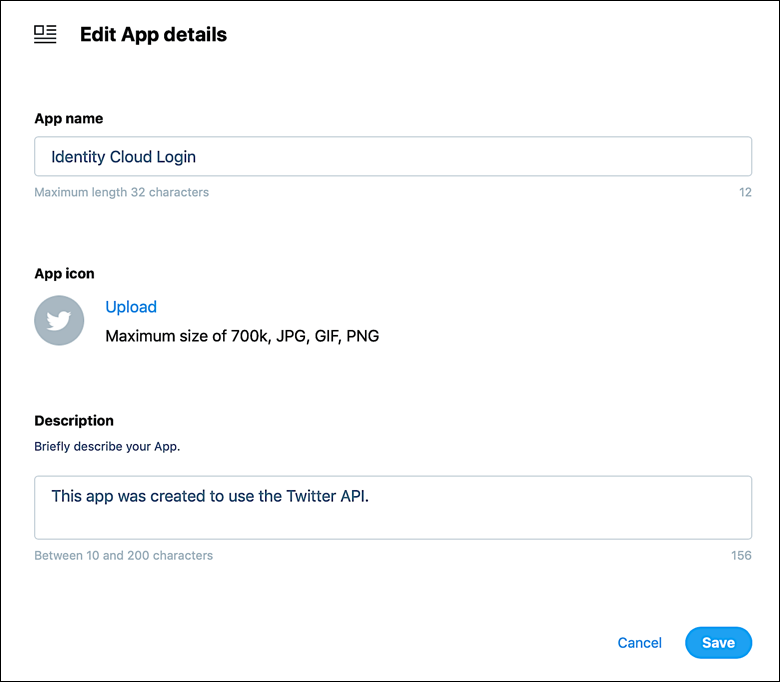
-
Make your changes, then click Save. Note that the icon and description are also displayed on Twitter’ s sign-in screen:
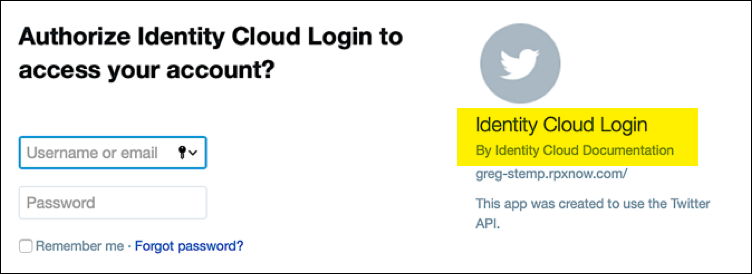
-
Your next step is to retrieve the app’ s API key and API secret; this information is required in order to configure Twitter in the Social Login dashboard. To retrieve this information, click Keys and tokens:

-
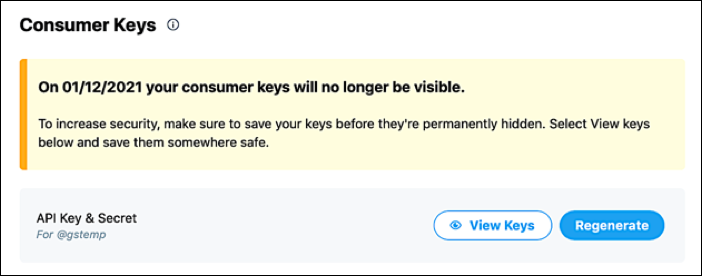
On the Consumer Keys page, click View Keys:
-
In the Here are your API key and secret dialog box, click the Copy button (the + sign) located to the right of your API key and then paste the copied API key into a secure location (such as password management program). Repeat this process to copy the API key secret:

-
When done, click Yes, I saved them to dismiss the dialog box. At that point, you can log off from the Twitter Developer Portal.
Create a standalone app for social login
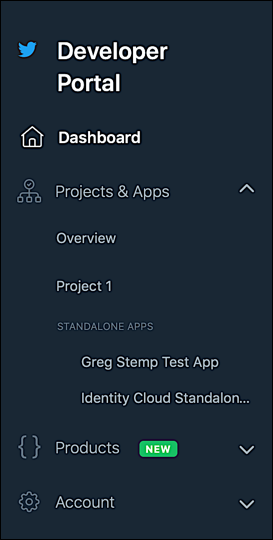
To create a standalone app, expand Projects & Apps in the navigation pane and then click Overview:
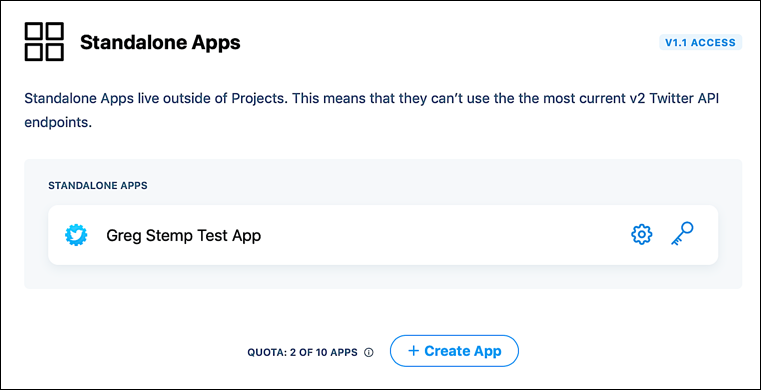
Scroll down to the bottom of the page and then click Create App:
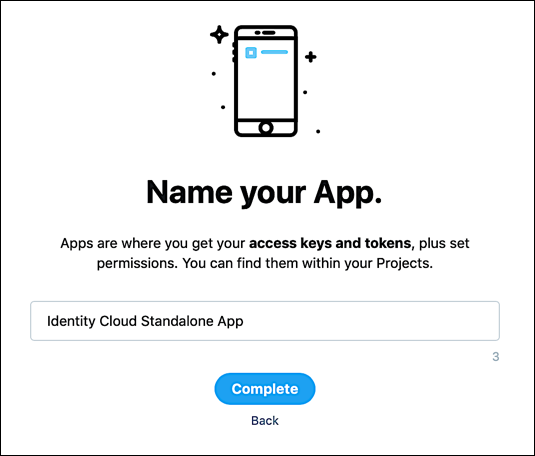
On the Name Your App page, give your app a unique name and then click Complete:
This creates a new standalone app and displays the home page for the app:

From this point on creating a standalone process is exactly the same as adding an app to a project. For starters, you’ll need to enable 3rd party authentication. To do that, locate the Authentication settings section and complete the following procedure:
-
Click Edit.
-
Select Enable 3rd party authentication:
-
If you want to return a user’ s email address as part of the Twitter API response, select the Request email address from users setting:

-
Enter your callback URI in the Callback URLs field, and enter the URL of your website in the Website URL field:

Your callback URI will typically be your social login URL (e.g., http: //greg-stemp.rpxnow.com) plus /twitter/callback. For example:
http: //greg-stemp.rpxnow.com/twitter/callback
-
If you want to, enter a friendly name for your website in the Organization name field. This name is displayed beneath your company logo on the Twitter sign-in screen.
-
If you are returning user email addresses in your social login response you must enter the URL to your terms of service in the Terms of service field, and the URL to your privacy policy in the Privacy policy field:

If you didn’t enable the Request email address from users setting then you can leave these two fields blank.
-
Click Save to save your new app. The Authentication settings section should now look similar to this:

If you’ d like to change your app name, app icon, or your app description, then, in the App Details section, click Edit:

Make your changes, then click Save. The app name, icon, and description are all displayed in the Twitter sign-in screen:
All that’ s left now is to retrieve the app’ s API key and API secret; this information is required in order to configure the app in the Social Login dashboard. To retrieve this information, click Keys and tokens:

On the Consumer Keys page, click View Keys:

In the Here are your API key and secret dialog box, click the Copy button (the + sign) located to the right of your API key and then paste the copied API key into a secure location (such as password management program). Repeat this process to copy the API key secret:

When that’ s done, click Yes, I saved them to dismiss the dialog box. At that point, you can log off from the Twitter Developer Portal.
Use an existing Twitter app for social login
If you already have a Twitter app for social login, complete the following steps to retrieve the application’ s API key and API secret:
-
Log on to the Twitter Developer Portal home page (https: //developer.twitter.com).
-
On the navigation menu, expand Projects & Apps in the navigation pane and then click the name of the app you want to use for social login:

-
On the App Details page, click Keys and tokens:

-
On the Consumer Keys page, click View Keys:

-
In the Here are your API key and secret dialog box, click the Copy button (the + sign) located to the right of your API key and then paste the copied API key into a secure location (such as password management program). Repeat this process to copy the API key secret:

-
When finished, click Yes, I saved them to dismiss the dialog box. At that point, you can log off from the Twitter Developer Portal.
Configure Twitter as a social login provider
To configure Twitter as a social login provider, make sure you have your Twitter consumer key and consumer secret, and then complete the following procedure:
-
Log on to your Social Login Dashboard (https: //dashboard.janrain.com).
-
From the Dashboard home page, click the Manage Engage Dashboard icon.
-
From the Engage Dashboard home page, in the Widgets and SDKs section, click Sign-Ins.
-
From the Sign-in page, verify that Widget is selected and then expand Providers.
-
From the list of Providers, click Twitter.
-
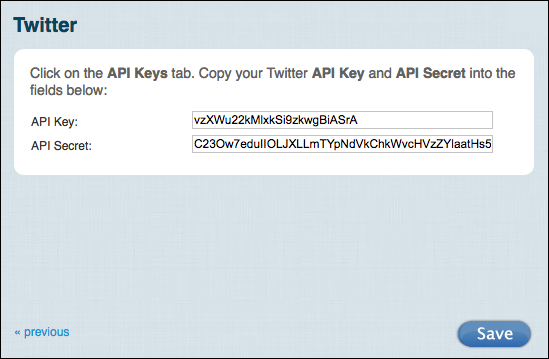
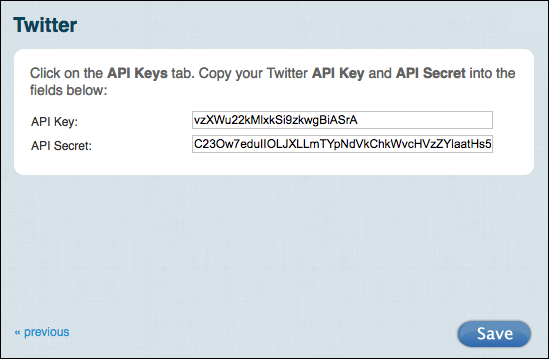
In the Twitter dialog box, click Next until you reach the screen requesting the API key and API secret:
-
Paste your Twitter consumer key in the API Key field, paste your Twitter consumer secret in the API Secret field, and then click Save. Twitter appears in your social login widget.
-
When you are finished, select Save and Publish and then click Publish. It might take as long as one hour before Twitter appears as a social login option on your web site.
Test Twitter social login
To test Twitter social login, complete the following procedure:
-
Do one of the following:
- If you have just published your widget settings, click the Test your widget link that appears after the widget has been saved.
- If you previously published your widget settings then, from the Engage Dashboard Sign-in page, click Launch a test widget.
-
From the Test page, click the Twitter icon:

-
In the Twitter / Authorize an application window, logon using a valid Twitter account:

-
If login succeeds, information returned from the Twitter profile is displayed in the API response preview field:
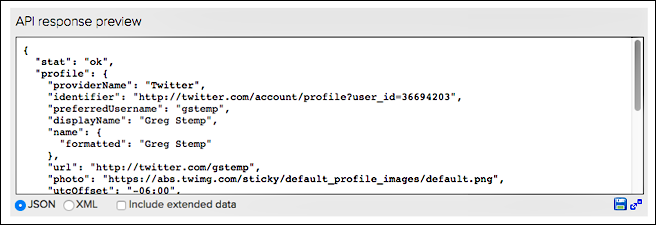
The returned profile information will vary depending on the Twitter account used in the test. You can verify Twitter profile fields by completing the following procedure:
-
From the Engage Dashboard home page, click the Manage Providers icon:

-
From the Configure Providers page, click Twitter.
-
Profile information returned from Twitter is displayed onscreen. For example:

Assign a different Twitter app for social login
If you want to use a different Twitter app or if you need to change your existing app, you must update the Twitter provider configuration settings. To do that, complete the following procedure:
-
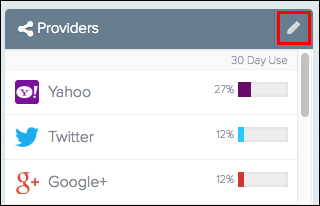
From the Engage Dashboard home page, click the Manage Providers icon:
-
From the Configure Providers page, click Twitter.
-
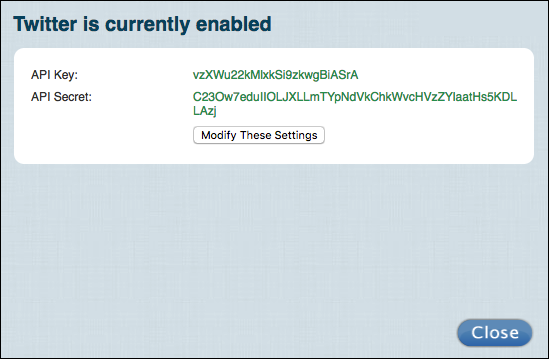
Click the green Configured button to display the Twitter is currently enabled dialog box:
-
To change the Twitter configuration, click Modify these settings.
-
In the Twitter dialog box, change the App Key and/or App Secret as needed, and then click Save:
Although you can modify your Twitter settings, you cannot delete those settings. If you delete the settings and then try to save your changes, you’ll see the error message Please enter your Consumer Key and Secret exactly as Twitter shows them.
This means that you cannot “ unconfigure” the provider: once configured, the Twitter icon will always be shown as green (i.e., configured) in the Social Login Dashboard.
Remove Twitter as a social login provider
If you no longer want to use Twitter for social login, you can remove Twitter as a social login provider by completing the following procedure:
-
Log on to your Social Login Dashboard (https: //dashboard.janrain.com).
-
From the Dashboard home page, click the Manage Engage Dashboard icon.
-
From the Engage Dashboard home page, in the Widgets and SDKs section, click Sign-Ins.
-
From the Sign-in page, verify that Widget is selected and then expand Providers.
-
In the widget, click the X in the upper right corner of the Twitter icon.
-
Scroll to the bottom of the page, select Save and Publish, and then click Publish. Twitter no longer appears in the sign-on widget.
You must always have at least one social login provider in the widget. If you delete all the providers and then click Publish you’ll see the error message Couldn’t save configuration: No providers.
Updated almost 3 years ago
