Introduction to Hosted Login v2
Prior to September 2020 there was a single version of Hosted Login (Hosted Login v1); among other things, that meant that all organizations subscribing to Hosted Login had the same capabilities, the same core set of screens, the same basic CSS stylesheet, etc. Any time a change was made to Hosted Login (for example, when it became possible to use configurable IDPs) that change immediately affected everyone.
With the release of Hosted Login v2, however, organizations now have multiple versions of Hosted Login at their disposal. What does this mean, and how are you supposed to juggle more than one version of Hosted Login? (Or are you supposed to juggle more than one version of Hosted Login?) Answering questions like those is the purpose of this documentation.
Or, to be more specific, answering questions like these:
- When will Hosted Login v2 be available?
- Should I upgrade to Hosted Login v2?
- How do I upgrade to Hosted Login v2?
When will Hosted Login v2 be available?
Actually, Hosted Login v2 already is available. However, and by design, organizations are not automatically upgraded to Hosted Login v2. Instead, organizations must manually upgrade to the v2 version, a process we’ll walk you through in a moment.
Before we do that, however, we should point out that upgrading to Hosted Login v2 is not an all-or nothing situation; in fact it’s possible to simultaneously run both Hosted Login v1 and v2. This allows for backward compatibility, and helps ensure that the introduction of the new version doesn’t conflict with any customized work you might have done with Hosted Login v1.
This also means that Hosted Login v2 can be introduced to, and tested by, a limited number of users before being more widely released. During this time some users might log on to Hosted Login v1 and other users might log on to Hosted Login v2. And that’s fine; the only thing to keep in mind is that users logging on to Hosted Login v1 won’t be able to take advantage of the new features available in Hosted Login v2.
OK, we stand corrected: there is another thing to keep in mind here. And that’s the fact that the ability to run both the v1 and the v2 versions of Hosted Login won’t last forever: at some point Hosted Login v1 will be deprecated. However, no end-of-life date has been set yet, and organizations will be given plenty of advance notice before the v1 version goes away. See the Hosted Login version history for more information.
Should I upgrade to Hosted Login v2?
Well, eventually you’ll need to: like we said, at some still-to-be-determined point in time Hosted Login v1 will be deprecated. For now, however, Hosted Login v2 offers the following capabilities that might make an upgrade worth your while, including:
-
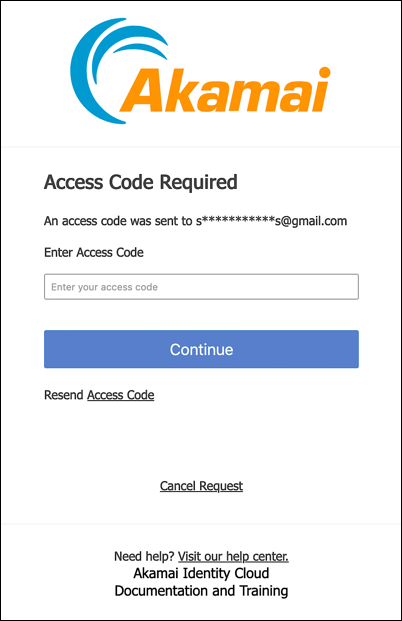
Two-factor authentication. This is by far the most interesting new addition to Hosted Login. In Hosted Login v1, users typically log on by providing their email address and password. That’s still the way users log on in Hosted Login v2. However, in the v2 version there’s an option for having users complete a second step before they’re fully logged on and before they’re issued access tokens. With this “two-factor authentication,” users are sent an access code (either by email or by text message) immediately after they’ve been authenticated. That access code must then be supplied back to Hosted Login:

If you don’t supply the access code, you won’t be logged on, and you won’t be issued an access token.
Not all that interested? That’s fine: two-factor authentication (2FA) is not required, and you can use it or not use it. Note, however, that, if your concerns about 2FA revolve around the user experience (and the need to repeatedly go through the two-factor authentication process) that if Hosted Login also supports the use of trusted devices, which gives administrators more control over when, and how often, users are required to go through the two-factor authentication process.
-
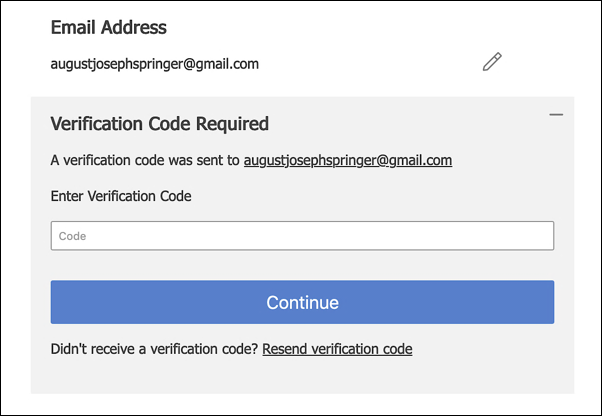
Better protection for the email and mobileNumber attributes. Hosted Login v2 moves the email, mobileNumber, and password attributes to the Account Security screen in the user profile; in addition to that, special protections have been added to the email and mobileNumber attributes. For example, if you change your cell phone that change won’t take effect immediately; instead, a verification code is sent to the new number; you must retrieve and supply that code before your email address actually gets changed:

A similar process is used if you change your mobile device number. In that case, a text message containing the verification code is sent to your mobile device.
Incidentally, these attribute safeguards are always enabled in Hosted Login v2, even if you decide not to use 2FA.
-
Navigational and ease-of-use improvements. Minor – but still very much welcomed – upgrades have been made to a number of the Hosted Login screens. For example, the traditionalRegistration screen now includes a link that enables users to sign-in:

In Hosted Login v1, no such link exists on the traditional registration screen, meaning that the screen was something of a dead-end for existing users who inadvertently landed there.
Likewise, Hosted Login v2 provides an option to include a Back to App button on the user profile screens:

Clicking this button provides an obvious way for the user to exit the user profile. In Hosted Login v1, the only way to exit the user profile is to use the browser’s back button or type a new URL in the address bar.
Where do users go after they exit their profile? That depends on the value you assign to the redirect_uri parameter when the user clicks a link to open their profile.
How do I upgrade to Hosted Login v2?
Upgrading to Hosted Login v2
The version of Hosted Login employed when a user logs on to your website or app is determined by the value of the loginURL property in the login policy associated with your OIDC login client: if you log on with OIDC client 64430515-01ea-4f5d-82e4-c36161af0093, then you’ll use either Hosted Login v1 or v2 based on the login policy associated with that OIDC client. Or, to be more specific, based on the value of the loginURL property.
For example, if you look at the property values for a Hosted Login v1 login policy, the loginURL property will look something like this:
{
    "id": "1e1ab726-f4b5-4bad-ba45-877027af4097",
    "identityStoreDetails": {
        "type": "janrainCapture",
        "connectionDetails": {
            "domain": "us-dev.janraincapture.com",
            "applicationId": "ces7u7uwwudrxtz933jvbehzne",
            "entityType": "user",
            "clientId": "6s7q89env535ek49hkz6hjsh3jgs93ud",
            "clientSecret": "7b7eqyuswtnpaa6zxdvuafum56r4cbsw"
        }
    },
 **"loginURL": "https://v1.api.us.janrain.com/e0a70b4f-1eef-4856-bcdb-f050fee66aae/auth-ui/login",**
    "customClaims": {
        "userinfo": {
            "consents": "consents"
        }
    },
    "title": "SE gstemp@akamai.com Dev Login Policy",
    "\_links": {
        "self": {
            "href": "/config/e0a70b4f-1eef-4856-bcdb-f050fee66aae/loginPolicies/1e1ab726-f4b5-4bad-ba45-877027af4097"
        }
    }
}
By comparison, the values for a Hosted Login v2 login policy looks exactly the same, with one crucial exception: v2 is added to the login URL, nestled between auth-ui and login. For example:
"loginURL": "https://v1.api.us.janrain.com/e0a70b4f-1eef-4856-bcdb-f050fee66aae/auth-ui/v2/login"
Believe it or not, that’s all you have to do to upgrade to Hosted Login v2: just add v2 to the loginURL property. (Although you should also make minor modifications to your socialRegistrationForm and traditionalRegistrationForm forms as well.) From that moment on, anyone who uses that login policy (that is, anyone who logs on using an OIDC login client associated with the policy) will use Hosted Login v2. Meanwhile, users who log on using a different OIDC client (an OIDC client whose login policy hasn’t been upgraded to v2) will continue to use Hosted Login v1. For example:
| OIDC Client | Login Policy Set to v2? | Version of Hosted Login Used |
|---|---|---|
| 1e1ab726-f4b5-4bad-ba45-877027af4097 | ✓ | v2 |
| 70a45721-c6ef-4d7c-91ff-f14e9346b8b | ✗ | V1 |
To be honest, it doesn’t get much easier than that: /auth-ui/v2/login means you’ll be using Hosted Login v2, and /auth-ui/login means you’ll be using Hosted Login v1.
Of course, even though upgrading is remarkably easy, there area few things to keep in mind before you enable a login policy for Hosted Login v2:
-
Login policies can be referenced by more than one OIDC client; that’s important because all OIDC clients that use a given policy will switch to Hosted Login v2 if you upgrade that policy. That’s why, for initial implementation and testing, we recommend creating a new OIDC client and a new login policy targeted specifically for use with Hosted Login v2.
-
As noted, Hosted Login versions are tied to login policies and not to user accounts. For example, suppose Bob logs on to your site using OIDC client 1e1ab726-f4b5-4bad-ba45-877027af4097; in that case, and because the client’s login policy has been updated, Bob will get the v2 user experience. But suppose that Bob uses OIDC client 70a45721-c6ef-4d7c-91ff-f14e9346b8b the next time he logs on, and suppose that client’s login policy hasn’t been updated. In that case, he’ll get the v1 user experience. Same user, but two different experiences based on OIDC client and login policy.
Does it matter if a user sometimes employs the v1 version and other times uses the v2 version of Hosted Login? Not necessarily, although, as noted previously, there are a few changes in screens and forms between the two versions. The biggest difference occurs if you decide to enable two-factor authentication (2FA): log on to Hosted Login v2 and 2FA will be enforced. Log on to Hosted Login v1 and 2FA won’t be enforced.
-
If you run into problems with Hosted Login v2, you can either assign the OIDC client a different login policy or edit the current login policy by removing /v2 from the login URL.
We should also note that you don’t have to do anything special if you want your login policies continue to use Hosted Login v1. For example, v2 is not included in the login URL for this login policy; that means that the policy uses Hosted Login v1:
"loginURL": "https://v1.api.us.janrain.com/e0a70b4f-1eef-4856-bcdb-f050fee66aae/auth-ui/login"
If you prefer, however, you can explicitly call out v1 in the loginURL property:
"loginURL": "https://v1.api.us.janrain.com/e0a70b4f-1eef-4856-bcdb-f050fee66aae/auth-ui/v1ogin"
That’s valid, but not required.
And what if you’re not sure how to modify the loginURL property? In that case, just keep reading.
Modify the loginURL property
To update the loginURL property in an existing login policy, complete the following steps:
-
Use the /{customerId}/config/loginPolicies/{loginPolicyId operation and the GET method to return the current properties and property values for the appropriate login policy. Copy those property values to your computer clipboard.
-
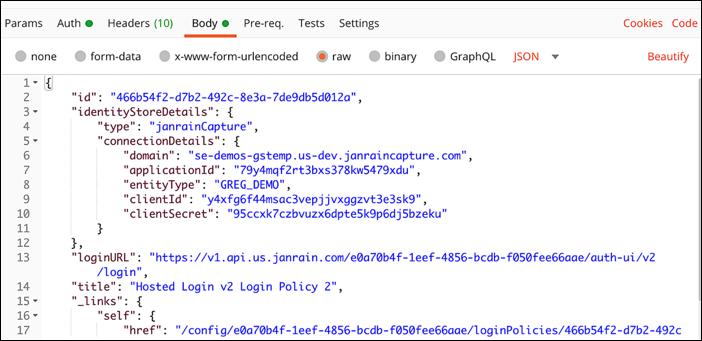
Use the PUT method (and the same operation) to change the loginURL. Paste the copied property values into the request body of your API call, then change the value of loginURL. For example, in Postman your request body should look similar to this:

-
Make your API call. If you’re using curl, that API call will look similar to the following:
curl -X PUT \
        'https://v1.api.us.janrain.com/e0a70b4f-1eef-4856-bcdb-f050fee66aae/config/loginPolicies/
         466b54f2-d7b2-492c-8e3a-7de9db5d012a' \
        --H 'Authorization: Bearer 0tep6YjErI7FnTrRtBCBdmkAqWacj\_IQzBzSm2o8MNLyjnT0UpOPLfklhcrovD4X'\
        -- H 'Content-Type: application/json' \
        -d '{
            "id": "4534eb38-f0f8-40a9-a980-e01a59967f43",
             "identityStoreDetails": {
             "type": "janrainCapture",
             "connectionDetails": {
                "domain": "se-demos-gstemp.us-dev.janraincapture.com",
                "applicationId": "79y4mqf2rt3bxs378kw5479xdu",
                "entityType": "GREG\_DEMO",
                "clientId": "y4xfg6f44msac3vepjjvxggzvt3e3sk9",
                "clientSecret": "95ccxk7czbvuzx6dpte5k9p6dj5bzeku"
            }
        },
        "loginURL": "https://v1.api.us.janrain.com/e0a70b4f-1eef-4856-bcdb-f050fee66aae/auth-ui/v2/login",
        "title": "Hosted Login v2 Login Policy 2",
    "_links": {
            "self": {
                            "href": "/config/e0a70b4f-1eef-4856-bcdb-f050fee66aae/loginPolicies/
        4534eb38-f0f8-40a9-a980-e01a59967f43"
                        }
                     }
    }'
If you get the HTTP response code 200 OK, that means that your policy has been successfully updated.
Updated over 3 years ago
