Create a field and add it to a Hosted Login form
In the article Add a field to a Hosted Login form , we explain how you can take an existing field (i.e., a field already defined in the flow) and add that field to a Hosted Login form. That’s a useful article, albeit with one potential drawback: as we noted, only a handful of fields are defined in the flow. Do you want to add a user’s first name or last name to a form? No problem: the user profile attributes givenName and familyName are associated with fields predefined in the flow. But what if you want to add the city or country that a user lives in, or the organization they’re associated with? That’s a different story. The user profile attributes in question (primaryAddress.city, primaryAddress.country, primaryAddress.company) don’t have fields defined in the flow. And until they, do those attributes can’t be added to a Hosted Login form.
Period.
But don't worry: in this article we’ll walk you through the process of creating a field (associated with the primaryAddress.country attribute) and then adding that field to a Hosted Login form. That, by the way, is a three-step process if you’re using the Configuration APIs:.
- Creating a translation key
- Creating a field
- Adding the field to a form
We’ll walk you through all three steps in the process, and then, as a bonus, show you a couple ways to make your fields a little fancier and a little more sophisticated.
And we’ll also show you how you can create and add a field by using the Console Registration Builder. Because, hey, why not?
Creating and Adding a Field by Using the Configuration API
Step 1: Creating a Translation Key
If you look at a field in the flow, you’ll see that the label attached to that field is actually a translation key (e.g., cd0f45a36216dc8737c7601fe5c9ba0e):
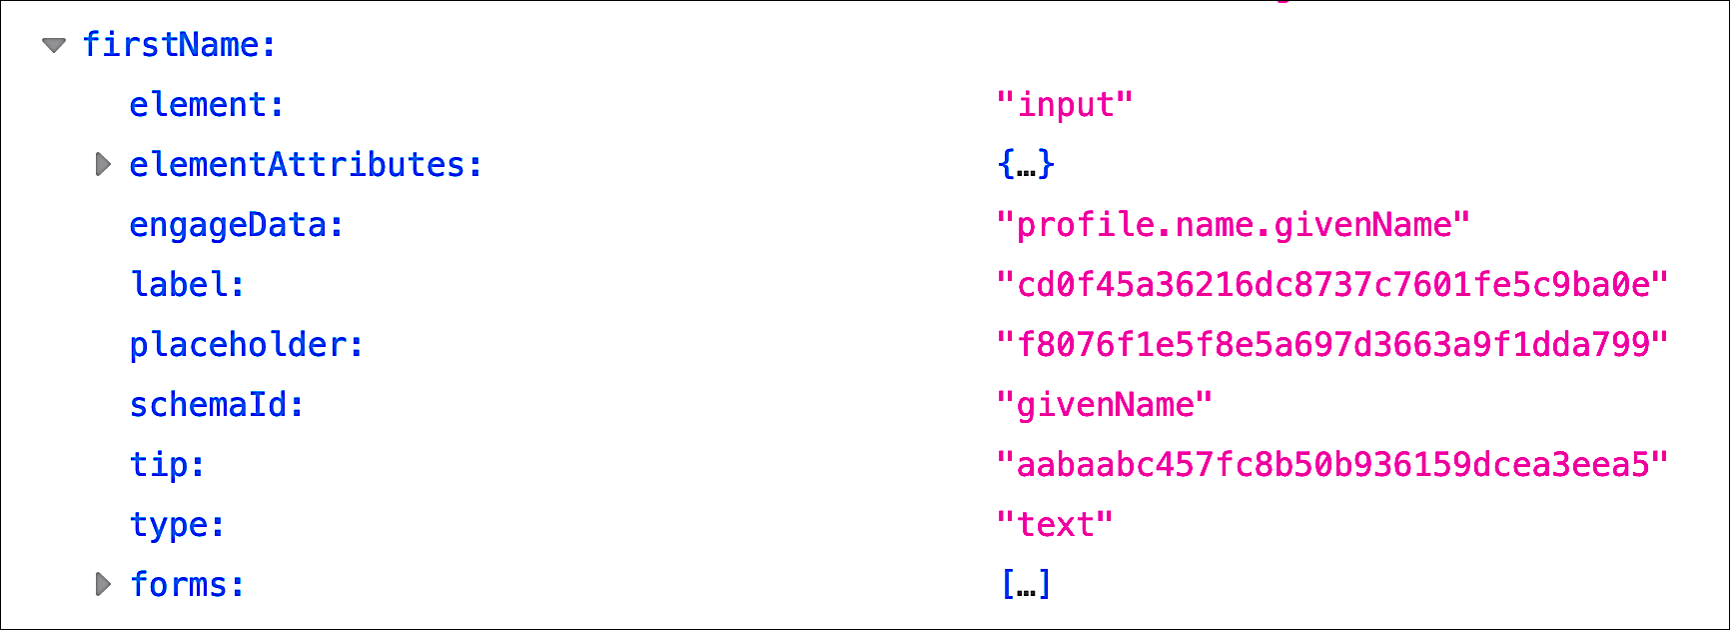
And if you look up that translation key, you’ll see the label displayed any time the field appears on a form:

So what does that mean for us? That means that, before we can create a field, we need to create a label that can be attached to that field. The following API call creates a new translation (for the en-US locale) that has the value Country of Residence:
curl -X POST \
  'https://v1.api.us.janrain.com/config/79y4mqf2rt3bxs378kw5479xdu/flows/testFlow/translations'\
  --header 'Content-Type: application/json \
  --d
    '[
       {
         "values": {
           "en-US": "Country of Residence"
                   }
        }
     ]'
If all goes well, our API call returns a translation key (for example, 9977e57d-2d15-4221-a336-930731e14e8b). And if we look up the value of that key we should see our new label:

In other words, we now have a new translation key and, equally important, a label for our forth-coming field. Step 1 is done.
Step 2: Creating a New Field
After we have a translation key we can create our field. There’s no doubt that fields can be complex but, for now, we’re going to create a very simple text field named country, a field tied to the primaryAddress.country attribute. (But don’t worry: later on, we’ll jazz this field up a little in order to demonstrate some of the field options available to you.)
For now, here’s an API call that creates a text field named country (note how the label property references the translation key we created in Step 1):
curl -X POST \
  'https://v1.api.us.janrain.com/config/79y4mqf2rt3bxs378kw5479xdu/flows/testFlow/fields' \
  --header 'Content-Type: application/json' \
  --d
    '{
       "type": "text",
       "name": "country",
       "schemaAttribute": "primaryAddress.country",
       "label": {
         "key": "9977e57d-2d15-4221-a336-930731e14e8b"
                }
     }'
Did that work? Well, if you look in the flow you should see a new text field named country:

So, yes: it worked.
Step 3: Adding the New Field to a Form
The final step in our three-step process is to add the country field to a form (the traditionalRegistrationForm form). Because we discuss adding a field to a form in the other article, we won’t spend much time explaining what we’re doing, or why we’re doing it. Instead, we’ll just show you an API call that adds the country field to the traditionalRegistrationForm form:
curl -X PUT \
 'https://v1.api.us.janrain.com/config/79y4mqf2rt3bxs378kw5479xdu/flows/testFlow/forms/traditionalRegistrationForm' \
  --header 'Content-Type: application/json' \
  --d '{
    "action": "traditionalRegistration",
    "fields": [
        {
          "name": "displayName"
        },
        {
          "name": "emailAddress"
        },
        {
          "name": "country"
        },
        {
          "name": "newPassword"
        },
        {
          "name": "newPasswordConfirm"
        }
    ]
  }'
And yes, you’re right: we did include a lot more items in this API call than simply the name of our new field. We did that because, any time you modify a form, you need to include all the properties of that form in your API call. If our API call only included our one new field then our form would end up only having one field on it.
Which is not the outcome we're hoping for.
As always, we recommend that you first use the GET method to return all the existing properties of your form, then paste those properties and property values into the request body of your PUT call. And then make your changes and modifications.
So what happens after we make our API call and look at the form in the flow? Well, barring some sort of unforeseen error, we should see that country has been added to the list of fields associated with the form (note that fields are listed in the flow in the same order they’re listed in our API call):

And if we access our Hosted Login sign-in screen and click Sign up for an account we’ll get the registration screen, a screen that now include the Country of Residence field:
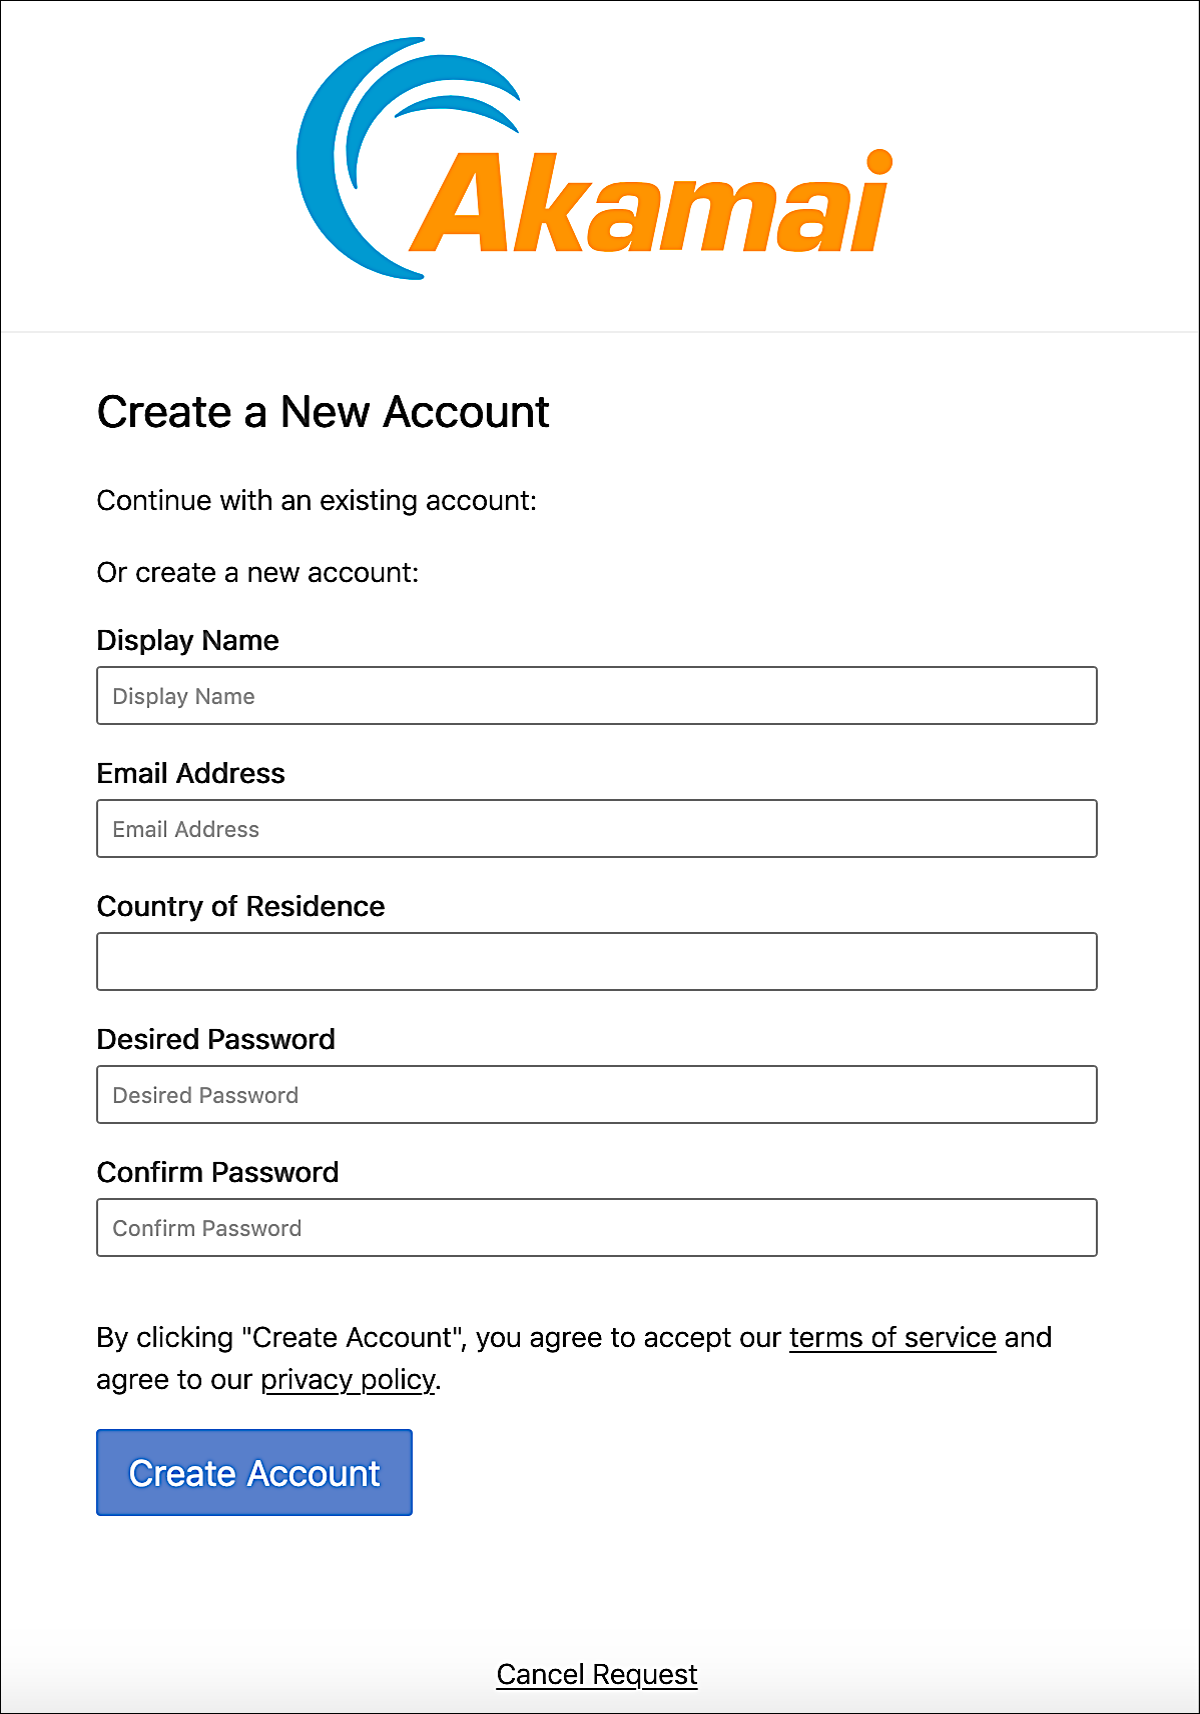
All that’s left is to create an account (making sure to specify a country of residence), click Submit, and see if the new field actually works:
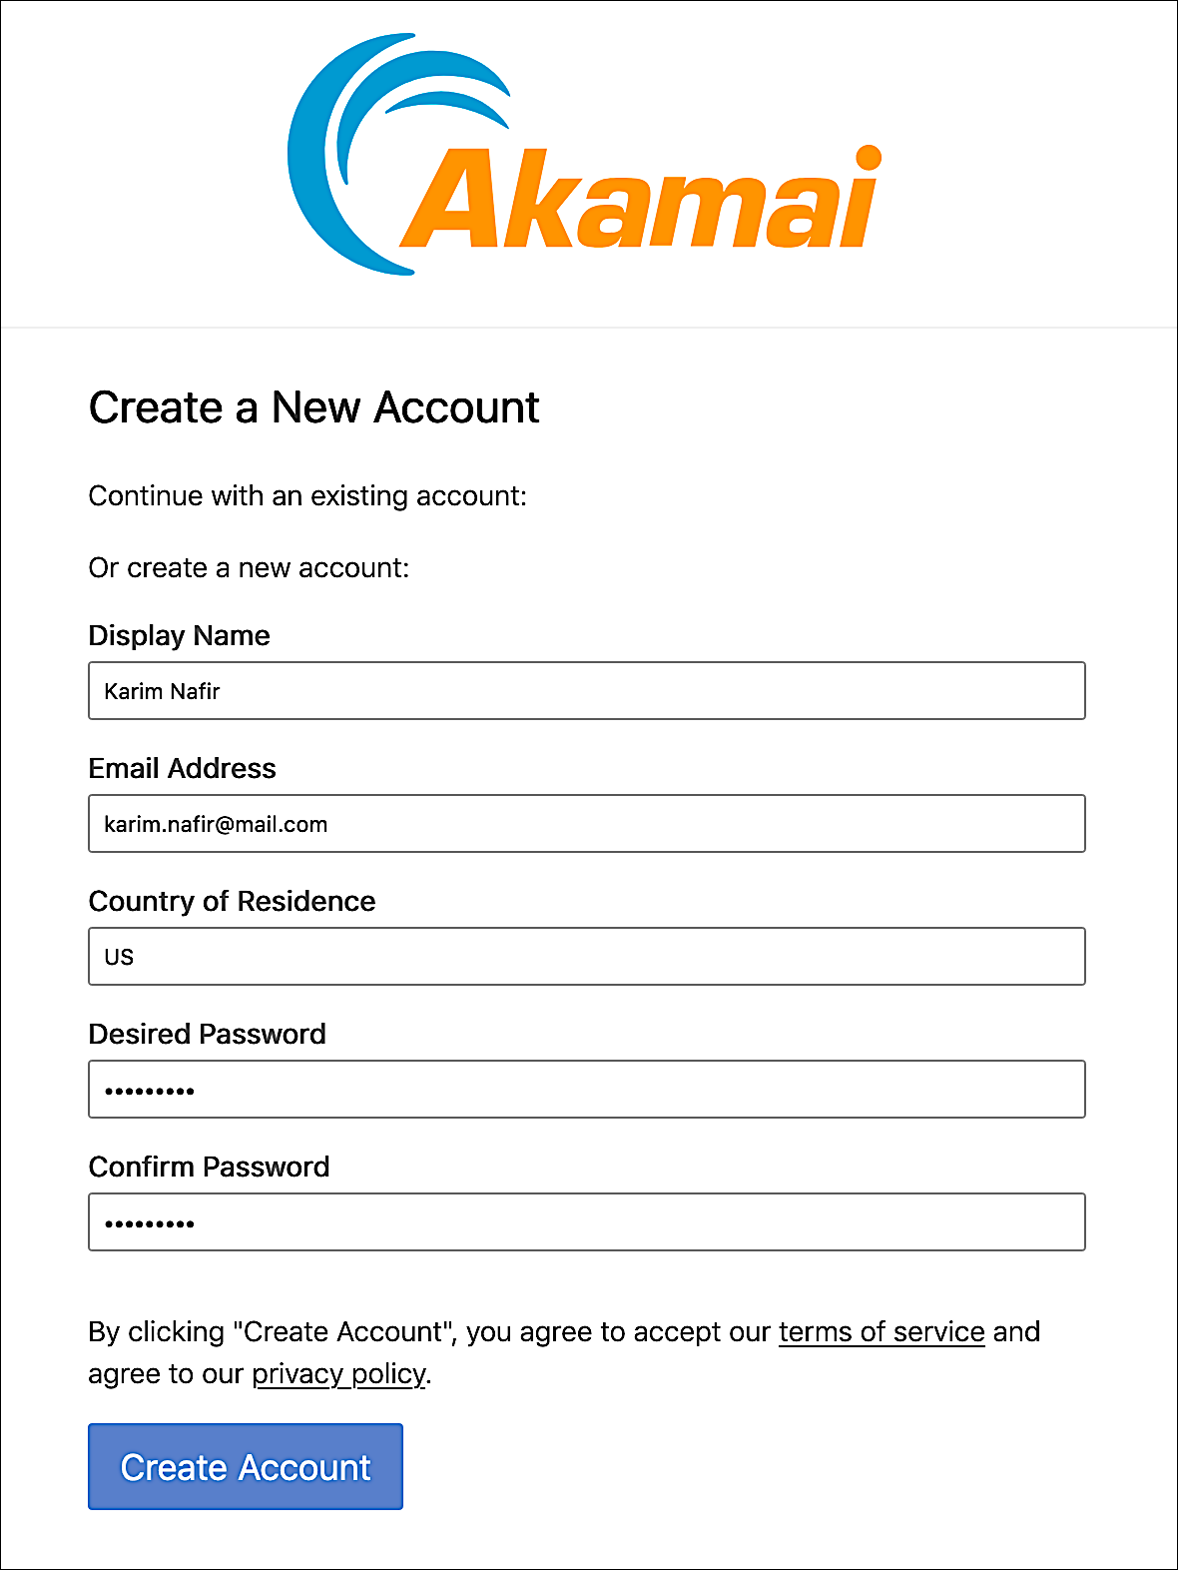
Based on the preceding screenshot, clicking Create Account should create a new account for Karim Nafir; the question is whether or not our modified form sets the primaryAddress.country attribute to US. And guess what? If we look at Karim’s user profile, we’ll see this:
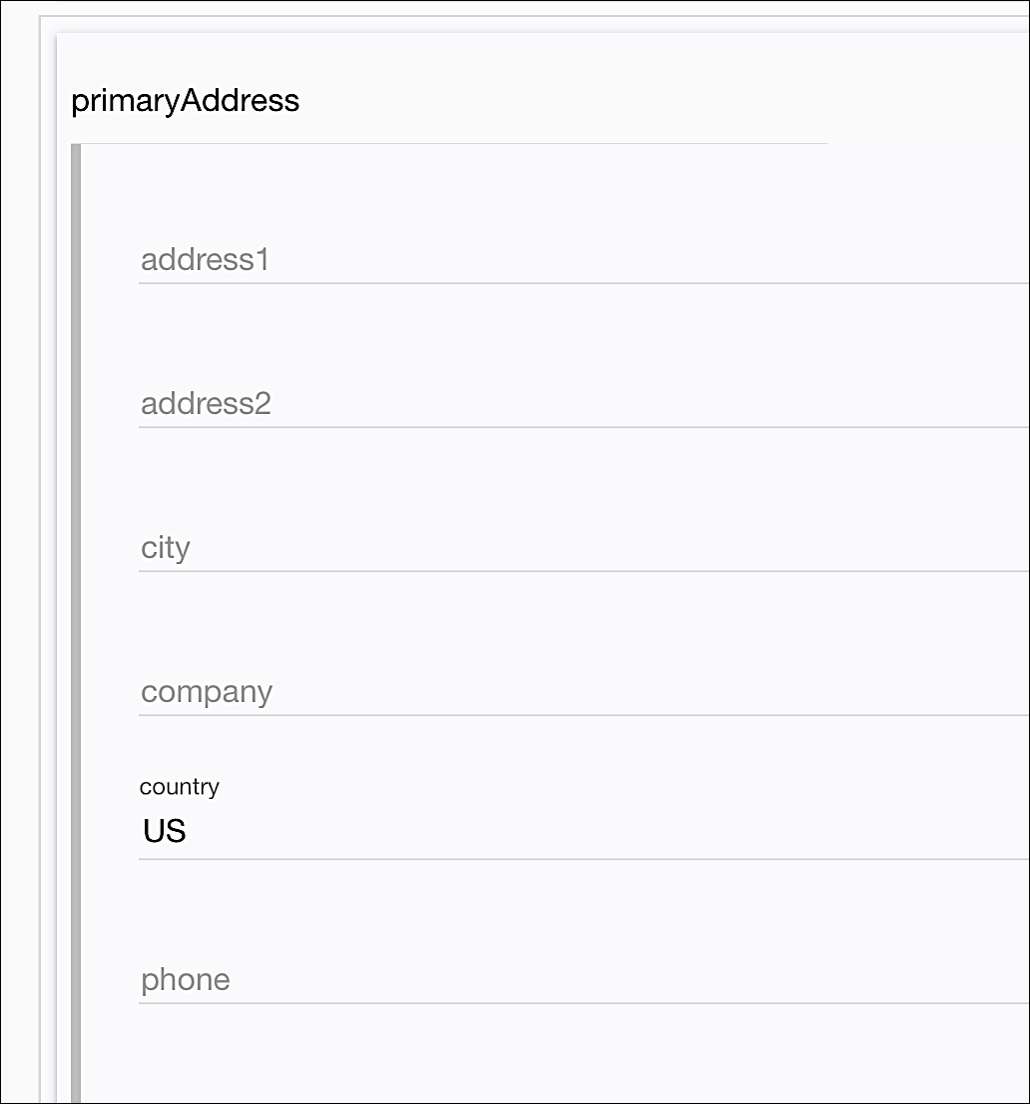
Tah-dah!
Bonus Tip: Adding a Placeholder to a Field
To this point we’ve created a new field, we’ve added that field to a form, and we’ve tested the field to ensure that it works. And it does: any text entered in the Country of Residence text box really did get written to the primaryAddress.country attribute. That’s great, and we deserve a well-earned pat on the back for our efforts. And yet, despite all that, there are a few modifications we can make that would improve the way our field looks, and works.
For starters, take a look at all the fields on our modified traditionalRegistrationForm form:
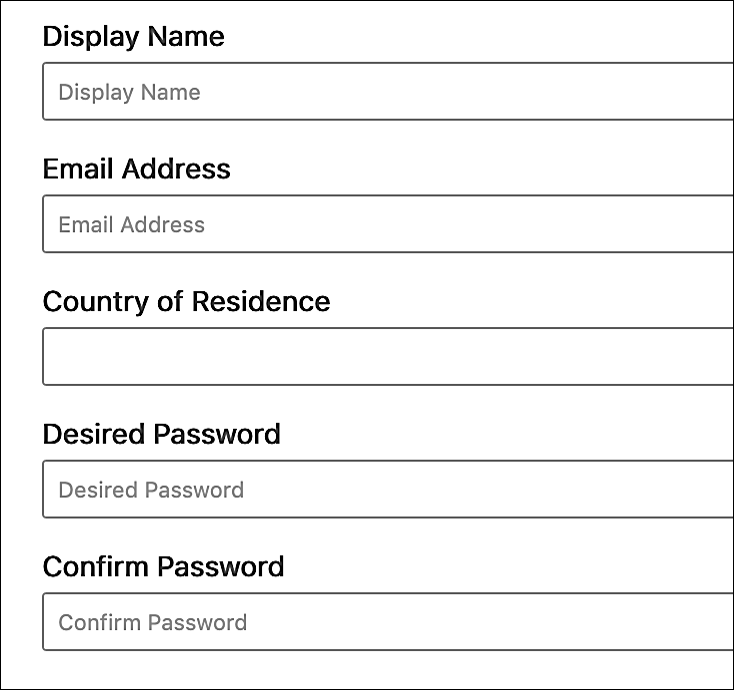
As you can see, the default fields all include an HTML “placeholder,” a short hint (shown in gray type) that clues the user in to the kind of data that should be entered in the field. The default fields have a placeholder; our custom field does not:

With that in mind, let’s use the /config/{appId}/flows/{flow}/fields/{field} operation and the PUT method to add a placeholder to our field. Before we can do that, however, we need to add a translation key to contain the placeholder text. Because you already know how to add a translation key we’ll simply present the code without further comment;
curl -X POST \
  'https://v1.api.us.janrain.com/config/79y4mqf2rt3bxs378kw5479xdu/flows/standardCopy/translations' \
  --header 'Content-Type: application/json' \
  --header 'Authorization: Basic eTR4Zmc2ZjQ0bXNhYzN2ZXBqanZ4Z2d6dnQzZTNzazk6OTVjY3hrN2N6YnZ1eng2ZHB0ZTVrOXA2ZGo1Ynpla3U=' \
  --d
   '[
      {
        "values": {"en-US": "Two-character country code"}
      }
    ]'
That call returns a translation key ID (for example, e209ff86-3efe-4136-b90d-77957f05df87) that we can use as the placeholder value.
Next, we employ the /config/{appId}/flows/{flow}/fields/{field} operation to add the new placeholder to our field. Keep in mind that, when you use the PUT method to modify a field, you must include all the relevant properties of that field in your request body. For example, here’s the syntax for adding a placeholder:
"placeholder": {
    "key": "e209ff86-3efe-4136-b90d-77957f05df87"
},
And here’s what you get if you put only the placeholder in your request body:
{
    "errors": {
        "type": [
            "Missing data for required field."
        ]
    }
}
What’s the problem here? The problem is that fields have a number of required properties (such as type and name) that we didn’t include in the request body. And because the PUT method replaces all the existing properties of a field with all the property values found in the request body that causes our API call to fail: our request body doesn’t include all the required properties.
So what’s the answer to this dilemma? You probably already figured that out: the answer is to make sure that your request body contains all the properties you want your field to have. In other words:
{
  "type": "text",
  "name": "country",
  "schemaAttribute": "primaryAddress.country",
  "label": {
    "key": "e4c66c4c-534f-4f65-9383-db50c4f2c36e"
  },
  "placeholder":{
     "key": "e209ff86-3efe-4136-b90d-77957f05df87"
  }
}
That should do the trick:
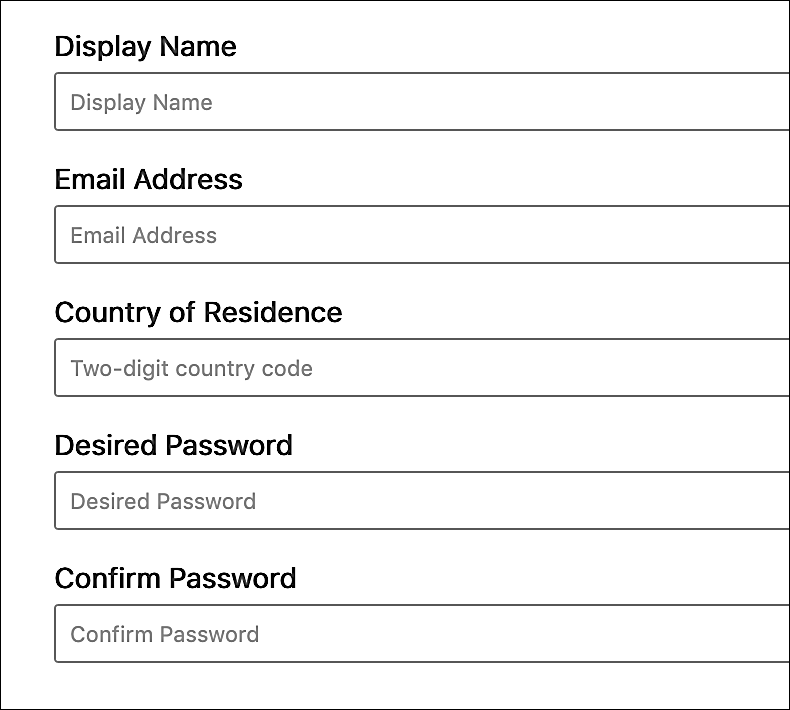
Just for the sake of completeness, here’s the full API call we used to pull that off:
curl -X PUT \
  'https://v1.api.us.janrain.com/config/79y4mqf2rt3bxs378kw5479xdu/flows/standardCopy/fields/country' \
  --header 'Content-Type: application/json' \
  --header 'Authorization: Basic eTR4Zmc2ZjQ0bXNhYzN2ZXBqanZ4Z2d6dnQzZTNzazk6OTVjY3hrN2N6YnZ1eng2ZHB0ZTVrOXA2ZGo1Ynpla3U=' \
  --d '{
        "type": "text",
        "name": "country",
        "schemaAttribute": "primaryAddress.country",
        "label": {
          "key": "e4c66c4c-534f-4f65-9383-db50c4f2c36e"
       },
        "placeholder":{
          "key": "e209ff86-3efe-4136-b90d-77957f05df87"
          }
       }'
Bonus Tip 2: Adding a Validation to a Field
Here’s another way we can up our field-creating game. As you probably know, many fields perform validations on the fly. For example, if you enter an email address that doesn’t look like an email address you’ll hear about it as soon as you exit the Email Address field:
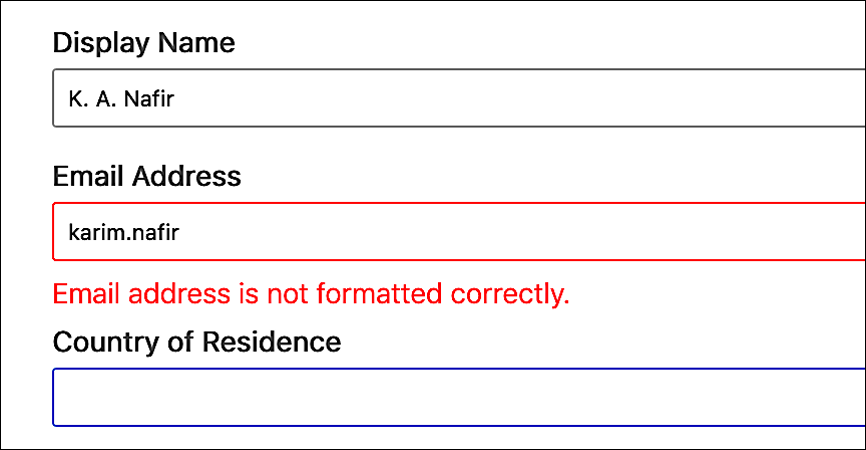
Our Country of Residence field doesn’t do that. We want people to enter a two-character country code as their country of residence, but there’s nothing that stops them from entering pretty much anything they want:
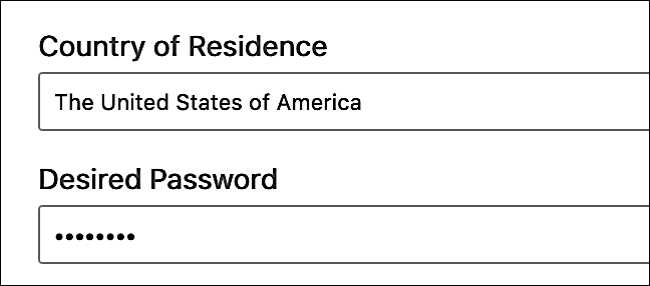
Obviously what we need to do is add a validation to the field that ensures that people enter two characters in the field, no more, and no less.
OK, true: what we really need to do is include a dropdown list and have users select a country of residence from that list. But, remember, this documentation is intended for educational purposes, not to serve as a blueprint for user interface design.
Before we show you any code we need to point out that a field validation consists of three parts:
-
rule. The name of the validation you want to use. In our case, we’re actually going to use two validations: maxLength (which specifies the maximum number of characters that can be used when filling out the field) and minLength, which specifies the minimum number of characters than can be used when filling out the field.
-
value. If the rule is the question (What’s the maximum number of characters I can use here?) then the value is the answer to that question. For both maxLength and minLength we’re going to set the value to 2: your response must have at least 2 characters, but no more than 2 characters. Which is a somewhat roundabout way of saying that the response must have exactly 2 characters.
-
message. Error message displayed to the user if the validation fails. Our error message (which must be configured as a translation key) is this: You must use a two-character code.
Before we can add a validation we need to create a translation key for use with the message property. Here’s some sample code that does just that:
curl -X POST \
  'https://v1.api.us.janrain.com/config/79y4mqf2rt3bxs378kw5479xdu/flows/standardCopy/translations' \
  --header 'Content-Type: application/json' \
  --header 'Authorization: Basic eTR4Zmc2ZjQ0bXNhYzN2ZXBqanZ4Z2d6dnQzZTNzazk6OTVjY3hrN2N6YnZ1eng2ZHB0ZTVrOXA2ZGo1Ynpla3U=' \
  --d '[
    {
      "values": {
        "en-US": "You must use a two-character country code"
                }
    }
  ]'
Now that we have the translation key (615cb1eb-e43a-46d0-a131-505723a75b10) we can configure our two validations. The JSON syntax for those validations looks like this:
"validation": [
{
  "rule": "maxLength",
  "value": 2,
  "message": {
    "key": "615cb1eb-e43a-46d0-a131-505723a75b10"
  }
},
{
  "rule": "minLength",
  "value": 2,
  "message": {
    "key": "615cb1eb-e43a-46d0-a131-505723a75b10"
  }
}
]
And our complete API call for updating the field looks like this:
curl -X PUT \
  'https://v1.api.us.janrain.com/config/79y4mqf2rt3bxs378kw5479xdu/flows/standardCopy/fields/country' \
  --header 'Content-Type: application/json' \
  --header 'Authorization: Basic eTR4Zmc2ZjQ0bXNhYzN2ZXBqanZ4Z2d6dnQzZTNzazk6OTVjY3hrN2N6YnZ1eng2ZHB0ZTVrOXA2ZGo1Ynpla3U=' \
  --d '{
     "type": "text",
     "name": "country",
     "schemaAttribute": "primaryAddress.country",
     "label": {
       "key": "e4c66c4c-534f-4f65-9383-db50c4f2c36e"
      },   "placeholder":{
       "key": "e209ff86-3efe-4136-b90d-77957f05df87"
   },
   "validation": [
     {
       "rule": "maxLength",
       "value": 2,
       "message": {
       "key": "615cb1eb-e43a-46d0-a131-505723a75b10"
       }
     },
     {
       "rule": "minLength",
       "value": 2,
       "message": {
         "key": "615cb1eb-e43a-46d0-a131-505723a75b10"
     }
  }
  ]
}'
Let’s see what happens if we try to enter anything but a two-character value in the Country of Residence field:
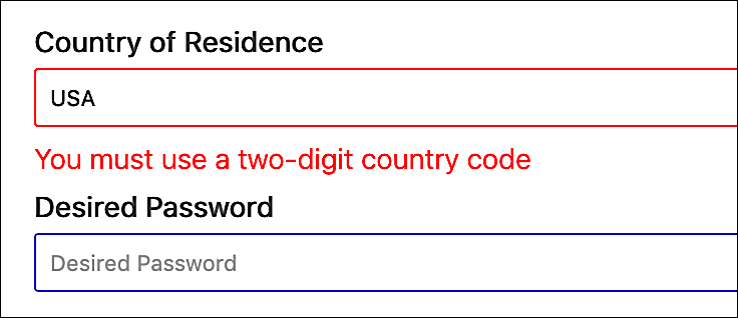
Nice, huh? Incidentally, customers have to use a two-character value if they enter something in the Country of Residence field. If they enter a three-character value (like USA) they’ll see the error message shown above, and they won’t be able to submit their registration form until the problem has been resolved.
But what if they don’t enter anything in the Country of Residence field? That’s fine: leaving this field blank doesn’t generate an error. That’s because we didn’t mark this as a required field, something that requires a separate validation. As you can infer from this screenshot, the default fields have all been marked as required;
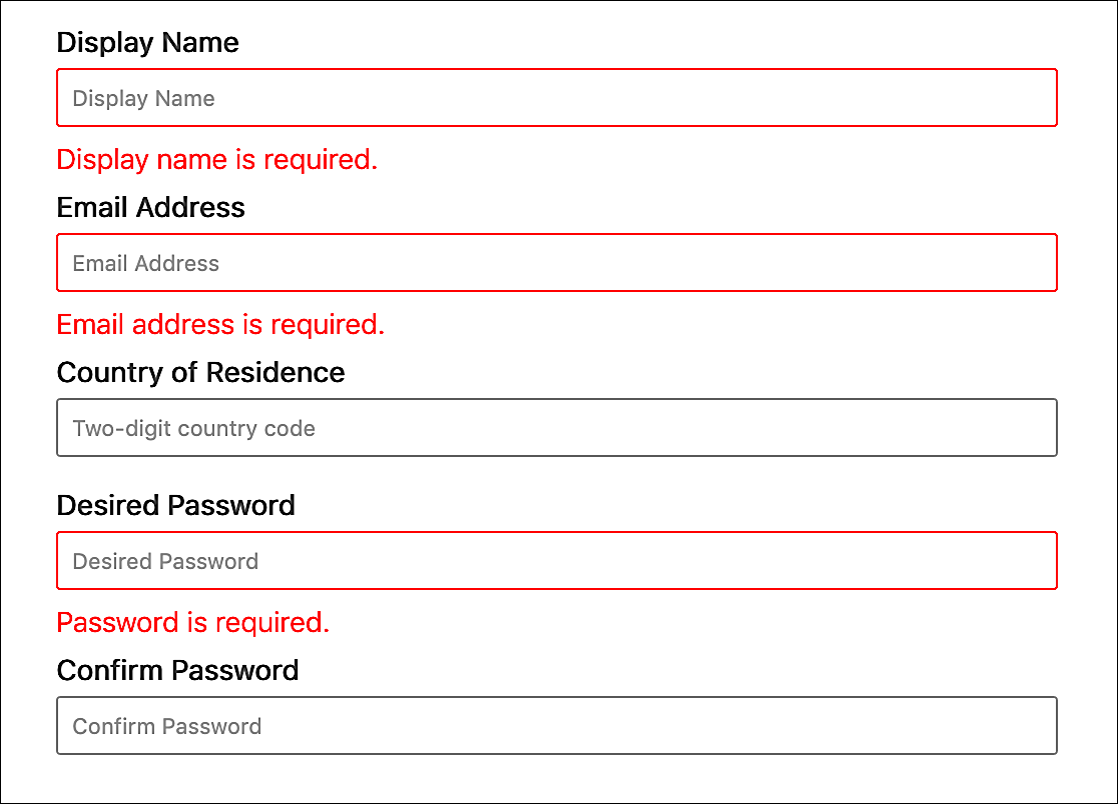
So let’s go ahead and create another translation key (Country of residence is required) and then use this syntax to add the required validation to our field:
{
  "rule": "required",
  "value": true,
  "message": {
    "key": "14071259-9caa-4eac-a735-9c6f54c8914d"
  }
},
Here’s what happens if you try to submit a totally blank form:
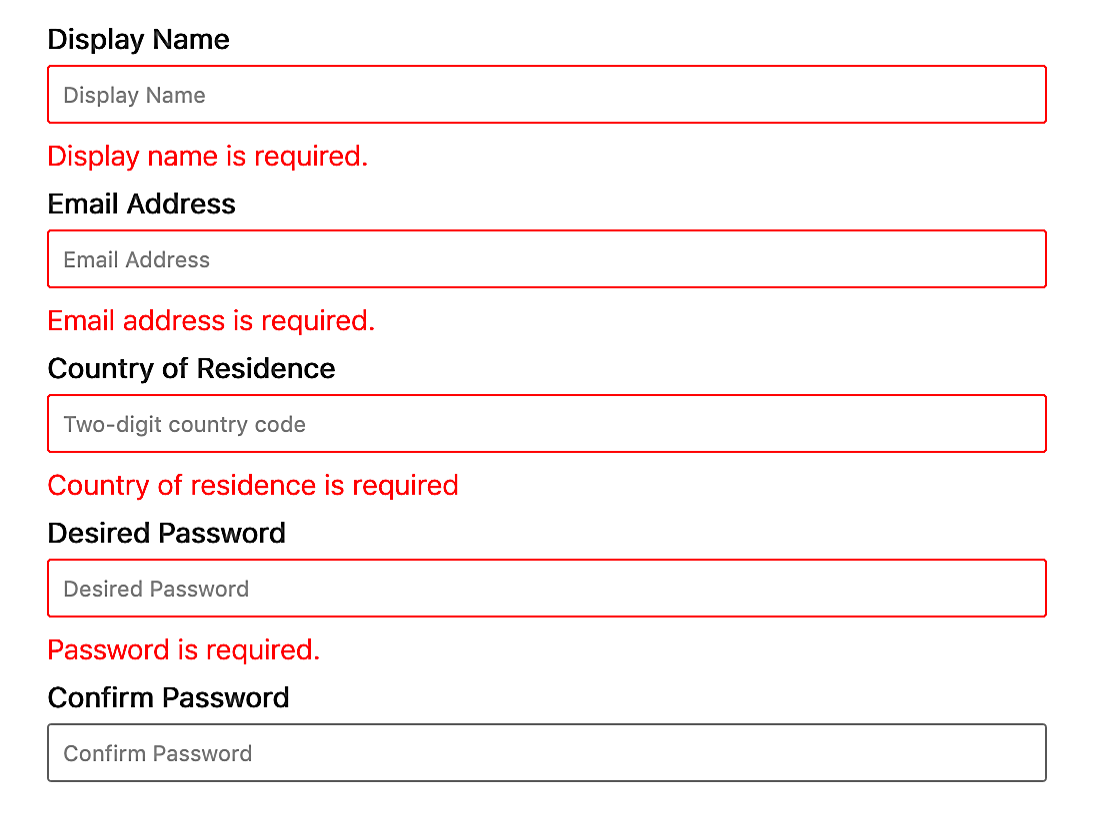
Best of all, we now have a custom field that’s indistinguishable from the predefined fields.
Creating and Adding a Field by Using Registration Builder
To create a field and then add that field to a form by using Registration Builder, complete the following procedure from within Console:
-
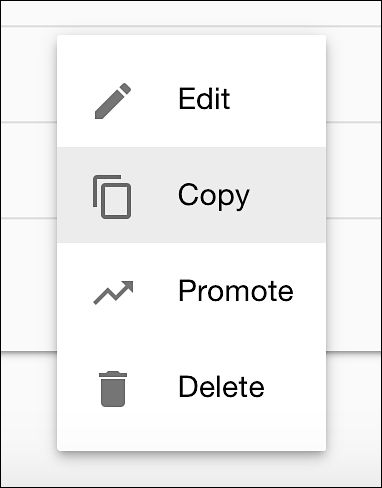
On the Registration Flows page, click the Actions icon next to the flow where the field will be added and then click Edit:
-
On the home page for the flow, click Fields and then click Create Field:

-
In the Choose a Schema Attribute for your new field dialog, click Schema Select to select the entity type where the attribute to be associated with the new field is found, then click Select an Attribute and select the underlying attribute:
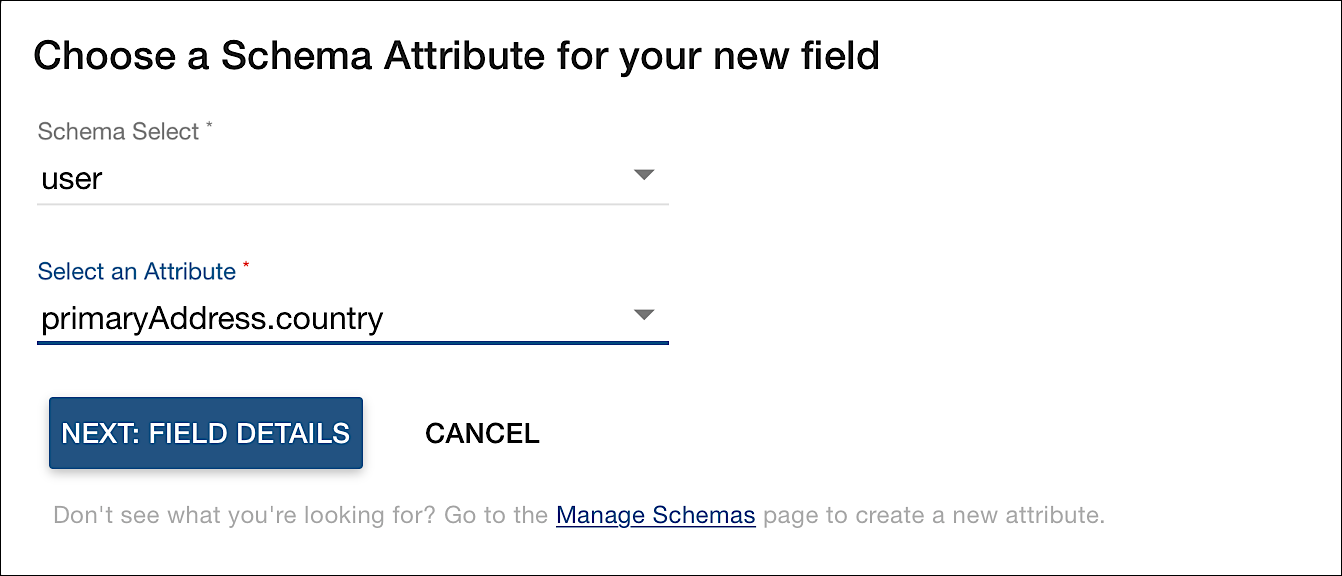
In the preceding example, the primaryAddress.country attribute found in the user entity type will be associated with the new field.
-
Click Next: Field Details.
-
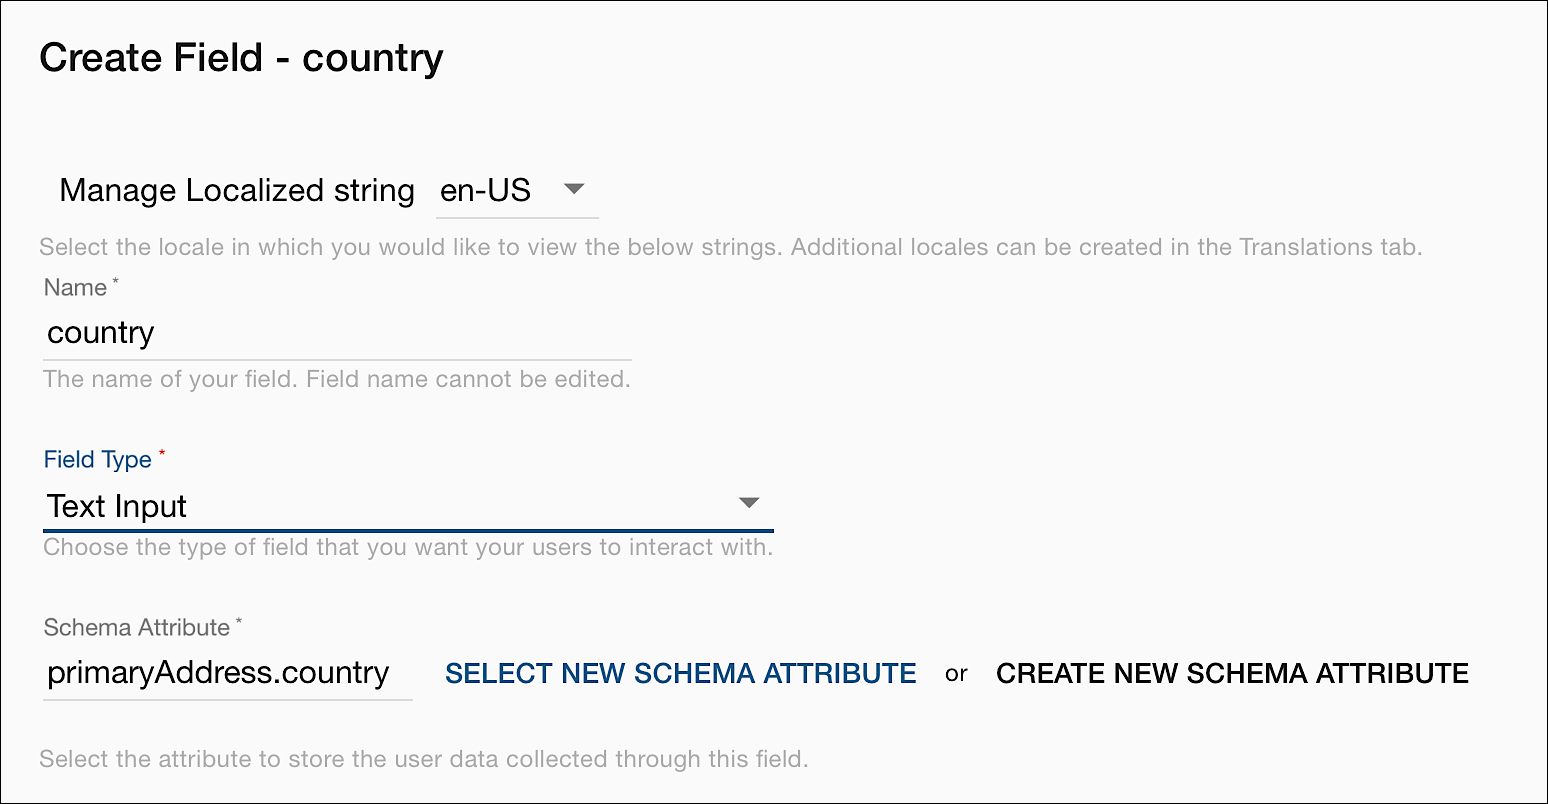
In the Create Field dialog, type the name of your new field in the Name field, then click Field Type and select the desired field type (in this example, we’re creating a Text Input field):
-
In the Label field, type the title of the field as shown in the Hosted Login UI. For example:

-
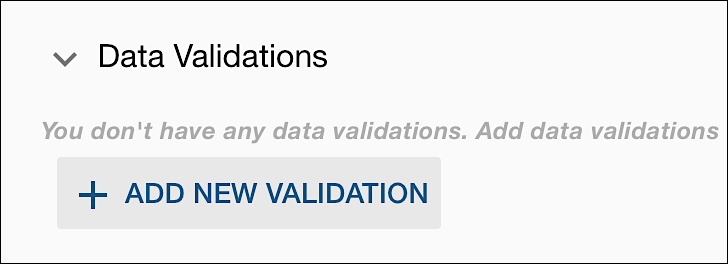
In the Data Validations section, click Add New Validation:
-
In the Add New Data Validation dialog, click Validation Type and select the data validation type (e.g., Required). In the Error message text field, type the error message displayed to the user if the data validation fails and then click Add Validation:
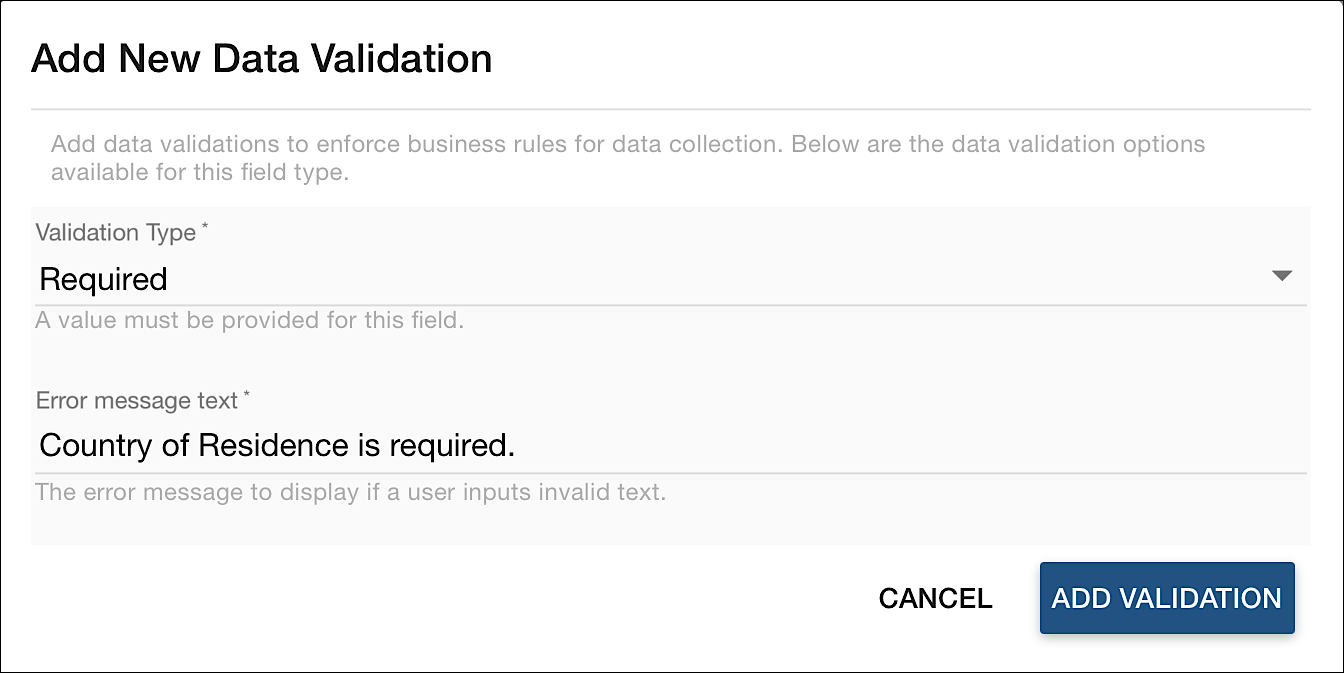
Note that, for now, we’re only adding a single validation rule to this form. However, you can as many validation rules as you need to (for example, the Minimum Length and Maximum Length validations). To do that, just click Add Validation and add as many validations as you like:
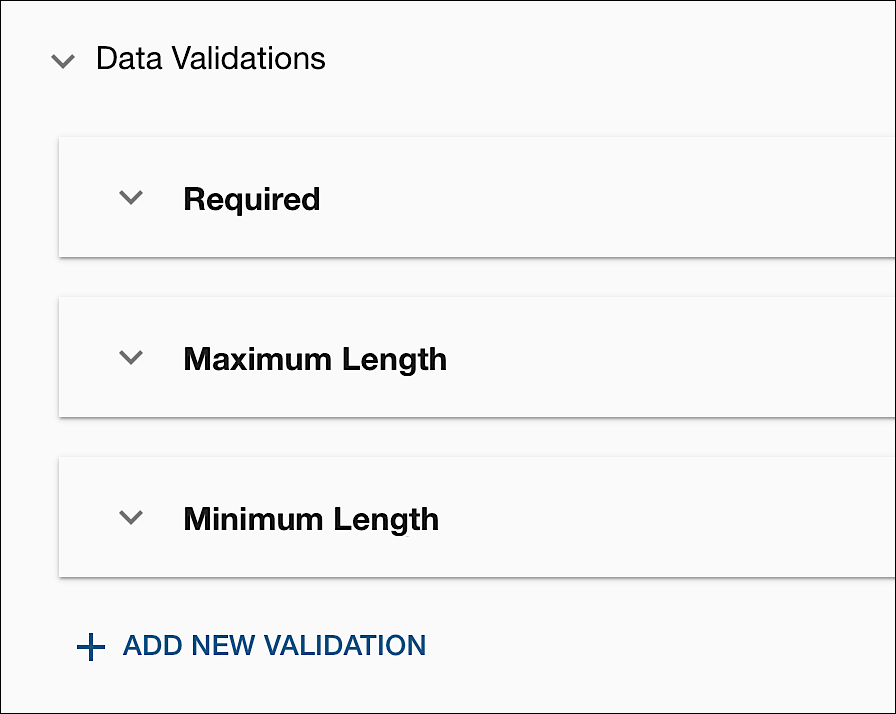
To remove a validation, click the trash can icon located to the right of the unwanted validation rule.
-
In the Forms section, click Add Form to display the Add this field to one or more forms dialog. In the dialog, click the form or forms where you want the new field to be displayed, then click Save Changes:
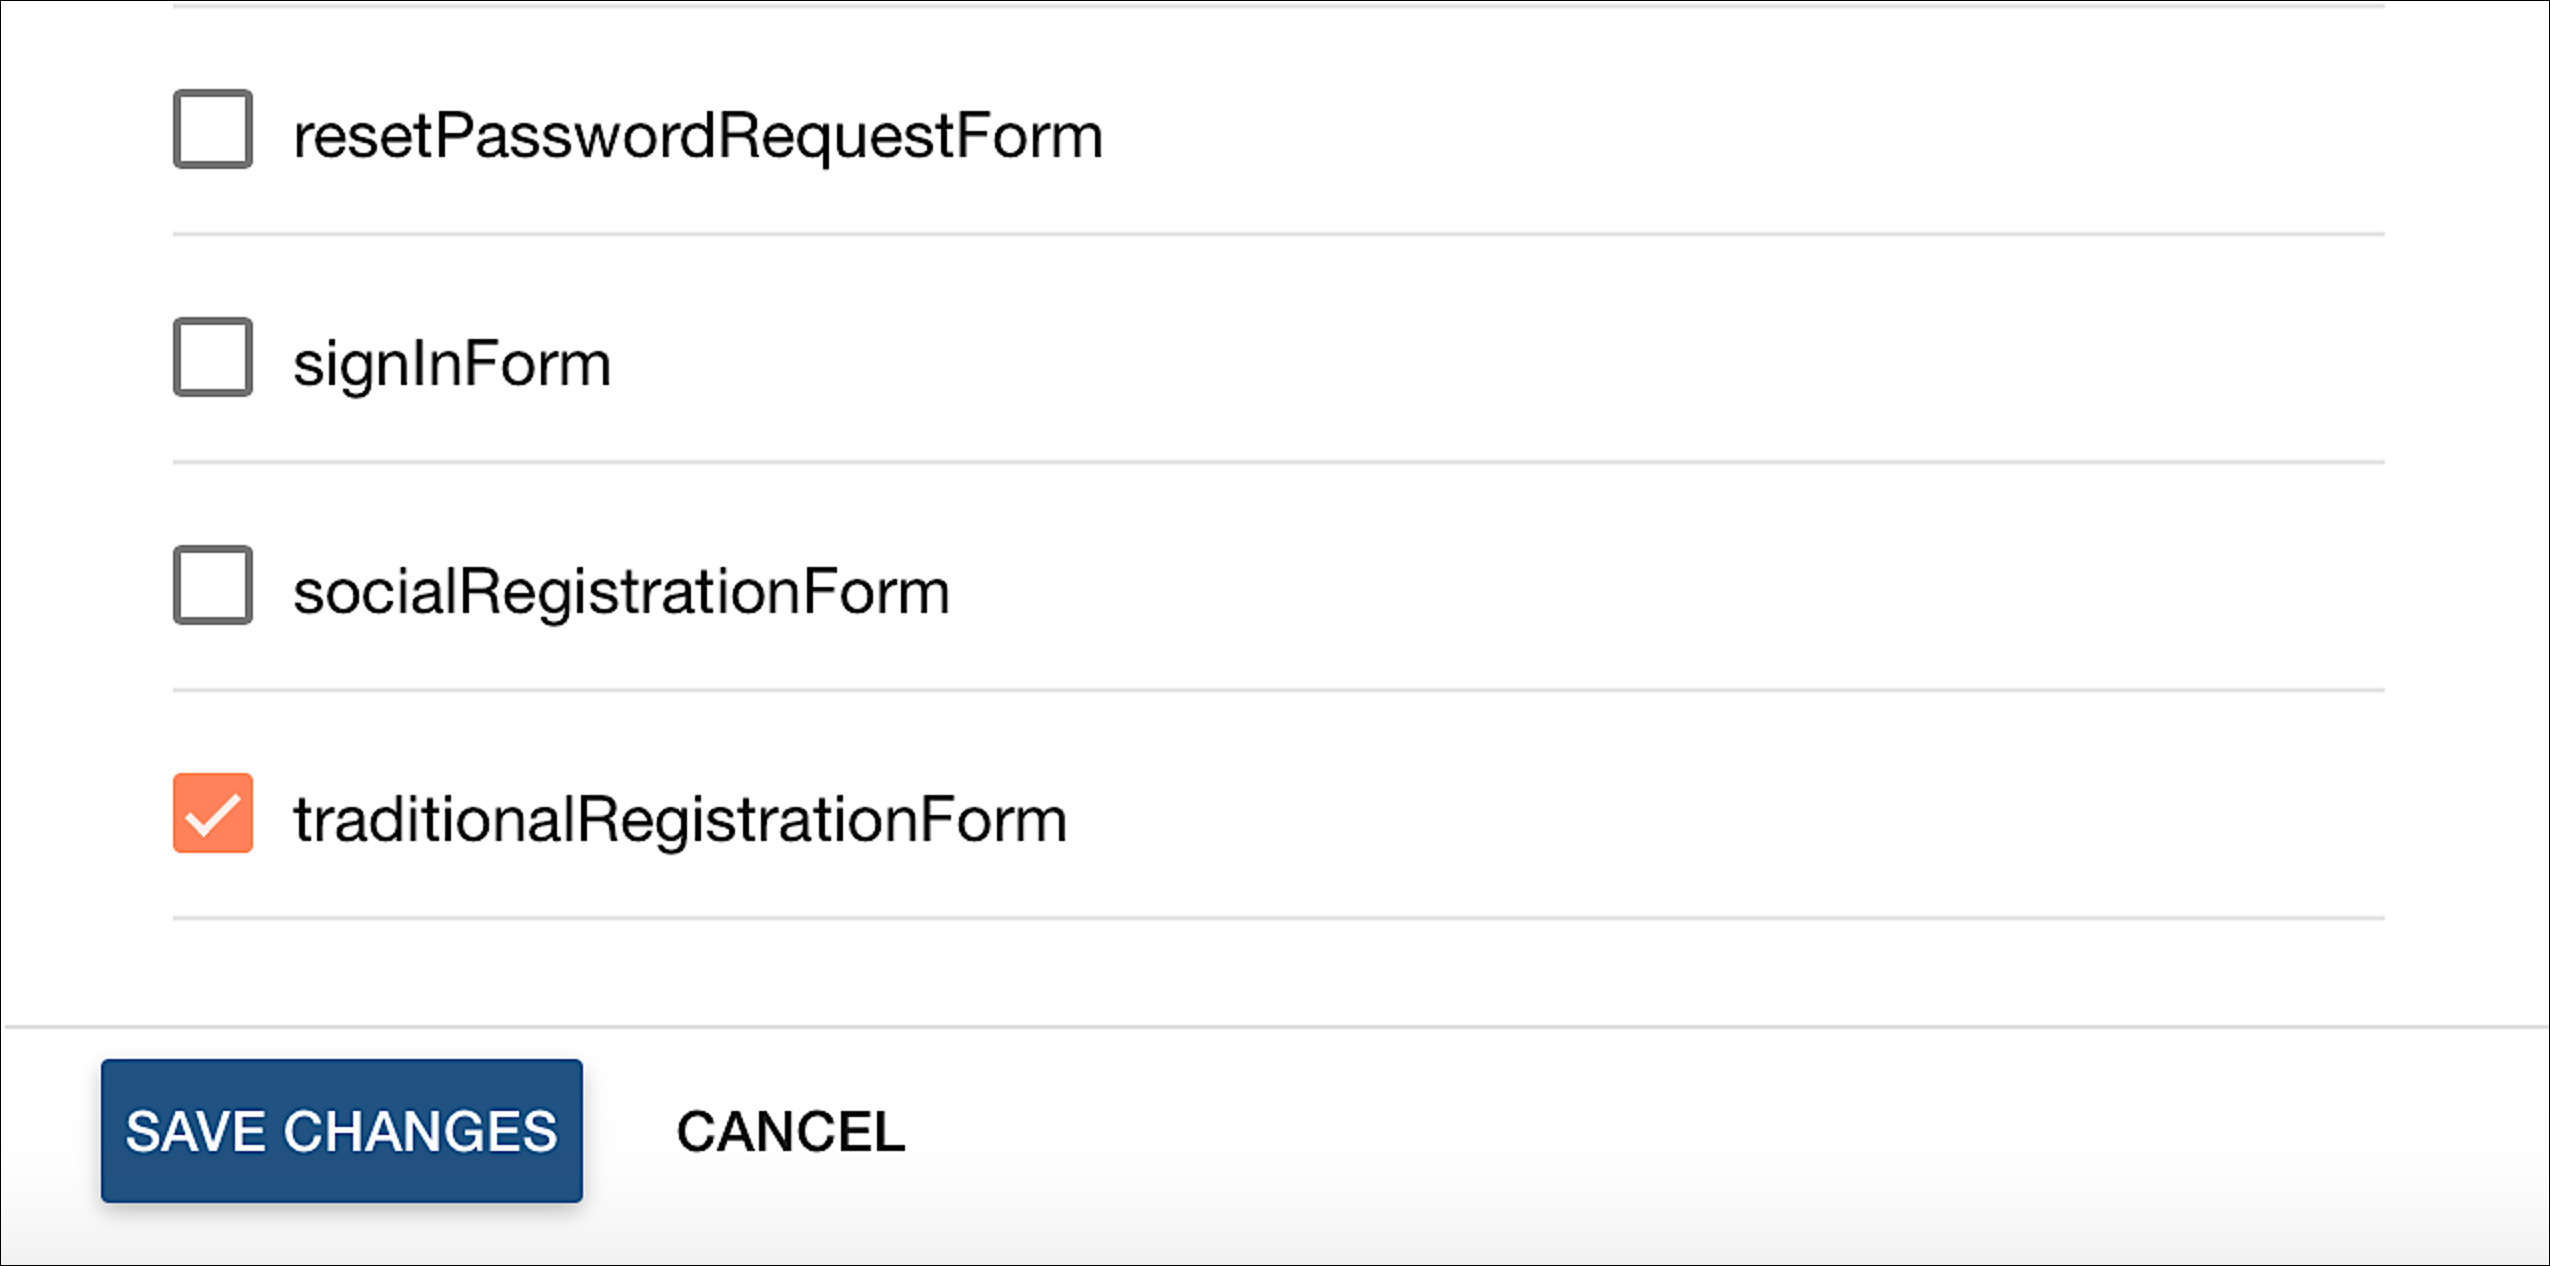
-
Scroll to the bottom of the screen and then click the Save Changes button for the field itself (the previous Save Changes button is only used to add the field to a form):
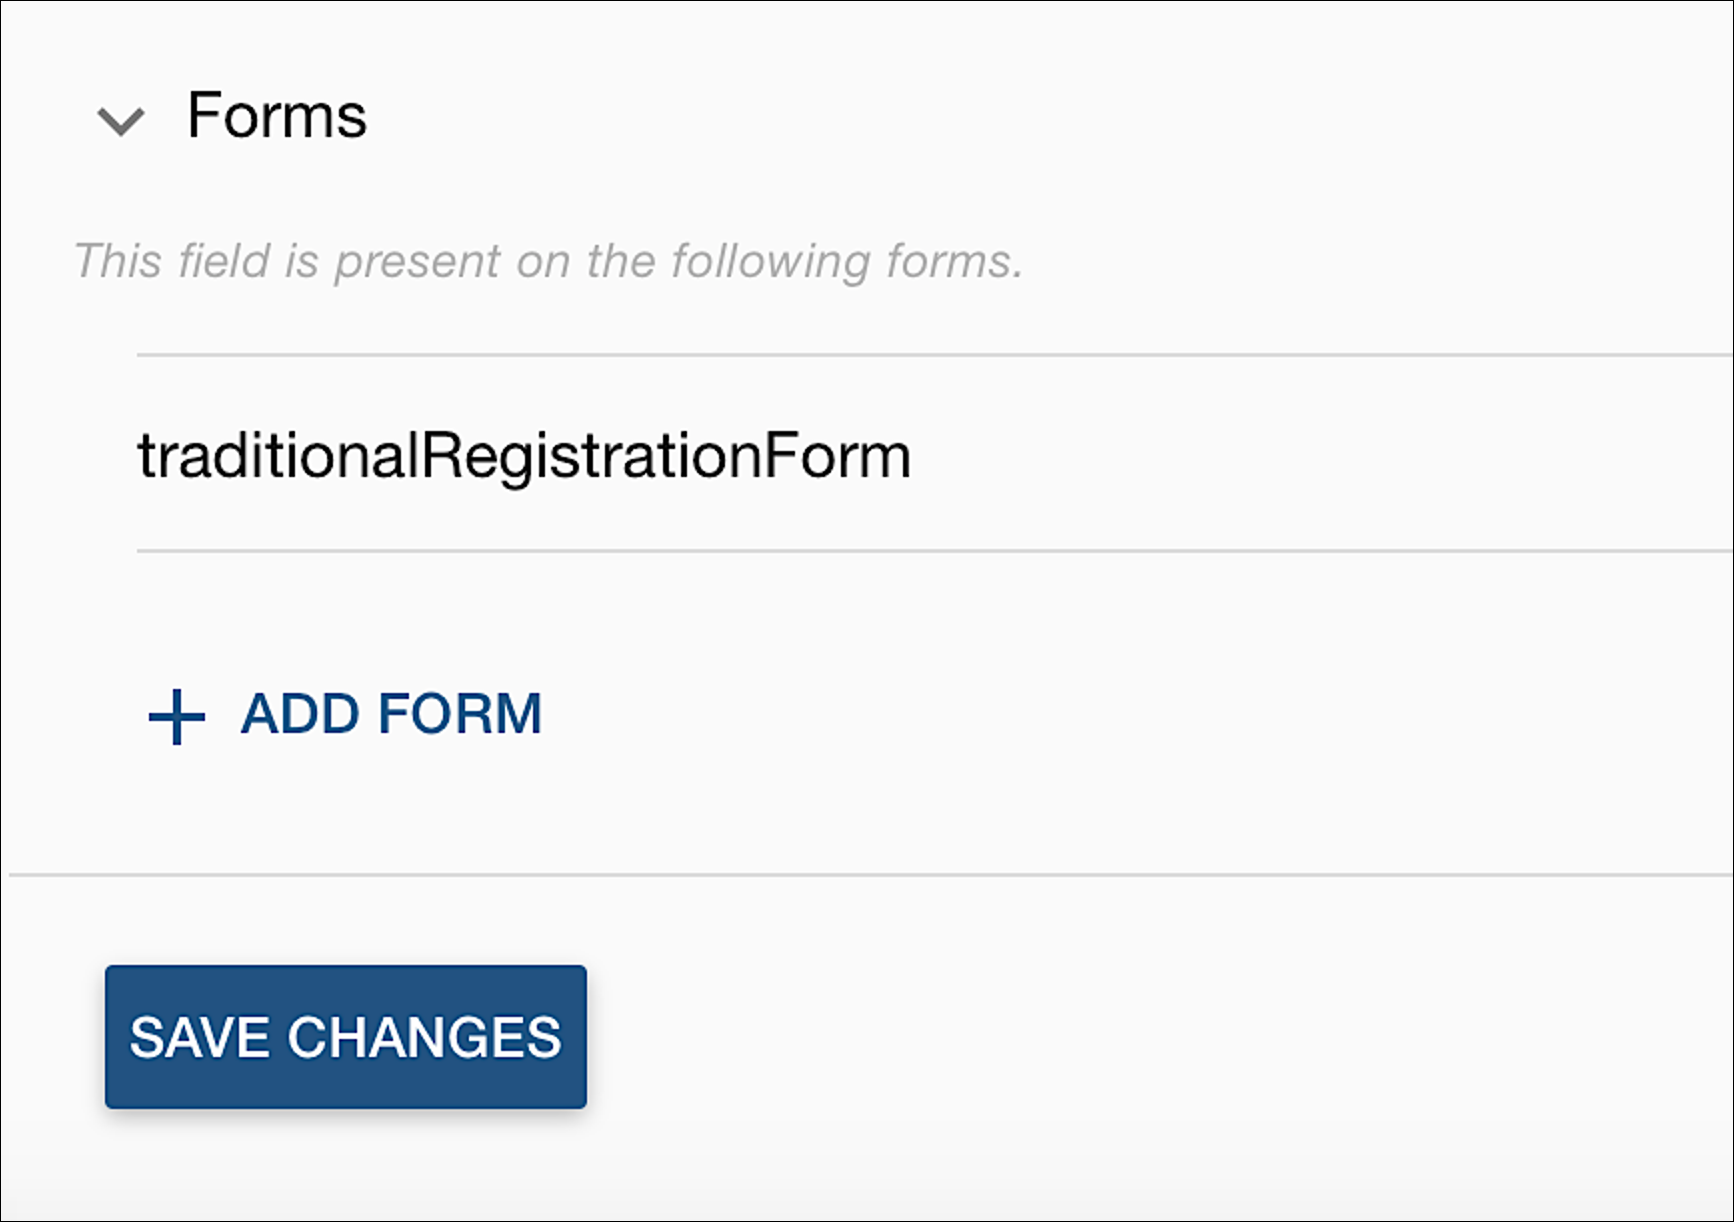
-
After your changes have been saved, click View Form to edit the form where the new field was added. For us, that’s the traditionalRegistrationForm form:
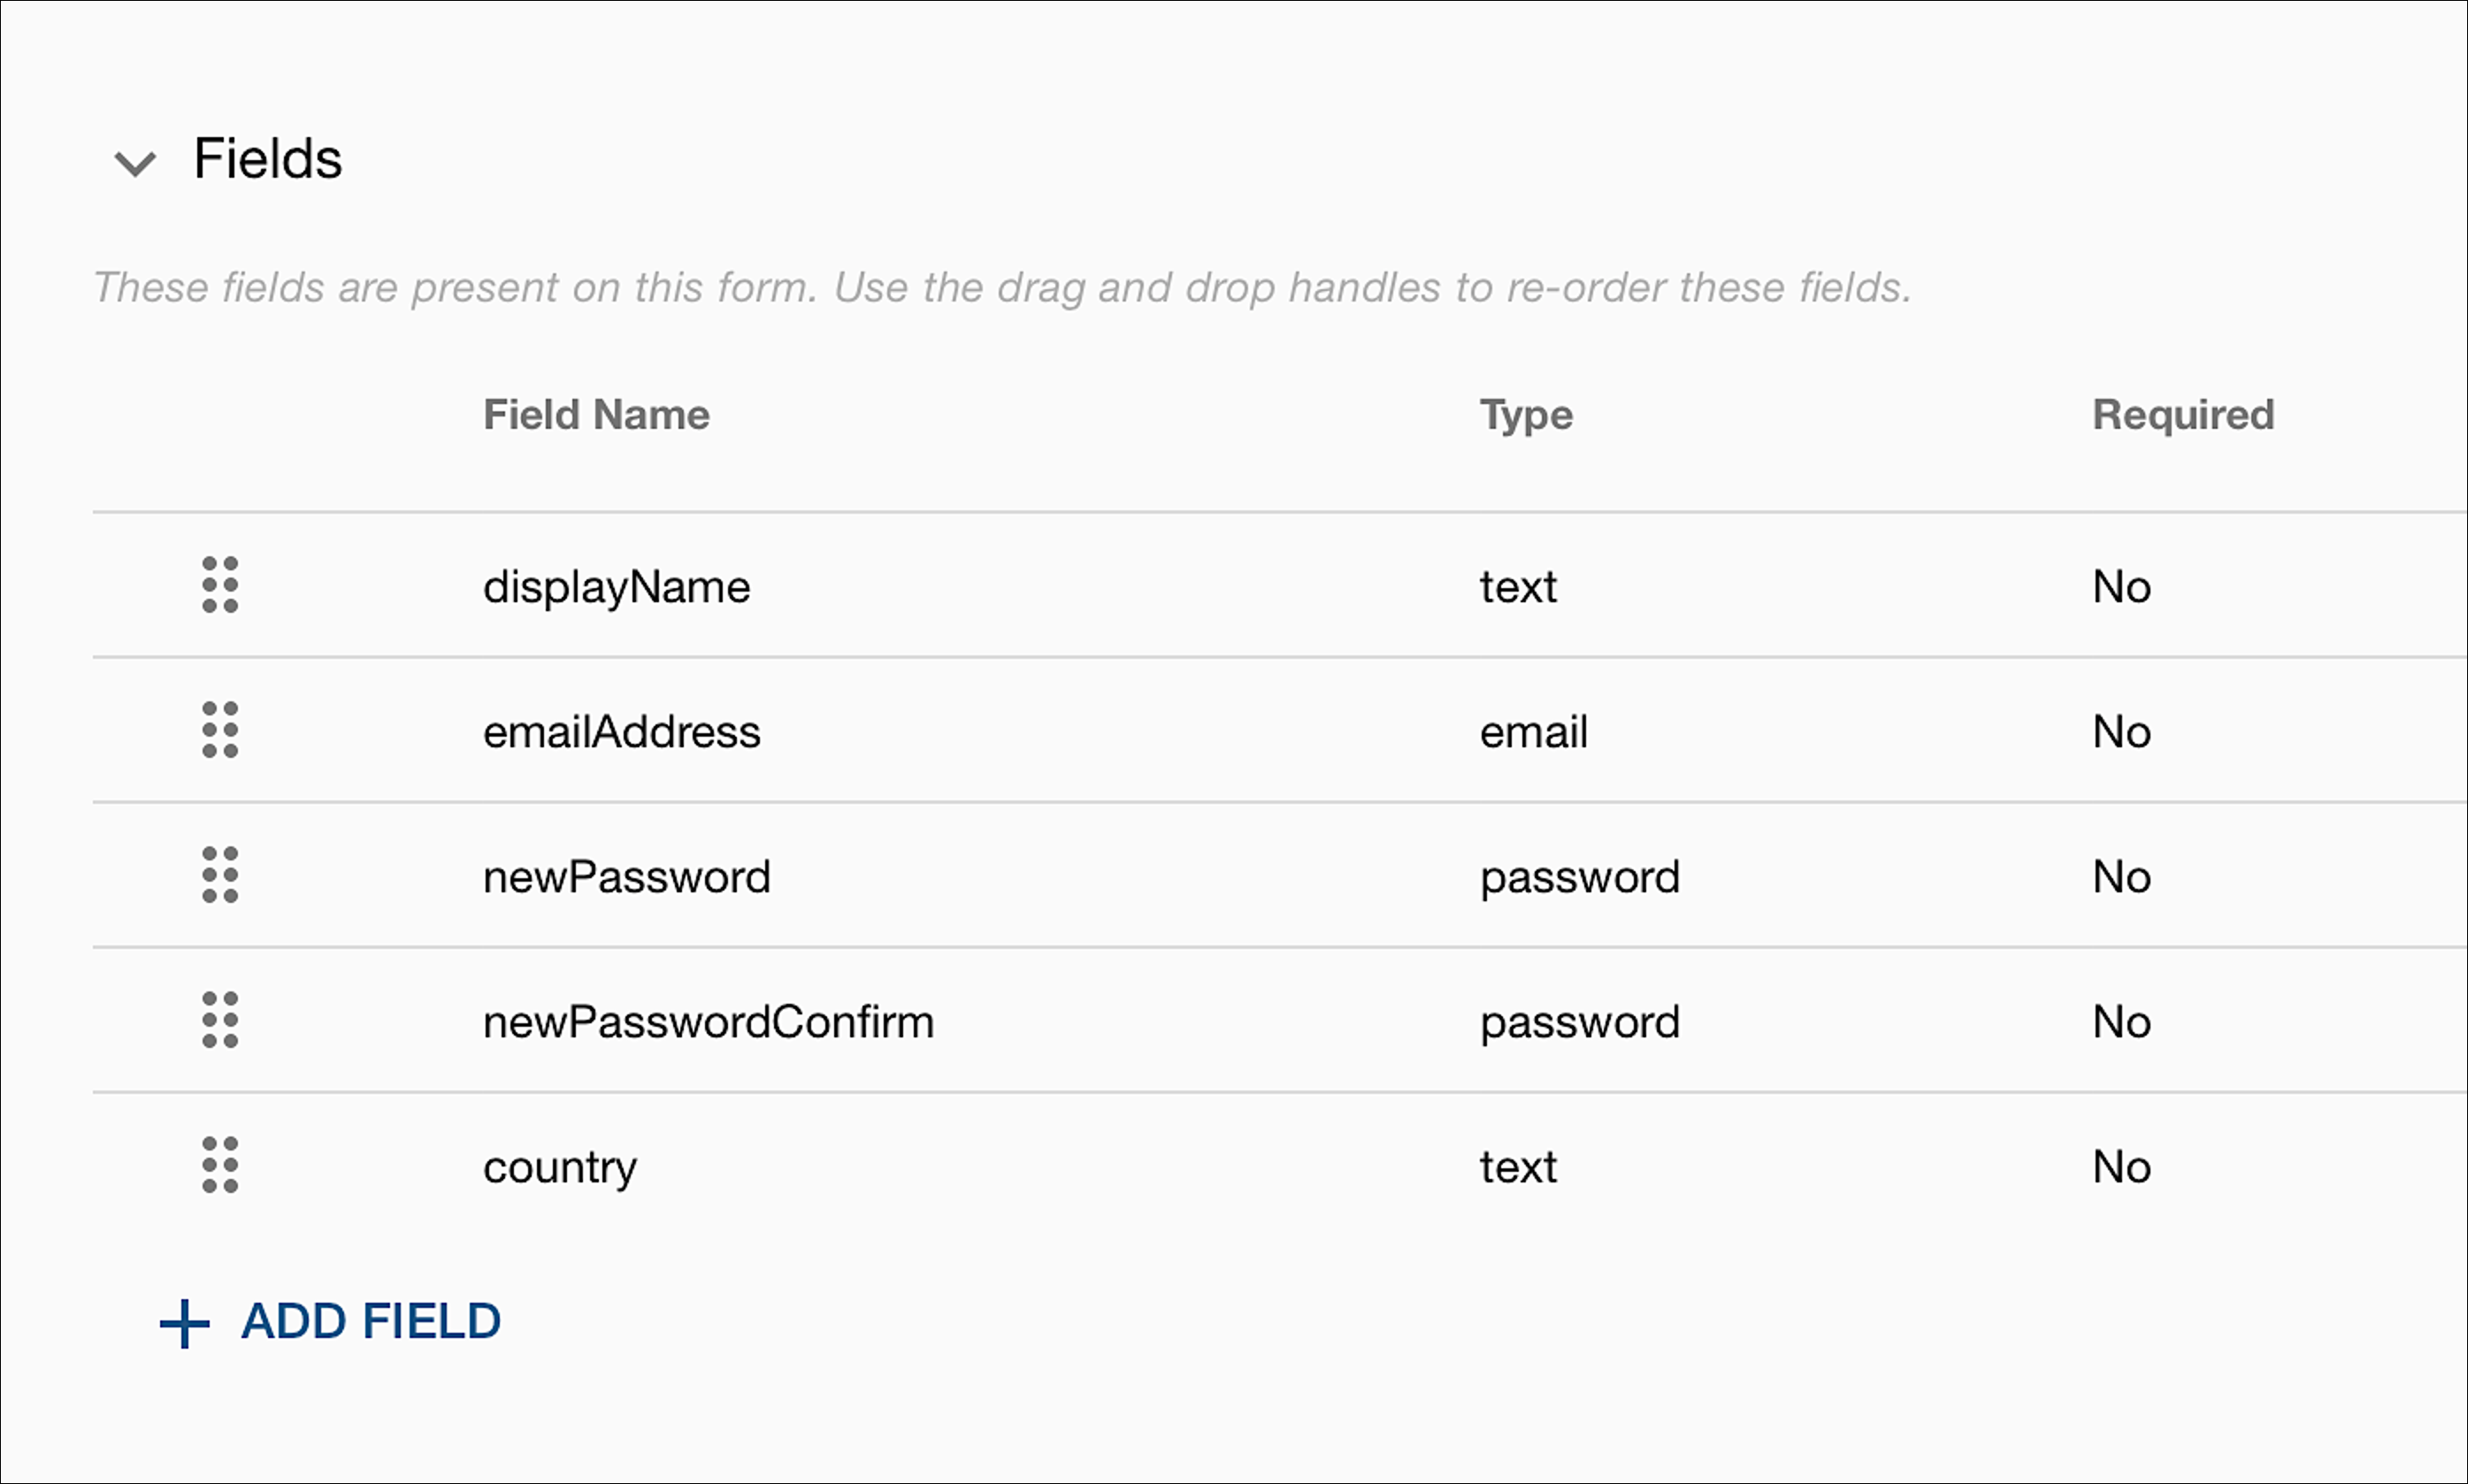
-
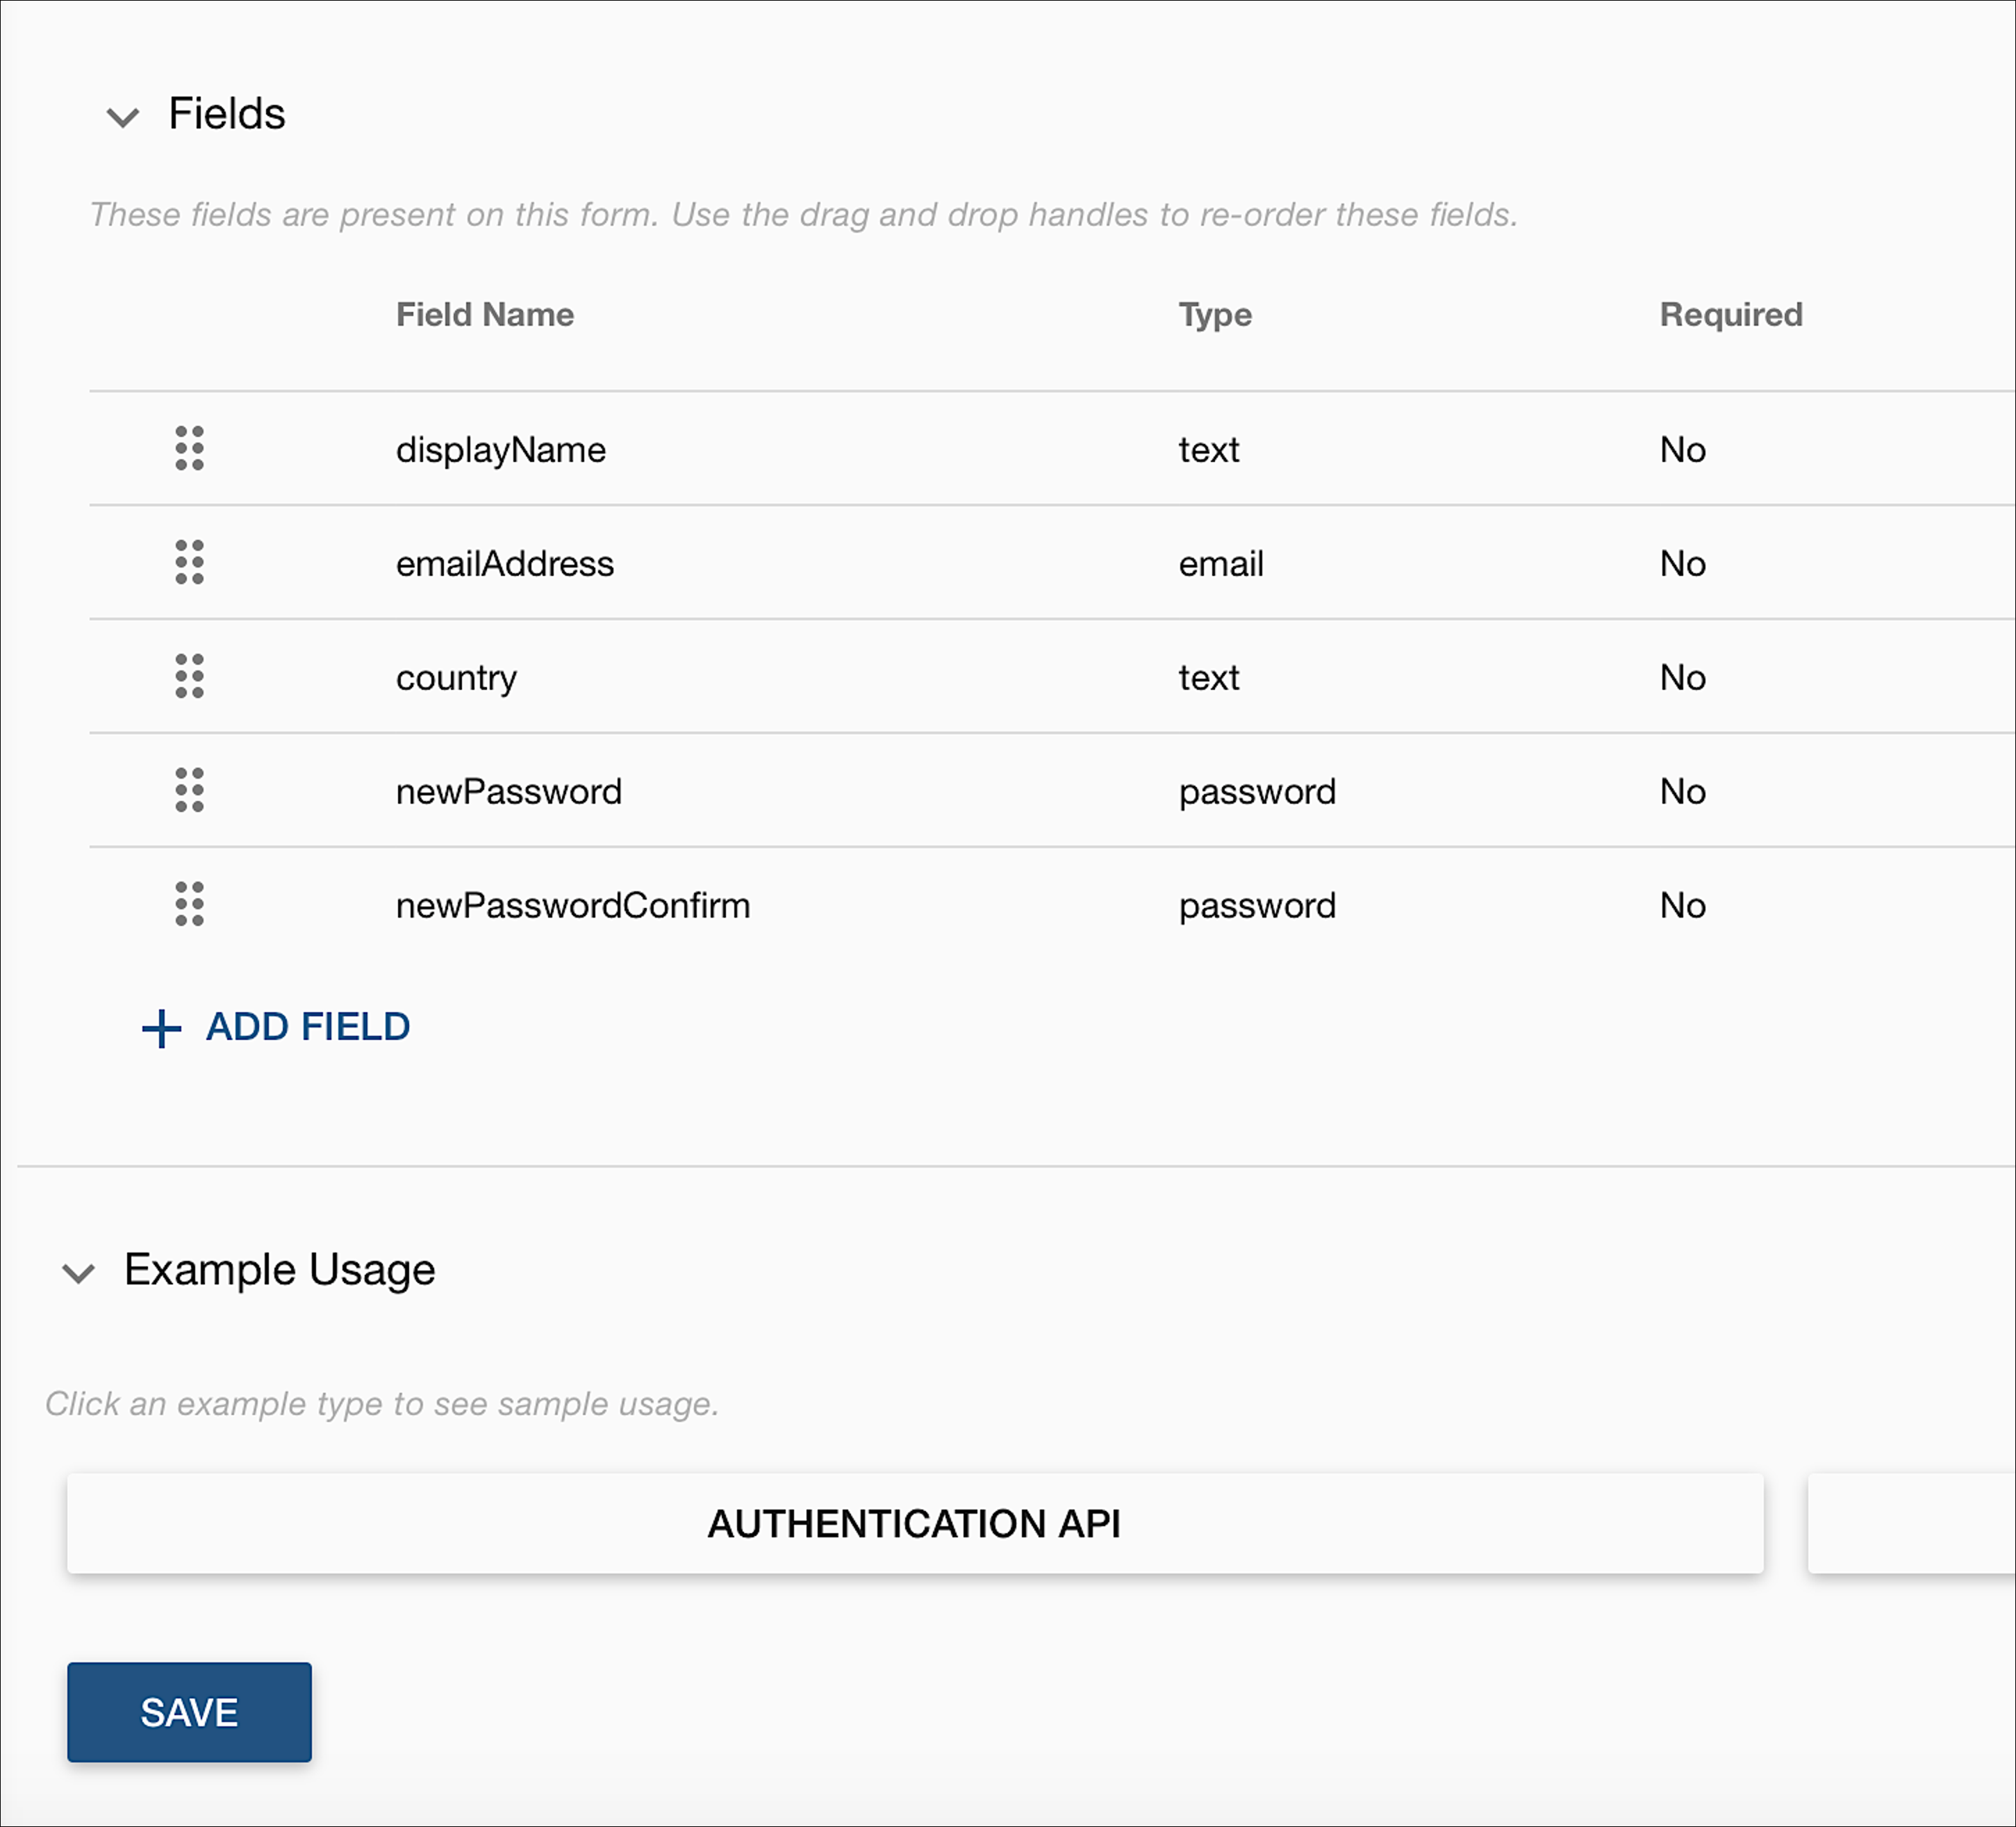
By default, your new field appears at the bottom of the form. To move the field to a different location, click the move handle located to the left of the field name and then drag and drop the field to a different spot:
-
Click Save to save your changes.
That’s going to give us a traditionalRegistration screen that looks similar to this:
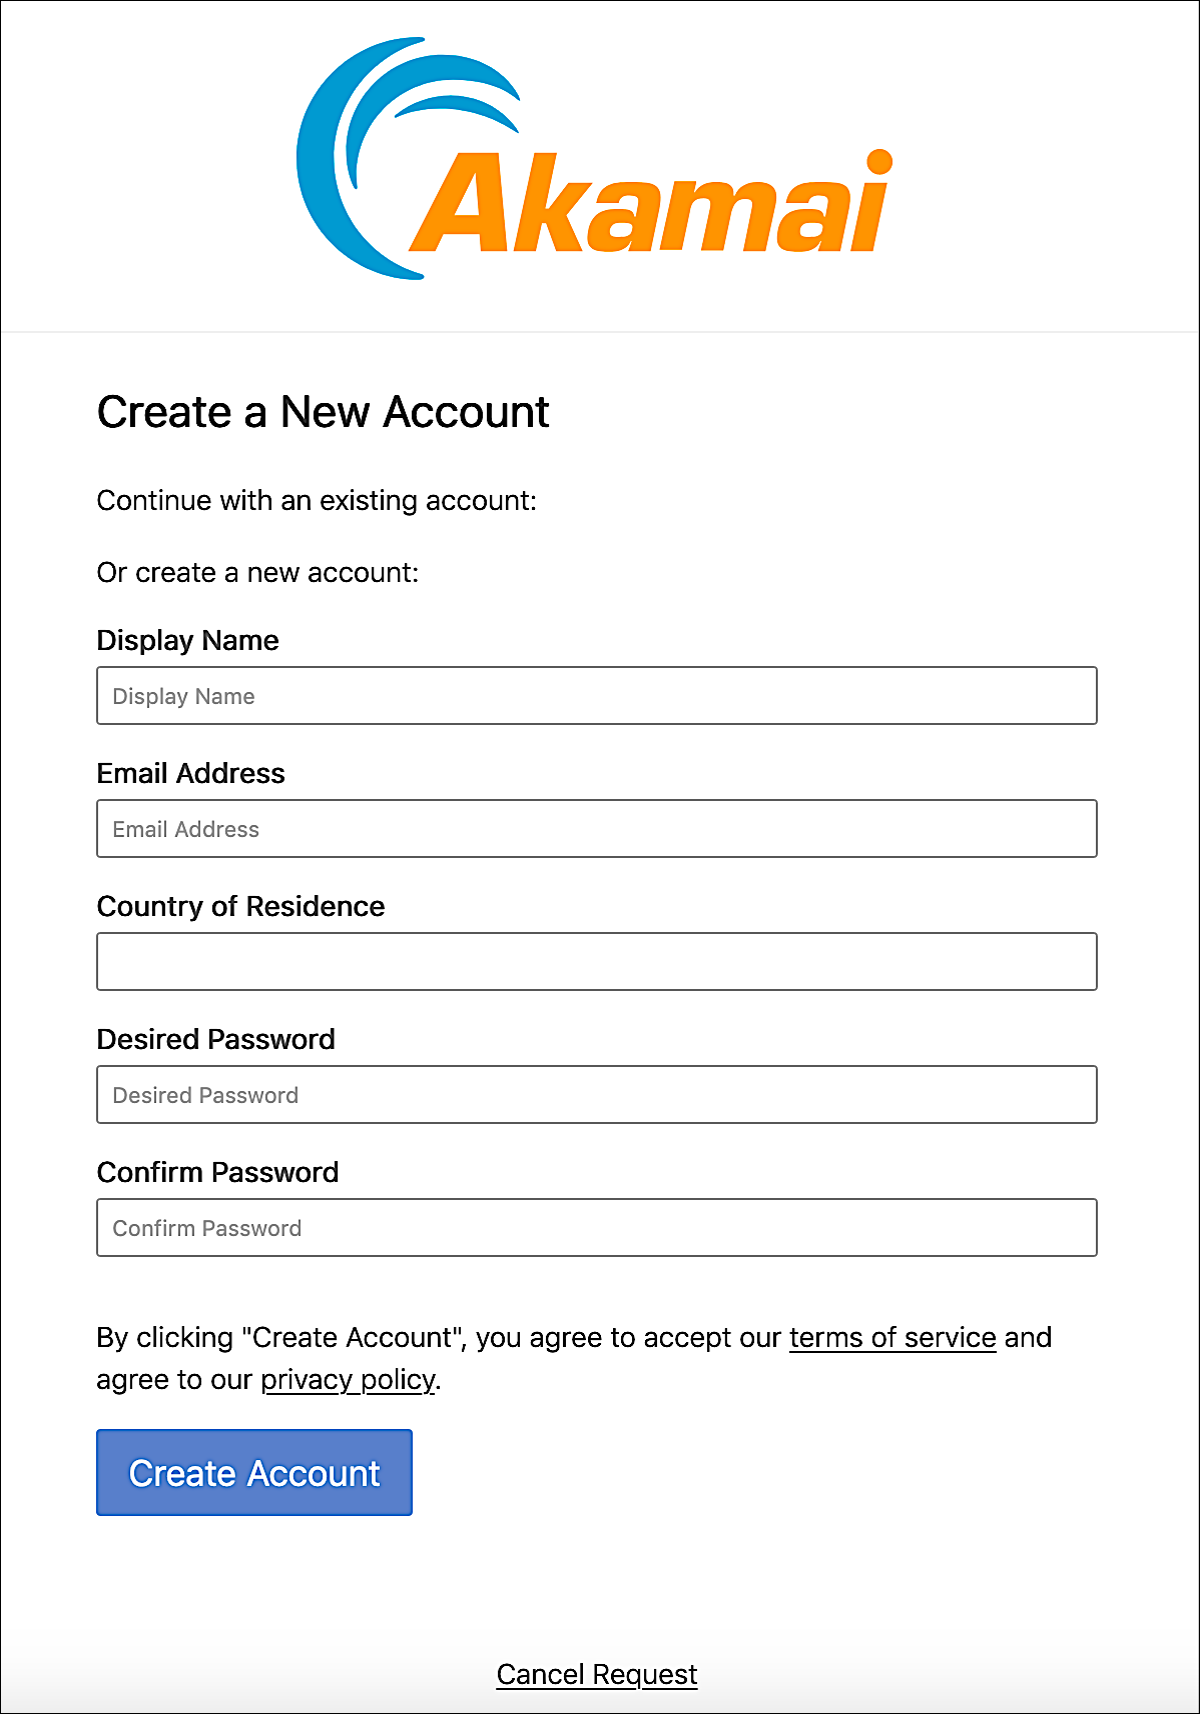
You're right: our new field doesn't include any placeholder text, does it? And there's a reason for that: at the moment, Registration Builder doesn't let you add placeholder text to a field. But that capability should be soon.
Updated over 3 years ago
