Add a field to a Hosted Login form
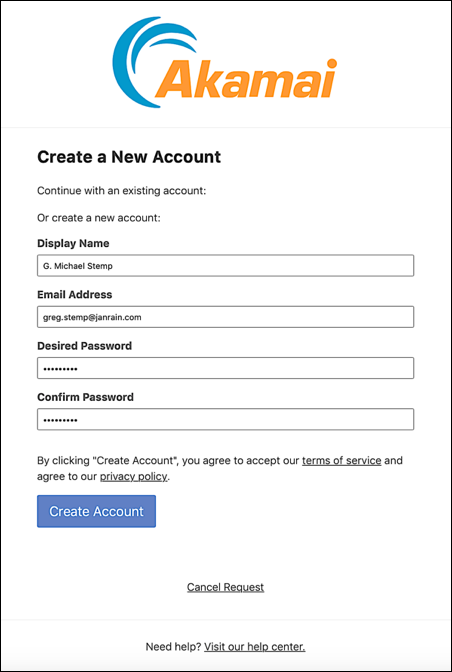
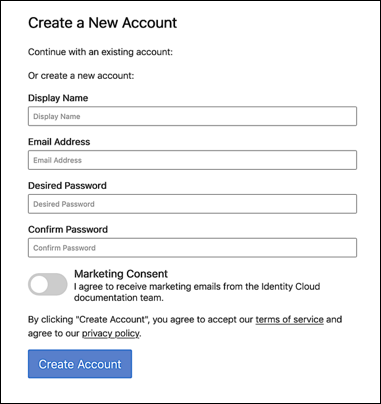
When you access a Hosted Login screen, you typically see a series of fields: UI elements you can fill in by typing, clicking, selecting or, well, by doing whatever you’re allowed to do with a given field. For example, when you access the Create a New Account screen (the traditionalRegistration screen) you’ll be presented with four fields (Display Name, Email Address, Desired Password, and Confirm Password):
OK, you’re right: technically, the name of the field is displayName, and Display Name is simply the label attached to that field. But we aren’t going to worry about details like that, at least not yet.
So why those four fields? Why not, say, First Name and Last Name? As is true for many things involving Hosted Login, the answer is this: because that’s the way things are defined in the flow. Without going into too much detail, if you look at the HTML markup for the traditionalRegistration screen you’ll see a JTL (Janrain Templating Language) tag for the traditionalRegistrationForm form followed by JTL tags for the four fields that appear when you access this screen:
<div style=”display:none;” id=”traditionalRegistration” class=”screen”>
 <div class=”auth-screen content-wrapper”>
   <h1 class=”screen-heading”>{* textCreateNewAccount *}</h1>
   <p class=”screen-description”>{* textCreateNewAccountSubHeading *}</p>
   <div class=”social-signin”>
     <p class=”screen-description”>{* textCreateNewAccountSocialSubHeading *}</p>
    <div class=”social-login-buttons”></div>
   </div>
   <div class=”traditional-registration”>
     <p class=”screen-description”>{* textCreateNewAccountTraditionalSubHeading *}</p>
     {* #traditionalRegistrationForm *}
        {* displayName *}
        {* emailAddress *}
        {* newPassword *
        {* newPasswordConfirm *}
        <p class=”registration-acceptance”>{* textAcceptanceBlurb *}</p>
       <div class=”form-action-buttons”>
         <button type=”submit” class=”register-button”>{* textCreateAccount *}</button>
       </div>
     {* /traditionalRegistrationForm *}
</div>We won’t talk much about JTL tags in this article. Suffice to say that JTL tags function similar to variables. For example, in the math problem 2 + x = 5, x is a variable that represents the number 3. Likewise, the JTL tag { emailAddress } is a variable that represents the emailAddress field. When you see a JTL tag in your HTML markup that tells you that, when the page is rendered, that JTL tag will be replaced with the appropriate value. In this case, that means that the emailAddress field is displayed.
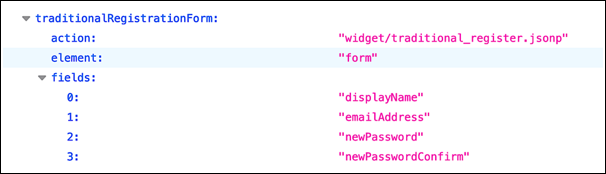
If we look at the flow, we’ll see that the same four fields are specified in the traditionalRegistrationForm form definition:
Why do those four fields show up on the traditionalRegistration screen? You got it: because the flow tells us that those four fields are supposed to show up on the traditionalRegistration screen.
And that leads to an interesting thought: what if we modified the flow and added another field to the form? Would that cause that same field to show up on our Hosted Login screen? Can we change the fields that are associated with a form and, as a result, are displayed on a screen?
Needless to say, there’s only one way to find out.
Before we do that, however, we need to mention one thing: in theory, any attribute you have in your schema can be displayed as a field. Would you like to display a field that gives users the option of subscribing to your newsletter? That’s fine: you just have to make sure there’s an attribute in your schema that can be used to store information about a user’s newsletter subscription status.
So then why did we say “in theory” any attribute you have in your schema can be displayed on a form? Well, that’s because, by default, only a very small subset of your user profile attributes are defined as fields within the flow. For example:
| Field name | Attribute name |
|---|---|
| currentPassword | password |
| displayName | displayName |
| emailAddress | |
| firstName | givenName |
| lastName | familyName |
| marketingConsent | consents.marketing.granted |
| middleName | middleName |
| newPassword | password |
| newPasswordConfirm | password |
| readOnlyEmailAddress | |
| signInEmailAddress |
Want to display a different attribute on your forms (for example, the primaryAddress.country attribute)? In that case, you first have to create a new field tied to primaryAddress.country and then add that new field to a form. That’s something we talk about in the article Create a field and add it to a Hosted Login form . For now, we’re going to focus on adding existing fields to a form.
With that in mind, let’s take a look at an API call that adds the firstName field to the traditionalRegistrationForm form (we’ll also take a peek at how you do this in Console):
curl PUT \
  'https://v1.api.us.janrain.com/config/79y4mqf2rt3bxs378kw5479xdu/flows/testFlow/forms/traditionalRegistrationForm' \
  --header 'Content-Type: application/json' \
  --header 'Authorization: Basic eTR4Zmc2ZjQ0bXNhYzN2ZXBqanZ4Z2d6dnQzZTNzazk6OTVjY3hrN2N6YnZ1eng2ZHB0ZTVrOXA2ZGo1Ynpla3U=' \
  --data-raw '{>    "action": "traditionalRegistration",
    "fields": [
        {    "name": "displayName"
        },
        {    "name": "emailAddress"
        },
        {   "name": "firstName"
        },
        {
            "name": "newPassword"
        },
        {
            "name": "newPasswordConfirm"
        }
    ]
}'
As you can see, there’s nothing very complicated about this API call. In fact, the only thing you need to watch out for is this: every field that you want displayed on your form must be included in the body parameter of your API call. What does that mean? Well, if you’re not familiar with the Identity Cloud Configuration APIs and the PUT method you might think, “Hey, all I want to do is add one field, so I should just include that one field in my API call.” Based on that thinking, you make an API call similar to this one:
curl -X PUT \
  'https://v1.api.us.janrain.com/config/79y4mqf2rt3bxs378kw5479xdu/flows/testFlow/forms/traditionalRegistrationForm' \
  --header 'Content-Type: application/json' \
  --header 'Authorization: Basic eTR4Zmc2ZjQ0bXNhYzN2ZXBqanZ4Z2d6dnQzZTNzazk6OTVjY3hrN2N6YnZ1eng2ZHB0ZTVrOXA2ZGo1Ynpla3U=' \
  --d '{
    "action": "traditionalRegistration",
    "fields": [
        {   "name": "firstName"
        }
    ]
}'
And what will that give you? That will give you this:
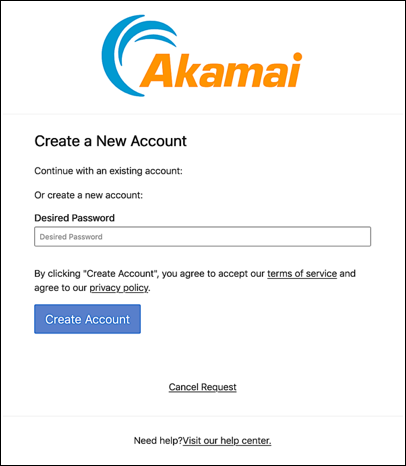
Needless to say, that’s not even close to what we expected to see. The problem? We didn’t specify all the fields in our API call. When you do that, the unspecified fields are going to get removed from the form, and weird things are likely to happen.
As you can see for yourself.
But if you include all the desired fields in your API call you’ll get something a little more to your liking:
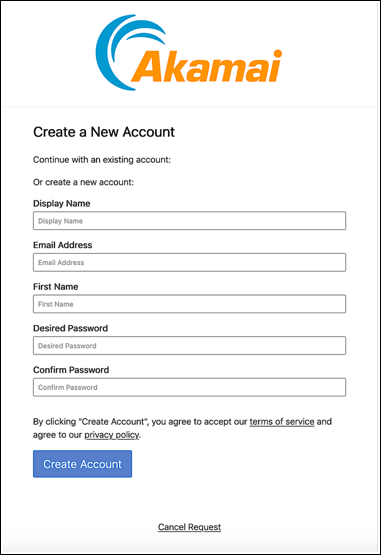
Incidentally, you can put any valid field on your forms. For example, the traditionalRegistrationForm form shown above has 5 text fields. But what if we have a checkbox field that we’d like to use on this form? That’s fine; go ahead and use it:
And if you ever change your mind and want to go back to the traditional traditionalRegistrationForm form, just make a new API call, one that only includes the original form fields:
curl -X PUT \
  'https://v1.api.us.janrain.com/config/79y4mqf2rt3bxs378kw5479xdu/flows/testFlow/forms/traditionalRegistrationForm' \
  --header 'Content-Type: application/json' \
  --header 'Authorization: Basic eTR4Zmc2ZjQ0bXNhYzN2ZXBqanZ4Z2d6dnQzZTNzazk6OTVjY3hrN2N6YnZ1eng2ZHB0ZTVrOXA2ZGo1Ynpla3U=' \
  --data-raw '{
    "action": "traditionalRegistration",
    "fields": [
        {   "name": "displayName",
            "required": true
        },
        {   "name": "emailAddress",
            "required": true
        },
        {
            "name": "newPassword",
            "required": true
        },
        {
            "name": "newPasswordConfirm",
            "required": false
        }
    ]
}'
And you’re right: that was easy wasn’t it?
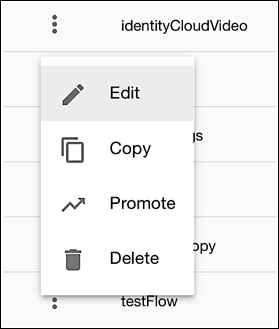
Of course, what might be even easier is to use Console to add and remove fields from a form. Want to add the First Name field to the traditionalRegistrationForm form? Then just complete the following procedure:
-
In Console, click Registration Builder, click the Actions icon next to the flow you want to modify, and then click Edit:
-
Click Forms, locate the traditionalRegistrationForm form, and then click the Edit Form icon:

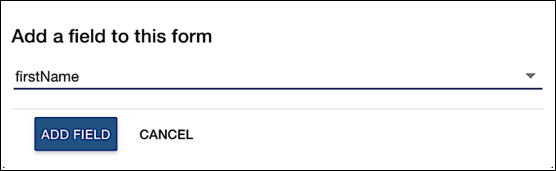
-
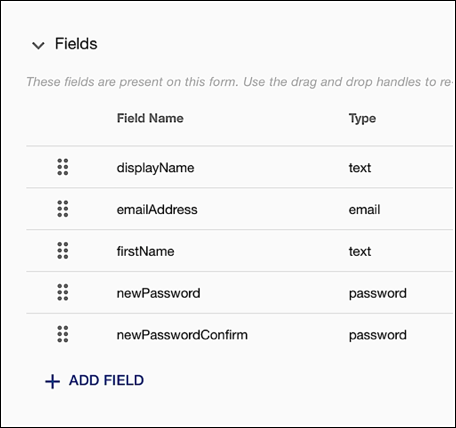
On the Edit Form page, in the Fields section, click Add Field, select firstName in the Add a field to this form dialog, and then click Add Field:
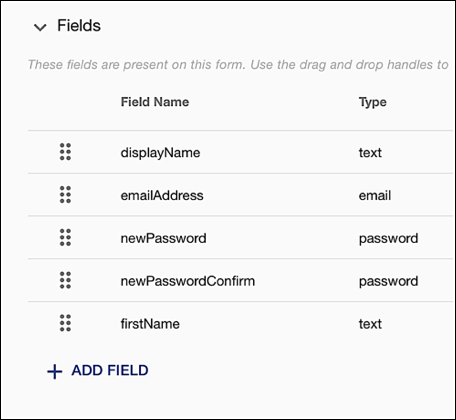
That adds the firstName field to the bottom of your form:
-
To move the field to a different location on the form (for example, so it comes right after the emailAddress field), click anywhere on the firstName field, hold down the left mouse button, then drag and drop the field to the desired location:
-
Click Save to save your changes.
To remove the field, use Registration Builder to open the form, then click the X next to the firstName field:

Click Save to save your changes and remove the field. Note that this doesn’t delete the field itself; it simply removes the field from the traditionalRegistrationForm form.
Updated 3 months ago