Configure Customer Care Portal settings
After your Identity Cloud implementation has been deployed, you can log on to Console and begin work, with no additional configuration required.
Well, like we said, with no additional configuration required. However, and especially if you are using the Customer Care Portal feature, you might want to (or need to) optionally modify some of the Console’s default settings. For example, suppose you have multiple API clients and you want to configure those clients differently; for example, the clients might be assigned different flows or use a different registration form. In that case, you’ll need to change one or more of the following settings. Note that settings where the CCP Only column is set to Yes are only available to Customer Care Portal applications. If CCP Only is set to No that means the setting is available to all Console applications:
| Setting | CCP Only | Description |
|---|---|---|
| ccp_edit_form | ✓ | Form used when editing a user profile in the Customer Care Portal. |
| ccp_enable_email_send_buttons | ✓ | Indicates whether the Resend Verification and the Send Password buttons are visible when editing a user profile in the Customer Care Portal. |
| ccp_flow_locale | ✓ | Flow locale used for Customer Care Portal actions such as creating and editing user profiles and sending emails. |
| ccp_flow_name | ✓ | Name of the flow used for Customer Care Portal actions such as creating and editing user profiles and sending emails. |
| ccp_flow_version | ✓ | Version number of the flow used for Customer Care Portal actions such as creating and editing user profiles and sending emails. |
| ccp_recover_password_form | ✓ | Form used when sending password reset emails from the Customer Care Portal. |
| ccp_registration_form | ✓ | Form used when creating user profiles in the Customer Care Portal. |
| ccp_verify_email_form | ✗ | Form used when sending email verification emails from the Customer Care Portal. |
| {entity_type}_search_distinguisher_field | ✗ | Attribute used to restrict agent access to a specified set of user profiles. This setting can only be configured at the global scope . |
| {entity_type}_search_distinguisher_field_values | ✗ | Used with entity_type_search_distinguisher_field to define the user profiles an agent can access. This setting can only be configured at the global scope. |
| {entity_type}_search_display_fields | ✗ | Defines the attribute values that are returned when you do a Console search. This setting can only be configured at the global scope. |
| {entity_type}_search_allow_empty | ✗ | When enabled, search results are not shown by default when you open the Manage Profiles page. This setting can only be configured at the global scope. |
| password_recover_url | ✗ | Base URL used when generating a password reset link. |
| verify_email_url | ✗ | Base URL used when generating an email verification link. |
Configure Console settings
Console settings can be configured by using either the Console itself or the Clients and Settings APIs. To add a setting by using the Console, complete the following procedure:
-
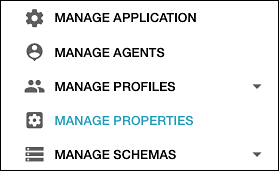
From anywhere in the Console, click the Manage Properties link:

-
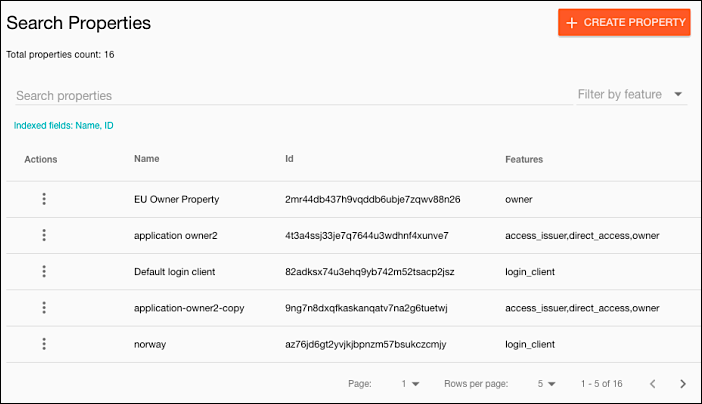
On the Manage Properties page, click the name of the property you want to add the setting to:

-
On the Edit Settings page, click the Add Setting icon to add a new, blank setting to the property:

-
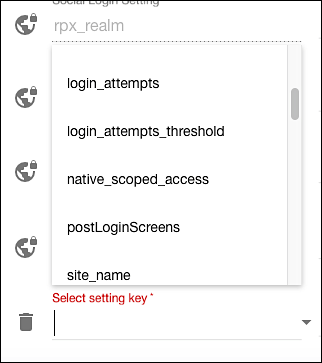
Click Select setting key and then click the name of the setting that you want to add (for example, login attempts):

-
In the Value field, type the value for the new setting:

-
Click the Save Changes icon to add the setting to the property.
To change the value of a setting, click Edit Settings on the Edit Property page:

Make your changes and then click the Save Changes icon.
To delete a setting (which restores the setting’s default value), to the Edit Settings page and then click the trashcan icon located to the immediate left of the setting name :

After the setting has been removed from the screen, click Save Changes to complete the operation.
Configure Console settings by using the Clients and Settings API
Console settings can also be added (as well as modified and deleted) by using the Clients and Settings APIs(). To add a new setting by using the APIs and the Postman application, complete the following procedure:
-
Configure Postman to use Basic authentication and to connect to your Capture URL. If you aren’t sure what your Capture URL is, you can find that URL on the Console's Manage Applications page listed under Registration Domains:

-
In Postman, set the method type to Post and then enter the configuration settings operation (for example, <https://greg-stemp.us.dev.janraincapture.com/settings/set>) :

-
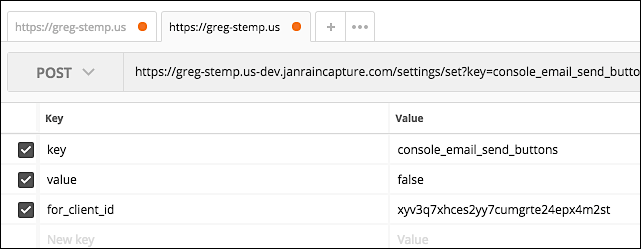
Click Params to expose the parameters section. You’ll need to add three parameters to this section:

-
To add the first parameter, in the Key field, type key. In the Value field, type the name of the setting to be added (for example, console_enable_mail_send_buttons).
-
To add the second parameter, in the Key field, type value and then, in the Value field, type the setting value (for example, false).
-
To add the final parameter, in the Key field, type for_client_id. In the Value field, type the client ID for the API client the new setting is to be associated with. Your screen will look similar to this:

-
Click Send. If you get back an OK message the setting has been successfully added:

This process is also used to modify an existing value. If the specified setting already exists, the API call will change the value. If the setting does not exist, the API call will add the new setting. To delete a client setting, use the Delete method.
Updated almost 3 years ago
