Create an OIDC login client
Creating an OIDC Login Client
When you make an authorization request in Hosted Login, that request must include the client ID of an OpenID Connect (OID) login client. For example:
https://v1.api.us.janrain.com/e0a70b4f-1eef-4856-bcdb-f050fee66aae/login/authorize
   ?client_id=a123ef65-83dc-4094-a09a-76e1bec424e7
   &redirect_uri= https://oidc-playground.akamai.com/redirect_uri
   &scope=openid
   &code_challenge=4YHvhtfK-l-yRIl4a1BN9ZuNSJJqy51A-_HaLcigLTs
   &code_challenge_method=S256
   &response_type=code
   &state=CiRIv18Ker8oavqKvTKevDBQ-TOgGdwZu48eMsvG9mg
So what is an OpenID Connect login client? Well, among other things, login clients are in charge of collating all the pieces of the login and registration puzzle, including login and token policies, allowed redirect URIs, and the application client (which, in turn, is in charge of collating such things as the flow, CSS stylesheets, email verification and password reset links, etc.).
Login clients also facilitate your authorization requests. Login clients don’t present your credentials to the authorization server; login clients have no idea who you are (nor, to be honest, do they care who you are). Instead, the login client introduces you to the authorization server; it’s then up to you to provide your credentials and be authenticated.
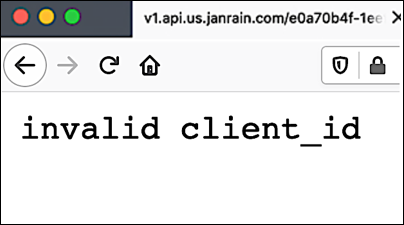
In other words, login clients are important. In fact, if you make an authorization request without using a login client, or at least without using a valid login client (i.e., a client authorized for use with your Hosted Login implementation), that request is immediately rejected with the following error:

Which means that you definitely need OIDC login clients. And, in this article, we’ll explain how you can create one.
To create an OIDC login client, use the /{customerId}/config/clients operation and the POST method. For example, a Curl command to create a public client looks something like this, with 01000000-0000-3000-9000-000000000000 representing your Akamai customer ID number:
curl -X POST \
  https://v1.api.us.janrain.com/01000000-0000-3000-9000-000000000000/config/clients \
  -H 'Authorization: Bearer Ki712dpGq5GPQcsxMHY6ShHY7wU_iTs0o9dPx4TEzf5yLIvddjnDVBJxjPDucf5YVB' \
  -H 'Content-Type: application/json' \
  -d '{
    "name": "Akamai Documentation Public Client",
    "redirectURIs": [
        "https://documentation.akamai.com/login"
    ],
    "loginPolicy": "ad2cad34-e06f-463e-a43f-b5c8af0ee965",
    "tokenPolicy": "a123ef65-83dc-4094-a09a-76e1bec424e7",
    "type": "public"
}'
This is a good time to mention that OIDC login clients are not the same thing as the API clients used elsewhere in the Identity Cloud. (However, the application client associated with a login client isa n API client). Not only do OIDC clients have totally different property sets than API clients, but the two clients are managed in completely different ways: most notably, OIDC clients can only be managed by using the OpenID Connect Configuration APIs. If you go into Console and look at the Manage Properties page, you won’t see any of your OIDC clients: the Console can only be used to manage API clients.
And even though there are a number of similarities, OIDC login clients also differ from the OpenID Connect configuration clients used to obtain administrative access tokens.
If you’re wondering what all the parameters in our sample API call mean, the following table should help answer your questions:
| Key | Description |
|---|---|
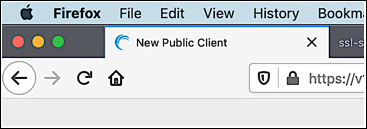
| name | Friendly name of the OIDC login client. By default the OIDC client name also serves as the title for the Hosted Login login page: if you have an OIDC client named New Public Client, then that’s the name that appears on your browser tab when you access the login page: To configure the client name, use syntax similar to this: "name": "Akamai Documentation Login Client"Client names must be unique for each organization (i.e., for each customer ID). For example, you can only have one OIDC client named Akamai Documentation Login Client. |
| redirectURIs | URL of the page the user is redirected to following authentication. The redirectURIs property accepts both HTTPS links and mobile deep links. However, all URLs in the redirectURIs array must use the HTTPS protocol except http://127.0.0.1.127.0.0.1 is the common IP address for localhost and is more secure than the localhost alias:"redirectURIs": ["http://127.0.0.1"]In addition, your redirect URI can contain any query parameters except for the reserved values code and state. As the name redirectURIs implies, you can specify multiple redirect URIs; just include each URI in double quotes, and separate the URIs by using commas: "redirectURIs": ["http://127.0.0.1", "https://documentation.akamai.com"]When making an authorization request, your request must include one of the URIs specified in the redirectURIs property. If it doesn’t, your request will fail. And note that URIs must match exactly: if your redirect URI is https://documentation.akamai.com, your authentication request can’t specify a redirect URI like *.akamai.com. Since you asked, exact matching helps guard against a malicious user setting up a redirect site on your domain. Yes, this user could set up the site malicious-site.akamai.com. However, as long as you don’t include malicious-site.akamai.com in your redirectURIs property you don’t have to worry about users inadvertently being redirected to that site. |
| loginPolicy | Unique identifier of the login policy associated with the client. For example:"loginPolicy": "b8097975-93c7-46db-8cfe-19609e67eadb"Login policies are required for both public clients and confidential clients (see the type parameter): you can’t login or register using an OIDC client that hasn’t been assigned a login policy. To create a confidential or public client you must specify a valid login policy at the time the client is created. (And yes, the POST method validates policy UUIDs before it actually creates the new client, so don’t think you can just throw in a “placeholder” policy.) If you find yourself thinking, “I’ll skip the login policy for now, and then add it in later,” well, we recommend thinking again: if a client is created without a login policy there is no way to add a policy after the fact. Instead, that client will never have a login policy. However, what you can do is assign the client any valid login policy, then change that policy later on if needed. If you’re wondering why loginPolicy isn’t a required property, there’s a good reason for that: the /{customer_id}/config/clients operation is also used to create configuration clients, and configuration clients don’t use login policies. (You can assign a configuration client a login policy, but that policy will be ignored.) |
| tokenPolicy | Unique identifier of the token policy associated with the client. For example:"tokenPolicy": "2dcae965-0d56-4961-a98e-f98583e30bb9"Token policies are primarily used to specify how long access tokens and refresh tokens are valid: by default, access tokens expire after 1 hour and refresh tokens expire after 90 days. Token policies also specify the OIDC scopes that can be issued following a successful authentication. (Your authorization request can ask for any number of scopes to be returned, but you can only get back the scopes included in the token policy.) |
| type | Specifies the type of OIDC client being created. Allowed values are: - public - confidential For example: "type": "public"The difference between public clients and confidential clients is this: confidential clients have a client secret and public clients do not. The secret (or lack of) affects how you make an authorization request: with confidential clients you must include the client secret in the request. By comparison, you can’t include a secret with a public client because public clients don’t have client secrets. Consequently, you must use PKCE grant type (Proof Key for Code Exchange) when using a public client to make an authorization request. Public clients were originally developed for use with cell phones and other devices that don’t run on TLS networks: it’s definitely not a good idea to be passing around client secrets on a non-TLS network. However, even though TLS networks are much more secure than their non-TLS counterparts, Akamai strongly recommends that you use public clients and PKCE for all your authorization requests. Which means, in the vast majority of cases, the type property should be set to public. You should also be aware that you can’t change the client type after it has been assigned: once a public client always a public client. Yes, you can try to change the type, and your API call will run without generating an error. However, the client type won’t be changed, either. |
In case we didn’t make it clear, when creating an OIDC login client, all of the preceding properties and property values must be specified in the body parameter of your call (and in JSON format). Otherwise your API call will fail.
OK, you’re right: you can leave out the login policy. If you do that, however: 1) if you set the type to public your API call fails (because public clients must have an associated login policy); and, 2) if you set the type to confidential and leave off the login policy you’ll end up creating a configuration client instead of a login client. And confidential clients can’t be used in an authorization request.
If your API call succeeds, you’ll get back a response similar to this:
{
   "id": "5847606e-bb5b-48d9-b1ea-4fccabd5f6ae",
   "name": "Akamai Documentation Public Client",
   "redirectURIs": [
       "https://documentation.akamai.com"
   ],
   "loginPolicy": "ad2cad34-e06f-463e-a43f-b5c8af0ee965",
   "tokenPolicy": "a7f902b3-6e63-4f60-87a6-6cf5a1bc8ff4",
   "type": "public",
   "_links": {
       "self": {
           "href": "/config/e0a70b4f-1eef-4856-bcdb-f050fee66aae/clients/5847606e-bb5b-48d9-b1ea-4fccabd5f6ae"
       },
        "application_client": {
            "href": "/config/79y4mqf2rt3bxs378kw5479xdu/clients/szjprfpwkt4thw8e95x99upj67ykrswe"
        }
    }
}
If you do get a response similar to this, that means that your OIDC login client has been created. But don’t leave just yet. Notice the data highlighted in red in the API response? Before your new login client can be used you also need to configure the application client associated with the login client. The red text gives you the ID (szjprfpwkt4thw8e95x99upj67ykrswe) of that application client.
Configuring Your Application Client
Application clients help provide a seamless interaction between the brave new world of OAuth and OpenID Connect and the rest of the Identity Cloud infrastructure. For example, the application client contains the name and version number of the Identity Cloud flow used to manage user logins and registrations. The application client also provides links to the stylesheets, fonts, logos, and authorizations rules that you can use to customize the user experience.
That’s important (and necessary) information, which explains why each OIDC client used for logins and registrations must be associated with an application client. No exceptions.
Unlike OIDC login clients, application clients are instances of Identity Cloud API clients; to be a little more specific, each application client is an API client configured with the login_client feature. As such, application clients can be modified by using either Console or the Identity Cloud Configuration APIs; however, you should never use Console (or the APIs) to create or delete application clients.
Fortunately, you don’t have to worry about creating or deleting application clients: applications clients are automatically created when you create a new OIDC login client, and are automatically deleted when you delete an OIDC client.
However, you will need to manage the client settings used by your application client. By default, the following client settings are created (and configured) at the time an application client is created:
-
janrainOidcClientId. The UUID of the confidential/public client that the application client is associated with. You can’t change this value, which is for the best: if you could, and did, change it, you’d break the link between the application client and the OIDC client.
-
user_entity_type. By default, this is set to user, meaning that users of this client have their profiles stored in the user entity type. However, you can change this to any valid entity type, provided that it’s the same entity type mentioned in the login policy associated with the OIDC client. In other words, the entity type referenced in the login policy must be the same entity type referenced in the application client.
-
password_recover_url. The base URL used when generating a password reset link. For an OpenID Connect implementation, use the following format to construct your password recover URL:
{base_url}/{CustomerID}/auth-ui/reset-password?client_id={OIDC client_id}
For example, suppose your base URL ishttps://v1.api.us.janrain.com, your customer ID number is 01000000-0000-3000-9000-000000000000, and your confidential/public client ID is 07e4b6e4-4a6f-4825-94fe-8a7bc57196c1. In that case, the password_recover_url should be set to this:https://v1.api.us.janrain.com/01000000-0000-3000-9000-000000000000/auth-ui/reset-password?client_id=07e4b6e4-4a6f-4825-94fe-8a7bc57196c1If this value isn’t configured users won’t be able to reset a forgotten password.
-
verify_email_url. The base URL used when generating an email verification link. For an OpenID Connect implementation, use the following format to construct your email verification URL:
*{base_url}/{CustomerID}/auth-ui/verify-account?client_id={OIDC client_id}**
For example, suppose your base URL is
https://v1.api.us.janrain.com, your customer ID number is 01000000-0000-3000-9000-000000000000, and your confidential/public client ID is 07e4b6e4-4a6f-4825-94fe-8a7bc57196c1. In that case, the verify_email_url should be set to this:https://v1.api.us.janrain.com/01000000-0000-3000-9000-000000000000/auth-ui/verify-account?client_id=07e4b6e4-4a6f-4825-94fe-8a7bc57196c1If this value is not configured users won’t be able to verify their email addresses, which also means that your Hosted Login sign-in screen will never be displayed.
In addition, you need to add the following settings to your application client:
-
default_flow_name. Name of the flow to be used with the login/registration process. For example:
"default_flow_name": "hostedLogin"If your application client doesn’t specify a flow name then your authorization request will fail.
-
default_flow_version. Version number of the flow used with the login/registration process. For example:
"default_flow_version": "20190720205552725054"If you’d prefer to always use the latest version of a flow, set default_flow_version to HEAD:
1"default_flow_version": "HEAD"1
The advantage of using HEAD is that you never need to change the flow version; if you update the flow the application client will automatically use the latest version. However, that’s also the disadvantage of using HEAD: if you modify the flow and there turns out to be a problem with that version, the application client (and, by extension, Hosted Login) will still use the latest version, problems or no problems. As a general rule, HEAD is good for testing and development scenarios, and not so good for production scenarios. Just remember that, every time you change the flow, you’ll need to update this setting.
Because application clients are API clients, settings can be managed either by using Console or by using the /config/{appId}/clients/{clientId}/settings API operation. If you decide to use the /settings operation to manage application client settings (add new settings, modify or delete old settings) keep in mind that each time you call the PUT method you must include all the settings that need to be in the application client. For example, suppose your application client settings look like this:
{
   "password_recover_url": "https://v1.api.us.janrain.com/e0a70b4f-1eef-4856-bcdb-f050fee66aae/auth-ui/reset-password?client_id=5847606e-bb5b-48d9-b1ea-4fccabd5f6ae",
   "_global": {
       "email_sender_address": "\"Identity Cloud Documentation\" <noreply@janrain.com>",
       "rpx_server": "https://rpxnow.com",
       "_self": "/config/79y4mqf2rt3bxs378kw5479xdu/settings",
       "email_method": "ses_sync",
       "custom": {}
   },
   "site_name": "Akamai Documentation Public Client",
  "_self": "/config/79y4mqf2rt3bxs378kw5479xdu/clients/szjprfpwkt4thw8e95x99upj67ykrswe/settings",
   "verify_email_url": "https://v1.api.us.janrain.com/e0a70b4f-1eef-4856-bcdb-f050fee66aae/auth-ui/verify-account?client_id=5847606e-bb5b-48d9-b1ea-4fccabd5f6ae",
   "custom": {
       "janrainOidcClientId": "5847606e-bb5b-48d9-b1ea-4fccabd5f6ae"
   },
   "user_entity_type": "GREG_DEMO"
}
You now decide to add the default_flow_name and the default_flow_version. With that in mind, you make an API call that – as far as you know – adds those two settings to the client:
curl -X PUT \ 'https://v1.api.us.janrain.com/config/79y4mqf2rt3bxs378kw5479xdu/flows/testFlow/links/linkHelp' \
  --header 'Content-Type: application/json' \
  --header 'Authorization: Basic eTR4Zmc2ZjQ0bXNhYzN2ZXBqanZ4Z2d6dnQzZTNzazk6OTVjY3hrN2N6YnZ1eng2ZHB0ZTVrOXA2ZGo1Ynpla3U=' \
  --data-raw '{
   "default_flow_name": "standard",
   "default_flow_version": "HEAD"
}'
Here’s what your API client settings look like after you make that API call:
{
    "default_flow_name": "standard",
   "_self": "/config/79y4mqf2rt3bxs378kw5479xdu/clients/szjprfpwkt4thw8e95x99upj67ykrswe/settings",
   "default_flow_version": "HEAD",
    "_global": {
        "email_method": "ses_sync",
        "_self": "/config/79y4mqf2rt3bxs378kw5479xdu/settings",
        "email_sender_address": "\"Identity Cloud Documentation\" <noreply@janrain.com>",
        "rpx_server": "https://rpxnow.com",
        "custom": {}
    },
    "custom": {
        "janrainOidcClientId": "5847606e-bb5b-48d9-b1ea-4fccabd5f6ae"<
    }
}
If you look closely, you’ll see that default_flow_name and default_flow_version were both added to the client settings; the client settings also retain all the global settings (i.e., values set at the application level) and any custom settings. But your other settings – including password_recover_url, site_name, verify_email_url, and user_entity_type – are gone. What happened here?
What happened is that none of those settings were included in your API call; consequently, they were removed from the application client. That’s because the PUT command functions more like a replace command: it replaces all the existing settings with the settings found in the body parameter of this call. And that’s exactly what happened.
The global settings survived because they can only be changed at the application level. And your custom setting – janrainOidcClientId – didn’t get deleted because you can’t delete that setting.
To ensure that all your existing settings are retained, your body parameter should look like this:
{
    "default_flow_name": "standard",
    "default_flow_version": "HEAD",
    "password_recover_url": "https://v1.api.us.janrain.com/e0a70b4f-1eef-4856-bcdb-f050fee66aae/auth-ui/reset-password?client_id=5847606e-bb5b-48d9-b1ea-4fccabd5f6ae",
   "_global": {
       "email_sender_address": "\"Identity Cloud Documentation\" <noreply@janrain.com>",
       "rpx_server": "https://rpxnow.com",
       "_self": "/config/79y4mqf2rt3bxs378kw5479xdu/settings",
       "email_method": "ses_sync",
       "custom": {}
   },
   "site_name": "Akamai Documentation Public Client",
   "_self": "/config/79y4mqf2rt3bxs378kw5479xdu/clients/szjprfpwkt4thw8e95x99upj67ykrswe/settings",
   "verify_email_url": "https://v1.api.us.janrain.com/e0a70b4f-1eef-4856-bcdb-f050fee66aae/auth-ui/verify-account?client_id=5847606e-bb5b-48d9-b1ea-4fccabd5f6ae",
  "custom": {
       "janrainOidcClientId": "5847606e-bb5b-48d9-b1ea-4fccabd5f6ae"
   },
   "user_entity_type": "GREG_DEMO"
}
Our recommendation for using the Configuration APIs to modify client settings? Use the GET method to return the current collection of settings, and paste that information into the body parameter of your PUT call. And then add or modify any settings as needed before actually making your API call.
Of course, an even better recommendation might be to use Console to manage your client settings. For example, to add the default_flow_name setting to your application client, complete the following procedure in Console:
-
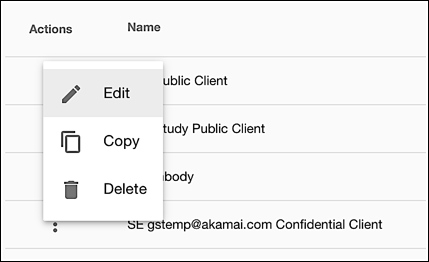
Click Manage Properties, click the Actions icon located next to the application client, and then click Edit:

-
On the Edit Property page, scroll to the bottom of the page and then click Edit Settings:

-
On the Edit Settings page, click the Add Setting icon:

-
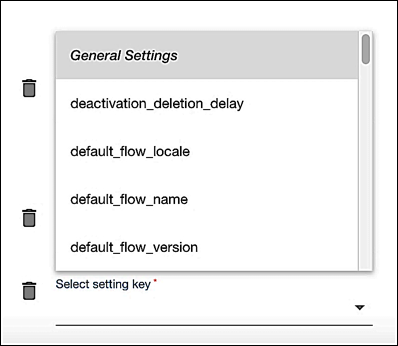
Click Select setting key field, and then select default_flow_name:

-
Type the name of your flow in the Value field and then click the Save Setting icon:

By the way, the settings we mentioned in this documentation are mandatory, but there are other settings that can be added to an application client that are extremely good to know about. See the article Application and API client settings for more information.
Updated about 2 years ago
