Return standard and custom claims
Providing ready access to user information is one of the strengths of the Akamai Identity Cloud; after all, there’s no point in collecting and storing user profile data if you can’t easily access that data and then use it to provide a better user experience. Perhaps the most notable way to return user data in Hosted Login is to specify one or more OpenID Connect (OIDC) scopes in your authentication requests. Scopes are a very useful tool, and they might provide everything your organization needs. And if they don’t? Well, in that case, there’s always standard claims and custom claims.
Returning Standard Claims
https://v1.api.us.janrain.com/e0a70b4f-1eef-4856-bcdb-f050fee66aae/login/authorize
   ?client_id=a123ef65-83dc-4094-a09a-76e1bec424e7
   &redirect_uri= https://oidc-playground.akamai.com/redirect_uri
   &scope=openid
   &code_challenge=GzHiKiXIUjDcqde3_xnWhKX53nCOltaSjshatyp3Y5U
   &code_challenge_method=S256
   &response_type=code
  &claims={"userinfo":{"updated_at":null,"email":null},"id_token": {"updated_at":null,"email":null}}
   &state=1qyUlIGIUCqA-M5oF1-basbqfqeoIJuPOq_AtdP_14I
Scopes are shortcut ways to return user information following a successful login; this information is then accessible from the userinfo endpoint. Scopes are actually collections of user data: each scope is composed of multiple claims, with each claim representing a single piece of user information (given_name is a claim that returns the user’s first name, family_name is a claim that returns the user’s last name, etc.).
User information like this is typically returned by using scopes simply because scopes are more convenient. For example, the profile scope returns the following claims for a user:
- name
- family_name
- given_name
- middle_name
- nickname
- preferred_username
- gender
- birthdate
- updated_at
By requesting the profile scope you save yourself the trouble of having to ask for the name claim, and the family_name claim, and the given_name claim, and the ….
But what if you don’t want all those claims, what if you only want the given_name claim or the birthdate claim? Well, there’s not a lot you can do about that, at least not with the scope parameter: scopes are pretty much all-or-nothing propositions.
But that’s not really a problem, thanks to the OIDC claims parameter. With this parameter, you can specify an individual claim (or set of claims) as part of your authentication request. That way you can return only the given_name claim or the birthdate claim. Or both. And, as a bonus, you can store this information in the identity token as well as (or instead of) making it accessible from the userinfo endpoint.
To show you how this works, let’s take a look at the Identity Cloud’s OpenID Connect Playground. The fourth section in the Playground is titled Configure additional claims, and looks like this:

If you expand Standard Claims, you’ll see all the standard OIDC claims that can be included in your authorization request:
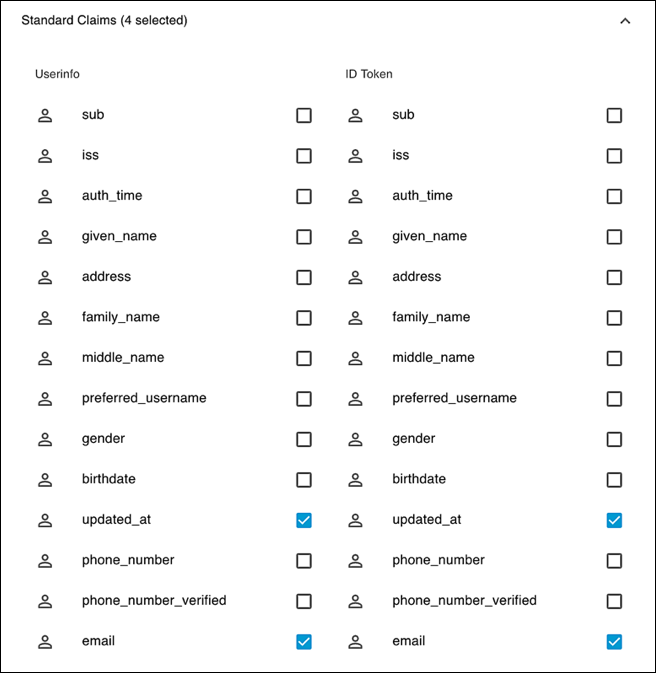
As you can see, there are actually two columns in this section, one labeled Userinfo and the other labeled ID Token. This enables you to select a claim and indicate whether you want that claim available the userinfo endpoint (the first column), added to the identity token (the second column), or both. In the preceding screenshot, we’ve opted to add the updated_at claim and the email claim to both the userinfo endpoint and the identity token.
That’s really all there is to it. Select the claims you want returned, then click Finish:

When you do that, your selected claims are added to your authorization request, and you’ll be ready to launch the authentication process:
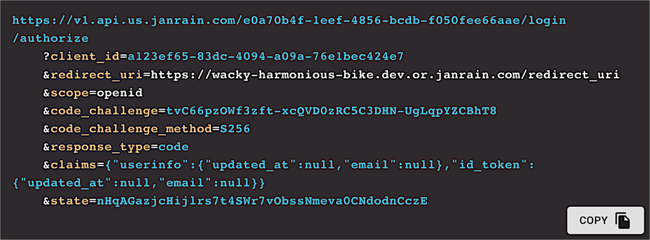
As you can see, the value assigned to the claims parameter is a JSON (JavaScript Object Notation) construct that, when expanded out, looks like this:
{
    "userinfo": {
         "updated_at": null,
         "email": null
    },
    "id_token": {
         "updated_at": null,
         "email": null
    }
}
If you’re wondering how to interpret this, the JSON consists of two name/value pairs: userinfo and id_token. (And yes, you’re way ahead of us: those are the two locations that returned claims can be directed to.) Both userinfo and id_token also contain two name/value pairs: updated_at and email. For example:
"updated_at": null
The name updated_at is simply the name of the claim we want returned. If we wanted to return the gender claim, we’d use a name/value pair like this:
"gender": null
And what does the null mean? Well, as it turns out, there are different ways that claims can be returned when using OIDC. “Null” simply means that we want to use the default method: return the actual value of the underlying user profile attribute.
So what did all that effort gain us? Well, you’ll be able to see the fruits of your labors after making a successful authorization request. If you look at the returned identity token, you’ll see both the email claim and the updated_at claim:
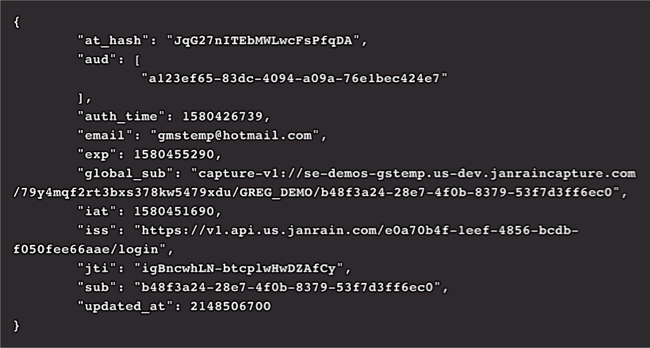
The same thing is true if you make a call to the userinfo endpoint:

We suppose that could have been easier, but we aren’t really sure how.
Returning Custom Claims
https://v1.api.us.janrain.com/e0a70b4f-1eef-4856-bcdb-f050fee66aae/login/authorize
   ?client_id=a123ef65-83dc-4094-a09a-76e1bec424e7
   &redirect_uri= https://oidc-playground.akamai.com/redirect_uri
   &scope=openid
   &code_challenge=GzHiKiXIUjDcqde3_xnWhKX53nCOltaSjshatyp3Y5U
   &code_challenge_method=S256
   &response_type=code
   &claims={"userinfo":{"organization":null},"id_token": {"organization":null}}
   &state=1qyUlIGIUCqA-M5oF1-basbqfqeoIJuPOq_AtdP_14I
Standard claims are remarkably easy to use: as long as you know the name of the claim (e.g., phone_number) you have everything you need to return that claim. It’s not exactly rocket science, which is a good thing.
In fact, the only real problem with standard claims is that there aren’t very many of them: although a typical user profile contains scores of attributes (including custom attributes that you might have added to your profiles), there are only a handful of standard claims. For example, suppose you’d like to return the organization that a user is associated with (that is, information stored in the primaryAddress.company attribute). That’s a problem: OIDC doesn’t include a claim that returns that information. Bummer.
But don’t despair: OIDC does enable you to create custom claims, claims that can return pretty much any attribute value found in your user profiles. It’ll take a tiny bit more effort to create that custom claim, but you will be able to create it. And to retrieve the desired information.
Before we launch into the creation process we should note that, when you make an authentication request, custom claims use the same parameter (claims) and the same syntax as a standard claim does:
claims={"userinfo":{"organization":null},"id_token": {"organization":null}}
So then what’s the difference between a standard claim and a custom claim? Or is there a difference?
As it turns out, yes, there is a difference. When we requested a standard claim, we just added the claims parameter and Hosted Login dutifully returned the requested claim:
claims={"userinfo":{"email":null},"id_token": {"email":null}}
But that only works because Hosted Login (and OIDC) already know what the email claim means: return the user’s email address. If we use a custom claim, like organization, well, Hosted Login has no idea what it’s supposed to return. Consequently, it simply ignores that claim and continues to process the rest of the authentication request.
In other words, Hosted Login doesn’t know that, when we ask for the organization claim, we’d like to get back the value of the user’s primaryAddress.company attribute. Needless to say, Hosted Login has no way of knowing that unless we specifically tell it, “Hey, when you see the organization claim, please return the primaryAddress.company attribute.”
So how do we tell Hosted Login all this? It’s surprisingly simple: all we have to do is define our custom claim (or claims) as part of the login policy associated with our OIDC client. For example, to define a custom claim (organization) that returns the primaryAddress.company attribute value to both the userinfo endpoint and the identity token, we need to add these lines to our login policy:
"customClaims": {
   "userinfo": {
       "organization": "primaryAddress.company"
   },
   "id_token": {
       "organization": "primaryAddress.company"
   }
},
As you can see, we add a customClaims property that consists of two values: userinfo (for making data accessible from the userinfo endpoint) and id_token (for storing data in the identity token). Each of these values is assigned another name/value pair:
"organization": "primaryAddress.company"
That’s our claim right there: a custom claim named organization that returns the value of the primaryAddress.company attribute. Now we can use the claims parameter and specify the organization claim:
claims={"userinfo":{"organization":null},"id_token": {"organization":null}}
Incidentally, here’s what the complete API call for updating our login policy looks like:
curl -X PUT \
  'https://v1.api.us.janrain.com/e0a70b4f-1eef-4856-bcdb-f050fee66aae/config/loginPolicies/ad2cad34-e06f-463e-a43f-b5c8af0ee965' \
  --header 'Content-Type: application/json' \
  --header 'Authorization: Bearer puvKhiFKPa7nQvS7GP8Q0B1launuL_MV-f8irh3FGMNcjTUu6AuTdo--IM2Eoctd' \
  --data-raw '{
    "id": "ad2cad34-e06f-463e-a43f-b5c8af0ee965",
    "identityStoreDetails": {
        "type": "janrainCapture",
        "connectionDetails": {
            "domain": "se-demos-gstemp.us-dev.janraincapture.com",
            "applicationId": "79y4mqf2rt3bxs378kw5479xdu",
            "entityType": "GREG_DEMO",
            "clientId": "y4xfg6f44msac3vepjjvxggzvt3e3sk9",
            "clientSecret": "95ccxk7czbvuzx6dpte5k9p6dj5bzeku"
        }
    },
    "loginURL": "https://v1.api.us.janrain.com/e0a70b4f-1eef-4856-bcdb-f050fee66aae/auth-ui/login",
    "title": "GREG_DEMO Login Policy",
  "customClaims": {
    "id_token": {
      "organization" : "primaryAddress.company"
    },
    "userinfo": {
      "organization" : "primaryAddress.company"
    }
  }
}'
This also means that, if we go back to the OpenID Connect Playground, we can now expand the Configure additional claims section, expand the Custom Claims section, then type the name of our newly-created claim in the Claim Name field:
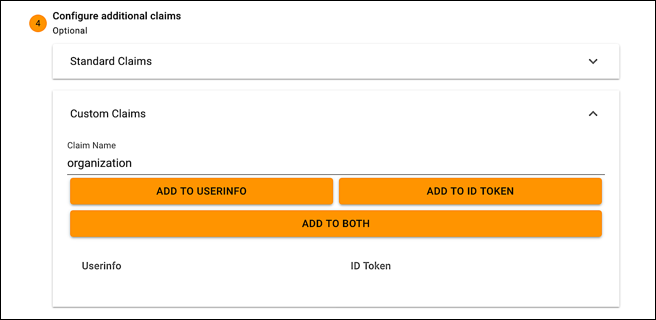
Click the appropriate button to add the custom claim to userinfo or the identity token (or both), and the claims parameter will be added to the authentication request:
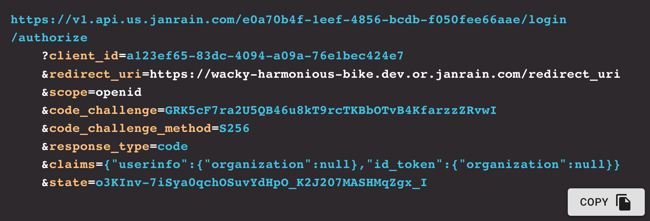
We know the suspense is killing you, so let’s see what happens after we make our authentication request. For one thing, the organization claim does appear in the identity token:
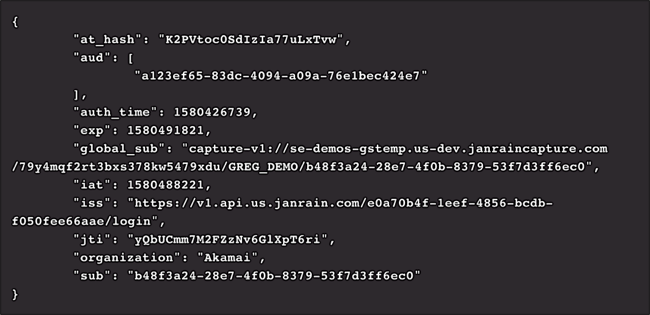
And if we make a call to the userinfo endpoint, we’ll see the organization claim there as well:

In other words, what happened after we make our authentication request? Everything we hoped would happen.
Updated almost 3 years ago
