Create a Hosted Login link
In a separate article, we show how you cab direct a link (as defined in your Hosted Login flow) to a specific URL. For example, by default the Visit our help center link on the sign-in screen simply opens up a another copy of the sign-in screen in a second tab or second window:

That’s … interesting …. but probably not all that helpful to your users. With that in mind, we showed you how you can point that same Visit our help center link to something a little more useful:

That’s more like it: now you can take your existing Hosted Login links (for your help center, privacy policy, and terms of service) and point them in a better direction.
Of course, you might be thinking, “Hmmn, it’s great that I can redirect my existing links, but is there any way that I can create my own links and then put those links on a Hosted Login screen?” And the answer to that is: yes. There are a few limitations, and the process is a tiny bit convoluted (just a tiny bit, mind you) but, yes, you can add custom links to your Hosted Login screens. And here’s how you do that:
- Create a translation key to serve as the text for the link (e.g., Visit our help center). You can change this text later on, but you can’t create a link without including a translation key.
- Create the new link.
- Add the new link to one or more Hosted Login forms.
In the next few sections of this documentation, we’ll walk you through each of these steps.
Step 1: Create a Translation
Links are of a little use unless you have some text to click on; that’s why Step 1 in this process involves creating a translation that contains the link text. That’s something easily done by using the /config/{app}/flows/{flow}/translations operation and the POST method:
curl -X POST \
  'https://v1.api.us.janrain.com/config/79y4mqf2rt3bxs378kw5479xdu/flows/testFlow/translations' \
  -H 'Content-Type: application/json' \
  -H 'Authorization: Basic eTR4Zmc2ZjQ0bXNhYzN2ZXBqanZ4Z2d6dnQzZTNzazk6OTVjY3hrN2N6YnZ1eng2ZHB0ZTVrOXA2ZGo1Ynpla3U=' \
--data-raw '[
	{
    "values": {
      "en-US": "This is a test link."
    }
}
]'Instead of creating a new translation, couldn’t you just use an existing translation? Well, in theory, yes. But there are at least two problems with that approach. First, you might have difficulty finding an existing translation that fits your needs: the default Identity Cloud translations tend to fill very specific needs.
Second, what happens if, sometime down the road, you (or someone else) changes the text of that translation? Well, here’s one thing that will happen: the text of your link will also change. Whether that’s a good thing or a bad thing is hard to say. But don’t bet against it being a bad thing.
Incidentally, in the preceding API call we only created a translation for US English:
"values": {
      "en-US": "This is a test link."
    }
That’s because en-US is the only locale we have for our Hosted Login test flow. But there’s nothing to stop you from including multiple languages in your API call:
"values": {
      "en-US": "This is a test link.",
      "it-IT": "Questo è un link di prova.",
      "fr-FR": "Ceci est un lien de test."
    }
If your API call succeeds, you’ll get back a response similar to this:
{
    "translations": [
        {
            "key": "85ae9bc6-6645-4aae-bb67-3fb028bf2f7c",
            "path": "",
            "values": {
                "en-US": "This is a test link."
            },
            "_self": "/config/79y4mqf2rt3bxs378kw5479xdu/flows/testFlow/translations/85ae9bc6-6645-4aae-bb67-3fb028bf2f7c"
        }
    ],
    "_self": "/config/79y4mqf2rt3bxs378kw5479xdu/flows/testFlow/translations"
}
For the moment, at least, the only part we care about is the value assigned to our new translation (i.e., the translation key).
Step 2: Create a Link
As soon as we have the translation key, we can create a new link by using the POST method and the /config/{app}/flows/{flow}/links operation:
curl -X POST \
  'https://v1.api.us.janrain.com/config/79y4mqf2rt3bxs378kw5479xdu/flows/testFlow/links' \
  -H 'Content-Type: application/json' \
  -H 'Authorization: Basic eTR4Zmc2ZjQ0bXNhYzN2ZXBqanZ4Z2d6dnQzZTNzazk6OTVjY3hrN2N6YnZ1eng2ZHB0ZTVrOXA2ZGo1Ynpla3U=' \
  -d '{
    "name": "testLink",
    "elementHref": "https://techdocs.akamai.com/identity-cloud",
    "target": "_blank",
    "elementText": {
    	"key": "85ae9bc6-6645-4aae-bb67-3fb028bf2f7c"
    }
}'
The four members included in the request body are summarized in the following table:
| Member | Value | Description |
|---|---|---|
| name | testLink | Name of the new link. Note that link names must be unique within a flow. |
| elementHref | https://techdocs.akamai.com/identity-cloud | URL of the page to be opened when the link is clicked. |
| target | _blank | HTML target value that specifies how the referenced page should be opened. It’s recommended that target always be set to _blank; that causes the referenced page to open in either a new window or a new browser tab (depending on how the user’s browser has been configured. If this member is not included then the target defaults to **_blank**. |
| elementText | {"key": "85ae9bc6-6645-4aae-bb67-3fb028bf2f7c"} | JSON-formatted name/value pair that points to the translation key created in Step 1. Note that the key-value pair must be enclosed in curly braces:
|
If your API call succeeds you’ll get back a response similar to this:
{
"elementHref": "https://techdocs.akamai.com/identity-cloud",
"elementText": {
"key": "85ae9bc6-6645-4aae-bb67-3fb028bf2f7c",
"path": "fields.testLink.elementText",
"values": {
"en-US": "This is a test link.",
"fr-CA": "",
"he": "",
"it-IT": ""
},
"_self": "/config/79y4mqf2rt3bxs378kw5479xdu/flows/testFlow/translations/85ae9bc6-6645-4aae-bb67-3fb028bf2f7c"
},
"name": "testLink",
"_self": "/config/79y4mqf2rt3bxs378kw5479xdu/flows/testFlow/links/testLink"
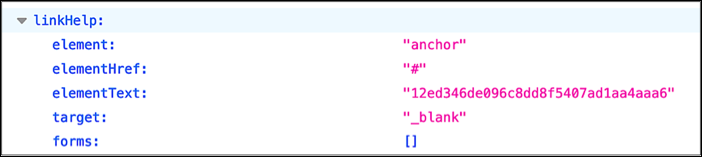
}As you can see, we now have a new link named testLink.
Step 3: Add Your Link to a Form
As we’ve noted elsewhere, links are actually a type of field; if you look in the fields section of the flow, you’ll see all your links stashed there:
For our purposes, that’s a good thing; after all, fields can be added to your forms, and forms can be added to screens. That’s how we can display our link on a Hosted Login screen: we simply need to add that link to a form that also gets displayed on a Hosted Login screen.
For this exercise, we’re going to add our link to the bottom of the signInForm form, a form that’s displayed on the Hosted Login sign-in screen. Here’s a Curl command that does just that:
curl -X PUT \
  'https://v1.api.us.janrain.com/config/79y4mqf2rt3bxs378kw5479xdu/flows/testFlow/forms/signInForm' \
  -H 'Content-Type: application/json' \
  -H 'Authorization: Basic eTR4Zmc2ZjQ0bXNhYzN2ZXBqanZ4Z2d6dnQzZTNzazk6OTVjY3hrN2N6YnZ1eng2ZHB0ZTVrOXA2ZGo1Ynpla3U=' \
  -d '{
    "action": "traditionalSignin",
    "fields": [
        {
            "name": "signInEmailAddress",
            "required": true
        },
        {
            "name": "currentPassword",
            "required": true
        },
        {
        	"name": "testLink",
        	"required": true
        }
    ],
    "next": null,
    "validation": [
        {
            "rule": "requireAuthFields",
            "message": "afeba216c561f421e6e19e6cfed3acd8"
        },
        {
            "rule": "invalidPassword",
            "message": "6f5f053294e79a8f303990b3c51e0163"
        },
        {
            "rule": "rateLimitExceeded",
            "message": "8d4293234c693c2a24ca5e2e7b5013c6"
        }
    ]
}'
And we know: that looks like a pretty lengthy command, especially when you consider the fact that it only takes a few lines to add the link. So then what’s all that other stuff for? Well, like most Identity Cloud Configuration APIs, the /config/{app}/flows/{flow}/forms/{form} operation requires you to include all the properties and all the property values in a form any time you call the PUT method: that’s because the PUT method replaces all the form’s existing properties and property values with the properties and property value’s specified in the request body. To give you a simplistic example of what that means, suppose a form had these four properties:
- A
- B
- C
- D
You now use the PUT method to add property E, but you don’t include the current four properties in that API call. So what properties will our hypothetical form end up with? That’s right, it ends up with the only property that was actually in the API call:
- E
The best way to handle this? Start by using the GET method to return all the properties and property values of the form, then paste that data into the request body of the PUT call. After you’ve done that, add your new field, make any other changes you might need to make, and then make the PUT call.
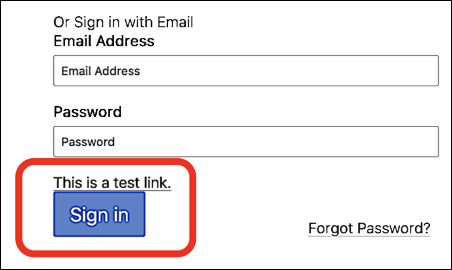
So now what happens? Well, now that we’ve added the link to the signInForm form, let’s bring up the sign-in screen and take a look:

Success!
Stylizing Your Links
As we just saw, it is possible to create your own links; it’s even possible to add those links to one of your Hosted Login screens (something you do by adding that link to a form). But while this works remarkably well, the aesthetics might leave something to be desired. For example, the link we just added works great, but it partly lies on top of the Sign in button, and can be a little difficult to see, and to use (it’s easy to click Sign in instead of clicking the link):
So is there a way to work around this issue? As a matter of fact, there is. You don’t necessarily have a ton of options here, but there are a few things you can do to improve the look and feel of your new link.
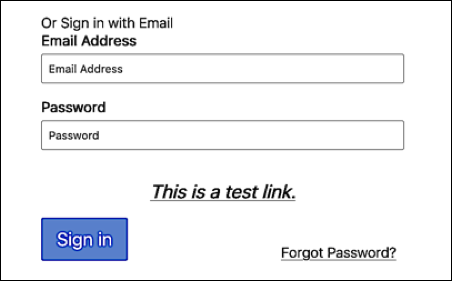
To begin with, you can use standard HTML tags when defining your translation text. By default, your translation is just a piece of normal text. But suppose we style our translation as an HTML heading; for example, suppose we use the following syntax when defining the key value:
"en-US": "<h2>This is a test link. </h2"And here's what the updated screen looks like:

That’s definitely an improvement: the text is bigger and easier to read, and there’s a little bit of space between the link and the Sign in button.
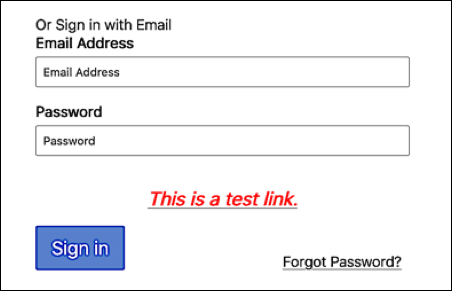
And we can get even fancier if we want to. For example, this syntax not only configures the link as an H2 heading, but it also puts the link text into italics (em) and centers the text:
"en-US": "<center><h2><em>This is a test link.</em></h2></center>"That’s going to result in a link that looks like this:
But wait: there’s more. If you’re familiar with CSS, well, then you can really have some fun. For example, this syntax takes our previous link and colors the text red:
"en-US": "<center><h2 style='color:red'><em>This is a test link.</em></h2></center>"Now our link looks like this:
There’s probably even more we could do with this, but this seems like the sort of thing that might be more fun to try on your own.
Updated 3 months ago