Create a data migration datafile
To carry out a data migration, you must export your legacy data to a comma-separated values (CSV) file; all the user information that you want to copy to the Identity Cloud user profile store must be contained within that file. That sounds easy and, for the most part, it is easy. But that doesn’t mean that there aren’t a few rules and regulations you must adhere to when creating your CSV file. For example:
-
The file must be UTF-8 encoded.
-
The first row of data must be a header row, and must contain the names of the Akamai schema attributes that the underlying data is mapped to. (Again, these are the Akamai attribute names, not your legacy field names.)
-
Fields must be delimited (separated) by using commas.
-
Fields containing commas or line breaks must be enclosed in double quotes. And, sometimes, double quotes must also be enclosed in double quotes. (Don’t worry: we’ll explain what that means momentarily.)
-
Boolean data must be represented as true or false, although this is case insensitive: values such as True or False are acceptable.
-
Datetime values must be represented using the following format: yyyy-mm-dd hh:mm:ss (Year-Month-Day Hours:Minutes:Seconds, with the time expressed using the 24-hour clock format). For example:
2019-01-02 11:14:22
In the following sections, we’ll discuss these requirements in more detail.
UTF-8 encoding
UTF-8 is a way of representing all 1,112,064 “code points” in the Unicode character system. For our purposes, assume that each code point represents a single character, like a w or a 5 or a $. If your legacy system offers different ways to encode an exported text file, make sure you select UTF-8:

Header row
The first row in your datafile must be a header row, and must contain the names of the schema attributes that the underlying data is mapped to. For example, if the initial item in a record is the user’s first name, and if that item is mapped to the givenName attribute, then the first item in the header row must also be givenName. For example:
givenName,familyName,displayName,birthdayTwo things to keep in mind here. First, letter casing is very important when dealing with schema attributes. givenName is the only way to refer to the aforementioned attribute; using a name like GivenName, givenname, or GIVENNAME will cause your command to fail. That’s because, technically speaking, there is no attribute named GivenName. If you use an attribute name like givenname, no records will be imported, and your error log will be filled with error messages telling you that there is no such attribute:
batch,line,error
1,2,attribute does not exist: /givenname
1,3,attribute does not exist: /givenname
1,4,attribute does not exist: /givenname
Second, you must use “dot notation” when referencing object attributes. For example, to reference the city that the user lives in, use the syntax primaryAddress.city, with the dot (.) separating the object name (primaryAddress) and the attribute name (city). Again, make sure that the letter casing is correct. If you are unsure about the spelling/letter casing for an attribute, go to the Manage****Schemaspage in the Console and verify the attribute names for yourself:
Field delimiters
Fields must be delimited (separated) by using commas. This syntax is correct:
givenName,familyName,primaryAddress.city
Bob,Jones,Portland
The following syntax, which uses the tab as a delimiter, is not correct and will cause the import command to fail:
givenName    familyName     primaryAddress.city
Bob              Jones              Portland
Oh, and don’t leave a blank space between the comma and the start of the next value. Do this:
Bob,Jones,PortlandDon’t do this:
Bob,Jones, PortlandWhy not? Well, if a field starts with a blank space the resulting attribute value will also contain a leading blank space. In the preceding example, the user would live in _Portland (with the underscore representing a blank space) and not in Portland (no blank space).
Values containing commas or line breaks
Field values containing commas or line breaks must be enclosed in double quotes. For example:
givenName,familyName,displayName
Bob,Jones,"Bob Jones, Sr."
“Standalone” double quotes can be included in the datafile as-is. For example, suppose you have a user with the following display name:
Bob "Skippy" Jones
That name is rendered like this:
displayName
Bob "Skippy" JonesBlank spaces are fine; you don’t need to worry about them. You only have to worry about commas and line breaks.
However, if you have a nested set of double quotes, those quotes must be “escaped” using a second set of quote marks. For example, supposed you have a JSON object similar to this:
"[{"identifier": "https://www.google.com/profiles/112548009676889564286", "domain": "google.com"}]"In the datafile, that entire JSON object must be enclosed in a set of double quotes. In turn, then, each embedded set of double quotes must be escaped. That results in the following value in the datafile:
"[{""identifier"": ""https://www.google.com/profiles/112548009676889564286"", ""domain"": ""google.com""}]"Boolean data
Boolean data must be represented as true or false (although this is case insensitive: values such as True or False are also acceptable) For example:
givenName,familyName,isSubscriber
Bob,Jones,true
Kareem,Nafir,False
If your legacy data system stores Boolean data in a different way (for example, as yes/no or 1/0 instead of true/false), you can use a data transformation to convert the legacy data to the valid format. With the proper transformation in place your datafile could look like this:
givenName,familyName,isSubscriber
Bob,Jones,yes
Karim,Nafir,no
Datetime values
Datetime values must be represented using the following format: yyyy-mm-dd hh:mm:ss (Year-Month-Day Hours:Minutes:Seconds, with the time expressed using the 24-hour clock format)
For example:
givenName,familyName,subscriptionDate
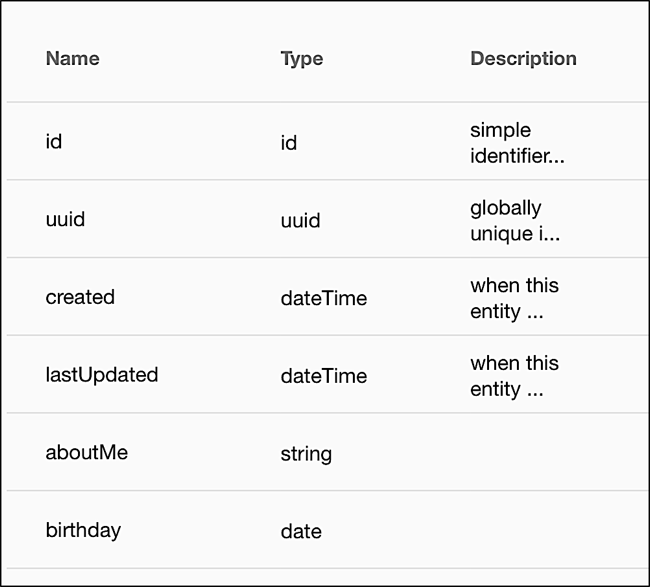
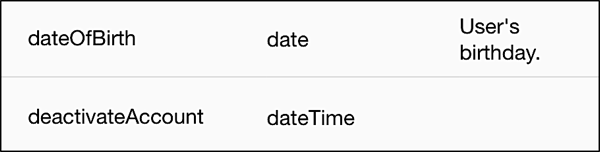
Bob,Jones,2018-12-19 22:04:00Having said that, there are a few caveats that accompany the use of dates and datetime values. First, Akamai schemas recognize two different date types: date values (which store only the year, month, and day) and datetime values, which also store the time of day. The schema tells you which date type is used by an attribute:
When it comes to data migration, these two data types are largely interchangeable. For example, suppose you enter a birthday using the full dateTime datatype:
givenName,familyName,birthday
Bob,Jones,1989-12-19 22:04:00
Is that a problem? No. In that case, the time of day (22:04:00) will be stripped off and only the date (12/19/1989) is stored:

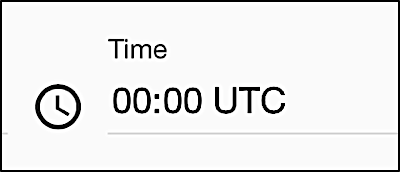
Likewise, suppose you leave off the time when working with a dateTime attribute:
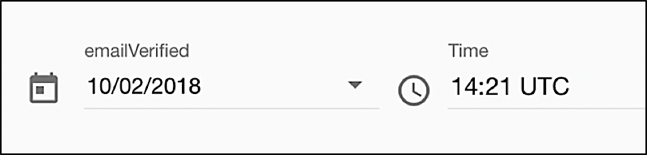
givenName,familyName,emailVerified
Bob,Jones,2018-12-19
Again, that’s fine. In a case like that, the time is set to 00:00:
The UTC shown in the preceding illustrations is short for Coordinated Universal Time (formerly known as Greenwich Mean Time) and is based on your distance from the Prime Meridian in Greenwich, England. For example, Portland, OR is 8 hours behind Greenwich Mean Time; that means that 10:00 AM Portland time is equivalent to 6:00 PM (18:00) UTC time.
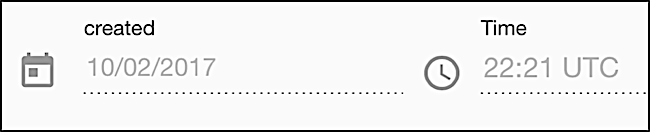
Does that matter to you when doing a data migration? It might. For example, suppose that, on December 14th you do a data migration at 9:01 AM Pacific Time,. Let’s further suppose that the value of one of the fields being migrated – emailVerified– was set to the same date and time: 9:01 AM on December 14th. After you do the migration, the created attribute (which is automatically filled in at the time a new user profile is created) is set to UTC time:
However, the datetime value hard-coded into your datafile does not get converted into UTC time. As a result, the date and time look like this:
We thus have a situation in which this user’s email address was verified 8 hours before his or her account was even created!
Admittedly, that’s not the worst thing that could ever happen, and there’s a good chance that it doesn’t matter that much to you. If it does matter to you, however, then you’ll need to convert your datetime values to UTC times before migrating the datafile. (And yes, that’s something a data transformation can do: in the case of Portland, you’d simply have to add 8 hours to every datetime value.)
Here’s another thing to keep in mind when it comes to working with dates. As we noted, date values (for things like birthdays) are stored in user profiles using the yyyy-mm-dd format:
givenName,familyName,birthday
Bob,Jones,2018-12-19
And yet, even though the preceding datafile is correctly formatted, here’s what happens when you run dataload.py:
File "/Users/greg/test/transformations.py", line 38, in transform\_date
raise ValueError("Could not parse date: {}".format(value))
ValueError: Could not parse date:  2018-12-19
What in the --
As it turns out, there’s a simple reason for this error, as well as a simple way to fix the problem. By default, dataload uses a data transform to convert birthdays to the proper format; this transform assumes that those birthdays have been entered like this: 12/19/1989. Because of that, the script tries to pull the pieces out of the date you entered and move them around to what it thinks is the correct date: 19-2018-12. However, that’s not a valid date, and the script fails.
So how do you fix this? Like we said, that’s easy. Just open dataload.py and look for these lines of code:
reader.add_transformation("password", transform_password)
reader.add_transformation("birthday", transform_date)
reader.add_transformation("profiles", transform_plural)
To keep the script from transforming birthdays, place a hashtag in front of the birthday line:
reader.add_transformation("password", transform_password)
#reader.add_transformation("birthday", transform_date)
reader.add_transformation("profiles", transform_plural)
That “comments out” the line and prevents dataload.py from applying the transformation to the birthday attribute. If you change your mind later on (perhaps because you exported birthdays using a different format), just remove the hashtag
reader.add_transformation("password", transform_password)
reader.add_transformation("birthday", transform_date)
reader.add_transformation("profiles", transform_plural)
And don’t worry: we explain this in more detail when we talk about data transformations.
When you’re finished, you should have a datafile that looks something like this (although, admittedly, this is a very simple example):
givenName,familyName,email,primaryAddress.phone,birthday
Marie,Fuentes,maria.fuentes.13@yahoo.com,503-555-0101,1960-10-18
Robert,Jones,robert.skippy.jones@hotmail.com,425-555-1234,1967-07-12
Antonio,Carrera,antonio_c_carrera@aol.com,503-555-8901,1963-12-24
Terrance,O'Reilly,terrance_oreilly@mail.com,425-555-1219,1960-07-10
August,Springer,augustjosephspringer@gmail.com,503-555-1234,1989-12-19
Karim,Nafir,karim.nafir@mail.com,503-555-4567,1989-07-05
A note regarding the gender attribute
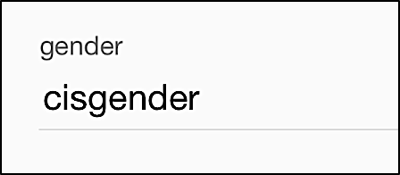
If you have used Akamai data migrations in the past, you might recall that gender data had to be entered as either male or female. This limitation no longer exists: you can now use any valid string value to indicate the user’s gender. For example, suppose your datafile looks like this:
givenName,familyName,gender
Bob,Jones,cisgender
That’s fine; the gender type cisgender will be accurately represented in the user profile:
Note that there is a transformation that can be applied to the gender attribute; this transformation enforces the values “male” , “female”, “other” or “not specified”. If this logic is undesirable, simply make sure that the line that calls transform_gender is commented out, or modify the transformation to suit your needs.
Updated 23 days ago