The custom origin (pinned certificate)
Follow this workflow to add a custom origin—"Your origin"—server to your property, by "pinning" your origin's secure certificate.
Before you begin: Understand the request flow
This is optional, but it's recommended. Take a minute to familiarize yourself with the flow of a request involving the Akamai network.
1. Set up your origin server
Before you can define a custom origin in your property, the following need to be applied:
-
Your domain needs to be registered with an accredited registrar.
-
You need a web server application such as Apache2 or NGINX installed on your origin server.
-
Your domain needs to be configured on your web server, using a public IP address. For example, in Apache2, you could set up a virtual host for your domain that directs to the root page of your site.
-
You need a secure certificate installed on your web server. For example, you could install Certbot, which uses Let's Encrypt, a trusted certificate authority to generate and verify the certificate.
-
You need to come up with a unique hostname for your origin server. You also need to update your DNS to include an "A" entry that associates this hostname with its public IP address.
Since web servers can be configured differently, this process can vary. Details are covered in Custom origin prerequisites.
2. Prepare your edge certificate
The first phase of a request flow involves the end user contacting Akamai edge servers. To secure this connection with HTTPS, you'll need to prepare your edge certificate.
If you need to use the custom certificate method, you'll need to wait until it completes provisioning before you can set up your Property Manager property. You'll receive an email once it's ready.
3. Set up your property
If you haven't yet, perform these operations to initially set up your property in Property Manager:
4. Set up the Origin Server behavior
Now you need to configure Property Configuration Settings to set up your custom origin.
-
Ensure the Default Rule is selected.
-
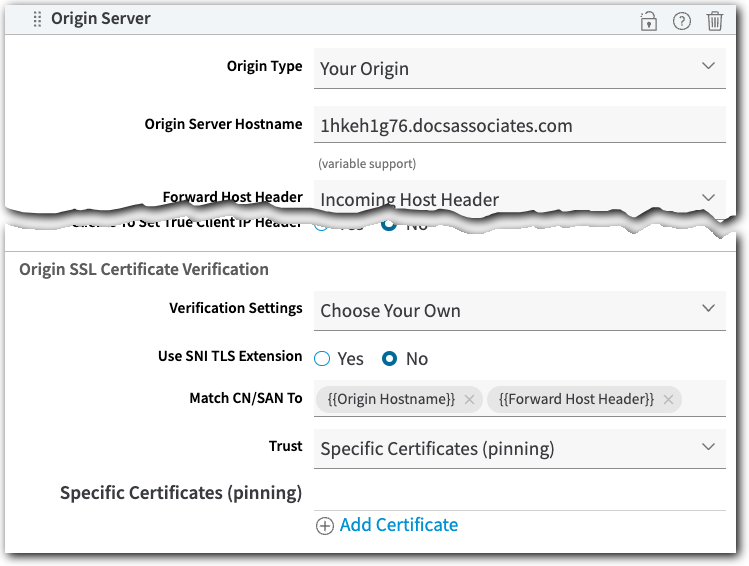
Set Origin Type to Your Origin.
-
Enter the Origin Server Hostname that you established when you set up your origin server.
Variable support
This field supports variable expression syntax. Typing "{{" in the option field triggers a list of objects to select. Additional details on this support are available by mousing over this option in the UI. Also see Variables overview.
-
Select the appropriate Forward Host Header. The selected header must be what's set as the Common Name (CN) or Subject Alternate Name (SAN) in your origin certificate.
-
Set the following options, as desired:
-
In Origin SSL Certificate Verification setting, define the following:
-
Verification Settings. Select Choose your own.
-
SNI TLS Extension. This applies if your origin server has been configured to host multiple Standard/Enhanced TLS certificates to support multiple sites. If this is the case, set this to Yes. The Server Name Indication (SNI) header will be sent in the TLS request to the origin. The SNI header value that's sent is the same as the header you've selected for Forward Host Header. You should set this option to No if the origin server returns an unexpected certificate.
-
Trust. Set this to Specific Certificates (pinning).
-
-
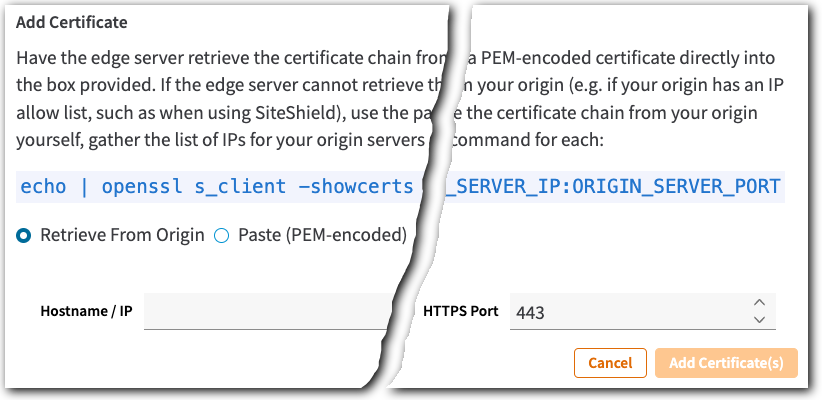
In the Specific Certificates (pinning) options that are revealed, click Add Certificate.

- Select one of these options to pin the certificate:
-
Retrieve From Origin. If you've fully configured your origin server as described in 1. Set up your origin server, you can select this option and provide either the public IP address or the domain for your origin server. Unless you've manually configured the HTTPS port of your origin server, leave HTTPS Port set to 443. This is the standard port for HTTPS traffic. If you're using Site Shield, retrieving an origin certificate might not work, so use Paste (PEM-code) option instead.
-
Paste (PEM-encoded). Access the SSL certificate on your web server application. (For example, this is the
fullchain.pemfile on an Apache2 web server installation.) Copy the full contents of the file and paste it here.

- Click Add Certificate(s).
- Leave the Ports options at their defaults.
Are you using Ion?
An Ion property contains specific rules that you can configure to optimize end-user access and use of your origin server:
Set up Origin Connectivity. Within the Accelerate delivery rule, this sub-rule lets you optimize the connection between edge and origin.
Configure the Origin Offload rule. Here, you'll use several sub-rules to control caching content at the edge and in an end user's browser.
Pinned certificates accumulate as the rule tree is processed
A request may process multiple Origin Server behaviors in multiple rules, including the Origin Server behavior you specify in the default rule. However, only the last Origin Server behavior in the rule tree applies to requests going forward. As certificates accumulate, it will trust all certificates pinned in the Origin Server behaviors executed earlier.
Consider this scenario: you pin a certificate for origin_A in the Origin Server behavior in the default rule. In another rule later on in the rule tree, you set up a match criteria, for example Hostname, and add another instance of the Origin Server behavior, pinning a different certificate there for origin_B. Because the certificates accumulate, if the request meets the match criteria, origin_B will trust both certificates.
Updated 4 months ago
