Manage SSH keys
When creating a Linode, you have the opportunity to select one or more SSH keys, which are added to the root user account of the new Linode. This lets you login over SSH using your associated private key instead of the root password.
These SSH keys are stored within your account and can be easily accessed from Cloud Manager. This guide walks you through how to view, add, and remove your account's SSH keys. For instructions on selecting an SSH key when deploying a Linode see Creating a Linode > Create a Password and Add SSH Keys.
View SSH keys
-
Log in to Cloud Manager.
-
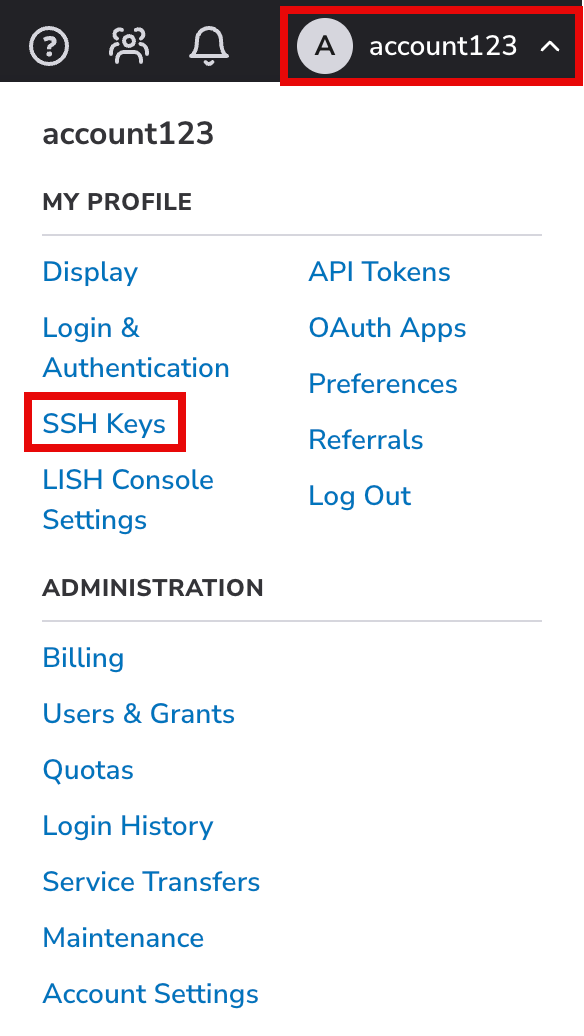
Click on your username on the top right and select SSH Keys in the dropdown menu that appears:

-
This opens the SSH Keys tab within the My Profile section. If you have uploaded any public keys, they are displayed on this page, as shown below.

Add a public key
Add a public SSH key to your user account so that you can easily install it on new Linodes (see Create a Linode).
The following SSH key formats are supported: ssh-rsa, ssh-dss, ecdsa-sha2-nistp, ssh-ed25519, and sk-ecdsa-sha2-nistp256 (an Akamai-specific format).
-
Access the SSH Keys page in Cloud Manager. See View SSH Keys above.
-
Click the Add an SSH Key button.

-
Within the Add an SSH Key panel that appears, enter a descriptive label for your key and paste your public key into the SSH Pulic Key field. To find and copy your public key on your local machine, use one of the following methods:
-
Windows 11 (or 10), macOS, Linux: If you created your key pair using most command-line tools, your public key is likely stored in a
.sshdirectory within your home folder and is likely calledid_rsa.pub. You can view your public key by opening PowerShell (Windows) or the terminal (macOS and Linux) and running the following command:cat ~/.ssh/id_rsa.pub -
Windows (through PuTTY): When using PuTTY to generate your key pair, the public key is stored as a
.ppkfile. Open this file using PuTTY to view your public key.
If you haven't yet generated a key pair to use with SSH, follow the instructions within the Creating an SSH Key Pair and Configuring Public Key Authentication on a Server guide.
-
-
Click the Add Key button to save your key. You should now see that public key on the SSH Keys page.

Remove a public key
If you no longer wish to deploy new Linodes with a certain SSH key, you can remove it from Cloud Manager. When doing so, the SSH key is not removed from any existing Linodes that may have used it.
-
Access the SSH Keys page in Cloud Manager. See View SSH Keys above.
-
Within the list that appears, locate the public key you wish to remove. Then, click the corresponding Delete link.
-
To confirm removal, click the Delete button within the confirmation dialog that appears.
Updated 4 months ago
