PostgreSQL
Connect to a PostgreSQL database
You can connect to a PostgreSQL Managed Database using:
Before you begin:
To connect to a PostgreSQL Managed Database, you need to know your username, password, a host or IP, and a PostgreSQL client. To learn how, see View connection details.
View connection details
To view connection details:
-
Log in to Cloud Manager
-
From the main menu, select Databases.
-
Select the PostgreSQL Managed Database cluster of interest from the list.
The Connection Details section contains information and credentials needed to connect to your database.
- username. The default user for all PostgreSQL Managed Databases is
akmadminwhich replaces the non-accessiblerootuser. Superuser access is not available.
The
akmadminuser and defaultdefaultdbdatabase should be used for administrative purposes only, you can create separate users and databases for application purposes. For more information about creating users and databases, see Using PostgreSQL.-
password. The randomly generated password for your database cluster.
-
host. The fully qualified domain name you can use to reach your database cluster through the public network.
IPv6 support
Use the IPv6 address (AAAA record) for this hostname to avoid network transfer charges when connecting to your database from Linodes within the same region.
- port.
- ssl. This field is set to
ENABLED, which means that it is required to use an encrypted TLS/SSL connection.
- username. The default user for all PostgreSQL Managed Databases is
-
To verify the Certificate Authority (CA) certificate when connecting to the database, download the certificate by clicking the Download CA Certificate link.
Connect using CLI
To connect to your database from a command-line, you can use the psql tool. This tool is included as part of most PostgreSQL server installations, though you can also install it separately on most operating systems.
Before you begin:
- Make sure the IP address assigned to your system is included within your database's access controls. If not, add it. To learn how, see Edit access control settings.
- Verify that the
psqltool is installed on your system by running thepsql --versioncommand. If it is not installed, install it. To learn how, see Install psql.
To connect to your database using CLI:
-
Edit the following
psqlcommand replacing:[host],[port]and[username]with the corresponding values in the Connection Details section.[path]and[database name]with the location and name of the downloaded CA certificate.
psql "host=[host] port=[port] username=[username] dbname=defaultdb sslmode=verify-full sslrootcert=/[path]/[database name]-ca-certificate.crt" -
Enter your password at the prompt.
-
Optional: To verify the CA certificate using OpenSSL, run the following command replacing:
-
[host]and[port]with the corresponding values in the Connection Details section. -
[path]and[database name]with the location and name of the downloaded CA certificate.
echo | openssl s_client -starttls postgres -connect [host]:[port] -CAfile /[path]/[database name]-ca-
certificate.crt 2>/dev/null | grep -i "Verify return code"
The expected response is:
Verify return code: 0 (ok) -
Once you are connected successfully, the PostgreSQL prompt appears and you can enter commands to interact with the database. See the psql documentation to learn more about the command and the options available to you.
Install psql
If you don't currently have the psql command-line client installed on your system, follow these instructions to install it through your distribution's repositories.
If you require a specific version of the PostgreSQL client, it's recommended to use the official PostgreSQL repositories instead of your distribution's. Visit PostgreSQL Downloads, select your operating system and distribution, and follow the corresponding installation instructions.
-
CentOS Stream 9 (and 8), CentOS/RHEL 8 (including AlmaLinux 8 and RockyLinux 8):
sudo dnf install postgresql -
CentOS/RHEL 7:
sudo yum install postgresql -
Fedora:
sudo dnf install postgresql -
Ubuntu and Debian:
sudo apt update
sudo apt install postgresql-client
Connect using pgAdmin GUI
The pgAdmin is an open-source application that provides a graphical interface for interacting with your PostgreSQL database. It can be used on a server through a web browser or as a stand-alone desktop application. This instruction covers the installation and use of the desktop application.
Before you begin:
- Download and install pgAdmin from the pgAdmin Downloads page. Make sure to select the appropriate file for your local operating system.
To connect to your database using pgAdmin GUI:
-
If you run the application for the first time, configure a primary password (also called master password). It's used to unlock any saved passwords for database servers you may configure.
-
Click Add a new server to register a server and configure a connection to a server. If you don't see this screen, in the main menu, go to Object > Register > Server.
-
In the General tab, set a name for your server.

-
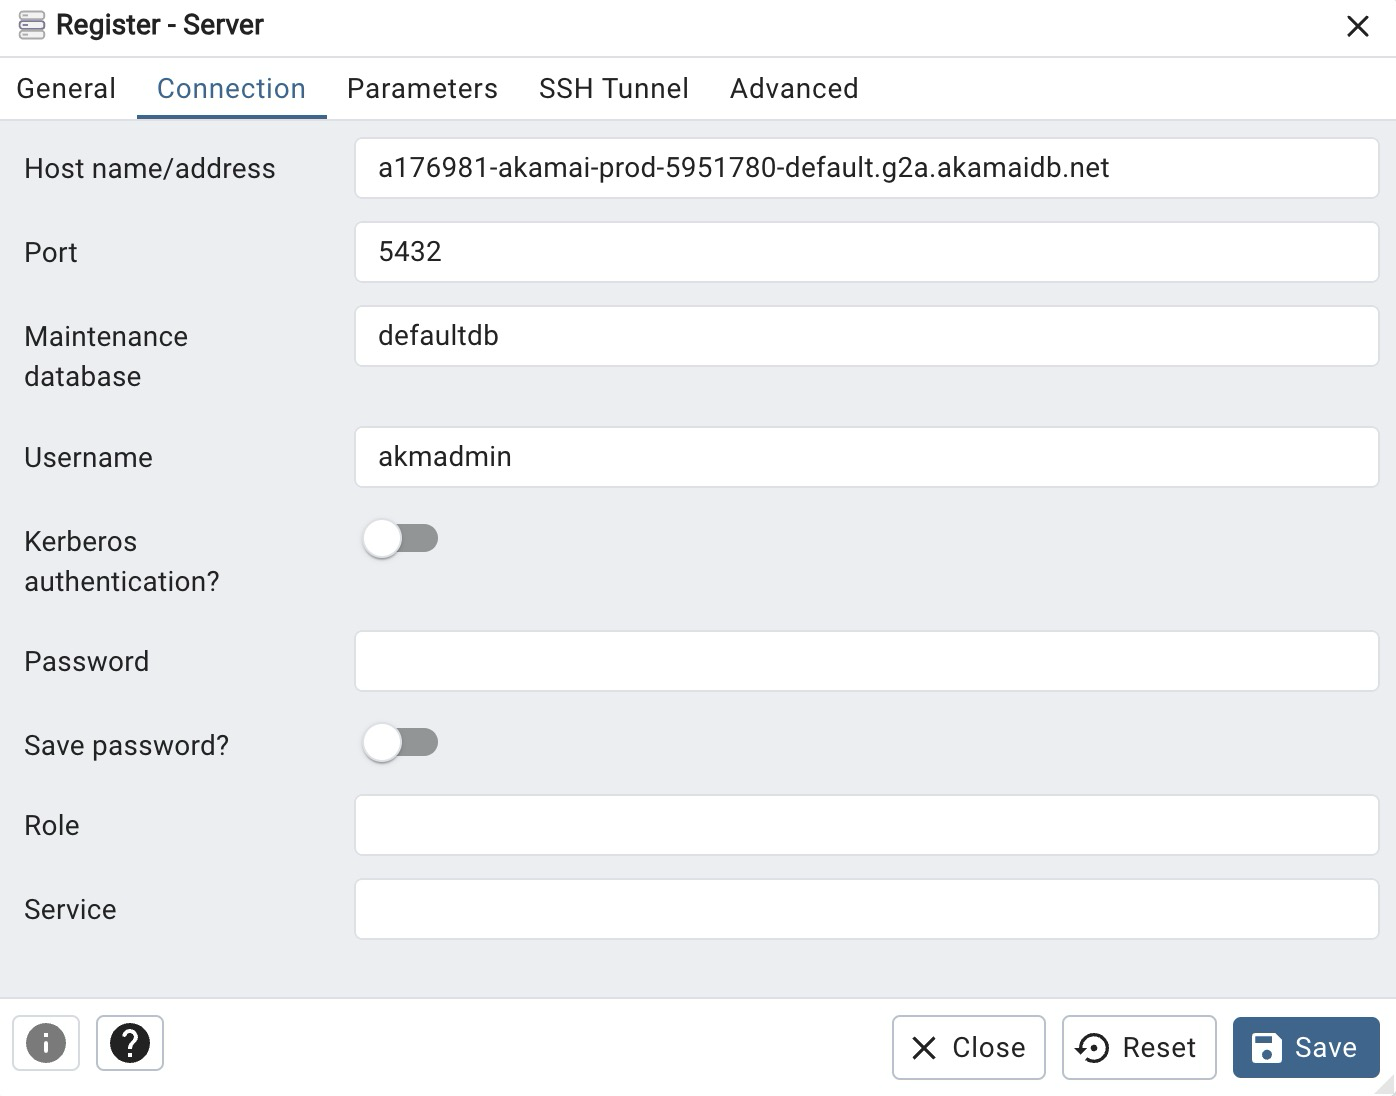
In the Connection tab, enter Host name, Port, and Username with the corresponding values from the Connection Details section, set Maintenance database to defaultdb, and enter Password.

-
In the Parameters tab, you can leave SSL Mode as prefer or set it to require.or verify-ca. The verify-ca option verifies the CA certificate each time you connect. If you choose this option, download the CA certificate from Cloud Manager and add the Root Certificate parameter, and enter the path to the downloaded file. To learn how to download the file, see View connection details.
-
Click Save.
Connect using DBeaver
DBeaver is a free and open source universal database tool for developers and database administrators. DBeaver provides a powerful SQL-editor, administration features, ability to migrate data and schema, monitor database connection sessions, and others.
Before you begin:
- Make sure the IP address assigned to your system is included within your database's access controls. If not, add it now, to learn how, see Manage Access Controls.
- Install the DBeaver Community or Pro software from the DBeaver Downloads page. Be sure to select the operating system you're using locally.
To connect to your database using DBeaver:
-
Open DBeaver and go to Database > New Connection.
-
In the Connect to a database window, select PostgreSQL and click Next.

-
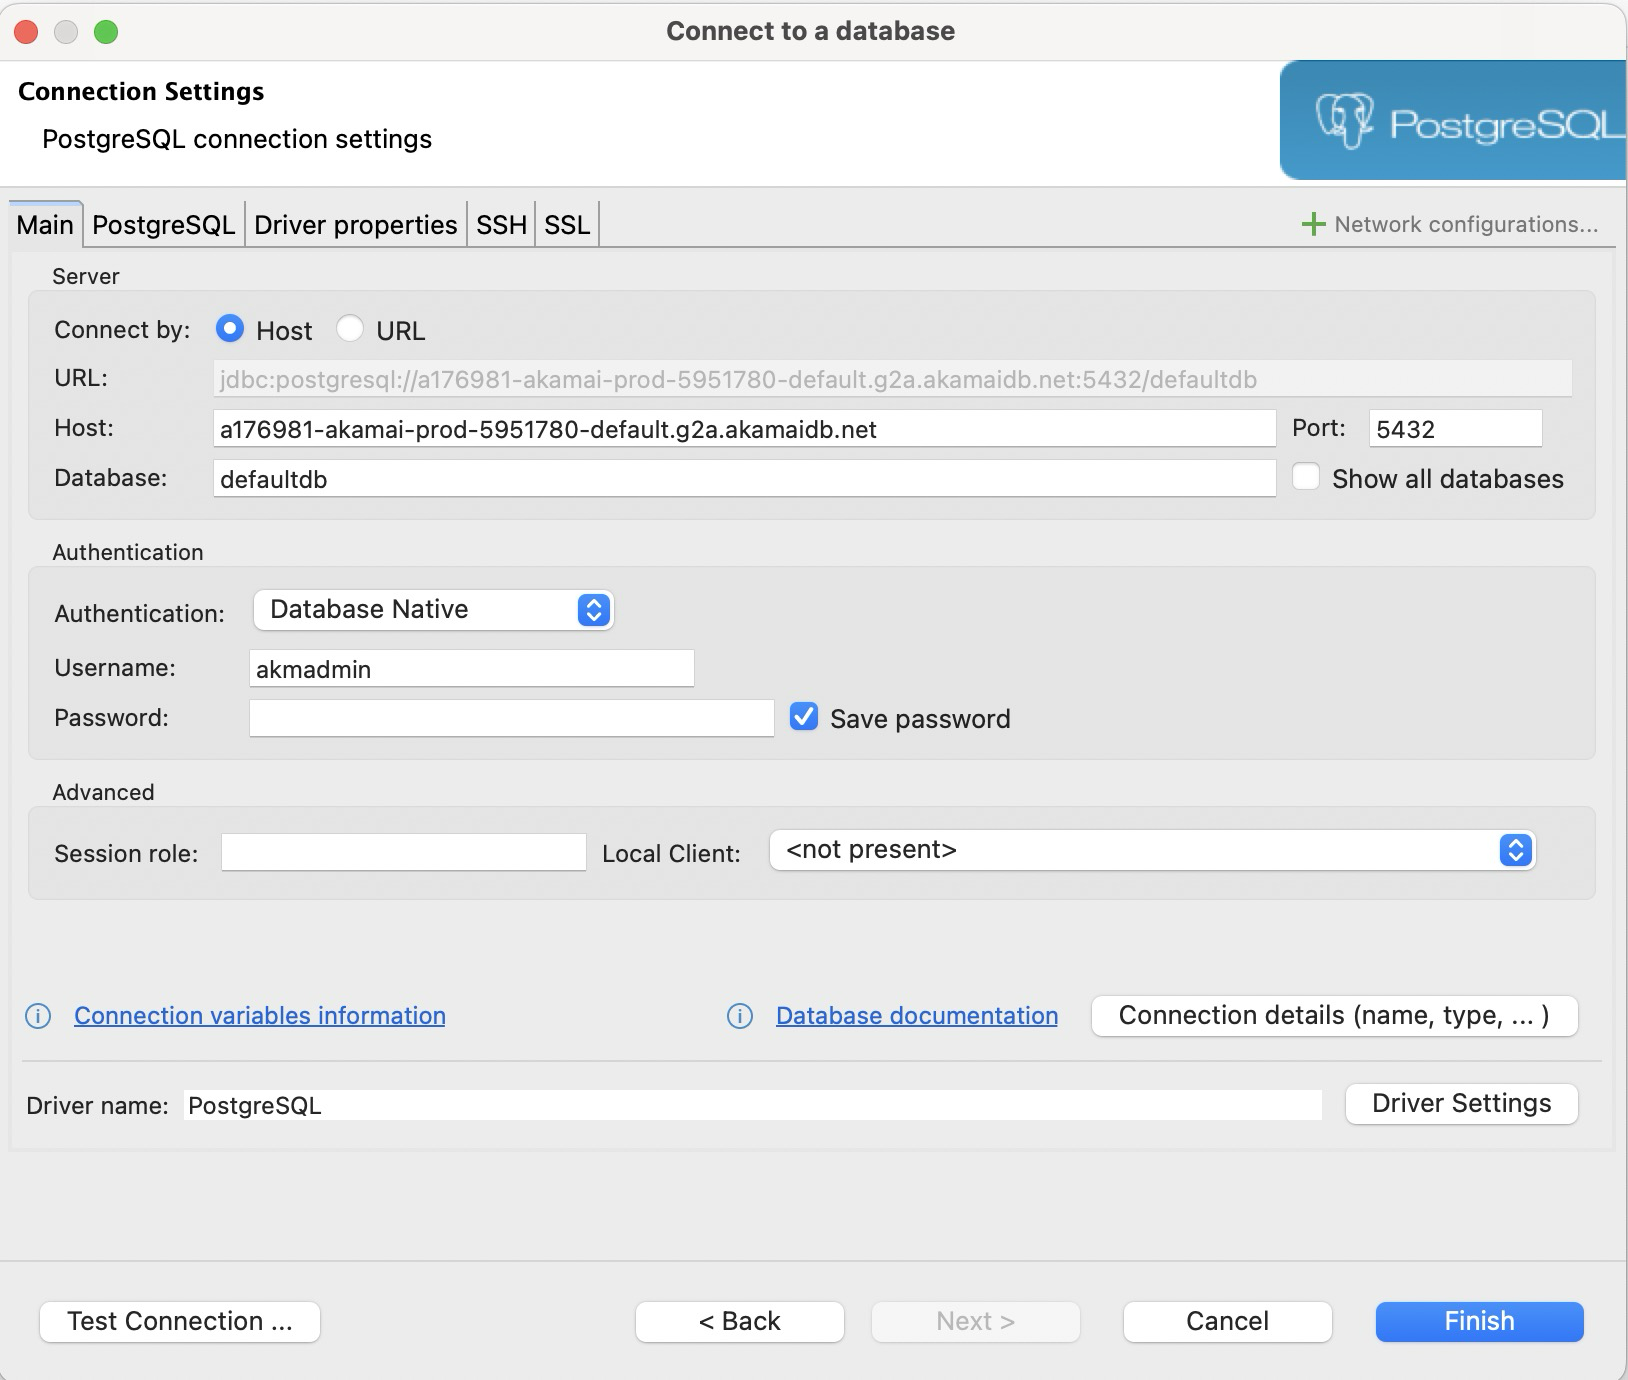
In the Main tab, enter Server Host (hostname) Port, and Username with the corresponding values from the Connection Details section, set Database to defaultdb, and enter Password. If you want to store the password so that you don't have to enter it manually every time you connect, click Save password locally and enter your password. For security reasons, it's recommended not to store your password.

-
Click Test Connection.
Use PostgreSQL extensions with Managed Databases
To learn about extensions, visit Aiven website: Extensions on Aiven for PostgreSQL .
Migrate a PostgreSQL database to a Managed Database
When migrating a database, there are two important terms to keep in mind: the source database and the target database.
- Source database: The original database running on a software, system, or machine that you wish to decommission. This could be PostgreSQL running within your own Linux server, a development database on your local machine, or even a cloud database.
- Target database: The new replacement database that you wish to use. For this guide, the target database will be a Managed Database running on Akamai Cloud.
Your individual migration workflow could deviate from the instructions provided here. You may need to consult with your developers or your application's documentation to learn how to perform some of these steps and to gather any best practices. You should also perform the migration on a staging server first and/or during a time when downtime least affects your users and/or business.
Before you begin
-
Create a Managed Database: To minimize downtime, make sure to create your Managed Database database cluster before continuing. This ensures that your database has been fully provisioned (which can take up to 30 minutes) and that you have the new database credentials available. See Create a Managed Database.
-
Ensure that the PostgreSQL version on your new Managed Database is equal to or greater than the version on your source database cluster. This guide uses the pg_restore utility, which cannot be used to import data into a PostgreSQL version older than on the source machine.
Export from the source database
Exporting the data from the original database is facilitated through the pg_dump and pg_dumpall utilities. The pg_dump tool saves a copy of a single database as a script file, while the psql runs the sql script to backup exiting roles.
-
Export the database roles. Create a script to export roles -
export_roles.sql.SELECT 'CREATE ROLE "' || rolname ||'"'|| CASE WHEN rolsuper THEN ' NOSUPERUSER' ELSE ' NOSUPERUSER' END || CASE WHEN rolinherit THEN ' INHERIT' ELSE ' NOINHERIT' END || CASE WHEN rolcreaterole THEN ' CREATEROLE' ELSE ' NOCREATEROLE' END || CASE WHEN rolcreatedb THEN ' CREATEDB' ELSE ' NOCREATEDB' END || CASE WHEN rolcanlogin THEN ' LOGIN' ELSE ' NOLOGIN' END || CASE WHEN rolreplication THEN ' NOREPLICATION' ELSE ' NOREPLICATION' END || CASE WHEN rolbypassrls THEN ' NOBYPASSRLS' ELSE ' NOBYPASSRLS' END || CASE WHEN rolpassword IS NOT NULL THEN ' PASSWORD ''' || rolpassword || '''' ELSE '' END || ';' FROM pg_authid where rolcanlogin \pset pager off \q -
Run script
export_roles.sqlto save roles information intocreate_role.sql. Replace [user] with the username for your source database. The default username for many PostgreSQL installations ispostgres. If you're connecting to a remote database, add--host [host]and--port [port]to the command below, replacing [host] and [port] with the corresponding values for your managed database.psql --dbname [database] --host [host] --port [port] --username [user] -q -t -X -f export_roles.sql > create_roles.sql -
Export each database you wish to backup. Replace
[database-name]and[user]with the corresponding values for your source database. The other options in this command are used to ensure maximum compatibility with PostgreSQL Managed Databases. If you're connecting to a remote database, add--host [host]and--port [port]to the command below, replacing [host] and [port] with the corresponding values for your managed database. You can run this command for each database you wish to export, though you may want to edit the--fileoption with a custom filename.pg_dump -Fd --quote-all-identifiers --verbose --lock-wait-timeout=480000 --no-unlogged-table-data --serializable-deferrable --jobs=1 --dbname [database-name] --username [user] --file database.backup
Import to the target managed database
Once you've successfully backed up the source database, you can import your data into your Managed Database (the target database). To import the database, this guide covers the pg_restore utility.
-
Use the
psqlcommand to import your database roles to your managed database. Replace [host], and [username] with the corresponding values for your Managed Database. The command below assumes your database roles backup file is calledcreate_roles.sqland is located in your current directory. If you used a different filename or path for your backup, replacecreate_roles.sqlwith your value.psql --dbname defaultdb --host [host] --port [port] --username [user] -q -t -X -f create_roles.sql -
Create your database, making sure that your preferred database name doesn't already exist. If it does, you can drop the database before creating it. In the commands below, replace [database-name] with the name of your database and [host] and [username] with the corresponding Connection Details for your Managed Database.
psql --host=[host] --username=[username] --dbname=postgres --command='DROP DATABASE IF EXISTS [database-name];' psql --host=[host] --username=[username] --dbname=postgres --command='CREATE DATABASE [database-name];'Using
DROP DATABASEcommand results in the deletion of any data stored on that database. If you are replacing an existing database and would like to avoid data loss, make sure you have a backup containing any data you would like to retain before running the command. -
Import your database file to your newly created database. The command below assumes your database backup file is called
database.backupand is located in your current directory. If you used a different filename or path, replacedatabase.backupwith your value.pg_restore --host=[host] --username=[user] --verbose --no-tablespaces --dbname=[database-name] database.backup
Updated 8 months ago
