
Custom domain with a TLS/SSL certificate
Akamai's Object Storage service supports shared and custom domain names:
- By default, files can be accessed through secure, HTTPS URLs within the shared domain
\*.linodeobjects.com. - You can also use a custom domain, such as a subdomain of
\*.example.com.
Here, we cover the configuration of a custom domain and adding a TLS certificate to secure that custom domain. It uses Cloud Manager, but you can use the Linode CLI and the Linode API, too.
Only supported with E0 and E1 endpointsThis configuration is only available for buckets created using an legacy E0 or E1 endpoint type. If your bucket was created using an E2 or E3 endpoint type you can't configure it as a custom domain with a TLS/SSL certificate.
Before you begin
You need a domain name to use with your Object Storage bucket. If you don't already own the domain, purchase it from a trusted registrar.
When configuring Object Storage with a custom domain, you need to use a fully qualified domain name (FQDN), such as assets.example.com or any subdomain of
\*.your-domain.tld. Apex (root) domains, such asexample.tld, are not supported.
Create a bucket
If you haven't yet, create an E0 or E1 bucket. The bucket needs to be labeled using your fully qualified domain name, such as assets.example.com. If your files already exist in a bucket that doesn't have this label, create a new bucket with this label, and copy or move your files to it. You can use a third-party client like Cyberduck to do this.
Configure DNS
To connect your custom domain, create a CNAME DNS record within the name server for your domain. You can do this through your DNS provider, such as one operated by your domain registrar or a service like Akamai DNS Manager. Create the CNAME record using these values:
-
Hostname/Name. This is the custom domain you want to use. Each DNS provider may require slightly different formatting. In many cases, enter just the subdomain value. For example, if you plan to use
assets.example.com, enterassets. -
Alias To/Target. This is the full URL on the shared domain, excluding the
https://part of the URL, for your Object Storage bucket. The URL can be the default file host functionality of Object Storage or the URL used to host a static website, for example:- File URL.
[bucket-label].[cluster-id].linodeobjects.com - Website URL.
[bucket-label].website-[cluster-id].linodeobjects.com
- File URL.
For more information on DNS records and CNAME records, see our Overview of DNS and DNS Records guide.
Get a TLS/SSL certificate
Next, you need to get a TLS/SSL certificate through a trusted certificate authority (CA). Here, we're using the certbot tool, that lets you create free certificates through the Let's Encrypt CA. Skip this section if you already have a certificate.
Before you begin
You need a specific file with specific contents that's accessible on your custom domain, within a certain directory. Having followed this guide, your custom domain now points to your bucket. You can create this file directly in your Akamai account. You can use Cyberduck, the Linode CLI, s3cmd, s4cmd, or any other tool or application that integrates with Object Storage and lets you create folders and files.
Set up the certificate
-
Install certbot. You can use your local machine, a Linode on Akamai Cloud, or any other compatible virtual machine:
- macOS
- Windows
- Any compatible Linux system listed on the certbot instructions page within the System dropdown.
-
Manually generate a certificate with this command:
sudo certbot certonly --manual -
When prompted, enter your custom domain, for example:
assets.example.comand press Enter. -
At this point, certbot looks for the file you created earlier. If it's found, it generates the certificate along with its private key and saves them to your system:
{{<output>}} Successfully received certificate. Certificate is saved at: /etc/letsencrypt/live/assets.example.com/fullchain.pem Key is saved at: /etc/letsencrypt/live/assets.example.com/privkey.pem This certificate expires on 2022-05-11. These files will be updated when the certificate renews. {{</output>}} -
You can view the saved certificate using a text editor. For instance, on a Linux system you can use
sudo cat [file-location]to output the file orsudo nano [file-location]to open the file.
Upload your SSL certificate
To upload your new SSL certificate to an Object Storage Bucket:
-
Log in to Cloud Manager and select Object Storage from the left menu.
-
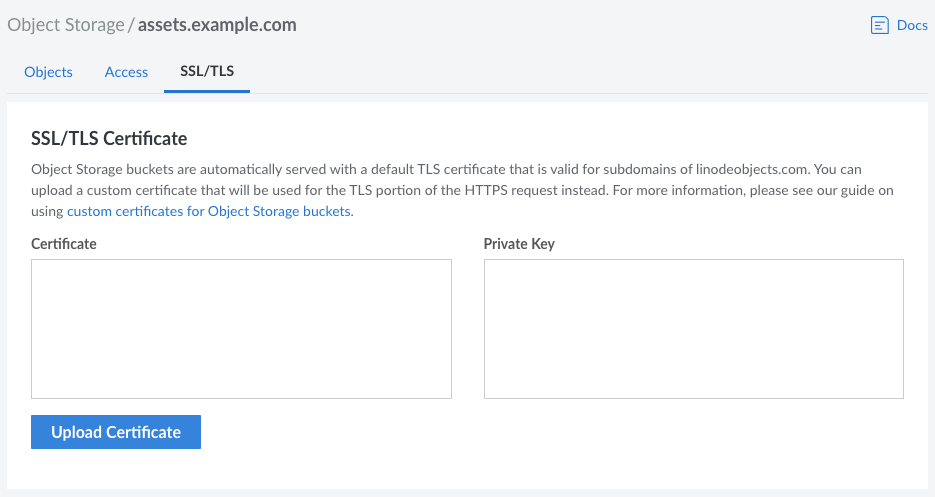
Open your bucket and select the SSL/TLS tab.
-
In the Certificate field, enter the contents of the certificate file you just created or obtained.
-
In the Private Key field, enter the contents of the corresponding private key file.
-
Click the Upload Certificate button to submit the certificate and attach it to your bucket.
Upload your files or static website
Before you can test your custom domain, you need to have files hosted in your Object Storage bucket. Upload your files or your static website. Set the permissions so the files can be read by the public. If you don't, you won't be able to view the files through any URL, either shared or custom.
If you currently don't have any files, you can create a test file called index.html, edit it to include the following text, upload it to your bucket's main directory, and make sure the permissions are set so it can be read by the public.
<html>
    <body>
        <h1>Hello world...</h1>
    </body>
</html>
Access your secured custom domain
You can now access your files or static website using your secured custom domain. Open a web browser and enter your custom domain. If you're using Object Storage just to store and access files, include the file path of the file you want to access. If you are using Object Storage to host a website, you don't need to enter any additional file path, assuming you've uploaded an index.html file, or have set a different file as the default.
Updated 2 days ago