
Manage IP addresses on a Linode
Each Linode is equipped with several IP addresses, which may enable it to be accessible over the public Internet and other Akamai services or accessible just to other Linodes within a VPC. This guide covers how to manage these IP addresses (including viewing, adding, removing, transferring, or sharing them) through Cloud Manager.
View IP addresses
-
Log in to Cloud Manager and click the Linodes link in the sidebar.
-
Click on your Linode from the list to view more details.
-
Within the top Summary section, you can view the primary IPv4 and IPv6 addresses.
-
To view all public and private IP addresses for this Linode (along with any associated rDNS values), navigate to the Network tab and review the IP Addresses section.
Types of IP addresses
IPv4 addresses
-
Public IPv4 Address: Most Linodes (those created without a VPC) have a single public IPv4 address, which enables your applications to be accessible over the Internet. Additional addresses can be provided with technical justification. If a VPC interface is configured when a Linode is created, that Linode typically does not have a public IPv4 address unless the Assign a public IPv4 address option is selected.
Public IPv4 addresses can be auto-assigned or come from reserved IPs for the region. To learn more about reserving IPs, see the Reserved IPs guide. -
VPC IPv4 Address: If a Linode is assigned to a VPC, that Linode is assigned an IPv4 address from the CIDR range configured on the subnet. This IP address can be automatically generated or manually provided. Optionally, if the Assign a public IPv4 address option is selected during creation, the Linode is assigned public IPv4 address as well.
-
VLAN IPv4 Address: When a Linode is configured with a VLAN, you assign it a IPv4 address to use within the VLAN. It is also automatically assigned a public IPv4 address.
-
Private IPv4 Address: Optionally, a private IPv4 address can be assigned to a Linode. This allows it to connect to other services located in the same data center, such as NodeBalancers or other Linodes. Private IPv4 addresses are available for configuration profile interfaces but are not supported on Linode interfaces. Private IP addresses are not supported for Linodes in distributed compute regions. For Linodes in these regions, we recommend using VPC. Other alternatives are VLAN and IPv6.
A VPC is the recommended method for network isolationIn most cases, a VPC is the better option for true network isolation than either a VLAN or a private IP address. For a comparison between these methods, review the VPC documentation.
IPv6 addresses
-
IPv6 SLAAC Address: This is the main IPv6 address used to communicate over the public Internet and with other services in the same data center. All Linodes are assigned a single SLAAC address, which cannot be removed or transferred. Additional SLAAC addresses cannot be provided. If you need an additional IPv6 address, consider using a /64 range (see below).
-
IPv6 Link Local: This IPv6 address is assigned to each Linode and used for internal routing.
-
/64 Routed Range: This is the most common range provided to our customers and sufficient for most applications that require additional IPv6 addresses. A single /64 range provides 18,446,744,073,709,551,616 addresses that can be used when configuring the applications within your system. See the Manual network configuration on a Linode guide for instructions on configuring specific addresses from a range. By default, up to one /64 range can be added per customer per data center.
-
/56 Routed Range: These larger ranges are typically only required by specialized systems or networking applications. A single /56 range provides 4,722,366,482,869,645,213,696 addresses that can be used when configuring the applications within your system. See Manual network configuration on a Linode for instructions on configuring specific addresses from a range. By default, up to one /56 range can be added per customer per data center.
-
/116 Pool: (4,096 addresses) An IPv6 pool is accessible from every Linode on your account within the assigned data center. Addresses from that pool can be configured on each Linode within that data center. This can enable features like IPv6 failover. By default, up to one /116 pool can be added per customer per data center.
The IPv6 /116 prefix has been deprecated and is no longer available for new Linodes. If you have an existing Linode with a /116 pool, please review the Upcoming changes related to network infrastructure upgrades to learn about changes that may affect your services.
Add an IP address
Follow the suitable instructions depending on whether your Linodes use configuration profile interfaces or Linode interfaces for networking.
Follow the instructions below to add an public IPv4, private IPv4, or IPv6 range to your Linode. By default, up to one /64 and /56 range can be added per customer per data center.
-
Log in to Cloud Manager and click the Linodes link in the sidebar.
-
Click on your Linode from the list and navigate to the Network tab.
-
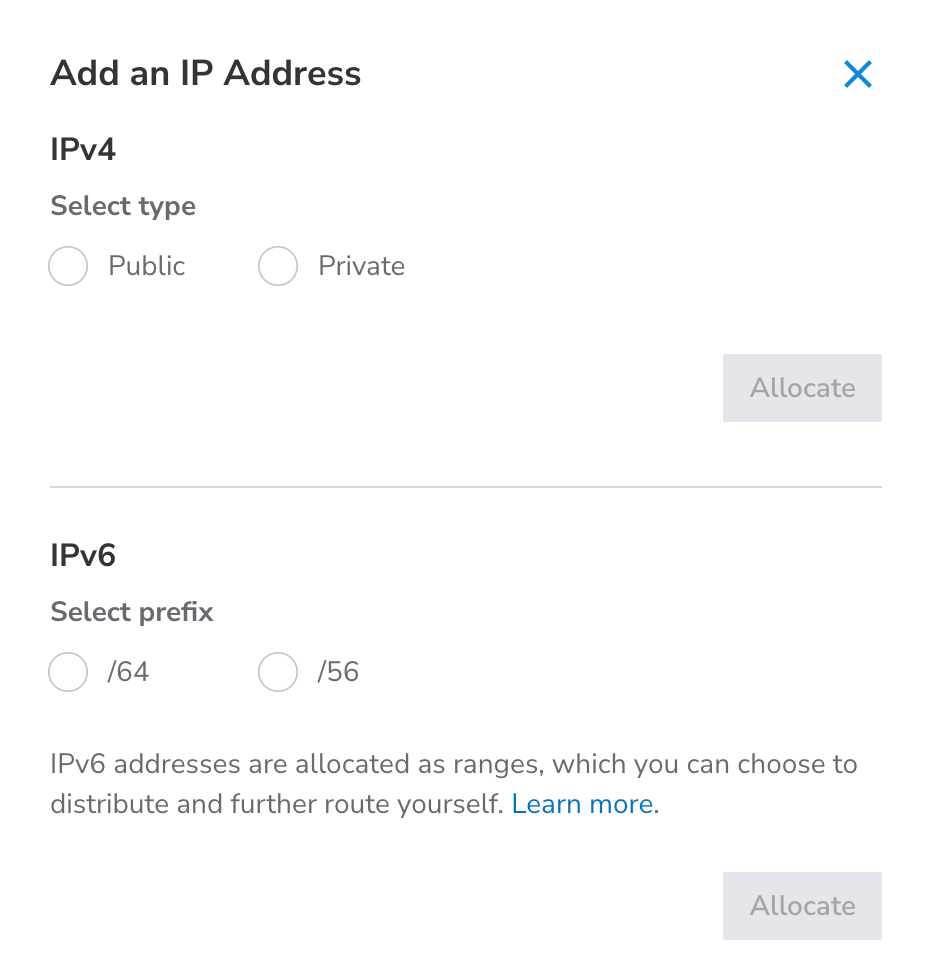
Click the Add an IP Address button under the IP Address section. This displays the Add an IP Address panel.

-
Within the form, select the type of IP address (or range) you wish to add. If you aren't sure, review the Types of IP addresses section and consider your own use case.
-
Click the Allocate button to add the additional address. If you receive a message similar to the following, you need to contact our Support team to request the IP address. Make sure to include any additional information or technical reasoning for the request.
Additional IPv4 addresses require technical justification. Please open a Support Ticket describing your requirement
Once the IP address or range has been added, it should be visible in the IP Address section.
-
To make sure the new IP address is configured within the internal system of the Linode, verify that Network Helper is enabled and reboot the Linode.
Network Helper sorts IP addresses numerically. This may result in the gateway being updated to match the lowest enumerated IP.
If Network Helper is turned off and you've configured a static IP address, you need to update the configuration files with the new IP address or enable Network Helper.
Due to the impending exhaustion of the IPv4 address space, you're required to provide technical justification for additional public IPv4 addresses. If you have an application that requires multiple IP addresses, consider using an IPv6 /64 range instead. Note that pricing for additional public IPv4 addresses may vary by region.
Configure rDNS
To change the rDNS value on an IP address, follow the instructions in Configure rDNS (reverse DNS) on a Linode.
Reserve an IP address
You can reserve a public IPv4 address currently in use by a Linode. Once reserved, the address is added to your account's reserved IP list and remains exclusive to you to use in the same region, even if the Linode is deleted. The IP will remain permanently tied to the region where the Linode was created. Reserved IPs are ideal for services requiring a consistent address.
Charges apply while the IP is reserved, even if it is not assigned to a Linode. For more details, see Reserved IPs.
-
Log in to Cloud Manager and click the Linodes link in the sidebar.
-
Click your Linode in the list and navigate to the Network tab.
-
In the IP Addresses section, click the … actions menu for the public IPv4 address you'd like to reserve.
-
Select Reserve IP from the dropdown. This displays the Reserve an IP Address form.

-
Select a Region for the IP. The reserved IPs and its resource must be in the same region.
Selecting a target region for reserved IPsThe reserved IP and its target resource must be in the same region. Because reserved IPs are tied to a specific datacenter's network topology, you cannot change this region or move the IP to a different datacenter later.
-
(Optional) Add any Tags to help organize and group your Akamai Cloud resources.
-
Click Reserve IP Address for the changes to take effect.
After the address is reserved, the Reserve IP button is grayed out in the dropdown. Note that this reserves only one individual public IPv4 address within a specific region at a time, not the whole CIDR block. Navigate to Networking>Reserved IPs to see all your reserved IP addresses.
In addition to reserving IP addresses currently in use by your Linodes, you can reserve IPs in the following ways:
- Independently. Follow the instructions in the Reserve an IPs address guide.
- During Linode creation. Follow the instructions in the Create a Linode>Assign to a Public Internet guide.
Delete an IP address
-
Log in to Cloud Manager and click the Linodes link in the sidebar.
-
Click your Linode in the list and navigate to the Network tab.
-
In the IP Addresses section, click the … actions menu for the IP address you'd like to delete.
-
Select Delete from the dropdown menu.

-
A pop-up confirmation dialog appears. Click the Delete Range button to confirm the request.
-
To make sure the IP address is removed from the internal system of the Linode, verify that Network Helper is enabled and reboot the Linode.
If Network Helper is turned off and you've configured a static IP address, you need to update the configuration files to remove the IP address or enable Network Helper.
Transfer IP addresses
Follow the suitable instructions depending on whether your Linodes use configuration profile interfaces or Linode interfaces for networking.
If you have two Linodes in the same data center, you can use the IP transfer feature to move or swap their IP addresses. This feature is especially useful when replacing one Linode with another. It lets you quickly move the IP addresses to the new Linode without needing to manually adjust DNS records with the new addresses.
Private IPv4 & IPv6 SLAACThe IP Transfer tool only applies to public IPv4 addresses and IPv6 ranges. It doesn't automatically swap or move private IPv4 addresses. If your application relies on private IPv4 addresses, you must manually update the private IP configurations inside your Linode' operating systems and application settings.
Also, SLAAC addresses can't be transferred between Linodes. See Transferring an IPv6 SLAAC address below for a workaround.
-
Log in to Cloud Manager and click the Linodes link in the sidebar.
-
Click on your Linode from the list and navigate to the Network tab.
-
Click the IP Transfer button in the IP Addresses table.

-
Locate the IP address or range you would like to transfer and select an action from the dropdown menu:
-
Move To: moves the IP address to another Linode. When choosing this option, select the destination Linode in the next dropdown menu that appears. If you are moving a public IPv4 address, there needs to be at least one remaining public IPv4 address on the source Linode.
-
Swap With: swaps the IP addresses of two Linodes. When choosing this option, select the destination Linode in the next dropdown menu that appears. Then select the IP address (belonging to the destination Linode) you would like to swap with the originally selected IP address.
The IP Transfer form only displays Linodes hosted in the same data center as the current Linode.
-
-
Click Save to transfer the requested IPs.
-
To make sure the new IP addresses take affect within the internal configuration of each Linode, verify that Network Helper is enabled and reboot the affected Linode(s). It may take up to 1-2 minutes for the transfer to take affect.
If Network Helper is turned off and you've configured a static IP address, you need to update the configuration files with the new IP addresses or enable Network Helper.
If the IP is unreachable after a few minutes, you may need to notify the router directly of the IP change with the
arpcommand run on your Linode:``` arping -c5 -I eth0 -s 198.51.100.10 198.51.100.1 ping -c5 198.51.100.10 198.51.100.1 ``` Replace `198.51.100.10` with your new IP address, and `198.51.100.1` with the gateway address listed in your Networking tab under the **Default Gateways** column of the *IP Addresses* table.
Transfer an IPv6 SLAAC address
IPv6 SLAAC addresses are not able to be transferred between Linodes. If this is something you need to do, consider moving the applications you want to be hosted on that IPv6 address over to the Linode containing that IPv6 address. One way to accomplish this is to clone the disks containing the data. See the Clone to an existing Linode section of the Clone a Linode guide. After the cloning process has completed, transfer any required IPv4 addresses.
Configure IP Sharing
IP Sharing is a feature that enables two Linodes to be assigned the same IP address for the purpose of configuring failover. Within a typical failover setup, traffic on the shared IP address is routed to the primary Linode. In the event that Linode fails or goes down, traffic is automatically re-routed to the secondary Linode. While IP Sharing can be configured in Cloud Manager, failover must be manually configured within the internal system of both Linodes. See Configure failover on a Linode to learn more about configuring failover.
When IP Sharing is enabled for an IP address, all connectivity to that IP address is immediately lost until it is configured on Lelastic, FRR, or another routing software. This is not an issue when adding a new IP address, but should be considered if you are enabling IP Sharing on an existing IP address that is actively being used.
To learn how to enable IP Sharing within Cloud Manager, review the following steps.
-
Log in to Cloud Manager and click the Linodes link in the sidebar.
-
Determine which two Linodes are to be used within your failover setup. They both must be located in the same data center. Make sure the IP address you wish to share has been added to one of those Linodes. If not, add it now. See Adding an IP address.
-
Of those two Linodes, select the one that does not yet have the Shared IP addresses assigned to it. Then, navigate to the Network tab.
-
Click the IP Sharing button under the IP Addresses section.

-
The IP Sharing form appears with a list of IP addresses that are available to be shared. Select the IP address you wish to share with this Linode.
If your desired IP address does not appear in that list, verify that the Linode to which it belongs has at least two public IPv4 addresses or has been assigned an IPv6 routed range (/56 or /64).
-
Click Save to enable IP Sharing.
-
After enabling IP Sharing in Cloud Manager, the next step is to configure a failover service (such as FRR, lelastic, or Keepalived) within the internal system on each Linode. For more information, see Configure failover on a Linode.
View the DNS resolvers' IP addresses
Each data center has its own set of DNS resolvers, which are accessed through both IPv4 or IPv6 addresses. To view the DNS resolvers, follow the instructions below.
-
Log in to Cloud Manager and click the Linodes link in the sidebar.
-
Click on your Linode from the list to view more details.
-
Navigate to the Network tab and review the DNS Resolvers list, which should appear to the right of (or below) the network transfer graph.

Confirm IP addresses are correctly configured
Our platform's Network Helper tool automatically configures the internal network settings of your Linode's Linux system. This ensures changes made to your IP addresses within Cloud Manager are also made internally on your Linode. If you decide not to use Network Helper or are using a custom unsupported distribution, you need to manually configure your system's networking. In this case, review the Manual network configuration on a Linode guide.
To verify that your IP addresses are correctly configured, run the ip command on your Linode (see man pages reference), specifically ip a show (ip addr show). For more information on using this command, see Use the IP command in Linux .
Updated 14 days ago