Assign a Linode to a VPC
VPCs enable private communication between Linodes within a data center and are a critical component of many application architectures. Follow the instructions within this guide to add both new and existing Linodes to a VPC.
There are three main ways to assign a Linode to a VPC:
- Assign a new Linode to a VPC through the Linode creation workflow
- Use the VPC management workflows to assign an existing Linode
- Manually edit a Linode's network interfaces to assign a VPC
Considerations
-
VPCs, along with VLANs and the public internet, are configured as network interfaces within a Linode's configuration profile (legacy) or Network settings. These network interfaces are configured automatically when creating a Linode with a VPC or when interacting with the VPC directly to assign and remove existing Linodes. You can also edit the Configuration Profile or Network settings directly to manually configure these network interfaces to suit specific use cases. Manually editing a Configuration Profile or Network settings on a Linode is typically the preferred way to assign a VPC to an existing Linode.
-
VPC resources requiring public internet access should be configured as a 1:1 NAT or use a forward proxy. It is not recommended to configure a separate network interface with public internet access (in addition to the VPC interface).
-
Linodes can only be assigned to a single subnet of a single VPC, though they can communicate with other Linodes on any subnet within the same VPC. Multiple VPC interfaces on an Linode are not allowed.
-
If an existing Linode is added or removed from a VPC, the Linode needs to be rebooted or shut down for the changes to go into effect.
Configuration options
When assigning both new and existing Linodes to a VPC, the following settings can be configured:
-
VPC: Multiple VPCs can be configured in a data center, but each Linode can only be assigned to a single VPC.
-
Subnet: When a Linode is assigned to a VPC, it also needs to be assigned a subnet. A subnet defines a collection of related Linodes and has its own RFC1918 IPv4 range (in CIDR format).
-
VPC IPv4 address: This is the IPv4 address of the Linode within the private network of the subnet. It must be within the CIDR range defined in the subnet. The address can be automatically generated or manually entered.
When manually entering the IP address, do not use the first two or last two IP addresses within the subnet's defined IPv4 range. These are non-host IP addresses and are set aside for routing and other features.
-
Public internet connectivity: By default, Linodes with a VPC cannot communicate over the public internet. To facilitate internet access, enable the Assign a public IPv4 address for this Linode option, which configures a 1:1 NAT on the VPC interface. This enables routing internet traffic over your Linode's public IP addresses.
-
Additional IPv4 ranges: You can assign additional IPv4 ranges that can be used to reach this Linode and/or the services running on it. For example, you may wish to assign additional IPv4 ranges to directly expose Docker containers to the VPC.
These settings are referenced in the workflows below.
Assign a new Linode to a VPC
When creating a new Linode, you have the option to assign it to an existing VPC. For complete instructions, review the Assign to a VPC section of the Create a Linode guide.
If a Linode is created with a VPC, the VPC is automatically enabled on the eth0 network interface. No other network interfaces are configured. An exception to that is if the Linode is also configured with a Private IP address (which is not recommended). In this case, the eth1 network interface is configured as Public Internet.
Use the VPC management workflows to assign an existing Linode
VPCs have their own Cloud Manager workflows and API endpoints that allow you to manage the Linodes that are assigned to each subnet on a VPC.
Power off the LinodeBefore assigning a Linode that uses Linode Interfaces to a subnet, the Linode must be powered off. Linodes that use Configuration Profile interfaces do not need to be powered off, but they must be rebooted for the changes to take effect.
To power off a Linode, log in to Cloud Manager, navigate to Linodes in the sidebar, select the Linode, and click Power Off in the top-right corner of its detail page.
-
Navigate to the Subnets section of a VPC. See View subnets.
-
Locate the subnet you wish to use, expand the corresponding ellipsis menu, and click Assign Linodes. This opens the Assign Linodes to subnet panel.
-
Within the Linodes dropdown menu, select the Linode you would like to add to the VPC on the selected subnet.
-
By default, an IPv4 address will be automatically generated for the Linode on the subnet's defined CIDR range. If you want to manually assign an IP address, uncheck the Auto-assign a VPC IPv4 address for this Linode option and enter your custom IPv4 address. This address must still be within the subnet's IP range.
-
To assign additional IPv4 ranges, click Add IPv4 Range, and enter the desired range. These extra IPs let you directly expose services such as Docker containers to the VPC.
-
Click the Assign Linode button to add the Linode to the subnet.
-
You can review and change the list of all Linodes assigned to that subnet. You can also assign additional IPv4 ranges. Once you are satisfied with your changes, click the Done button.
-
Power On or Reboot each added Linode to automatically configure the VPC interface on the system.
When assigning a Linode to a VPC in this way, the VPC network is automatically configured on the eth0 network interface. In addition, eth1 is configured to access the public internet. Using a VPC network interface alongside the public internet network interface is not recommended. Consider editing your Linodes configuration profile to remove this interface.
Manually edit a Linode's network interfaces to assign a VPC
Every Linode can have up to three network interfaces (Public, VPC, and VLAN) that are managed as Linode Interfaces or Configuration Profile Interfaces.
-
Log in to Cloud Manager, click the Linodes link in the sidebar, and select the Linode that will be assigned to a VPC from the list. The Linode's details are displayed.
-
If the Linode uses Linode interfaces, network interfaces are edited in the Network tab. For Linodes using Configuration Profile Interfaces (legacy), network interfaces are managed in the Configurations tab.
Linode Interface
(Network tab)Configuration Profile Interfaces
(Configurations tab)Power off the Linode if it's not already in an OFFLINE state. The Power Off button is located near the top of the Linode's detail page.
Navigate to the Network tab. In the Network Interfaces section, click Add Network Interface to open the Add Network Interface drawer.
Select VPC.
Navigate to the Configurations tab. In the Configurations table, locate the configuration profile you wish to modify and click the corresponding Edit button, which may also appear within the ellipsis (⋯) menu. The Edit Configuration opens.
Note: For an Linode to be configured on a VPC, the VPC option needs to be selected on at least one interface. In most cases, a VPC should be configured on the first network interface (
eth0). Configuring a VPC on other interfaces prevent the Linode from communicating with other subnets in the same VPC. For more details regarding configuring network interfaces, review the configuration profile settings .In the editing pane, scroll to the Networking section.
Determine which interface you wish to configure for the VPC and select the VPC setting from that interface's dropdown menu. In most cases, you should configure the VPC on
eth0and delete all other interfaces.
-
Next, configure the VPC, subnet, and IP address for this interface.
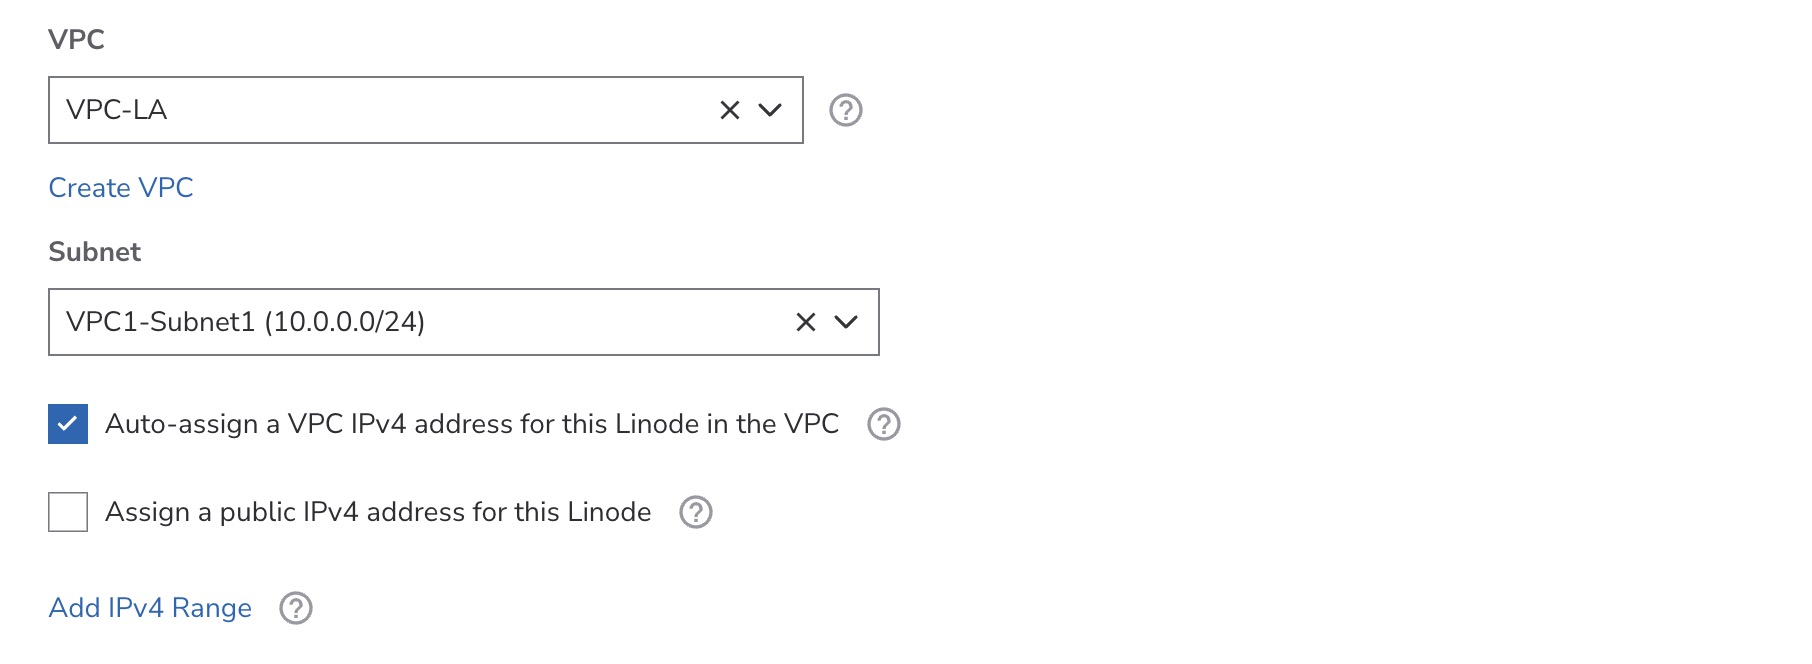
- VPC: To assign this Linode to a VPC, select the VPC from the VPC dropdown menu. If you do not yet have a VPC in the selected data center, click the Create a VPC button and follow the instructions on the Create a VPC guide.
- Subnet: A Linode can be assigned to a single subnet, which lets you further segment traffic and services within a VPC. Select the desired subnet within the Subnet drop down menu.
- Auto-Assign IPv4 address: By default, an IPv4 address will be automatically generated for the Linode on the subnet’s defined CIDR range. If you want to manually assign an IP address, uncheck the Auto-assign a VPC IPv4 address for this Linode option and enter your custom IPv4 address. This address must still be within the subnet’s IP range.
- Additional IPv4 ranges: You can assign additional IPv4 ranges that can be used to reach this Linode and/or the services running on it. For example, you may wish to assign additional IPv4 ranges to directly expose Docker containers to the VPC.
-
If this is a VPC Linode Interface, you can assign a Cloud Firewall specifically for this interface. For Linodes using Configuration Profile Interfaces (legacy), firewalls are assigned at the Linode level and apply to all of the Linodes non-VLAN interfaces.
-
If this is a VPC configuration profile interface, verify that auto-configure networking option Network Helper under Filesystem/Boot Helpers is enabled.
-
Add, save and apply your changes.
Linode Interface Configuration Profile Interface Click Add Network Interface. The Linode's details are displayed and the VPC interface is added.
Power the Linode back on to assign the VPC interface to the Linode. The Power On button is located near the top of the Linode's detail page.
Click Save Changes.
Reboot the Linode so that the new network interfaces are configured within the Linode's internal Linux system. The Reboot button is located near the top of the Linode's detail page.
Updated 5 months ago