Edge Transport based Tunnel Applications
EAA Edge Transport is a novel architecture built on the global distribution of Akamai Connected Cloud delivering significant improvements for latency sensitive applications.
You must be familiar with Connector Pools and how to configure them to use this feature.
Note
- You must use a Unified Connector for this workflow. Unified Connector does not support forward proxy. If you need it, contact Akamai Support.
Let us understand the limitation with the EAA Tunnel-type client-access application and how we can address the issue using an Edge Transport based Tunnel Application.
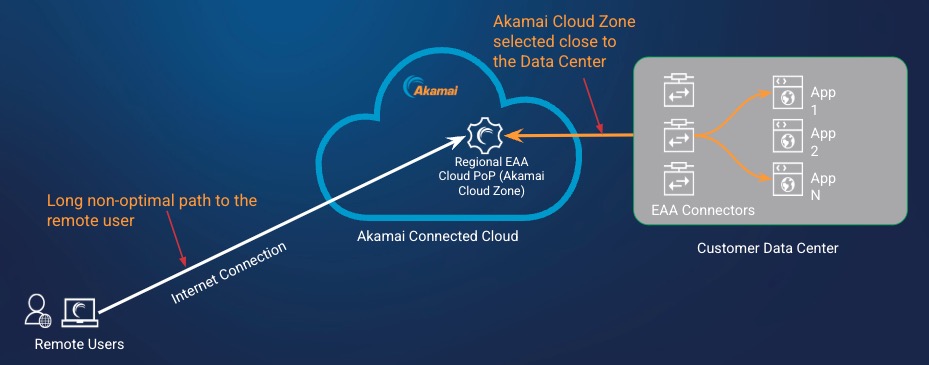
Problem
When you configured EAA Tunnel-Type Client-access applications, you chose an Akamai Cloud Zone located near the application in the Datacenter. However, in today’s world, remote users access the applications from home, branch office, or coffee shops and their distance changes from the Akamai Connected Cloud. This might create a long non-optimal path to the remote user when accessing the tunnel-application, affecting the application performance.
Solution
To solve this problem you can create an Edge Transport enabled Tunnel application and use AZT Client (version 6.X or later version) to access the application.
The connection between the remote user and the application in the data center is established as described below:
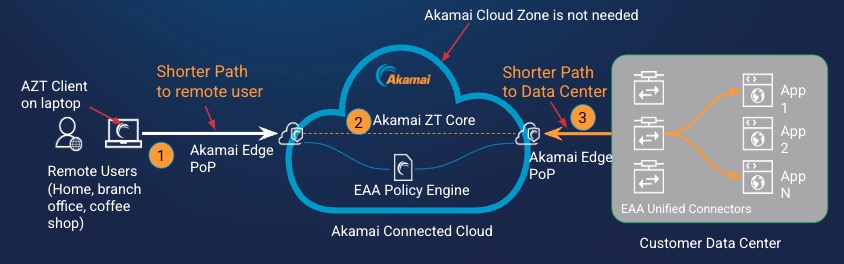
- The AZT Client on the remote user’s laptop locates the closest Akamai Edge PoP and establishes a connection.
- The built-in EAA policy engine ensures that the authenticated user is authorized to access the application. The Akamai ZT Core within the Akamai Connected Cloud makes a connection to another Akamai Edge PoP close to the customer data center, selecting the most efficient route for the application traffic to the authorized user.
- The EAA Unified Connector in the customer data center dials out the Akamai Edge PoP that was selected in 2.
Therefore you get enhanced performance with reduced latency while accessing edge transport enabled tunnel applications as compared to legacy tunnel-type client-access applications.
Workflow for Edge Transport enabled Tunnel Application
Here is the workflow for creating an edge transport enabled tunnel application, where a remote user can access the edge transport enabled tunnel application in the data center:
STEP 1: Create a new Connector Pool
- Log in to the Enterprise Center.
- Navigate to select Application Access > Clients & Connectors > Connector Pools.
- Click Add New Connector Pool.
- Provide these details:
Name: A name for the connector pool.
Description. A description for the connector pool.
Location. Provide a location for your connector pool. This is just a named reference for you and the connector does not physically reside at the location specified.
Package Type. Select a package for the connector pool.You can only add connectors that match this package type to this connector pool.
Note: You will not be able to add connectors of other package type once the connector pool is created.
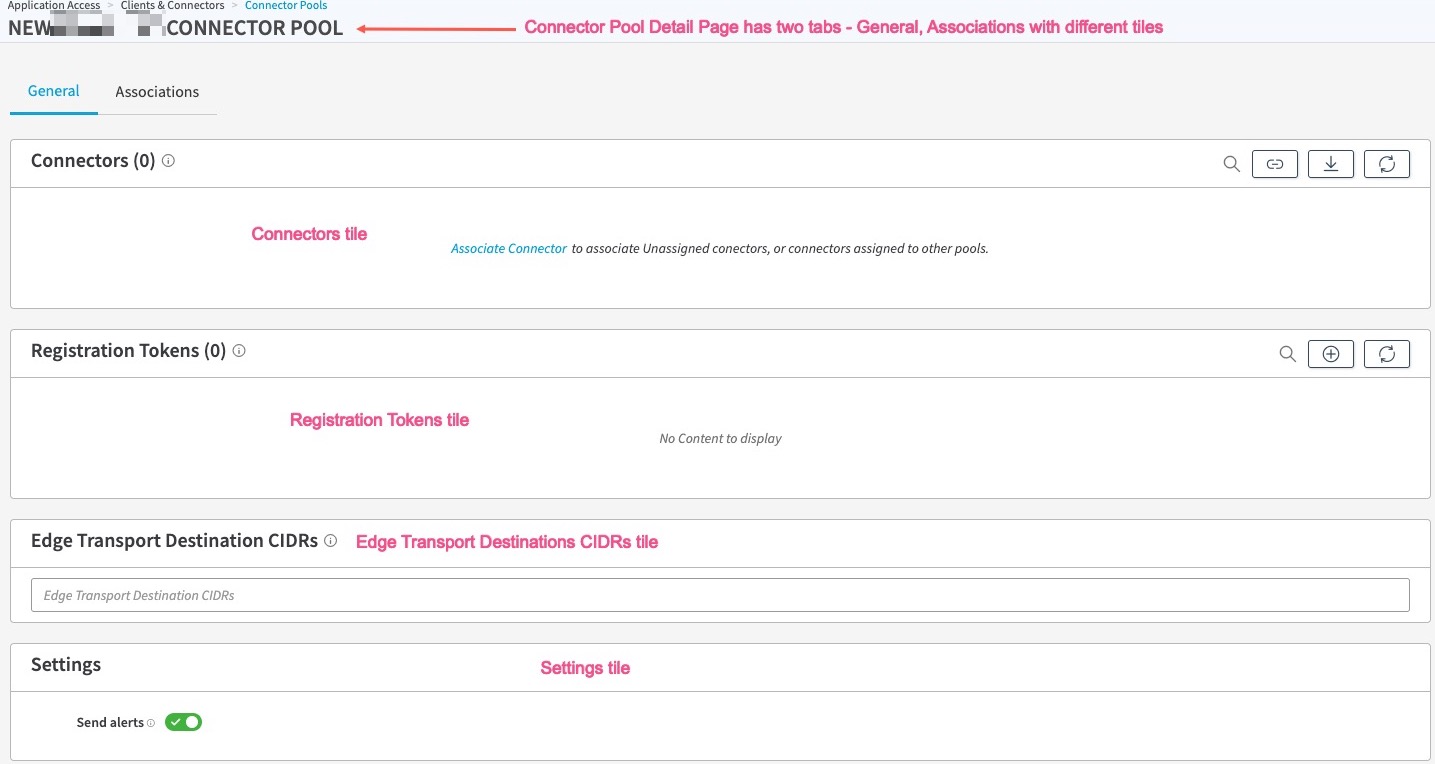
- Click, Create Pool.Your connector pool is created. All of the tiles are empty in a newly created pool. Under the General tab, you will use the Registration Tokens tile, Connectors tile, and Edge Transport Destination CIDRs tile for the rest of the configurations.
- Go to the Settings tile. If your firewall limits outbound access to a specific set of IPs, enable IP-Address-Only Outbound Access checkbox and update the allow-list in your firewall. See Allowlist with IP table (March 2026 update). If your firewall supports domain based firewall, then you need not enable this checkbox.
- Click Save, to save the changes.
STEP 2: Add a Unified connector to the Connector Pool
You must create a registration token for the unified connector and do manual registration in your virtual environment.
Alternatively, you can do the automatic registration for the unified connector, where you embed a registration token in the standard connector template, and then download a custom connector template in the virtual environment.
Note: You must also make sure that the DNS resolver configured for the unified connector is in the same location as the connector itself for optimal performance. You can use the Config console menu option 3 - Configure DNS server to set it up.
STEP 3: Add the Edge Transport Destination CIDRs to the Connector Pool
Add all of the networks behind the connector pool in the Destination CIDRs tile. All of the Destinations in STEP 5, must be on this network.
- Go to the Edge Transport Destination CIDRs tile on the Connector Pool details page.
- Add all of the networks behind the connector pool in the data center using the CIDR notation which also includes the IP addresses of all the DNS servers.
STEP 4: Add and activate the local DNS Servers
Add the DNS resolvers for your datacenter.
The Akamai Edge Transport does DNS resolution on its Edge Transport Platform. After the DNS resolution is done, the Akamai Edge Platform steers the application traffic to the correct connector pool based on Destination CIDR mentioned in the pool.
If you specify any FQDNs for Destinations in STEP 5, these local DNS servers will be used to resolve them.
- Log in to the Enterprise Center.
- Navigate to select Application Access > General Settings > Settings.
- Click DNS Resolvers.
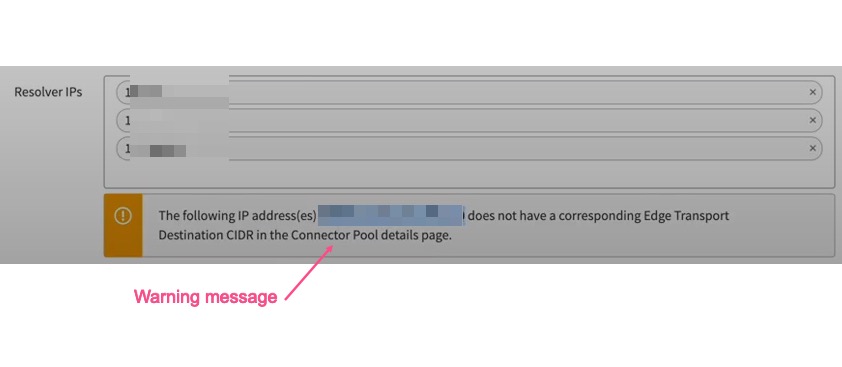
- For Resolver IPs, add the local DNS servers.
Note:If you add a Resolver IP that does not fall within the Destination CIDR range, you will see a warning:
You can fix this issue by making sure the resolver IP falls within the Edge Transport Destination CIDR in the Connector Pool detail page.
- For Timeout, add a timeout value in seconds, so that EAA can time out if the DNS server does not respond within this duration.
- Click Save, to save the list. This automatically deploys the changes.
STEP 5: Create a Edge Transport enabled Tunnel Application
Create a tunnel-type client-access application with the edge transport mode enabled in it. Add the Destinations for your application. It must be a subset or the same as the Destination CIDRs you entered in the Connector Pool in STEP 3.
-
Log in to Enterprise Center.
-
In the Enterprise Center navigation menu, select Application Access > Applications > Applications.
-
Click Add Application (+).
-
Populate these fields:
- Type select Client-Access App.
- Name. Provide an application name.
- Description. Provide a description.
- Mode select Tunnel mode with Edge Transport.
-
Click Add Application.
-
In App Settings, for Endpoint Host, select Use Akamai Domain. A hostname is created for the application.
-
For Destinations, click Add Destination.
Provide the following for each destination:
Protocol. Select TCP, UDP, or all,
IP or URL. Add the IP addresses in CIDR notation or FQDNs.
Port. Provide any specific ports between 1 and 65535, or a range of ports.
Click Save, to save the destination.
Note
- The IP address must be the same as or a subset of the IP address you entered in the Destination CIDRs in the Connector Pool.
- If you entered any FQDNs, it is resolved by the DNS resolvers you entered in STEP 4. Also the resolved IP address for the FQDN must be within the list of Destination.
- Repeat step 7 to add more destinations, if your tunnel application accesses other destinations.
- To add authentication to the application select Authentication.
- Enable Authentication.
- In Identity provider select an identity provider from the list. The selected IDP must have Enable EAA Client enabled in the Settings tab, Client section.
- Click Assign Directory and select one or more directories from the list.
- Click Associate.
The directory appears in Assigned Directories.
- Click Save and Deploy, to save and deploy the application.
STEP 6: Verify with the GPA Client
Prerequisite. Install the Access section of Guardicore Platform Agent (7.0 version) on your laptop.
- Open GPA Client.
- Click the INFORMATION tab.
- If the application is communicating with the remote user using the Edge Transport in Akamai Edge network, a number is shown for Edge Connections.

Limitations
These are the limitations for Edge Transport based Tunnel Applications:
- Edge Transport does not support Forward Proxy.
- You cannot have two connector pools with the same Destination CIDRs.
- Any Device Posture remediations are just shown as Deny for Edge Transport Applications with no alerts.
- If you are only having Edge Transport Applications or Hybrid Applications, you must use GPA Client version 7.2 or higher to use Enterprise DNS applications. Using GPA Client 7.1 or lower versions, Enterprise DNS does not work.
Using Direct Connect with Edge Transport-based Tunnel Applications (Beta)
NoteThis is a Beta feature and can be enabled in your contract by contacting Akamai Support.
For some cases for Edge Transport based tunnel applications, when GPA Client sends traffic through the Akamai Edge network to the connector pool inside the datacenter, the latency may be more than a direct connection.
In the example below, the latency for the Edge Transport based path is 55 while the direct connection is 25.

In such scenarios, if you enable Direct Connect with Edge Transport, the GPA Client switches gracefully to Direct Connect mode after Edge Transport is established without any interruption to the application access, providing better latency and performance. Note that Direct Connect mode only works after Edge Transport is established.
Enable Direct Connect mode for Connector Pool
Follow this procedure to enable Direct Connect mode, after you have configured Edge Transport mode.
- Log in to the Enterprise Center.
- Navigate to select Application Access > Clients & Connectors > Connector Pools.
- Select the Connector Pool for which you have configured Edge Transport settings like Edge IP Binding, Destination CIDRs which you are using with your application.
- Go to the Settings tile.
- Enable Direct Connect. Select one of the following based on the type of firewall your datacenter has:

- Auto (EIM). This is the default setting. If your NAT firewall supports Endpoint Independent Mapping (EIM), then select this mode. This allows easy peer-to-peer connections.
- Manual (Port Forward). If your firewall does not support EIM, then use this mode. You will also need to configure an inbound UDP forward rule for each of your connectors in the connector pool. Go to the Connectors tile, and set the Public Interface IP and Direct Connect Port for each of your connectors in the Connector Pool.

Using Port forwarding technique, UDP packets are forwarded from the Public Interface IP and Direct Connect Port to the connector’s private IP and port 32323.
Note: If you have multiple connectors in your connector pool, and you are using manual direct connect mode, you must set the public interface IP and direct connect port for each of the connectors. Otherwise Edge Transport mode is used as the fallback mechanism.
- Click Save, to save your settings. You will see Direct Connect enabled and the mode that is configured for your Connector Pool in the Connector Pool summary section on the right side:

Updated 15 days ago