Configure network with connector VM console menu
You can use the Connector VM Network Configuration Menu to perform various networking tasks. The connector console is available in VMWare and VirtualBox.
-
Open the console of the connector. If the screen is blank, press any key to bring it back.
Connector is fully operationalmessage appears. -
Follow the instructions on the screen and press ALT+F3 (Windows) or FN+ALT+F3 (MacOS).
Connector VM network configurationconsole menu appears.
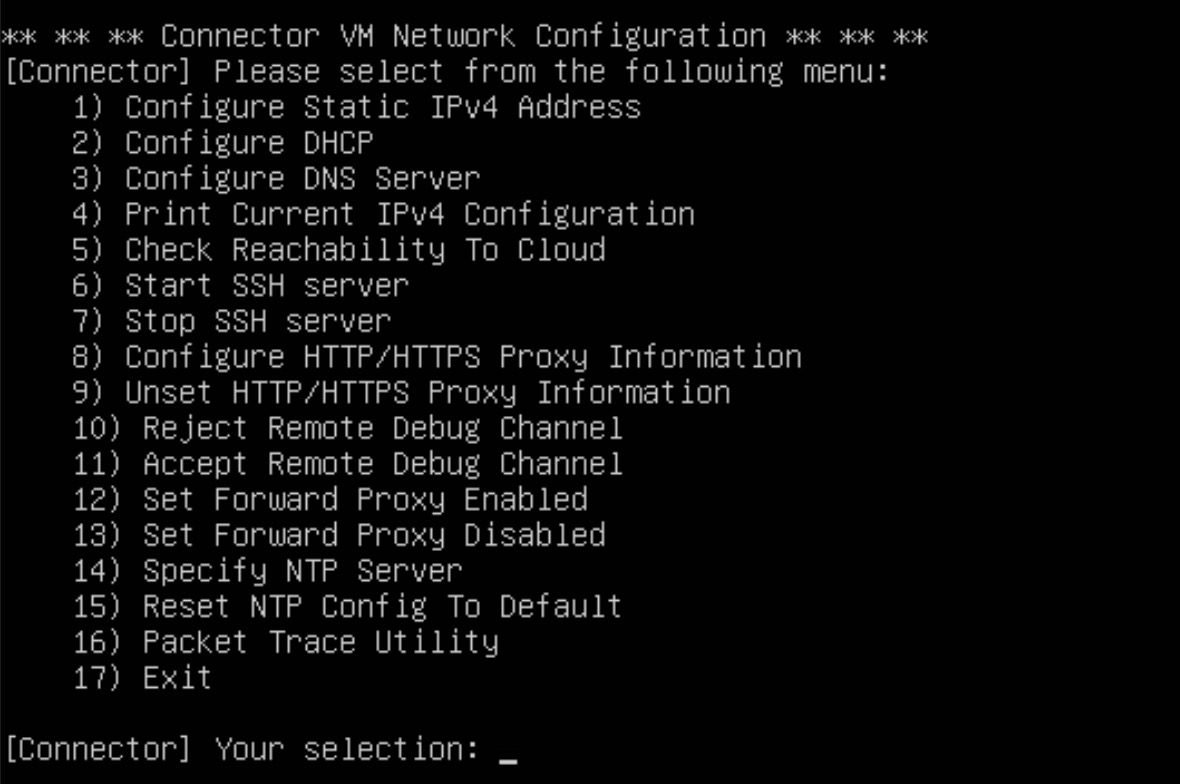
- Select an option from the console menu and enter the required information to perform network configuration task.
These tasks apply only to connectors installed in VMware or VirtualBox environments.
| Console menu option | Task | More info |
|---|---|---|
| 1) Configure Static IPv4 Address | Assign a static IP address to a connector | Enter a static IP, netmask, gateway and DNS server for this connector. Next, select 5). |
| 2) Configure DHCP | Configure DHCP for a connector | In Configuring DHCP. Proceed? type y. Next, select 4). |
| 3) Configure DNS Server | Configure a DNS configuration server to a connector | Enter the DNS server address. Connector points to a new DNS server, and pings google.com and the mgmt.bubblewrapp.net to ensure connectivity. Next, select 4). |
| 4) Print Current IPv4 Configuration | Check connector connectivity | Note the connector's IP address, netmask, gateway, DNS settings, and proxy configuration. Next, select 5). |
| 5) Check Reachability To Cloud | Verify connectivity | The connector uses www.google.com and www.akamai.com to ensure connectivity. |
| 6) Start SSH Server | Start the SSH server | Message about SSH start and a process number appears. |
| 7) Stop SSH Server | Stop the SSH server | Message about SSH stop and that no process was found appears. |
| 8) Configure HTTP/HTTPS Proxy Information | Configure a forward proxy server | Type y, enter the URL, and port number for the forward proxy (for example, http://192.162.1.1:3128). Connector uses the new forward proxy server, and use Enterprise Application Access and pings google.com to ensure connectivity. |
| 9) Unset HTTP/HTTPS Proxy Information | Unset a forward proxy server | Type y. The forward proxy is unset and the service is restarted with a new IP configuration. After configuration change, it pings www.google.com and mgmt.bubblewrapp.net to ensure connectivity. |
| 10) Reject Remote Debug Channel | Disable remote debugging | Keep remote debugging disabled by default. |
| 11) Accept Remote Debug Channel | Enable remote debugging | Enable to solve connector issues with support. Next, select 10). |
| 12) Set Forward Proxy Enabled | Enable a forward proxy | In Configuring Set Forward Proxy. Proceed? type y. Connector establishes a connection to the applications behind the forward proxy. |
| 13) Set Forward Proxy Disabled | Disable a forward proxy | In Configuring Unset Forward Proxy. Proceed? type y. Connector disables a connection to the applications behind the forward proxy. |
| 14) Specify NTP Server | Configure an NTP server | In Configuring NTP Server. Proceed? type y. In Specify NTP server name enter the server name. |
| 15) Reset NTP Config To Default | Reset the NTP configuration to the default server | In Configuring NTP Server To Default. Proceed? type y. |
| 16) Packet Trace Utility | Generate a Packet Capture (similar to TCP Dump) using the Packet Trace Utility | See Packet Trace Utility |
| 17) Exit | Leave the console menu |
Assign a static IP address to a connector
-
Go to the connector console. If the screen is blank, press any key to bring the text back up. An operational status message appears for the connector.
-
Pressing ALT+F3 (for Mac users: FN+ALT+F3 ).
-
Select 1) Configure Static IPv4 Address.
-
Follow the prompts and enter a static IP, netmask, gateway and DNS server for this connector.
-
Once complete, press Esc to return to the configuration menu.
-
Verify connectivity. Select 5) Check Reachability to Cloud.
Configure a DHCP address for a connector
DHCP is a network protocol used to assign dynamic IP addresses and provide configuration information to devices such as servers and others so they can communicate on a network using the Internet Protocol (IP).
-
Open the connector console. If the screen is blank, press any key to bring it back. An operational status message appears for the connector.
-
Press ALT+F3 (for Mac users: FN+ALT+F3 ).
-
Select 2) Configure DHCP.
-
When prompted at Configuring DHCP. Proceed? enter
y. -
Once complete, press Esc to return to the configuration menu.
Now that the connector has an IP address it will ping google.com and the EAA service to ensure connectivity.
- Select 4) Print Current IPv4 Configuration to verify the IP configuration and that the connector has been assigned an IP address.
Configure a DNS server for a connector
This procedure only applies to connectors installed in VMWare or VirtualBox environments.
-
Open the console connector. If the screen is blank, press any key to bring it back. An operational status message appears for the connector.
-
Press ALT+F3 (for Mac users, FN+ALT+F3 ).
-
Select 3) Configure DNS Server.
-
When prompted, enter the DNS server address and press Enter.
Your connector is now pointing to a new DNS server. It will ping google.com and the EAA service (mgmt.bubblewrapp.net) to ensure connectivity.
-
Once complete, press Esc to return to the configuration menu.
-
Select 4) Print Current IPv4 Configuration to verify the IP configuration and that the DNS server address is the one you entered.
Check connector connectivity in the connector console
If your connector fails to check-in to EAA after five minutes, there may be a problem with its networking dynamic host configuration protocol (DHCP) configuration or an outbound connection through your firewall or forward proxy.
-
Go to the Connector Console. Press ALT+F3 (for Mac users: FN+ALT+F3 ).
-
Select 4) Print Current IPV4 Configuration.
Note the connector's IP address, netmask, gateway, DNS settings, and proxy configuration.
-
Once complete, press Esc to return to the configuration menu.
-
Verify connectivity. Select 5) Check Reachability to Cloud.
In Enterprise Center, the connector status for the connector changes to Connector is running.
If connectivity continues to fail, contact support.
Accelerate connector connectivity time with the cloud
Make sure that the connector VM can reach the Internet and the Akamai cloud. To confirm reachability:
-
Go to the Connector Console. Press ALT+F3 (for Mac users: FN+ALT+F3 ).
-
To verify your IP and DNS configuration in the connector console select 4) Print Current IPV4 Configuration.
-
Once complete, press Esc to return to the configuration menu.
-
To verify connectivity select 5) Check Reachability to Cloud. The connector uses
www.google.comandmgmt.stage.bubblewrapp.netto ensure connectivity. -
Press Esc to return to the configuration menu.
If your connectors run within Amazon, make sure the connector instance is configured with the correct security policies to allow outbound traffic to any IP for port
443.
Configure a forward proxy server for a connector
Depending on your network configuration, you may need to route all external communication to or from a connector through a forward proxy server.
-
Go to the connector console. If the screen is blank, press any key to bring up the opening screen.
-
Press ALT+F3 (for Mac users: FN+ALT+F3 ).
-
Select 8) Configure HTTP/HTTPS Proxy Information.
-
At the prompts, enter
yand the URL and port number for the forward proxy (for example,http://192.162.1.1:3128).
Your connector now uses the new forward proxy server. It will ping google.com and use EAA to ensure connectivity.
Enable or disable remote debugging
Enable or disable remote debugging on Enterprise Application Access (EAA) from a connector console to run diagnostics.
-
An operational status message appears for the connector. If this screen is blank, press any key to bring it back.
-
Go to the Connector Console. Press ALT+F3 (for Mac users: FN+ALT+F3 ).
-
Select 11) Accept Remote Debugging Channel.
After resolving the issue, select 10) Reject Remote Debug Channel to disable it again, which is the default value. Remote debugging must be disabled unless you are working with support to solve connector issues.
Updated 5 months ago