Install connector in VMware
VMware is a virtualization and cloud computing software provider. VMware bases its virtualization technologies on its bare-metal hypervisor ESX/ESXi in x86 architecture. It allows you to run multiple virtual machines on a single physical machine, with each virtual machine sharing the resources of that one physical computer across multiple environments. Different virtual machines can run different operating systems and multiple applications on the same physical computer.
VMware vSphere is a cloud operating system, or virtualized data center platform. VMware vSphere includes the following components:
-
VMware ESX / ESXi hypervisor. A type-1 hypervisor that functions as the virtualization server.
-
VMware vCenter Server. Manages vSphere environments.
-
VMware vSphere Client. Installs and manages virtual machines through the hypervisor. It allows you to deploy and export virtual machines, virtual appliances (a preconfigured virtual machine that typically includes a preinstalled guest operating system and other software), and vApps stored in Open Virtual Machine Format (OVF).
-
VMware VMFS. The file system component from VMware.
Create and download a connector in EAA
Create an Enterprise Application Access (EAA) identity connector and download the connector file to install in a virtual environment.
-
Log in to Enterprise Center.
-
In the Enterprise Center navigation menu, select Application Access > Clients & Connectors > Access and Identity Connectors.
-
Click Add New Connector (+).
-
Enter a connector name and an optional description.
-
For Package select VMware.
-
(Optional) If you need remote debugging, enable Debugging.
-
Click Save.
The connector you created appears in Connectors list page. You will see Created in the Status column. A banner appears indicating that you will receive an email when the connector file is ready for download. Click the Download Template link. -
Download the connector file and save it in a secure location. The contents of the connector
.tgzfile is required to set up the connector in the virtual environment.
It may take some time before your connector file is available for download.
Next, install the connector in a virtualized environment.
Install the connector in VM
After you create and download a connector in EAA, you can install it in your virtualized environment (VM).
Connector footprint:
| Requirement | Recommended |
|---|---|
| Processors | Intel-VT, or AMD-V with hardware virtualization enabled four cores |
| Memory (RAM) | 8 GB |
| Storage | 16 GB |
| Network | 1 vNIC,1 GB/s, Static IP address or dynamic IP assigned from DHCP server, DNS |
- Install your EAA connector VM in either vSphere, VMware Workstation, VMware Player, or Virtual Box. Follow the instructions from the Connector VM ready for deployment email.
Next, deploy the connector.
Deploy the connector
Initial Setup
- Download the VMware connector from the Enterprise Center.
- The connector downloads as a
tar.gzfile but the file extension may be incorrect in Microsoft Windows. Rename thetarfile totar.gzfile. For example, rename<filename>.tarto<filename>.tar.gz. - Extract the
/agentdirectory. - To deploy a connector with ESX or ESXi follow the steps below based on which version of ESX or ESXi you are using.
Deploy a VMware vSphere Client using ESX or ESXi versions earlier than 6.5
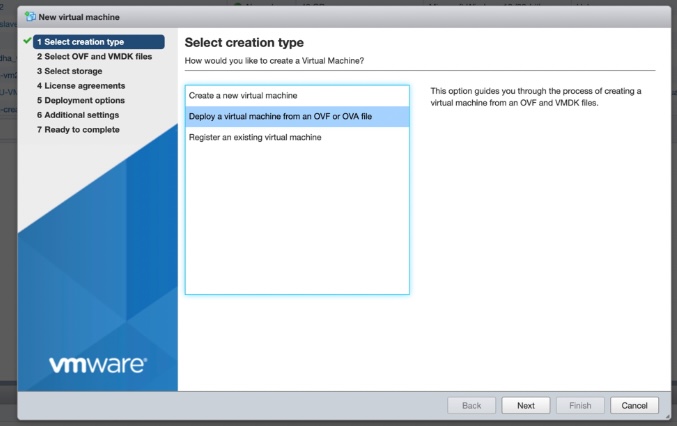
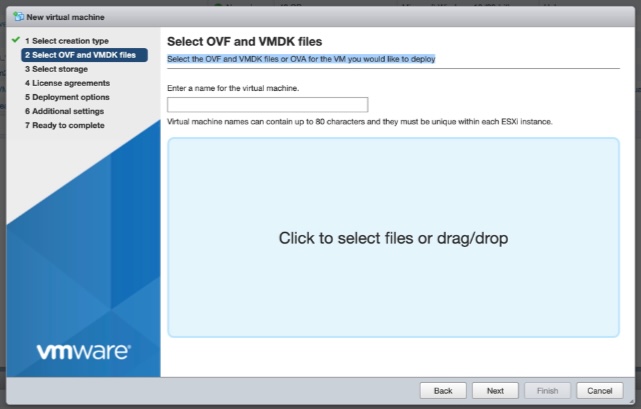
- In the VSphere Client:
a. Select Create/Register VM

b. Choose, Deploy a virtual machine from an OVF or OVA file

c. Upload the agent.ova file.

Make sure that the Open Virtualization Application/Appliance (OVA) deployment is completed successfully. Wait for the success message to appear.
Deploy a VMware vSphere Client using ESX or ESXi version 6.5 or later
Prerequisite: To deploy a connector with ESX or ESXi versions later than 6.5, use the VMware Open Virtual Machine Format (OVF) tool from a command line interface.
Execute this CLI command:
./ovftool -ds="<TARGET_DATASTORE_NAME_FOR_VSPHERE_LOCATOR>" --network="<TARGET_NETWORK_FOR_YOUR_VSPHERE>" --allowExtraConfig —name="<NAME_OF_VM_INSIDE_ESXI>” <PATH_TO_OVA FILE>/filename.ova "vi://IP_ADDRESS_OF_ESXI_SERVER"
Note: See OVF CLI Command line options guide for additional details.
Verify that connector is running
- Return to the Enterprise Application Access.
- In the Enterprise Center navigation menu, select Application Access > Clients & Connectors > Access and Identity Connectors.
- On the connector list page, check your connector. The connector status should be Ready and should see Connector is running.
If your connector fails to check-in after five minutes, there may be a problem with its networking DHCP configuration or an outbound connection through your firewall or forward proxy. You can use the connector VM console menu (option 5) to check the reachability to Cloud. If issues are not resolved also see, Troubleshoot connectors.
Updated 10 months ago
