SCIM provisioning with Okta
Provision users from Okta using SCIM
You can use SCIM protocol to import users' digital identities from Okta (the source system) to Enterprise Application Access, by creating SCIM directory in EAA as the SCIM target and Okta as the SCIM source.
Supported Features in EAA
- Push Users. Users in Okta that are assigned to the Akamai application in Okta are automatically added as members to your organization in Akamai.
- Push Groups. Groups and their members in Okta can be pushed to Akamai.
- Update user attributes. You can update the user attributes and mapped between EAA and Okta.
- Deactivate users. If users are deactivated in Okta, the changes are reflected in EAA quickly.
Follow the steps in the Configuration section to complete the SCIM provisioning with Okta.
Prerequisites
Sign in to your Okta account.
This integration supports endpoints compatible with the SCIM 2.0 specification.
Configuration
STEP 1: Create a new SCIM directory of type Okta in Enterprise Center
-
Log in to Enterprise Center.
-
In the Enterprise Center navigation menu, select Application Access > Identity & Users > Directories.
-
Select Add New Directory (+).
-
Enter name and description for directory.
-
In Service Type select SCIM, and in SCIM Schema select Okta.
-
Select Add New Directory.
-
Open your new directory Settings > General and copy SCIM base URL . Save it for Okta SCIM provisioning in STEP 4.
-
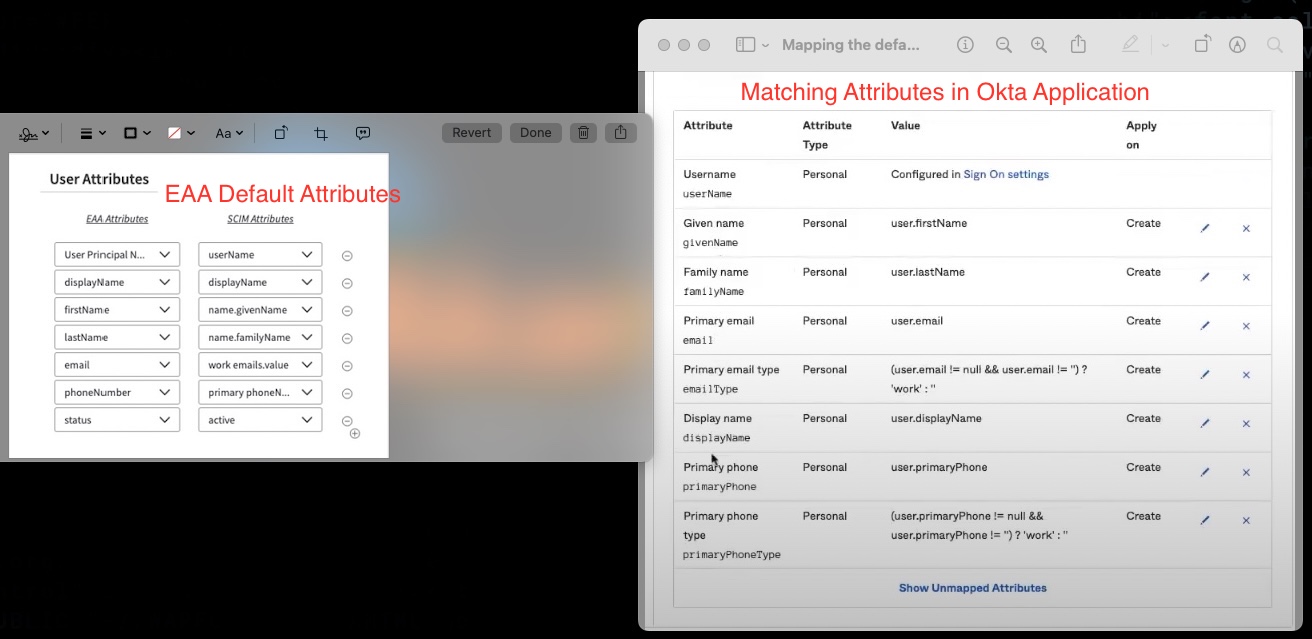
In Settings > Attribute Mapping check that these default User and Group mapping attributes are present. If not, add them:
| EAA Attributes | SCIM Attributes |
|---|---|
First Name | name.givenName |
Last Name | name.familyName |
Email | work emails.value |
Phone Number | primary phoneNumbers.value |
Make sure that your Okta SCIM application contains the same set of attributes. See the Attribute mapping in STEP 4.
-
In General select Create Provisioning Key.
-
Enter name and description for the key and select confirm (✓).
-
Copy Provisioning key by clicking on the copy to clipboard icon. Save it for Azure SCIM provisioning in STEP 4.
-
In General > Login preference Attributes select either User principal name or Email to choose for a user a way to log in.
-
Select Save.
The newly created SCIM directory appears in Directories list in Identity & Users > Directories.
STEP 2: Add user and group accounts in Okta
-
Sign in to your Okta account at
https://<your tenant name>.okta.com. Select Admin to get into your administrator console. -
To add an individual user account, go to Directory > People.
-
Select Add Person and enter this data in the Add Person dialog:
a. In User type, select User.
b. Enter the user's data.
c. Select Add User.
-
To add a group account, go to Directory > Groups.
-
Click Add Group and enter this data in the Add Group dialog:
a. Enter the group's name and description.
b. Select Add Group.
STEP 3: Create SCIM application in Okta
-
Sign in to your Okta account at
https://<your tenant name>.okta.com. Select Admin to get into your administrator console. -
In Applications > Applications select Browse App Catalog.
-
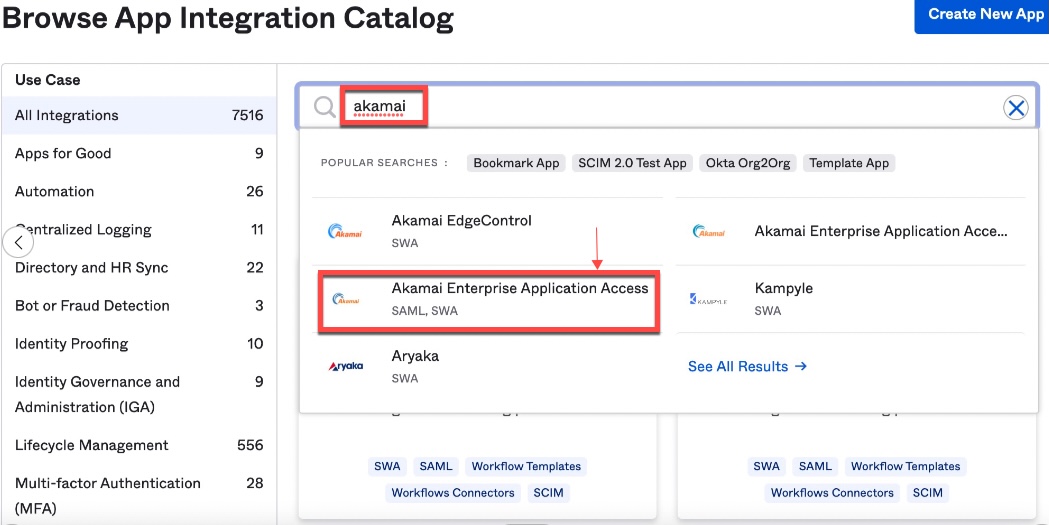
In Browse App Integration Catalog search for Akamai, and from the search results select Akamai Enterprise Application Access SCIM, SAML, SWA:

-
Click Add Integration on the next screen.
-
In the General Settings:
a. In the Application label, enter the application name.
b. For Base URL, enter the login portal URL of the IdP.
-
Click Next.
-
Accept default settings, and click Done.
Your SCIM application created in the Okta Admin portal is now ready.
STEP 4: Configure provisioning in Okta
Follow these steps to enable the communication between Enterprise Application Access and Okta by providing your authentication properties.
-
Sign in to your Okta account at
https://<your tenant name>.okta.com. Select Admin to get into your administrator console. -
Go to Applications > Applications.
-
In Applications select the EAA application you created in STEP 3. 3
-
In Provisioning select Configure API Integration.
-
In Provisioning select Enable API Integration.
Use the values you saved in STEP 1:
a. Paste your Provisioning key into API Token.
b. Select Test API Credentials to verify your credentials.
c. When you receive a confirmation, select Save.
Your Enterprise Application Access and Okta are now connected via SCIM protocol.
- In Provisioning you can configure the following settings:
-
To App. Here you can configure data that flows to the EAA service from Okta user profiles and through the integration.
-
To Okta. Here you can configure data that flows to Okta from the EAA service.
-
API Integration. Here you can modify your API authentication credentials.
-
In To App select Edit to enable operations for your group's endpoint.
-
Enable Create, Update and Deactivate Users, and select Save.
-
Map the default attributes in EAA (STEP 1.8) with these corresponding attributes in Okta:

Note
- In Okta, no "status" attribute is listed in the attribute mapping and is implicitly set from the Okta side.
- If there are any additional attributes that appear inside Okta Application, the admin must manually delete the attribute by clicking the X mark in the Attribute row, and clicking Remove Mapping in the dialog box.
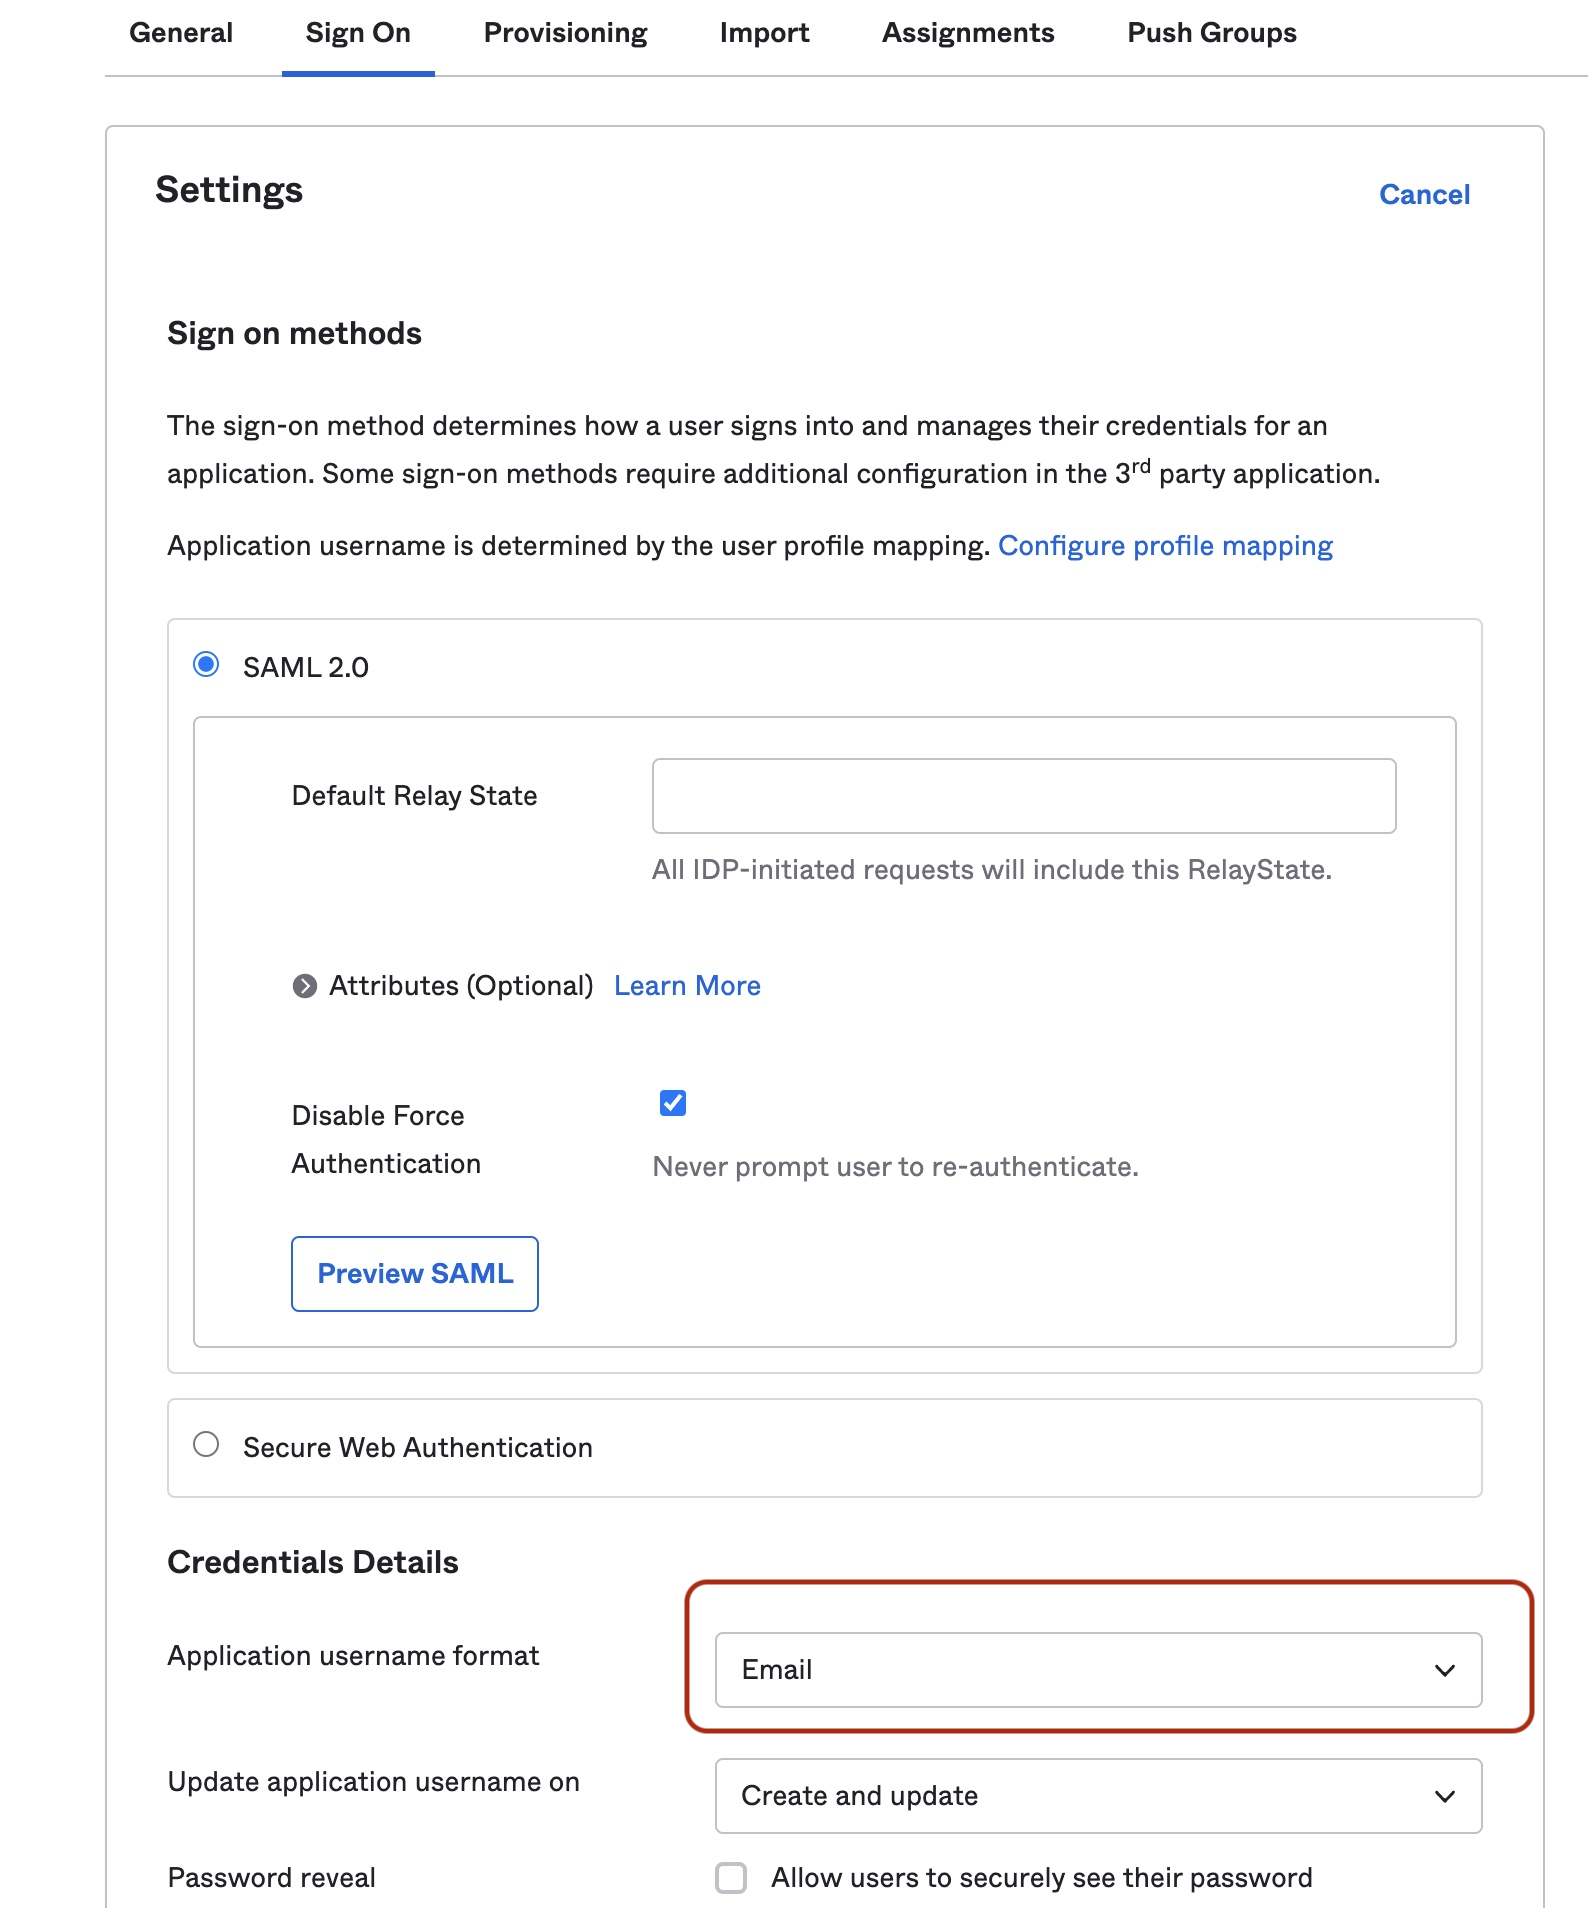
- In Sign On select Email as the Application username format.

- Your provisioning settings for your SCIM application are now configured. Next, you can optionally set up alias provisioning in the Okta Admin portal.
STEP 5: Assign groups to your SCIM application in Okta
Follow these steps to assign users to your SCIM application.
-
Log in to your Okta account at
https://<your tenant name>.okta.com. Select Admin to get into your administrator console. -
Go to Applications > Applications.
-
Select Assignments to assign individual users or groups. To assign a group select Groups.
-
In Assign SCIM app to Groups select Assign > Assign to Groups.
-
In Assign SCIM app to Groups search for a group you want to provision, and select Assign.
In Assign SCIM app to Groups you can enter additional information for the selected group. To continue select Save and Go Back. -
Select Done.
In SCIM Assignment you can see the newly assigned group or groups. -
Go to Push Groups to push groups to Enterprise Application Access and enable group-based management.
-
In Push Groups > Find groups by name enter and select the name of your assigned group.
The name of the selected group appears below. -
To add more groups select Save & Add Another, and repeat the previous step.
-
To accept default settings and confirm your groups select Save.
-
For each of the selected groups, open the Push Status and select Push now to override the users and their privileges in Enterprise Application Access via immediate transfer from Okta.
Known issues
- Presently, Akamai does not support the Sync password Okta provisioning feature, since it does not process or store password, even if it is sent in the request payload.
Updated 10 months ago
