Forward proxy support
Use a forward proxy with EAA Client
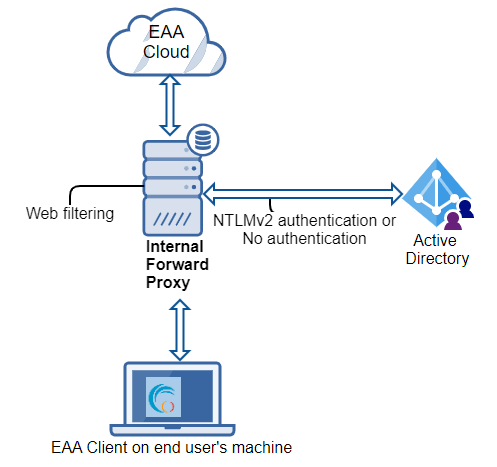
Configure EAA Client when you have a forward proxy within your organization. Some organizations use a forward proxy server within the corporate network to connect to the internet. The user's computer connects to the forward proxy server to perform operations like authentication, web filtering, and then the traffic is routed to the internet.
If EAA Client is installed on these machines, organizations require EAA Client to forward all Enterprise Application Access traffic to the forward proxy before reaching the Enterprise Application Access Cloud.

EAA Client supports both HTTP and HTTPS proxy type. With respect to proxy authentication, EAA Client supports No Authentication, NTLMV2 Authentication modes.
You need to configure the system proxy for the users' computers. You may use a Group Policy management tool (GPO) to push the system proxy changes to all the user's computers. Based on the OS, the system proxy setup is different as described below.
System Proxy configuration for Mac users
EAA Client sends secure web traffic. Use only these proxy settings for any interface (like Wi-Fi, Thunderbolt). For example, if you use a Wi-Fi interface, configure the following proxy settings:
-
In Select a protocol to configure select option for HTTPS traffic: Secure Web Proxy (HTTPS).

-
In Secure Web Proxy Server enter proxy server's URL host or IP address (port number).
If you select more protocols, EAA Client only sends secure web traffic.

If you select only Web Proxy (HTTP) as the protocol for any interface, EAA Client only sends secure web traffic (proxy settings don't work).

System Proxy configuration for Windows 7 users
Make sure you set the manual proxy settings for your organization's proxy server.
-
Open the Start Menu and type proxy.
-
Click, Configure proxy server.
The Internet Properties window opens. -
Select Connections.
-
In Local Area Network (LAN) settings click LAN settings.
-
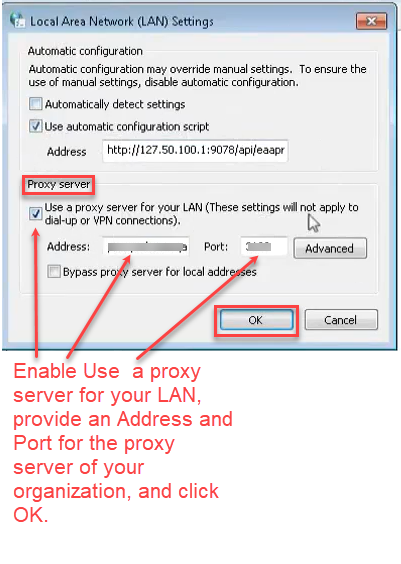
In Proxy server enter the Address and Port of the proxy server.

System Proxy configuration for Windows 10 users
Make sure you set the manual proxy settings for your organization's proxy server.
-
Open the Start Menu > Settings > Network & Internet > Proxy.
-
In Manual proxy setup select Use a proxy server.
-
In Address enter the IP address of proxy server.
-
In Port enter the port of the proxy server.
-
Add any exceptions list (optional).
-
Click Save.

Note
If you're using EAA Client 2.7 or earlier versions, EAA does not consider the system proxy exception list configured on the end user's machine. For EAA Client 2.8 version, the system proxy exception list configured on the end user's machine is considered and onboards the traffic accordingly. You must make sure that domains and hosts configured in the system proxy exception list is not a part of the tcp-type or tunnel-type client-access application.
Configure EAA Client with a forward proxy for Windows 10 and Mac
-
Run the silent install command with forward proxy mode enabled. Use the
--forwardproxy enableoption.
If you do not use this option in silent install, the forward proxy is disabled.- For example - to do a silent install for EAA Client for Windows 64x with an IdP portal URL
https://myidpportal.mycompany.comenable the forward proxy server, and to start EAA Client immediately after installation - download the EAA Client and run the command:
<EAA Client package directory>\EAAClient-x64.exe" --mode unattended --unattendedmodeui none --url <idp_portal_url> --forwardproxy enable- To do a silent install for EAA Client for MacOS with an IdP portal URL
https://myidpportal.mycompany.comrun the command:
sudo ./Contents/MacOS/installbuilder.sh --mode unattended --unattendedmodeui none --url https://myidpportal.mycompany.com --forwardproxy enable - For example - to do a silent install for EAA Client for Windows 64x with an IdP portal URL
When the user opens the EAA Client, the proxy is enabled in EAA Client Settings > Options > Advanced.
If your organization configured a forward proxy on the user's computer, the Proxy (URL host or IP address
of proxy server URL) and the Authentication type appear. The Network is Public (using Proxy).
If you are on a trusted network and proxy server is used the Network is On-premises (using Proxy) appears.
You cannot disable the forward proxy option on the command line with Silent install. You can only disable the forward proxy within the EAA Client settings window. EAA Client receives this information from the Proxy Settings configured by the network administrator.

-
Share the proxy credentials with the employees of the organization.
-
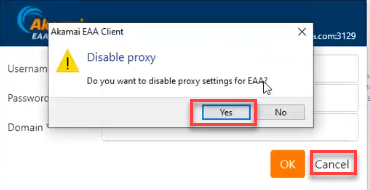
The user is prompted for proxy credentials and enters the Username, Password, and Domain and clicks OK.
If any of the credentials are incorrect, the user is prompted again with a dialog box.

If EAA Client detects proxy configured in the system, alert appears under Alerts:
Client is ready to use Proxy.
All traffic intercepted by EAA Client, now goes through the organization's internal forward proxy to reach the Enterprise Application Access Cloud, then to reach the app server.
All inbound traffic comes to the EAA Client through the forward proxy.
EAA Client checks the system proxy settings every 45 seconds for any changes and updates (like proxy server's URL or IP address, or port, domain).
If the user logs out or quits EAA Client, they are prompted to enter the proxy credentials when they login or authenticate again with EAA Client.
If you disable Enable Proxy option in the EAA Client settings window, and enable it again, you are prompted to enter the proxy credentials.
If the network administrator updates the PAC script inside Automatic proxy setup in the Proxy Settings on the Windows or macOS, EAA Client does not update the PAC details but issues an alert PAC file is already in use please disable existing PAC settings. The admin or user has to turn off the Proxy setup script in the Automatic proxy setup to fix this issue.

The user can disable the forward proxy in two ways:
-
Disable the Proxy in EAA Client > Options > Advanced.
-
Click Cancel when prompted to enter the proxy credentials, and click Yes for Disable proxy.

The user may not be able to use EAA Client to access TCP-type and tunnel-type client access applications when a forward proxy is configured by the organization because EAA Client doesn't intercept the traffic with this configuration.
Configure EAA Client with a forward proxy for Windows 7
Prerequisite:
-
In the Windows 7 OS proxy settings, you, or the user have to add proxy auto-configuration (PAC) file manually to the Script address when they want to use EAA Client with a forward-proxy server. The Script address is
http://127.50.100.1:9078/api/eaaproxypac.

-
In LAN Settings enable Use automatic configuration script, add the PAC script address, and click OK.
-
Run the silent install command with forward proxy mode enabled. Use the
--forwardproxy enableoption. If you do not use option in silent install, the forward proxy is disabled.
For example - to do a silent install for EAA Client for Windows 64x computer with an IdP_portal_URLhttps://myidpportal.mycompany.com, enable the forward proxy server and to start EAA Client to immediately after installation - download the EAA Client and run the command:<EAA Client package directory>\EAAClient-x64.exe" --mode unattended --unattendedmodeui none --url <idp_portal_url> --forwardproxy enableOr, to do a silent install for EAA Client for Mac computer with an IdP_portal_URL of
https://myidpportal.mycompany.comrun the command:sudo ./Contents/MacOS/installbuilder.sh --mode unattended --unattendedmodeui none --url https://myidpportal.mycompany.com --forwardproxy enable
You cannot disable the forward proxy option on the command line with Silent install. You can only disable the forward proxy within the EAA Client settings.
When the user opens the EAA Client, the Proxy is enabled in EAA Client Settings > Options > Advanced . If the organization has configured a forward proxy on the employees' computer, the Proxy (URL host or IP address of proxy server URL) and the Authentication type is displayed. The Network is Public (using Proxy).
-
If you are on a trusted network and a proxy server is being used check Network > On-premises (using Proxy).

-
Share the proxy credentials with the employees of the organization. The user is prompted for proxy credentials and enters the Username, Password, and Domain and clicks OK.
If any of the credentials are incorrect, the user is prompted again with the dialog box.

All traffic intercepted by EAA Client now goes through the organization's internal forward proxy to reach the Enterprise Application Access Cloud, then to reach the app server. All inbound traffic comes to the EAA Client through the forward proxy.
When EAA Client is not in use, the admin or user has to remove the PAC script manually.
For Windows, you get an alert when EAA Client has successfully detected proxy configured in the system (check the alerts inside EAA Client settings).

The user can disable the forward proxy in two ways:
-
Disable Proxy in EAA Client > Options >Advanced.
-
Click Cancel while entering the proxy credentials, and click Yes for Disable proxy.

The user may not be able to use EAA Client for accessing your TCP-type and tunnel-type client access application, if a forward proxy has been configured by the organization, since EAA Client does not intercept the traffic anymore.
Limitations of EAA Client forward proxy support
-
Auto-detection for Web Proxy Auto Discovery (WPAD) protocol and proxy auto-configuration (PAC) is not supported in this release.
-
MITM Proxy is not supported.
-
SSO-based authentication is not supported.
-
On macOS, when both VPN and EAA Client are enabled, any changes to the system proxy settings is not detected in the EAA Client settings.
-
EAA Client in Windows 7 does not support automatic management of PAC script configuration in system proxy settings.
-
For internet explorer browser configuration, add
127.50.100.1under Exceptions. See Microsoft docs for navigating to the Exceptions from the Settings > Internet options menu .

-
On a macOS, forward proxy is not supported with Safari browser.
Use alerts to debug forward proxy issues with EAA Client
Check the alerts to debug any commonly faced issues while configuring EAA Client with a forward proxy.
EAA Client issues several alerts in the EAA Client settings when you configure forward proxy when you have problems. You can set the verbosity to high and check the alerts, if you have problems.
- If the proxy server is not reachable from user's machine, you get the alert:
Connection TimedOut to Proxy: http...
Check reachability to Proxy Server
Check the proxy server host URL or IP address, port and make sure it's correct. Retry after correcting it.
- If the user's laptop is using a wrong authentication scheme, you get the alert:
Unsupported proxy authentication scheme
Please contact administrator
You should use NTLMv2 authentication or No authentication scheme. Contact the network administrator to fix it.
- If you entered wrong proxy credentials, if you set the verbosity to high and check the alerts, you see:
Authentication Failed to Proxy: https...
Please authenticate again
Enter the correct proxy credentials and retry to authenticate with the proxy server.
- If you have an existing PAC file in your Automatic Proxy Setup, you will receive this alert message:
PAC settings already in use: http...
Please disable existing PAC settings
You should disable the existing PAC settings.
Updated 10 months ago
