Cloud Directory
Every customer is provisioned with an EAA Cloud Directory to provide quick access to applications without Active Directory (AD) integration or to extend third party or contractor access to applications without VPN. By default all users are part of the main Users group. Enterprise Application Access doesn't store or cache passwords for users.
Here are some tasks that you can perform with the cloud directory:
Add users and invite them to the cloud directory or a specific identity provider
Add and invite, or invite again, users to the EAA service.
Add users to Enterprise Application Access by inviting them to the Cloud Directory. They receive an email with a link to activate their account. If a user is unable to activate their account, the email link may have expired. You cannot check if the link has expired. If you suspect the link has expired, invite the user again.
-
Log in to Enterprise Center.
-
In the Enterprise Center navigation menu, select Application Access > Identity & Users > Directories.
-
Click Cloud Directory.
The Users page opens. -
Click Add New User (+).
-
Enter email, first name, and last name.
-
Enter a default password for the the new user. Follow the password restrictions for creating the password. Note down the password and provide the password to the new user after validating the ID of the new user for the organization. Do not email the password.
-
For Identity Providers, select the IdP for which you want to invite the user from the list.
NoteThis option for selecting Identity Providers and inviting the users in Limited-Availability (LA) and can be enabled in your contract by Akamai Support.
-
Click Send Invite.
New users receive an email to create a password and complete their account authorization. -
Click Save User Changes (✓).
You can create more groups and add users to various groups for role-based authorization. -
If the user is unable to activate the account due to an expired email link, you can select Re-invite User from the menu next to the user.
The user receives an email with an active link to join the cloud directory.
For example, if a user with these values is added by the admin:
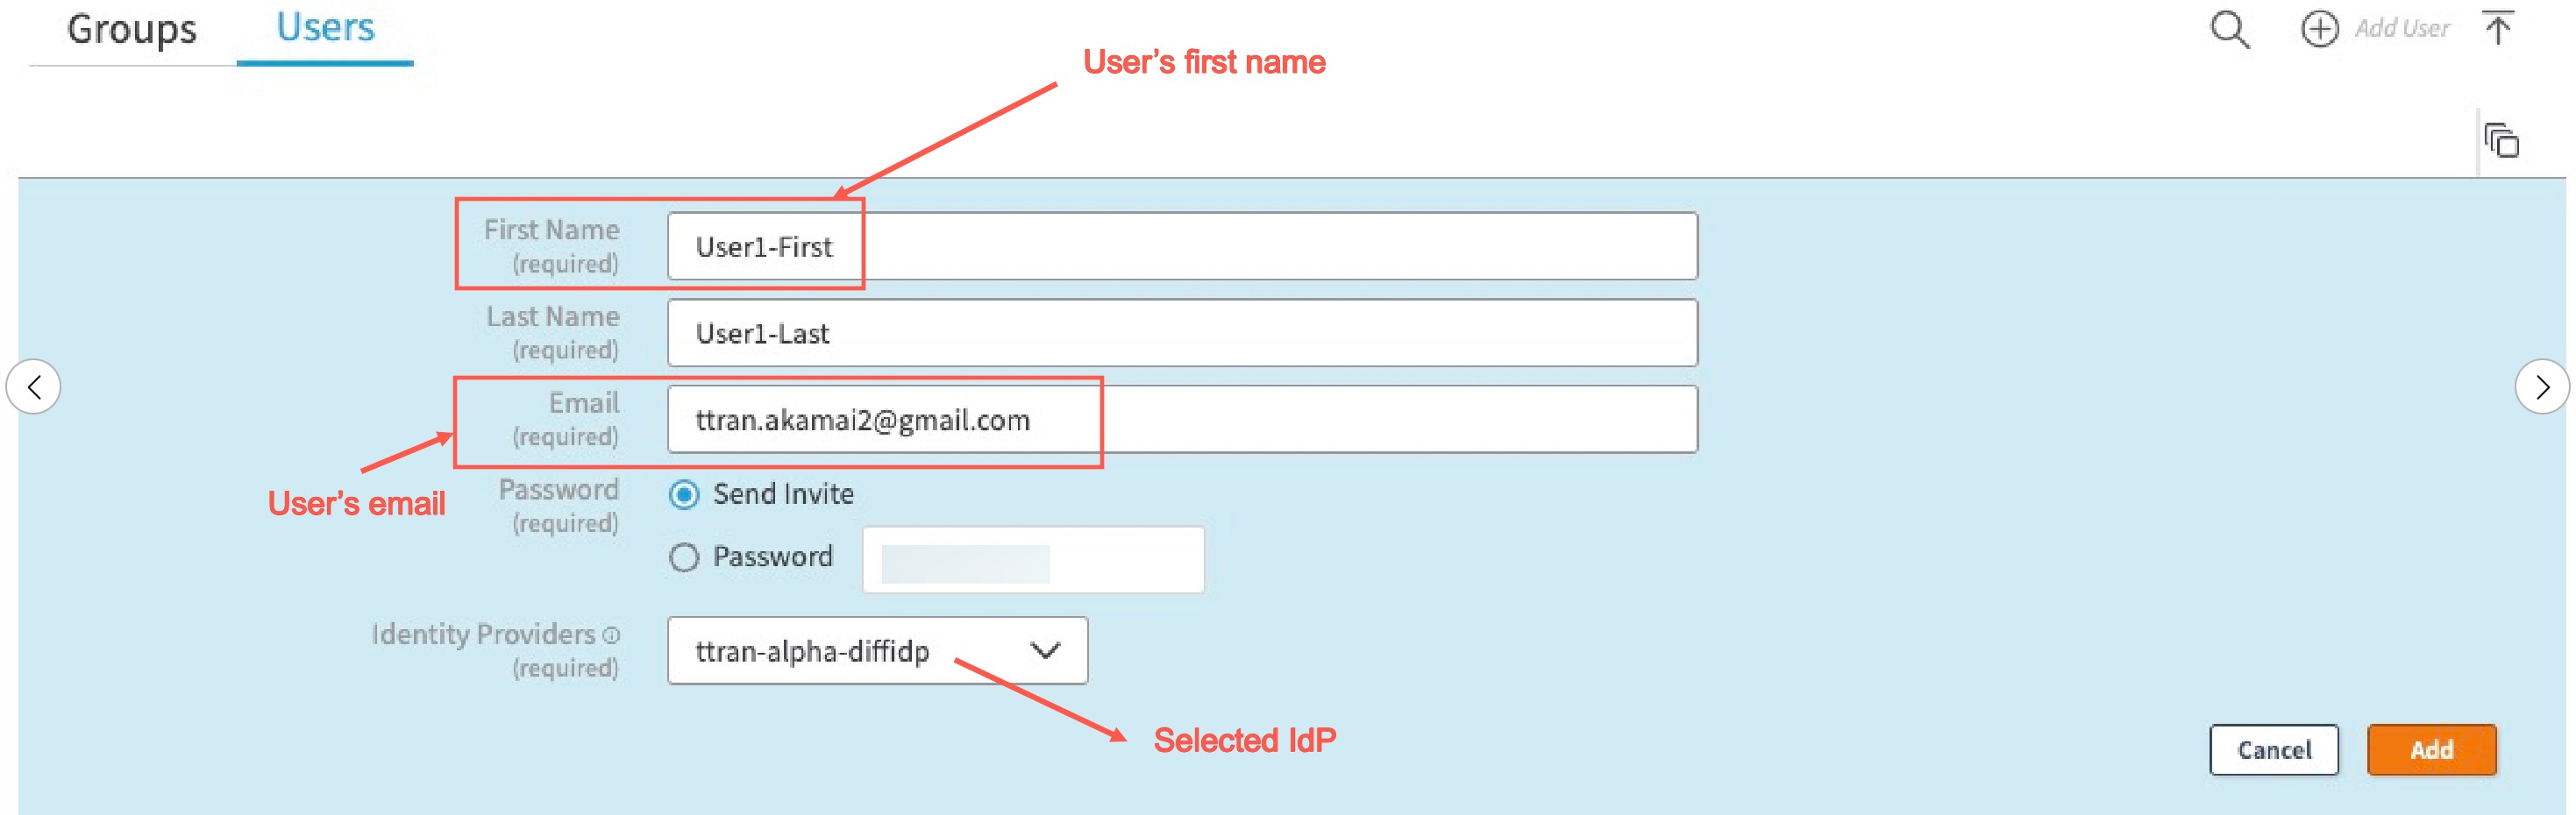
FIGURE 1: Sample user information and selected identity provider
An email of this format is sent to the email address provided:
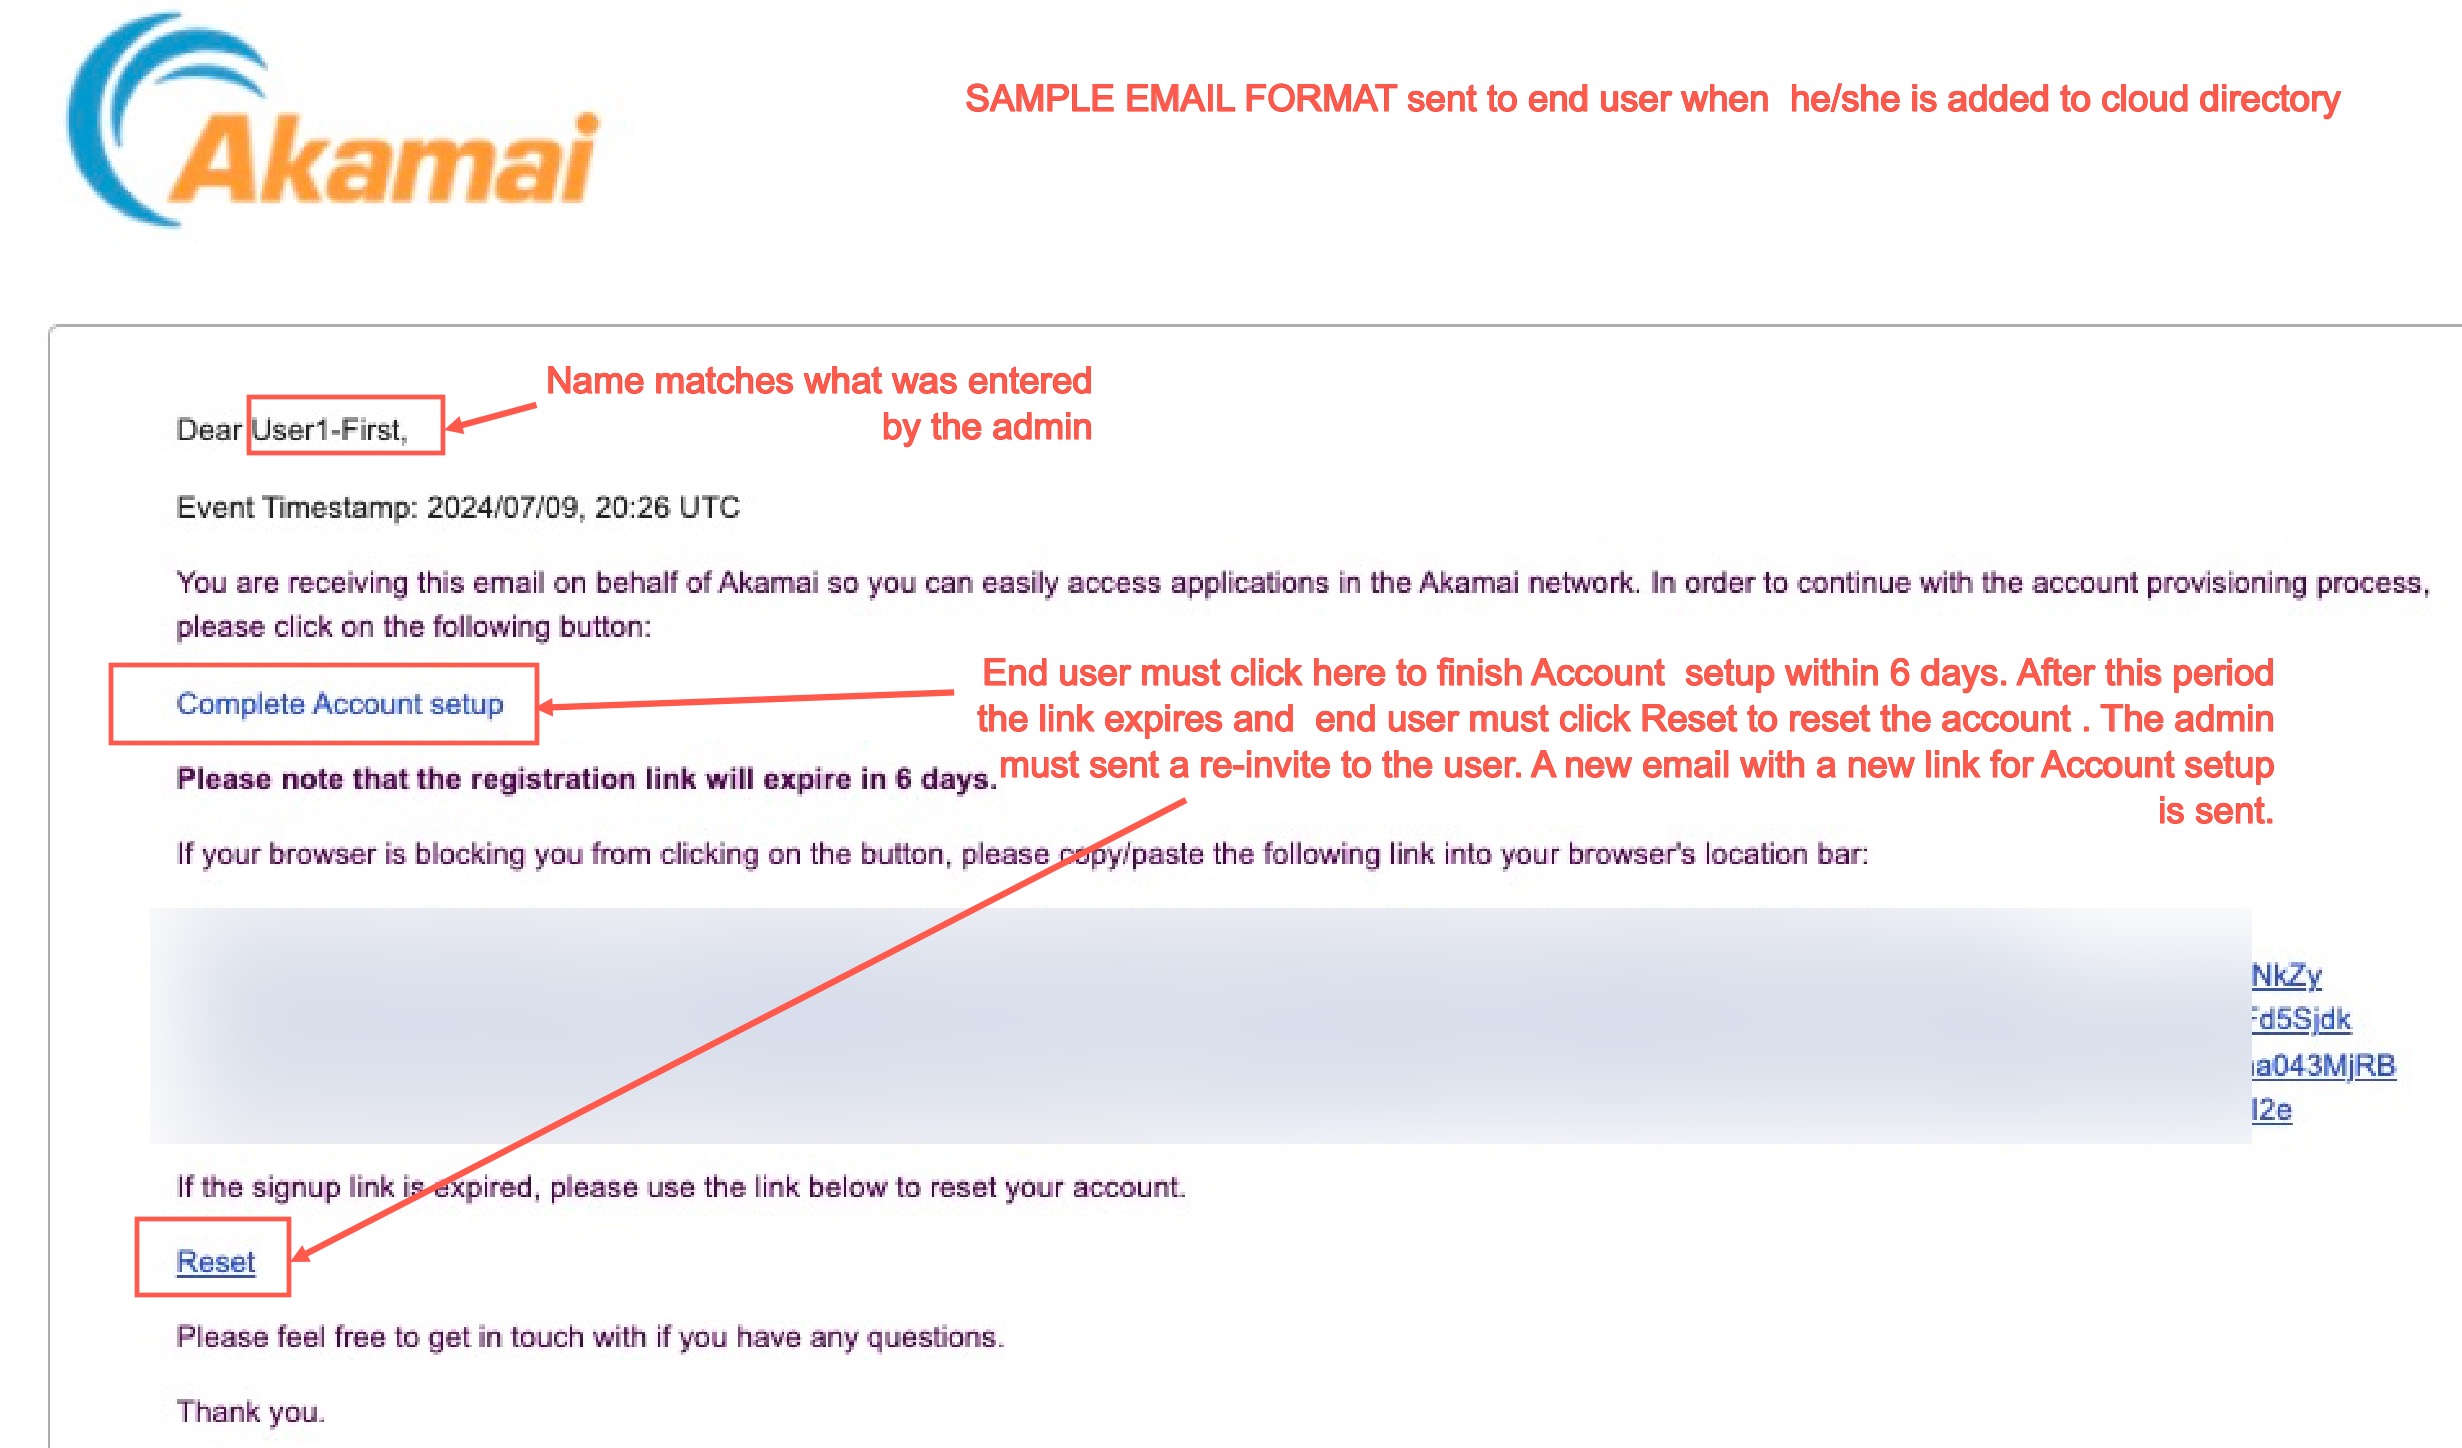
FIGURE 2: Sample email for inviting end-user
When the end user clicks Complete Account setup and enters the username/password, they will be allowed to access the EAA service. If they are invited to a specific IdP, that will appear in the login portal URL. In this example, the selected IdP, “ttran-alpha-diffidp” was selected in FIGURE 1 appears in the URL in FIGURE 3:
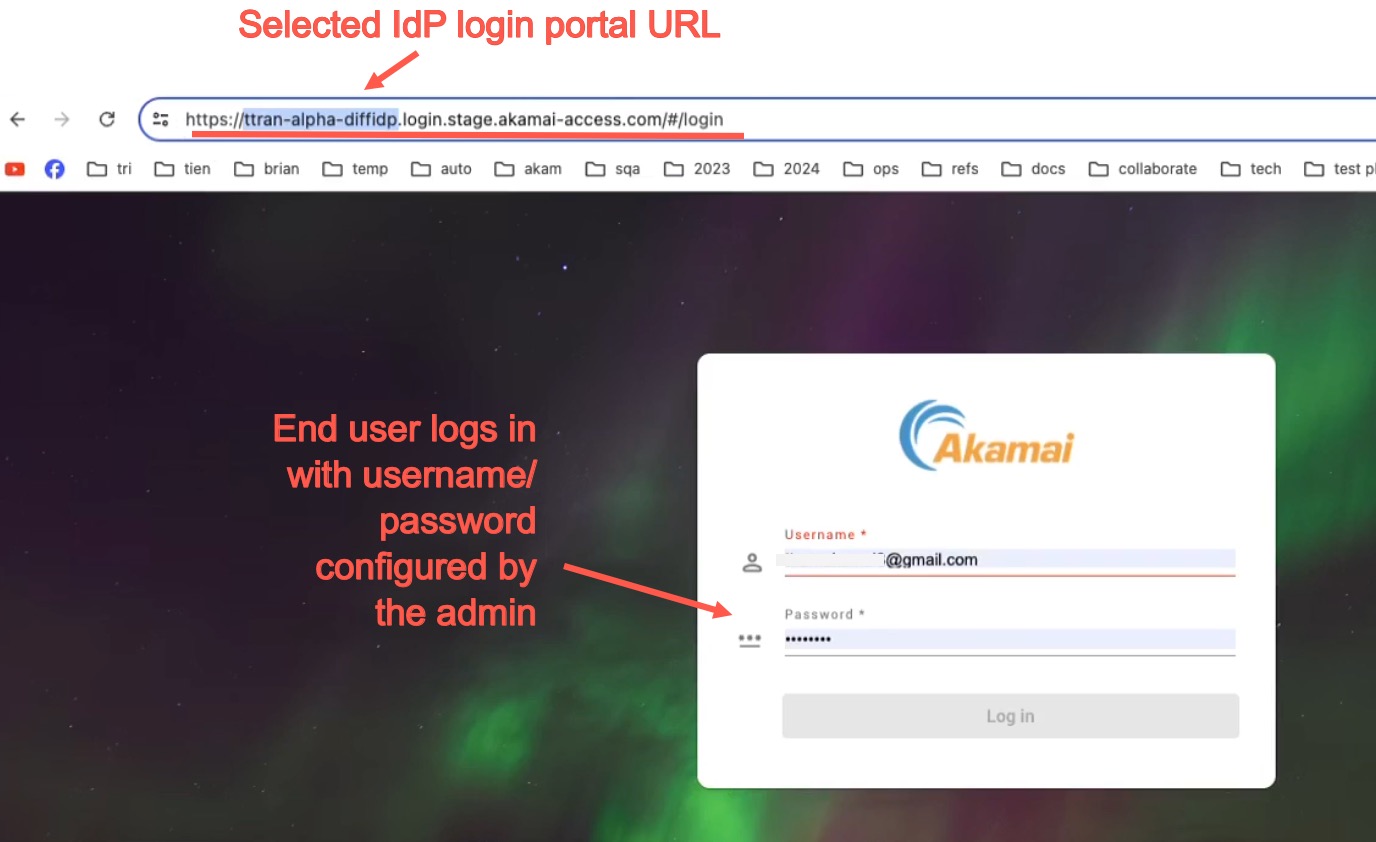
FIGURE 3: Login portal URL of selected IdP where end-user logs in
NoteIf your account does not have access to this feature then the end user is invited to access the default IdP associated with the cloud directory.
-
To perform a bulk upload, click Bulk Upload Users.
The Bulk Upload Users dialog appears. -
Select your
CSVfile and click Upload.
Password Restrictions
Enterprise Application Access is flexible when it comes to passwords, but there are limitations on what you can use for password names.
Create all user and system-level passwords using the following requirements. Passwords must not be predictable or easy to guess. These passwords must meet the following requirements or they are rejected by the authorization system:
-
Minimum length of eight characters.
-
Cannot be the same as the username, accountID, userID, or loginID.
-
Contain at least one character from the following categories:
- Uppercase characters
- Lowercase characters
- Numeric characters
- Non-alphabetic characters (special characters "~!@#$%^&*_-+=`|()[]:;"'<>,.?/".)
-
Passwords must not be shared or given to another user.
-
Group passwords are forbidden.
-
Passwords must not be stored in clear text.
-
Passwords must be changed or the account is disabled upon:
- Password compromise
- Suspected security breach
- Password disclosure
Add or remove users from the Cloud Directory admins group
Manage the Cloud Directory Admins group. If a user is unable to log in to the Akamai Enterprise Center, complete this procedure to make sure that the user is part of the Cloud Directory admin group.
-
Log in to Enterprise Center.
-
In the Enterprise Center navigation menu, select Application Access > Identity & Users > Directories.
-
Select Cloud Directory to open it.
-
Click Groups.
-
Locate the Admins group.
-
Click Add/Remove User A list of existing users displays.
-
Filter and select the required user or users from the list. Click Associate.
-
To edit user memberships for the admin group, select or deselect a user or users, and click Associate.
-
Click Save.
Bulk operations for Cloud Directory
Bulk operations like bulk delete users, bulk re-invite users, and bulk group add are available for Cloud Directory in Enterprise Center.
- Log in to Enterprise Center.
- In the Enterprise Center navigation menu, select Application Access > Identity & Users > Directories.
- Select the Cloud Directory.
On the top right corner, select the relevant bulk operation and follow the on screen guidance to perform the action:
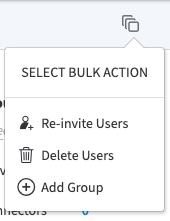
a. Delete Users. Allows the admin to delete multiple existing users at once. An alert message is sent indicating the successfully deleted user list and failed to delete user list.
b. Re-invite Users. Allows admin to send password reset/re-invite list to multiple existing users at once. User can verify password reset by logging into the login portal (identity provider) or user can re-register by clicking on the registration link.
c. Add Group. Allows the admin to select multiple existing customers and add them to multiple groups at once.
Upload users in bulk and add them to multiple groups
In the EAA Cloud directory, you can add multiple users to multiple groups by uploading a .csv file that has the data created in a predefined format.
Before you begin:
- Create a CSV file that contains users listed in each row. Make sure each row contains this information:
email, first_name, last_name, password, group(s)
Separate information with a comma. If you want to add a user to multiple groups, you must enclose them inside double quotes.
For example, if you’re users_groups.csv file has this data:
email1, first_name_1, last_name_1, pass_1, "test_group_1, users"
email2, first_name_2, last_name_2, pass_2, "test_group_1, test_group_2"
email3, first_name_3, last_name_3, pass_3, "users, test_group_3"
email4, first_name_3, last_name_3, pass_3, users
Then the user email1 is added to test_group_1 and users group; the user email2 is added to test_group_1 and test_group_2 group; the user email3 is added to test_group_3 and users group; and the user email4 is added to users group respectively.
- Save the CSV file to a secure location.
To upload users in bulk to Cloud Directory and add them to multiple groups with a CSV file:
- Log in to the Enterprise Center.
- In the Enterprise Center navigation menu, select Application Access > Identity & Users > Directories.
- Select the Cloud Directory.
- Click the Bulk Upload users icon in the top right corner.
- Select the .csv file you created.
- Click Upload.
Updated 5 months ago