Packet Trace Utility
With the EAA Packet Trace Utility, EAA adds the ability to generate and transfer packet captures from the connector to any verified host machine using Secure Copy Protocol (SCP) or SSH File Transfer Protocol (SFTP). You can encrypt the packets for better security and also filter the type of packets making it easier for troubleshooting, giving a similar experience like the WireShark tool or TCPDUMP capability. With this, the administrator can perform self-service troubleshooting before reaching Akatec or Akamai Support.
You can have a maximum of five capture files. After that, you will have to delete any of the existing capture files, to record any more captures. After 7 days, the capture files will be purged, if not sent to a verified host. The maximum size of a capture file can be 100 MB.
Note: Packet capture is not supported on Azure or AWS platforms.
Navigation through the menu: The EAA Packet Capture utility has a self-intuitive menu. Within the Packet Trace Utility, you can use the Up Down arrows to navigate through the menu and select Enter to make a selection. Or you can enter the number shown in the menu to make the selection. You can also use the Tab to go to the next screen or next section within a screen, and Escape to go to the Previous screen.
Open the Connector Console menu
-
Open the console of the connector. If the screen is blank, press any key to bring it back.
Connector is fully operationalmessage appears. -
Follow the instructions on the screen and press ALT+F3 (Windows) or FN+ALT+F3 (MacOS).
Connector VM network configurationconsole menu appears.
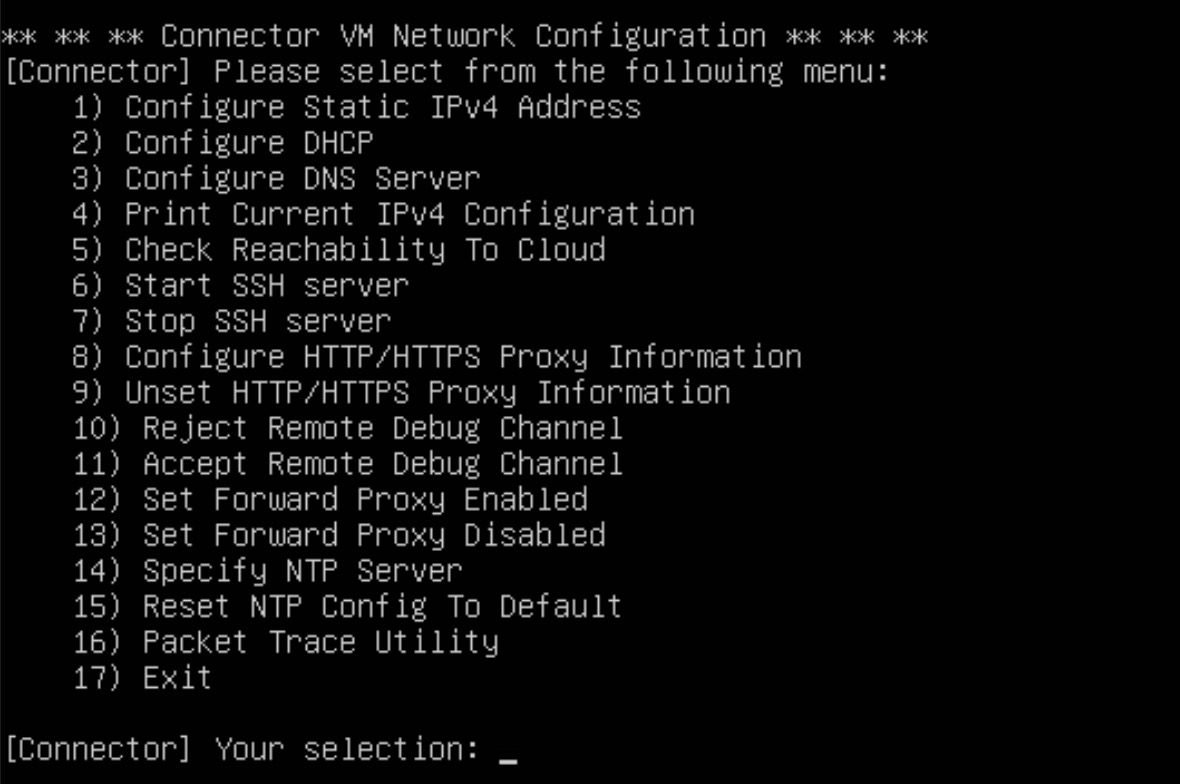
Connector Console main menu
Within the 16) Packet Trace Utility option, you can perform the Key Setup Process, Generate a Packet Capture File with or without filters, Manage the Capture Files, and Send it to a Host using SCP or SFTP protocol.
Key Setup Process
You can add different types of keys for verifying the Host, doing key-based authentication with the Host, and encrypting the packets while sending to the Host. Follow this procedure before you start your packet capture.
- Select 16) Packet Trace Utility and you come to EAA Packet Capture Utility screen. Go to (3) Settings
- On the next screen select (1) Key Setup
- Select (1) Add Key
- In the Key Details section, for Type, select one of the following:
SSH Public Key. The SSH Public Key is used to verify the host before the connector sends the packet capture to the host.
SSH Private Key. SSH Private Key for Key-based Authentication of the host.
GPG Encryption Key. GP Encryption Key If you want to encrypt - For File, select the path to public key on the host machine. It is generally a .pub file.
Enter the tab to go to the Pull from section.
Provide these details for the Host machine where you want to send the packet capture files:- Host. IP address of the host machine
- Protocol. Select either SCP or SFTP
- Verify Host. Leave this blank. For the first time, you will not be able to verify the host
- User. Provide the username to log into the host, which you setup when you configured the SCP or SFTP server.
- Auth: Select Password.
- Password: Provide the password required for the user to log into the SCP or SFTP server.
Note: For the very first time, you must use a password-based authentication. You cannot use key-based authentication, since keys are not yet loaded to the connector utility.
- Select Add.
You will see a message, Pulling key …. After it is done, the keys are added.
Generate a Packet Capture file
- Select 16) Packet Trace Utility. Select 1) Capture . This takes you to the Capture Screen. Select (1) Start/Stop to capture all traffic and go to step 3. If you wish to create a package capture file for certain types of traffic, for example, ARP (Address Resolution Protocol), TCP, etc you should create a filter and go to step 2.
- (Optional) To capture the packets for a particular type of traffic you must select a filter. Select (2) Change Filter,use up/down to select the filter you created, click (1) Select Filter. The Current Filter shows the selected filter. Select (3) Back.
In the Capture Options screen, provide these details:- Filename. A name for your capture file.
- Interface All the interfaces in your connector are shown. Select the interface you want the packet capture for.
- Duration (optional) Enter a number followed by s,m, or h for seconds, minutes or hours. For example, enter 5s for 5 seconds duration. The maximum size of the capture file is 100MB. If no duration is provided, the capture is automatically stopped when 100 MB is reached.
Note: If you do not provide the duration, you can use (1) Start/Stop to both start and stop the capture manually. But if your capture reaches 100MB, it will be automatically stopped since the maximum size is 100 MB.
Note: If no filter is chosen for the capture, you will see No filter chosen. at the top. If a filter is chosen, the filter name is shown at the top.
- Press OK.
You will see a Capture started message, and after it stops, you will see a Capture stopped message. The capture is saved as the filename in the Manage Captures.
Create a Filter
- Select 16) Packet Trace Utility. Select 1) Capture . This takes you to the Capture Screen. Select (2) Change Filter
- In the next screen select
- Provide these details:
- Name. A name for the filter.
- Filter expression Provide the type for filter. For example, if you want TCP type traffic only, enter TCP)
- Description A description for your filter
- Press OK.
The filter is created.
- Select (3) Back to go back to the previous screen to perform any other actions.
Delete a Filter
- Select 16) Packet Trace Utility. Select 1) Capture . This takes you to the Capture Screen. Select (2) Change Filter
- In the next screen move down to the filter till you select the filter name you want to delete..
- Enter (2) Delete to delete the filter.
The selected filter is removed. - Select (3) Back to go back to the previous screen to perform any other actions.
Managing Packet Captures
All of the packet capture files are stored here. You can have up to a maximum of 5 capture files. You can delete, transfer to Host using SCP or SFTP protocol, or open the Capture in the console.
You can get to the Manage Captures menu in two ways:
From top menu: Select 16) Packet Trace Utility. Select (1) Manage Captures.
From inside the Packet Capture start/stop screen, select (3) Manage Captures.
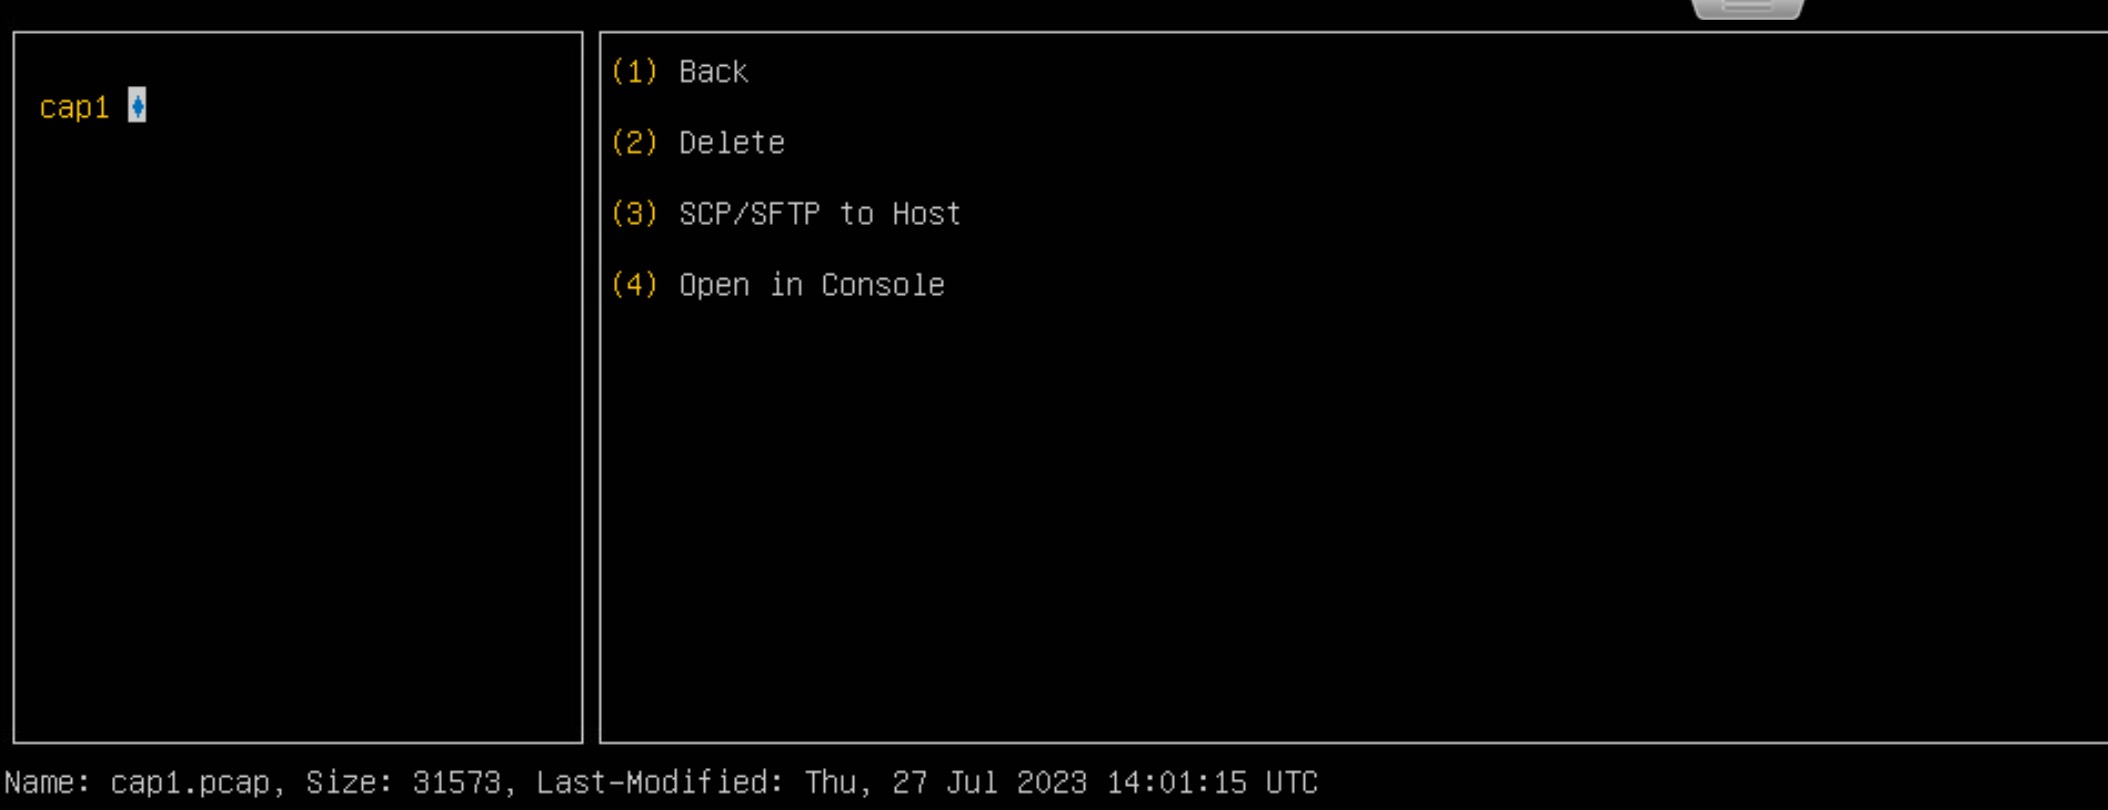
Manage Captures Screen
You can perform these actions inside Manage Captures:
(1) Back Navigate back to the earlier screen.
(2) Delete Delete capture file/s.
(3) SCP/SFTP to Host Send the packet capture file to a verified host using SCP/SFTP protocol.
(4) Open in console Open the packet capture file in connector console.
Check the packet capture file
-
Within the Manage Captures screen, select a capture file by pressing Enter next to the capture name. You will see a * when the capture file is selected.
-
Select (4) Open in console, to open the capture file. You can check the contents to make sure it is okay. You can also filter by any of the types in the Filter: , just like Wireshark utility. You can filter by Packet No, Time, source or destination IP address, Protocol like DNS, ARP, UDP, TCP, Port No, Packet length, or Other Info.
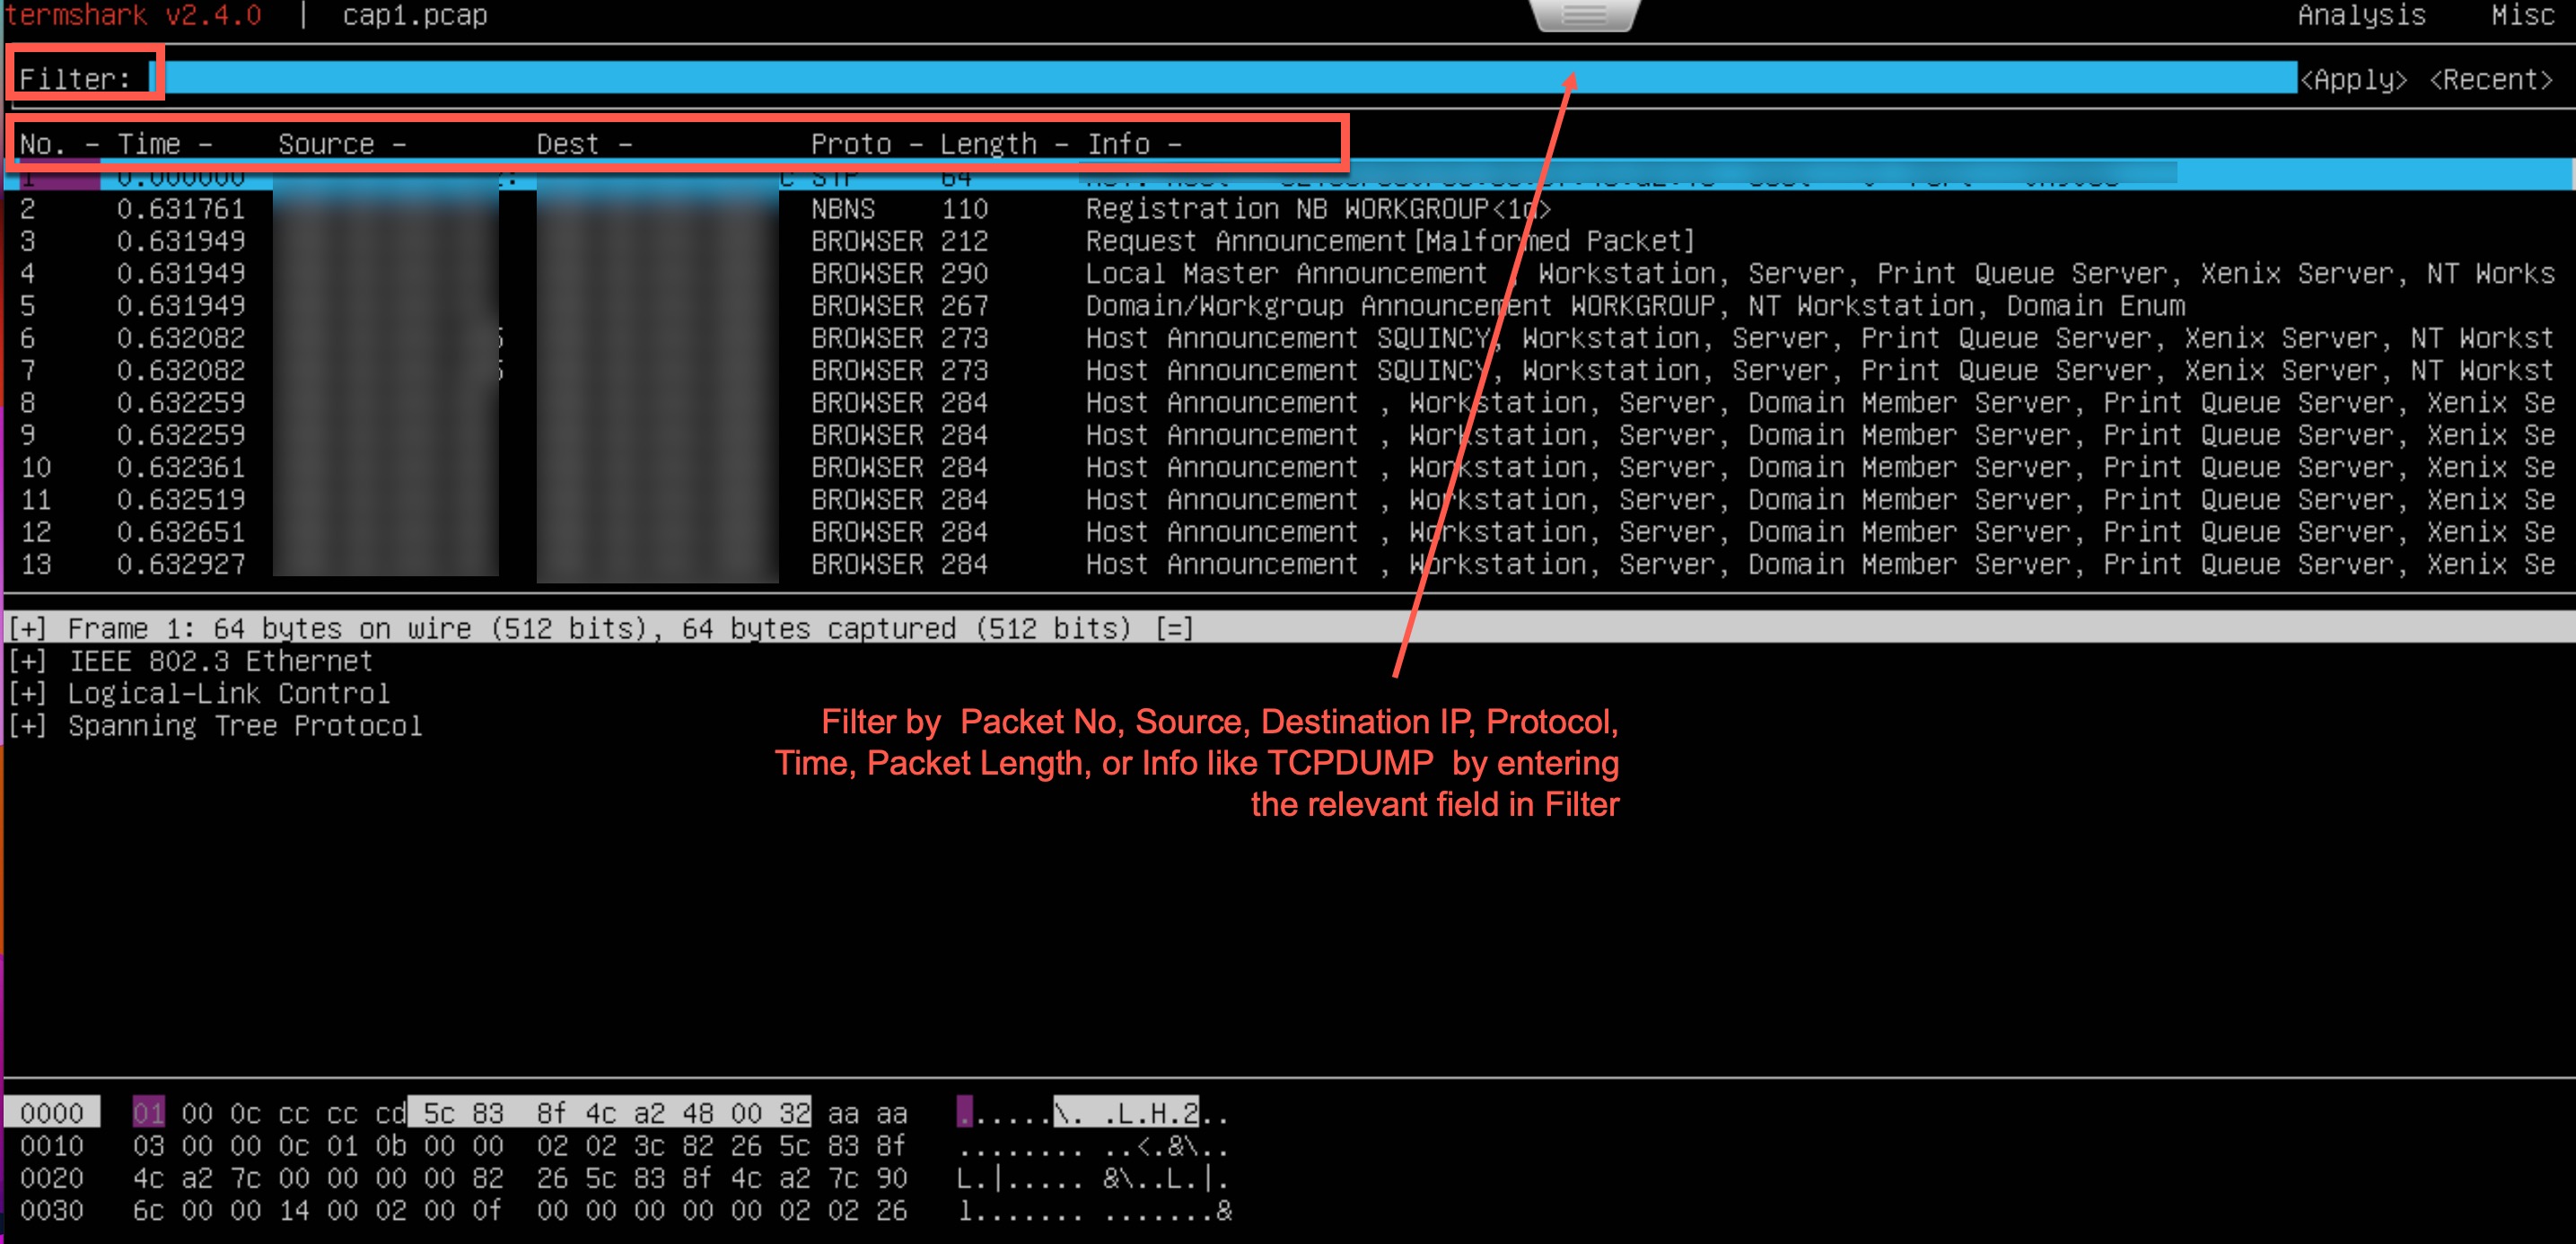
- After checking the capture file, press ESC , go to Misc at the top right, navigate to q | quit or press q, select for Do you want to quit?, to go back to the previous screen and perform any other actions. Normally, you would want to check your capture is okay and then send to the Host using SCP or SFTP protocol.
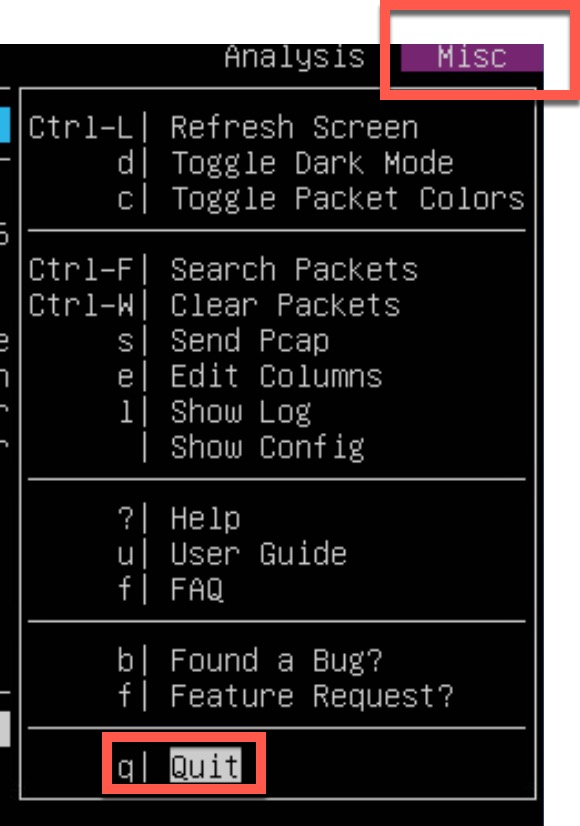
Note: Additional tasks that can be done with the termshark utility are:
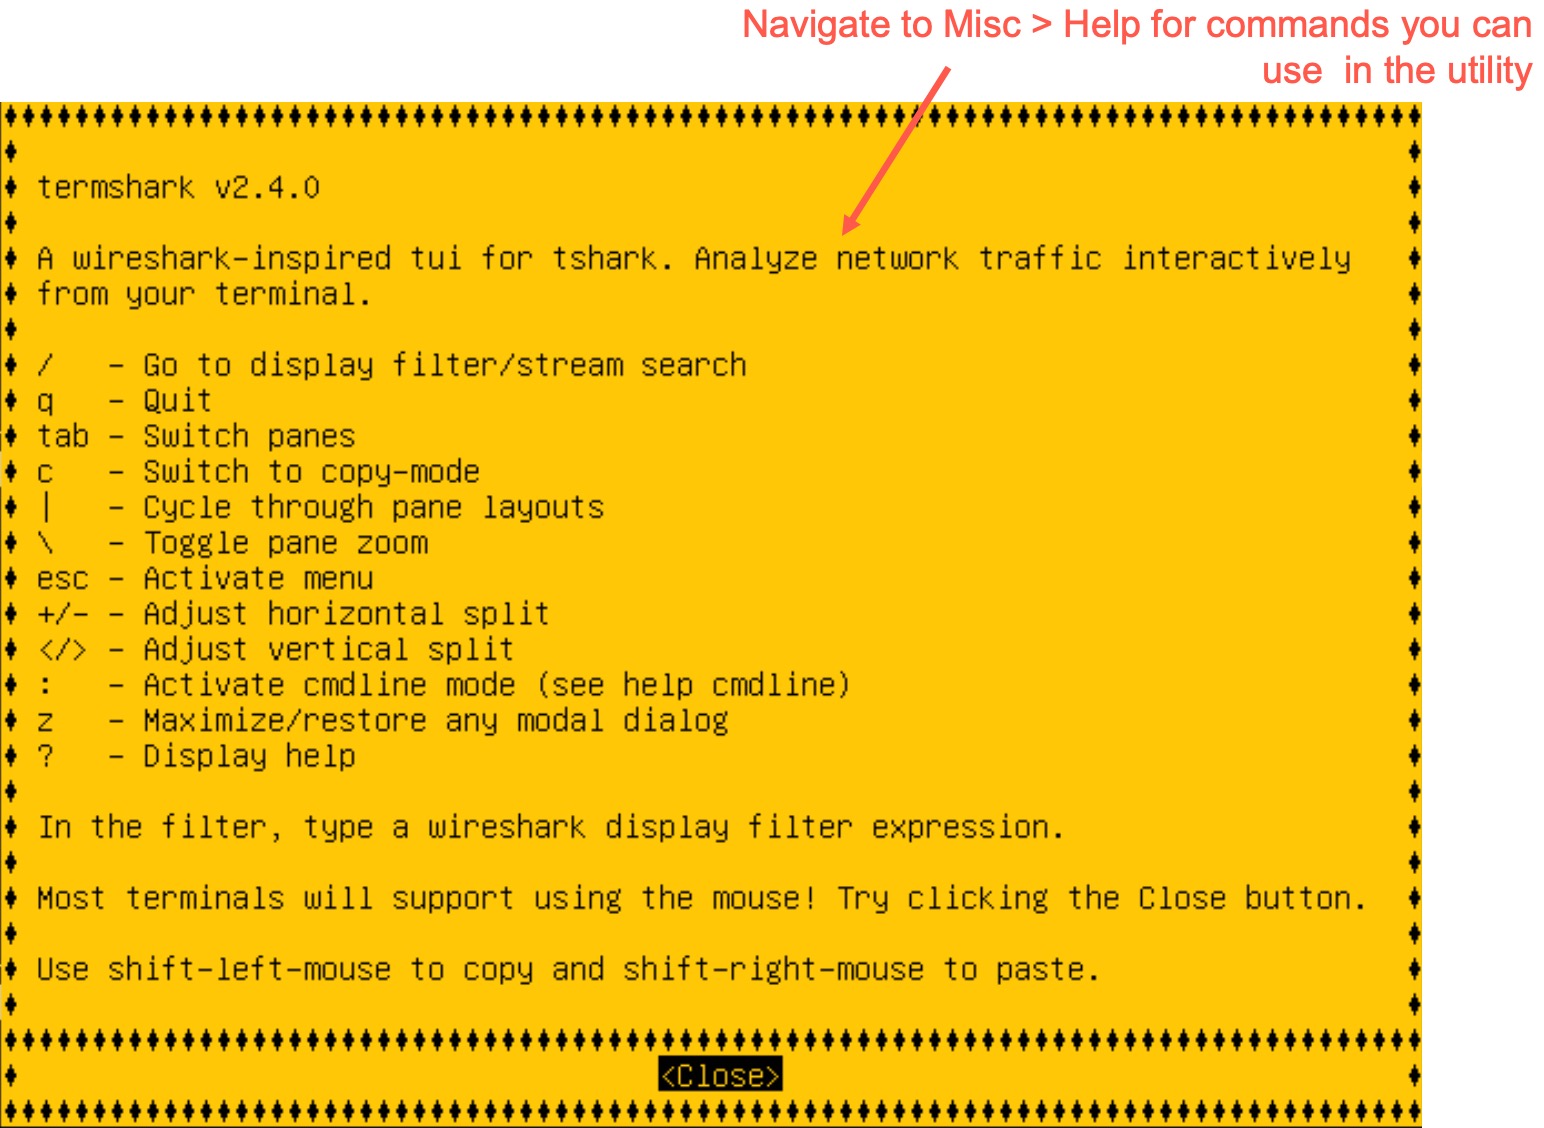
You can learn more about filtering and debugging captures in termshark documentation
Use SCP or SFTP to send to Host
Prerequisite: Complete the Key Setup process before you can send the packet capture file to the server.
Note: You may want to check the packet capture trace before sending it to a verified host.
You can use Secure Copy Protocol (SCP) or SSH File Transfer Protocol (SFTP) to transfer up to five packet capture files to a verified host from the Manage Captures screen.
- Within the Manage Captures screen, select one more of the capture files by pressing Enter next to the capture filename. You will see a * when the capture file is selected. Go down the list to select multiple captures and select Enter for the capture you wish to SCP/SFTP to the the host machine
- Select (3) SCP/SFTP to Host to SCP or SFTP to the Host.
- Provide these details:
- Host IP address for the hostname.
- Path Path where you want the file to be stored on the Host machine.
- Encrypt If you want the file to be encrypted for security, press Enter. An asterisk appears. You must add the GPG Encryption Key. See Key Setup Process.
- Protocol Select either SCP or SFTP.
- Verify Host Press Enter, an asterisk appears if the host is verifiable. The host is verified before sending the packet capture. You must add the SSH Public key of the Host. See Key Setup Process.
- User username for the host machine.
- Auth Select Password for password-based authentication, select Key for key-based authentication, Note: You must upload the SSH Private Key of the host on the connector machine to use key-based authentication. See KeySetup Process.
- Password - Password for the user to log into the host machine,
or Passphrase - Passphrase for Key-based authentication - Press Enter to save the information.
- After you are done working with your capture file, press (1) Back to go back to the previous screen to perform any other actions.
Delete capture files
- Within the Manage Captures screen, select one more of the capture files by pressing Enter next to the capture name. A * appears when the capture file is selected. Go down the list to select multiple captures and select Enter for the capture you wish to delete.
- Select (2) Delete, to delete the file/s
After you are done working with your capture file, press (1) Back to go back to the previous screen and perform any other actions.
Troubleshoot issues
If you get API error: 500. Failed to connect to remote server. Permission Denied message, check that the IP address for the SCP/SFTP server is correct, the username in User field, or Password is correct. Check to ping the server with the IP address to make sure it is not down. Verify these fields and try again.
Updated 10 months ago
