Connector Pools
Connector Pools allows you to manage all of your connectors in one place, thereby improving your productivity.
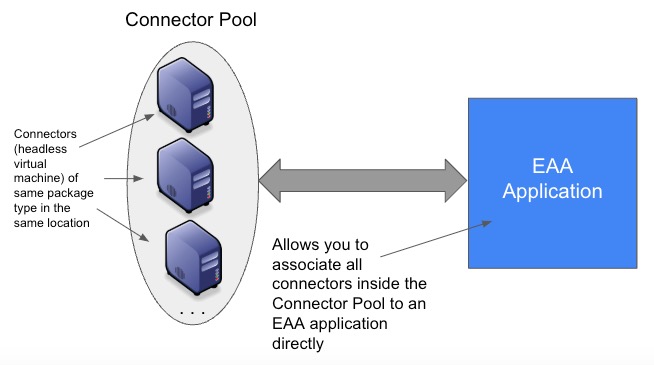
In EAA, you can group a set of connectors that are in the same geographical location and are of the same package type, to create a Connector Pool. You then assign this Connector Pool to a set of applications (of any type like web app, client-access app, RDP, SSH) defined within the Application Access Group (AAG), Directories, or Enterprise DNS Applications. If your organization has many applications you don’t have to assign the connector to each application and deploy it individually. This applies for Directories and Enterprise DNS applications. Changes are made in one place and applied in multiple areas thereby improving productivity and simplifying the onboarding process.
In addition, you can create a reusable registration token for Unified connectors, which can be used multiple times for installing the connector within the connector pool, allowing you to manage your connectors very efficiently.
You can also configure the Connector Pool to send alerts to notify the admin when any of the Connectors are down, unreachable, or their state changes.

You can associate a Connector Pool to an EAA application directly. The Connector Pool has connectors of the same package type and serves the application traffic.
This also simplifies connector management, since the connectors register themselves using the registration token, either using automatic registration or manual registration.
Create a Connector Pool
- Log in to the Enterprise Center.
- Navigate to select Application Access > Clients & Connectors > Connector Pools.
- Click Add Connector Pool.
- Provide these details:
Name: A name for the connector pool.
Description. A description for the connector pool.
Location. Provide a location for your connector pool. This is just a named reference for you and the connector does not physically reside at the location specified.
Package Type. Select a package that matches the package of the existing connector you want to assign. - For Pool type, select the default option of Standard, which provides secure access to applications within the data center for remote users.
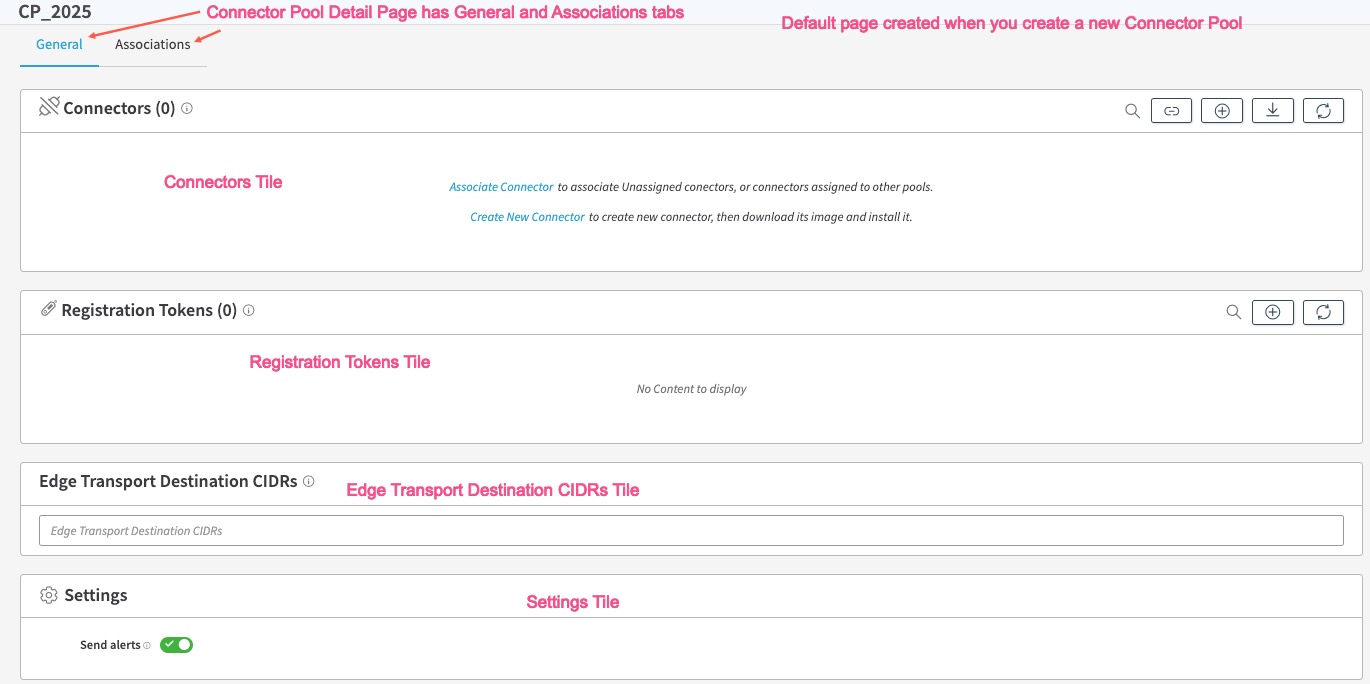
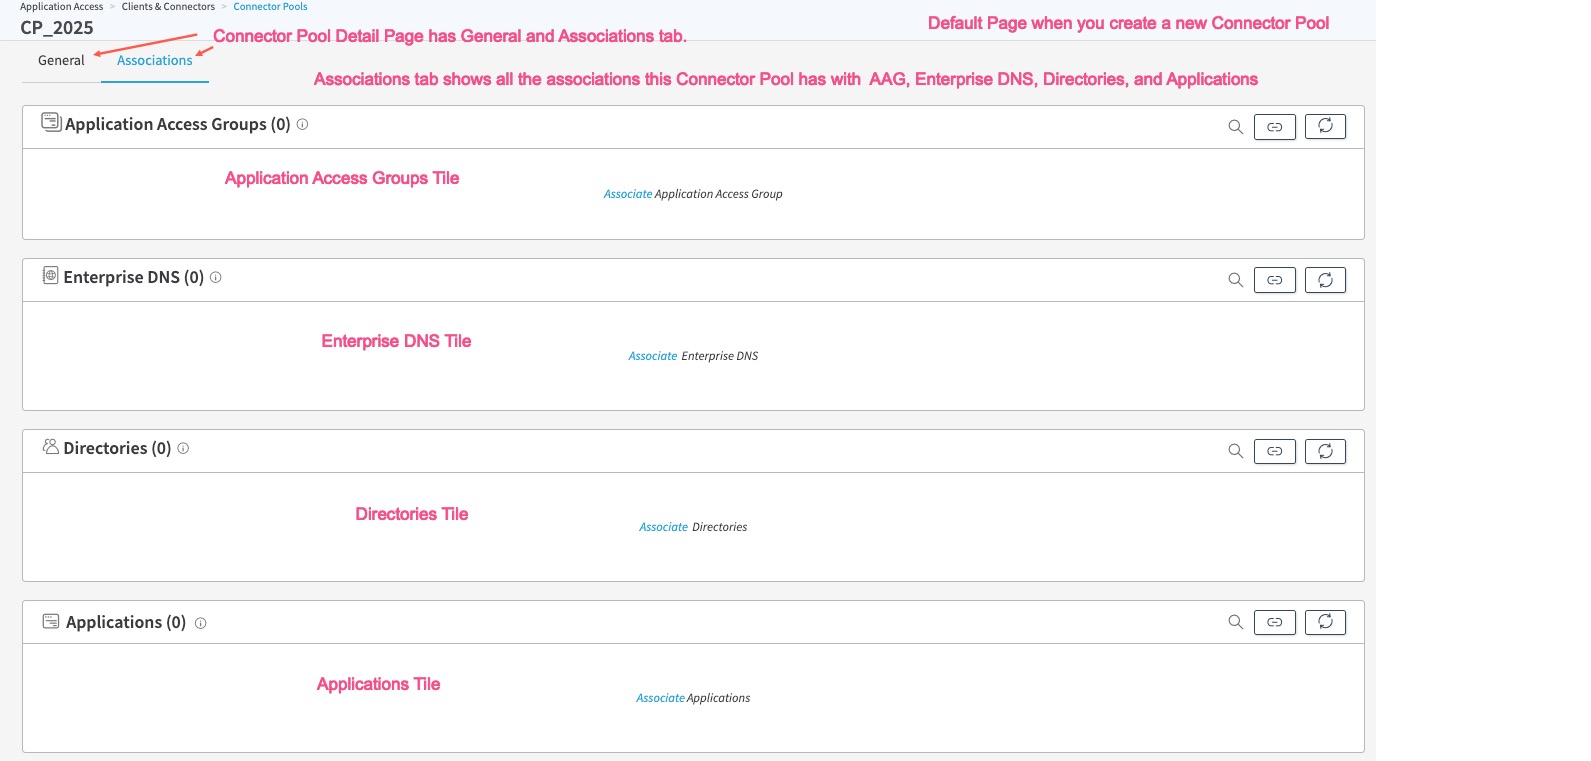
- Click, Create Pool.Your connector pool is created. You will see General tab and Associations tab.
In the General tab you will see empty Connectors, Registration Tokens, Edge Transport Destination CIDRs tiles. In the Settings tile, you will see Send alerts enabled by default.
Initially, in the Associations tab you will see that this Connector pool has no associations. It will not have any Application Access Groups, Directories, Enterprise DNS, or Applications associated with this connector pool on the Connector Pool detail page.
Associate existing Connectors to the Connector Pool
You can associate connectors that serve the applications in the AAG, Directories, or Enterprise DNS applications to the Connector Pool. All the connectors of the Connector Pool must be of the same package type. Your existing connectors not assigned to any connector pool are unassigned connectors.
- Log in to the Enterprise Center.
- Navigate to select Application Access > Clients & Connectors > Connector Pools.
- Select the Connector Pool you created.
- Click General tab.
- Click Associate Connector in the Connectors tile or Associate Connectors to the Connector Pool icon.
- All the connectors of this package type are shown.
- To select all of the unassigned connectors, click the box next to unassigned connectors. A check mark appears in the box and all connectors are selected.
- To select a specific unassigned connector, click the > next to unassigned connector to expand it. Select the specific unassigned connectors from the list. A check mark appears in the box next to the selected connector.
- To select other connectors from other connector pools, you can select the connector pool. A check mark appears in the box and the connector pool is selected.
6.Click Associate. All existing unassigned connectors are associated with the connector pool and appear in the Connectors tile on the Connector Pool details page.
Create a new connector on the Connector Pools page
You can create a connector of the same package as the connector pool, on the connector pools page.
- Log in to the Enterprise Center.
- Navigate to select Application Access > Clients & Connectors > Connector Pools.
- Click on the Connector Pool that you created. It will be of a certain package.
- Click General tab.
- Click on Create New Connector in the Connectors tile or Add New Connector to the Connector Pool icon.
- Provide a Connector Name, Description (optional) for the connector. Enable Debugging, if you wish to enable troubleshooting for the connector, with more detailed logs and debug utilities. The package type for the connector is automatically derived from the package type of the connector pool.
- Click Save.
- The new connector appears in the Connectors tile of the Connector Pool page.
- You can download the connector image and upload it in your virtual environment.
Associate a Connector Pool to an AAG, Directory, or Enterprise DNS
After you create a Connector Pool and add connectors to it, you can associate it to an Application Access Group, Directory, or Enterprise DNS.
- Log in to the Enterprise Center.
- Navigate to select Application Access > Clients & Connectors > Connector Pools.
- Click on the Connector Pool that you created.
- Click Associations tab.
- To associate an AAG to this Connector Pool, go to the AAG tile, click Associate Application Access Group to the Connector Pool, select the AAG, click Associate. The AAG appears in the Connector Pools page, in the Application Access Groups tile.
- To associate a directory to this Connector Pool, go to the Directory tile, click Associate Directories to the Connector Pool, select the Directory, click Associate. The Directory appears in the Connector Pools page, in the Directories tile.
- To associate a Enterprise DNS to this Connector Pool, go to the Enterprise DNS tile, click Associate DNS Server to the Connector Pool, select the Enterprise DNS, click Associate. The Enterprise DNS appears in the Connector Pools page, in the Enterprise DNS tile.
- Click on the respective AAG in the AAG tile, or Directory in the Directories tile, or Enterprise DNS in the Enterprise DNS tile.
- You are taken to the AAG details page or Directories details page or Enterprise DNS details page, respectively.
- Click the Pending Changes blue tab on the right.
- Verify that AAGs, Directories, EDNS, and associated connector pools associations are all correct, and click Deploy.
- Provide a Deploy Confirmation message.
- Click Deploy
Note: Your connectors in the connector pool must be running successfully for the deployment to succeed.
Associate a Connector Pool to an Application
You can associate a Connector Pool to an EAA application directly. The Connector Pool has connectors of the same package type and serves the application traffic.
If you did not use connector pools and you had multiple connectors serving application traffic and providing high-availability, you had to add connectors individually to the application. Now, you can associate all the connectors to the Connector Pool and directly associate them to an EAA Application.
With this model, you can add or remove connectors from an application without requiring redeployment.
After you create a Connector Pool and add connectors to it, you can associate it to directly an Application.
- Log in to the Enterprise Center.
- Navigate to select Application Access > Clients & Connectors > Connector Pools.
- Click on the Connector Pool that you created.
- Click Associations tab.
- Go to the Applications tile.
- Click on Associate applications to connector pool.
- Search for the application from the list, select it, and click Associate. For the Associate dialog box, select Yes. The application is added to the Applications tile and receives traffic from the Connector Pool.
- You can also perform additional actions to an application that is added to the Connector Pool:
- Manage. Open the application detail page in edit mode, allowing you to make additional configuration changes.
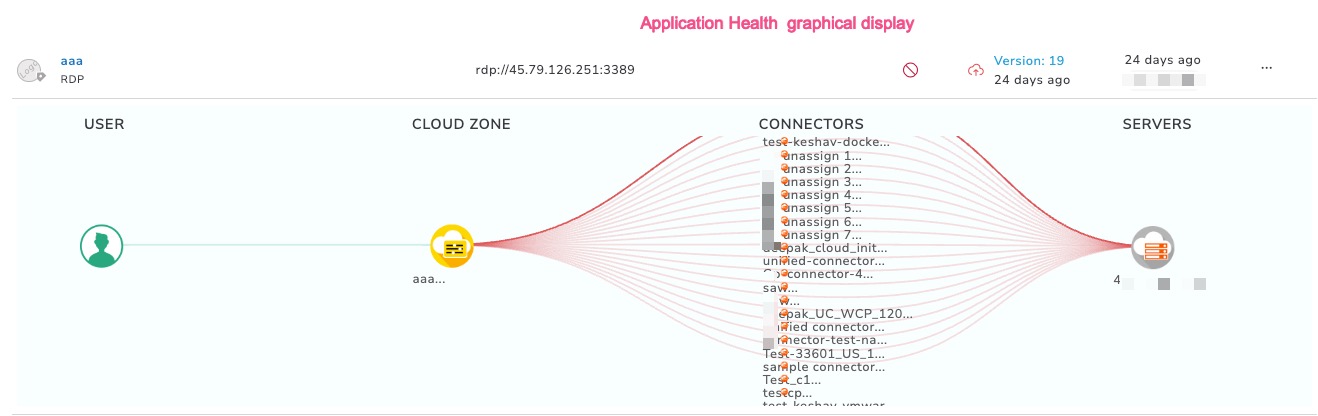
- Application Health. Opens a graphical display of the Application health and shows the traffic from the User, Cloud Zone, Connectors, and Server:
- Dissociate. For Dissociate Application dialog box, click Yes. Dissociates the Application from the Connector Pool.
Associate an Application to a Connector Pool
You can associate an Application to a Connector Pool. All the connectors of the Connector Pool will serve the application traffic.
- Log in to the Enterprise Center.
- Navigate to select Application Access > Applications > Applications.
- Click on the Application on the Applications list page.
- In the Settings section, click the Connectivity, Authentication and Access tab.
- Select Connector Pools.
- Click Associate Connector Pools to the Application.
- Select the connector pools you wish to associate to the application.
- Click Associate.
- Click Save to save the changes, or Save and Deploy to save and deploy the application
Miscellaneous actions for Connector in a Connector Pool (Diagnostics, Performance, Disable Connector, Edit, Delete, Move Connector to Pool, Dissociate)
You can perform any of these actions on a connector added to a Connector Pool.

- Log in to the Enterprise Center.
- Navigate to select Application Access > Clients & Connectors > Connector Pools.
- All the Connector Pools are shown on the Connector Pools list page.
- Select the Connector Pool where your connector resides on which you wish to perform Diagnostics, check Performance, Disable, Edit, Delete, Move to another Pool, or Dissociate operations:
i. Diagnostics. Help you run diagnostics debug utility. Remote debugging has to be enabled.
ii. Performance. See Connector Health Monitoring
iii. Disable Connector. Connector is disabled from the connector pool, so that it will not be able to serve any traffic to the resources like Directories, Enterprise DNS, or AAG. If the Connector has associations with other resources then they are shown and you can close the dialog box. Click Close. You will not be able to disable the Connector without dissociating the connector from the connector pool.
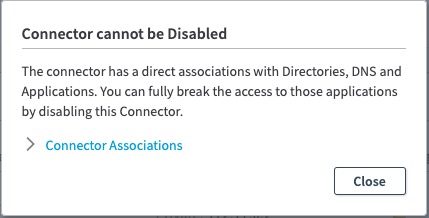
You must first dissociate the Connector from the Connector Pool, and then disable it.(see below vii.)
iv. Edit. Allows you to edit any of the Connector values and make changes. Click Save Connector (tick mark)
v. Delete. Deletes the Connector permanently. Resources (applications, directories, enterprise DNS) associated with this connector will go down as well.
vi. Move Connector to Pool. This enables you to move a connector from one connector Pool to another one. Select another Connector Pool of the same package type and click Associate. This Connector is moved to the new Pool If not available, you can also create a new Connector Pool of the same package type by clicking Create New.
vii. Dissociate. Connector is dissociated with this connector pool and moved to the unassigned connectors list. It will stop serving traffic to the resources of this Connector Pool, but will continue to serve traffic to any directories, applications directly associated with it, if any. Click Dissociate. Click Save Connector.
Assign Unassigned Connectors to a Connector Pool from the Connector Pools list page
All your existing connectors are shown as Unassigned Connectors on the Connector Pools list page. Follow these steps to assign it to a connector pool, if you’ve already created the connector pool. You can either use Bulk Edit for multiple connectors or Assign to Pool for each connector.
- Log in to the Enterprise Center.
- Navigate to select Application Access > Clients & Connectors > Connector Pools.
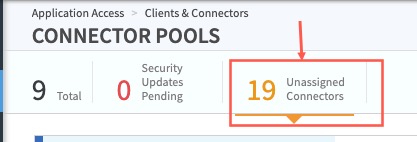
- All the existing connectors are shown as Unassigned Connectors at the top.
- Click on it, a new window appears with all the unassigned existing connectors.
- If you want to assign more than one of the unassigned connectors to a single connector pool, select Bulk Edit.
a. In the Assign Connectors to a Pool window, select one or more connectors or Connector Pool, click Select.
b. All of the Connector Pools of the same package type as the individual connectors are shown selectable and other connector pools are grayed out (not selectable).
Your unassigned connectors will now be assigned to the connector pool of the same package type.
- If you want to assign each of the unassigned connectors individually, select Assign to pool, in the Connector Pool column, for the connector you wish to assign.
a. For all the connector pools that are of this Package type are shown in the drop down list.
b. From the Pools column, Select the connector pool or connector pools you wish to assign the connector to.
c. Click Associate.
d. Click Assign, for the dialog message, Are you sure you want to assign this connector?
Your unassigned connector will now be assigned to the connector pool of the same package type.
Assign a connector to a Connector Pool from the Connector list page
- Log in to the Enterprise Center.
- Navigate to select Application Access > Clients & Connectors > Connector Pools.
- On the Connectors list page, under the Connector Pool column, you can see if any of your existing connectors are already assigned to a Connector Pool or not.
- For a connector that is not assigned to any connector pool and you wish to assign it follow these steps:
- In the connector pool column, click Assign to pool. For all the connector pools that are of this Package type are shown in the drop down list.
- From the Pools column, Select the connector pool or connector pools you wish to assign the connector to.
- Click Submit.
- Click Assign, for the dialog message, Are you sure you want to assign this connector?
Your unassigned connector will now be assigned to the connector pool of the same package type.
- For a connector that is already assigned to the connector pool, the connector pool name is shown. If you click on it, it takes you to the Connector Pool details page, and you can make changes, if required.
Set Alerts for Connector state changes
You can send alerts to the administrator when the connectors in the connector pool go down, come up, or unreachable and not communicating with the applications.
- Log in to the Enterprise Center.
- Navigate to select Application Access > Clients & Connectors > Connector Pools.
- All of the Connector Pools are shown on the Connector Pool list page.
- Select the Connector Pool for which you want to set the alerts.
- Click General tab.
- Go to the Settings tile in the Connector Pool detail page.
- Enable Send alerts. If any or all of the connectors of this Connector Pool are down, come up, or unreachable an alert is sent to the administrator.
Disabling the Connector Pool
By default when you create a Connector Pool and assign connectors to it, it is enabled by default. This allows it to serve traffic to the different resources like AAG, Directories, or Enterprise DNS applications that are associated with this pool. You can disable the Connector Pool and not traffic is sent to the resources. After disabling, you will not be able to add any new resources.
- Log in to the Enterprise Center.
- Navigate to select Application Access > Clients & Connectors > Connector Pools.
- All of the Connector Pools are shown on the Connector Pool list page.
- Select the Connector Pool you wish to disable.
- On the right side, next to Pending Changes, turn off the Enable button.
- This Connector Pool will not be able to serve traffic to the existing resources and you will not be able to add any new resources. All the Connectors inside the Connector Pool as disabled as well.
Connector Registration Token
In earlier versions of EAA, the security credentials for a connector was embedded inside the connector and was for one-time use only. So, for example, if you had to install ten connectors to drive the traffic to your application, you had to download the connector image ten times from the EAA Management portal on the Connectors page and then do the manual install in your virtual environment. This takes a lot of time for connector management for the administrator.
To simplify the connector management process, EAA has introduced a Connector Registration Token which is essentially a multiple-use security credential associated with the connector image. The registration token can be generated from the Enterprise Center admin portal along with security settings from the Connector Pools page. It allows the administrator to download the connector image once and set up many connector instances quickly as the number of registration tokens that you have generated.
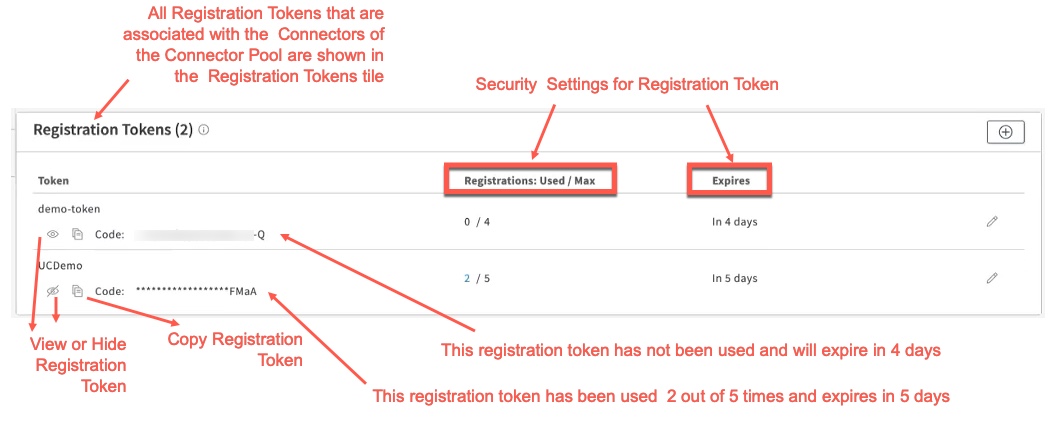
In the above example, the admin has created two registration tokens with different security settings. One of the tokens expires in 4 days and has been unused. The second token has been used 2 out of 5 times and expires in 5 days. Every time you use the registration token for installing a connector in the data center, the Registrations : Used gets incremented till the Max limit is reached, provided it is within the Expires period. Even if you delete the connector after creating and installing it with the token, the Registrations : Used does not decrement, since it has already been counted as used for a registration or it cannot be reused for another connector registration. If you do not use all of the registration tokens (Registrations : Used = Registrations : Max) within the Expires period, they are invalid and cannot be used any more. You must regenerate new Registration Tokens.
Registration Tokens can only be used for the Unified Connectors within this Connector Pool.
For the Manual Registration process, the Registration Token must be copied and pasted into the Connector Console utility while installing the connector in the virtual environment in the data center.
For the Automatic Registration process, the Registration Token is automatically embedded in the connector before you download the Connector from Enterprise Center, and install it in the virtual environment in the data center.
Create a Registration Token for Unified Connector
You can create a connector registration token with security settings. Unified Connectors can register themselves with the Connector Pool using the Registration Code in the Registration Token.
- Log in to the Enterprise Center.
- Navigate to select Application Access > Clients & Connectors > Connector Pools.
- Click General tab.
- Go to the Registration Tokens tile.
- Click on Add Registration Token for the Connector Pool (+ icon)
- Provide these security settings for the Registration Token
- Token name. A name for the registration token
- Maximum number of registrations. Maximum number of times you want to reuse this token for other connector images.
- Expires in. Specify the no of days the registration token is valid for reuse. After the expiration, you will not be able create any reusable images of the connector.
- Generate image with embedded token. (for automatic registration only) You can embed the registration token in the connector image, so that it can be downloaded at once in the virtual environment when you do automatic registration. It is not needed to enable this option, if you want to do manual registration.
- Click Add to list. The Registration Token is added to the Registration Tokens tile.
You can use the registration token for connector registration in the virtual environment using the Manual Registration or Automatic Registration of the Unified Connector image.
Use Registration Tokens tile to generate a Unified Connector with registration token
After you create a registration token for the Unified Connector, you can generate a Unified Connector image with the token embedded in the image, directly in the registration tokens tile.
- Log in to the Enterprise Center.
- Navigate to select Application Access > Clients & Connectors > Connector Pools. All of the Connector Pools are shown on the Connector Pool list page.
- Click the Connector Pool for which you want to create a registration token.
- Click General tab.
- Go to the Registration Tokens tile.
- You will see the registration token that you created earlier.
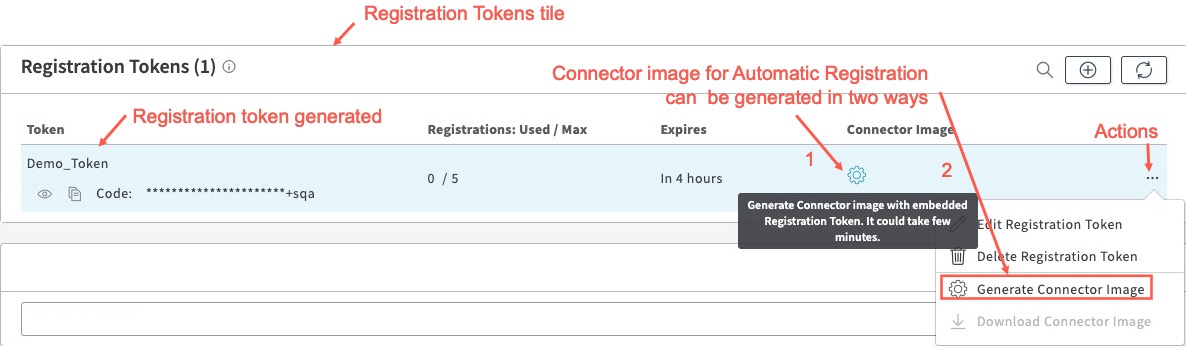
- You can generate the Unified Connector image with a specific registration token in two ways:
- Click the Generate Connector image with embedded Registration Token. Gear icon under Connector image column.
- Click the Actions next to the registration token. Select the Generate Connector Image.
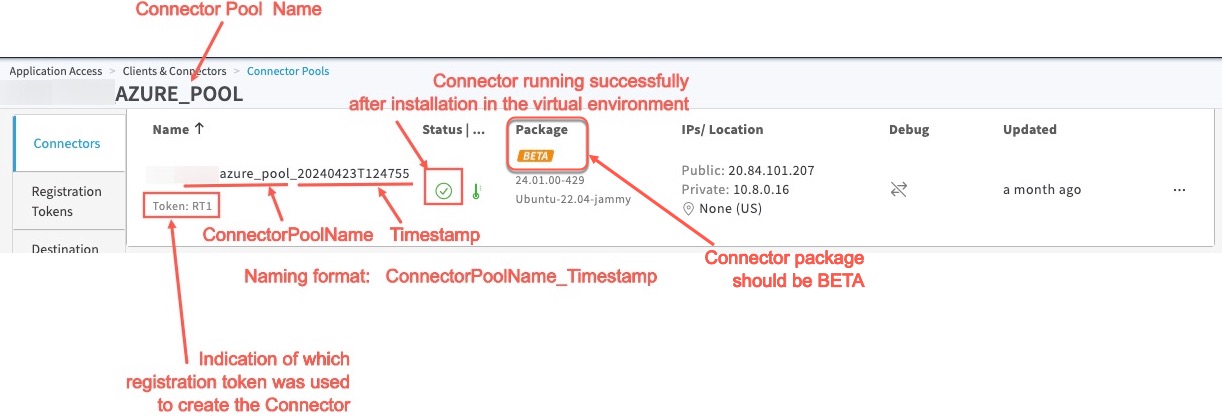
This will take some time, since the file is more than 1 GB. After the image is generated you will see an entry in the Connectors tile, the package type is BETA and the name of the generated image is of the form, CONNECTORPOOLNAME_TIMESTAMP where CONNECTORPOOLNAME is the name of the connector pool and the TIMESTAMP is the timestamp of when the Beta Connector image was generated with the embedded registration token.
For example, here we have a Beta Connector image of name
azure_pool_20240423T124755, where Connector Pool Name is AZURE_POOL and the timestamp is 20240423T124755, i.e. April 23, 2024 at time of 12 hours 47 minutes and 55 seconds:
Manual Registration of Unified Connector Image
In the manual registration process, you download the connector image. Then, you provide the Registration Code during installation of the connector instance. The base connector image is downloaded only once and reused to instantiate multiple connector instances with the registration token, as long as the security settings of the registration token is satisfied.
- Log in to the Enterprise Center.
- Navigate to select Application Access > Clients & Connectors > Connector Pools. All of the Connector Pools are shown on the Connector Pool list page.
- Select the connector pool you created earlier.
- Click General tab.
- Go to the Connectors tile in the Connector Pool detail page.
- Click Download Unified Connector Image.
- For Connector Image Token(s), select the registration token you created earlier. If you did not create a registration token, see Create a Registration Token
- Click Manual Registration. Click Download. You can download the generic image of the Unified connector.
- Launch your virtual environment and connector to your virtual instance.
- Use the unified connector serial console to activate the unified connector.
- If you go back to the Connector Pools page and click Refresh the list of connectors associated to the Connector Pool (
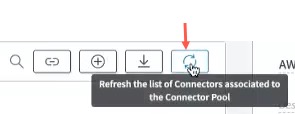 ),you will see the newly installed connector in the connector pool in your data center. This might take a few minutes to show up in the Enterprise Center, while EAA validates the token and its security settings and runs successfully. You will see an entry for the Unified connector in this format:
- To reuse the registration code for installing another instance of the connector in the data center, repeat steps 11, 12, 13 and register a second instance. If you reuse a connector token after the maximum number of registrations, the connector registration fails in the virtual environment.
Since you’re not required to download the connector instance again, it greatly improves the productivity and connector maintenance is simplified.
Automatic Registration of Unified Connector Image
In the automatic registration process, you can embed a registration token in the standard connector template, and then download a custom connector template in the virtual environment. This custom connector template can be instantiated multiple times for multiple connector instances within your data center, as long as you adhere to the security settings of the registration token that you associated while creating the customer connector template.
- Log in to the Enterprise Center.
- Navigate to select Application Access > Clients & Connectors > Connector Pools.
- All of the Connector Pools are shown on the Connector Pool list page.
- Click the Connector Pool for which you want to create a registration token.
- Click General tab.
- Go to the Registration Tokens tile.
- Click on Add Registration Token for the Connector Pool (+ icon)
- Provide these security settings for the Registration Token
- Token name. A name for the registration token
- Maximum number of registrations. Maximum number of times you want to reuse this token for other connector images.
- Expires in. Specify the no of days, months, or years the registration token should be valid for reuse. After expiration, you will not be able create any reusable images of the connector.
- Generate template with embedded token. (for automatic registration only) You can embed the registration token in the connector image, so that it can be downloaded at once in the virtual environment when you do automatic registration. It is not needed to enable this option, if you want to do manual registration.
- Click Add to list. The Registration Token is added to the Registration Tokens tile.
- Next you need to download the Connector Template. This can be done in two ways:
- Using the Registration Tokens tile: In the Registration Token’s tile, click Download Connector template with embedded Registration Token under Connector Template column. The file, for example, Microsoft Azure.json, gets downloaded to your machine.

ii. Using the Connectors tile: Go to the Connectors tile in the Connector Pool detail page. Click Download Unified Connector Image. Click Automatic Registration. For Connector Image Token, select the correct Registration Token from the list. Make sure the token is not expired and not fully used. If you did not create a registration token, see Create a Registration Token. Click Download. The file, for example, Microsoft Azure.json, gets downloaded to your machine.
- Install the template in your Azure virtual environment. See Install Connector in Microsoft Azure environment.
- Go back to the Enterprise Center. Navigate to Application Access > Clients & Connectors > Connector Pools.
- If you go back to the Connector Pools page and click Refresh the list of connectors associated to the Connector Pool (),you will see the newly installed connector in the connector pool in your data center. This might take a few minutes to show up in the Enterprise Center, while EAA validates the token and its security settings and runs successfully. You will see an entry for the Unified connector in this format:
- You can reuse the custom connector image to instantiate multiple connector instances in your data center, as long as you adhere to the security settings of the registration token embedded in the custom image.
Since you’re not required to download the connector instance again or embed a security token during connector installation, it further improves the productivity and connector maintenance is even more simplified.
Unhide Registration Token and Unified Connector Image from Akamai support
For improved security the registration token and downloading the unified connector image are hidden from Akamai support. You can temporarily enable access to the Akamai Support team, so that they can see the registration token, download the connector image to assist with any support issues.
Grant access to Akamai support to Registration Token and Connector Image
You can allow Akamai support team to access the Connector registration token and unified connector image temporarily to debug any support issues.
- Log in to the Enterprise Center.
- Navigate to select Application Access > General Settings > Akamai Support Access.
- For Grant access to the Akamai Support team for, select a duration of 1 hour, 1 day, 1 month, or 1 year, you wish to provide access to the Akamai Support team.
- Click Save.
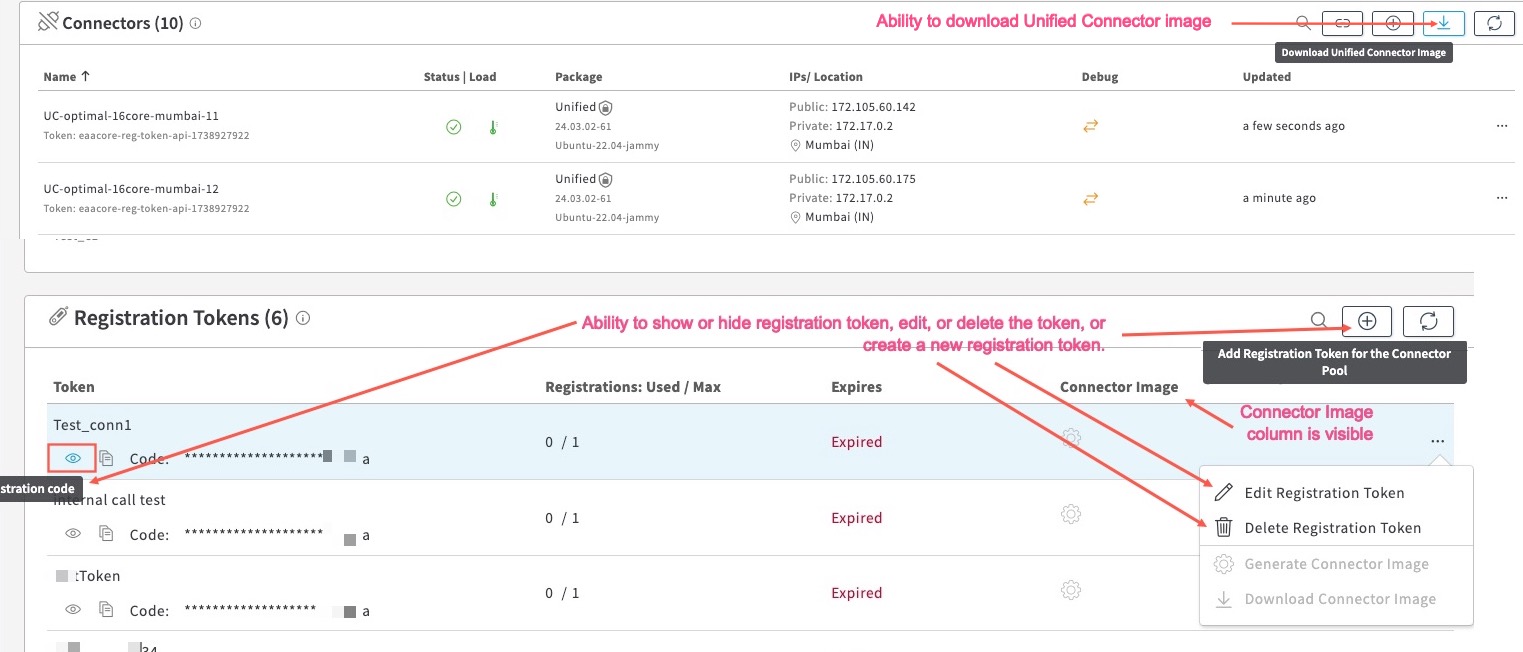
This gives access to the Akamai support team to the following on the Connector Pools detail page:
- Download Unified Connector Image
- Add Registration Token for the Connector Pool
- Create a new the Registration Token
- Edit or Delete the token
- Show Registration Code
- Visibility of Connector Image column in Registration Tokens tile
- After receiving support from the Akamai support team, if you wish to remove access for the above, navigate back to Application Access > General Settings > Akamai Support Access, and click Revoke. Akamai support team will not have access to the following on the Connector Pools detail page for the selected time period.

By disabling access, you get additional security for your organization. This is the default setting in your contract.
Monitor Connector Pool Health and Application Summary
You can monitor the health of the connector pool, check the connector load on the connector pool, load on each connector within the connector pool. It also provides visibility into the application traffic for all applications, including Edge Transport-based applications, associated with each connector within the connector pool. You can also get the per-application traffic metrics. Click the Monitor tab on the Connector Pool Details page to see the detailed metrics:

You can see these sections:
Summary. It shows the status of all the connectors associated with the connector pool, package type, and the status of the connector pool.
Connectors. You can search by a connector or click on a connector to view detailed metrics. For the selected connector, at the top you see the connector version, OS version, geolocation, public and private IPs. Also, Applications that are up or down, Directories that are up or down as shown:

Performance metrics. You can see the Connector Load for the selected period of 1 hour, 4 hours, 1 day, 7 days, or a custom range using the calendar. The refresh icon updates the load graph for the current time. The Connector Load is based on these metrics:
- CPU utilization
- Memory utilization
- Disk usage
- Traffic in MegaBytes/second
and is represented by a colored thermometer of red, orange, and green based on the load.
Here’s an example of the Connector Load for 4 hours:

Application Summary. The total requests, bytes in(Kilobytes), and bytes out(Kilobytes) from all of the applications that are using this connector within the connector pool. Also, each row provides requests, bytes in, and bytes out per application. This includes all applications, including Edge Transport based applications.

Click on the graph icon under the Analytics column for each application, to see a graphical representation of the metrics:

Updated 10 days ago