Install connector in Microsoft Azure
Install an EAA connector in Microsoft Azure environment.
Installation Requirements
Compatible virtual environment:
- Microsoft Azure
Computing capability:
- CPU. Four virtual cores
- Memory. 8 GB RAM
- Storage. 16 GB hard drive disk space (4 GB allocated to swap space and 12 GB of free space).
Network:
- A private IP address inside the Local Area Network (LAN), either DHCP or static. The connector should run close to internal applications, possibly in the same subnet as the application, and be able to communicate with the application in test.
- Dial-out access to the Internet on TCP port
443. A connector must reach the Enterprise Application Access service over the internet. This communication is carried out over an open TCP port443, and only needs outbound connectivity. - Access to the applications. The port and protocol must be accessible in the LAN.
- A firewall that allows the connector's private IP address to reach the application on configured port numbers. For example, a firewall rule to allow the connector to reach the application server internal IP address or hostname (if DNS is configured) on port numbers
80,443, or any application specific port.
Note
If you access browser based applications, configure connector with 4 vCPUs, 8 GB RAM and 40 GB storage space at a minimum.
Download the connector
-
Log in to Enterprise Center.
-
In the Enterprise Center navigation menu, select Application Access > Clients & Connectors > Access and Identity Connectors.
-
Click Add New Connector (+). Provide a name and an optional description.
-
For Package select Microsoft Azure.
-
(Optional) If you need remote debugging, enable Debugging.
-
Click Save. The connector status changes to Created. Click Download Template, to download the file.
Install the connector
Prerequisites
-
Set up Microsoft Azure account and billing.
-
Make sure an Azure administrator created a resource group necessary for template deployments. If not, to create a resource group, refer to the Microsoft Azure documentation on managing resource groups in Azure portal.
A minimum size of Standard**_F4s_v2** is required to secure any type of application.
-
Log in to your Microsoft Azure portal.
-
Click Deploy a custom Template.
-
In Custom Deployment, click Build your own template in editor. Edit template appears.
-
Remove all the properties and elements in the template file. Click Load file and select the Microsoft Azure.json connector file that you downloaded to your machine. Paste the contents from the connector file. Click Save.
Note:
If your account has Standard for StorageAccountType, you will need to replace “Premium_LRS” for “storageAccountType” key with “Standard_LRS” value for “managedDisk” attribute as shown below:
If you have Premium for StorageAccountType, no change is required.
- Configure the basic settings:
- In Subscription select a type of subscription.
- For Resource choose Select existing..., and in the menu, select your resource group. If it does not exist, select Create new and create a new resource group.
- In Instance details section, configure the following:
- In Region, select the region where resources are located.
- In Admin Username enter the administrator's username of the virtual machine.
- In Admin Password enter the administrator password of the virtual machine.
- In Vnet Resource Group enter the resource group of the virtual network.
- In Existing Virtual Network Name enter the name of the virtual network.
- In Subnet Name enter the name of the subnet in the virtual network.
- In Vm Size, enter a suitable size for the virtual machine (like virtual CPUs and memory) based on your policy.
- In Vm Name, provide a name for the virtual machine. Do not use underscores in the name.
- Click Review + create. Make sure all values are correct and click Create. The deployment of your virtual machine will progress. Under Deployment details section, after the deployment completes, the Status will be Created next to your Resource, and it will be of Virtual Machine type. For example:

The message changes to Your deployment is complete.
- To check if the virtual machine was created in Microsoft Azure log in to your Microsoft Azure portal.
- In the Microsoft Azure menu click Virtual Machines.
- Check if the virtual machine appears and is running.
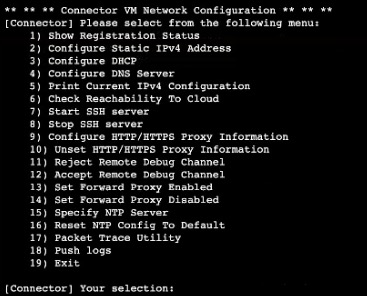
- Go to the virtual machine you created. Navigate to Help > Serial console and start the serial console. You will see all the options that are available in the serial console menu.

- Choose (1) Show Registration Status. You will see a message that the Connector is Registered Successfully!
Verify the connector is running
- Return to Enterprise Center.
- In the Enterprise Center navigation menu, select Application Access > Clients & Connectors > Access and Identity Connectors.
- On the connectors list page, select your Microsoft Azure connector and click Approve.
- Verify that the connector shows the private and public IP addresses assigned to it. The connector reaches out to the EAA Cloud. The status changes to Ready and Connector is running.
Updated 10 months ago

