Unified Connectors
EAA Unified Connector is available and can be deployed on various platforms. If you are migrating your existing connectors to Unified Connectors, refer to Unified Connector Migration.
Unified Connector Platform support
Unified Connectors are supported in VMWare, Amazon Web Services (AWS), Microsoft Azure, Hyper-V, Google Cloud Platform (GCP), Openstack/KVM, and Docker environments.
It is not supported for the VirtualBox environment.
Unified Connector deployment
To deploy unified connectors in any of the supported environments, namely VMWare, Amazon Web Services (AWS), Microsoft Azure, Google Cloud Environment (GCE), Hyper-V and Openstack/KVM follow these steps:
- Create a Connector Pool for the specific environment.
- Create a registration token.
- Register the connector using manual registration or automatic registration.
- Launch your virtual environment and connect to your virtual instance.
- Deploy the connector using the Unified Connector console.
For Docker environment follow these steps:
- Create a Connector Pool for the specific environment.
- Create a registration token.
- Automatic Registration process of docker unified connector. or
- Manual Registration process of docker unified connector.
Connect to your virtual instance to launch the Unified Connector serial console.
The Unified Connector console is available in VMWare, Amazon Web Services (AWS), Microsoft Azure, Google Cloud Environment (GCE), Hyper-V and Openstack/KVM.
It is not available for Docker.
You can launch your virtual instance and connect to it. Select the virtual platform below and follow the steps:
VMWare
- Login to your VmWare ESXi environment.
- Go to your Virtual machine instance in Virtual Machines.
- Right click and select the Open console in new window.
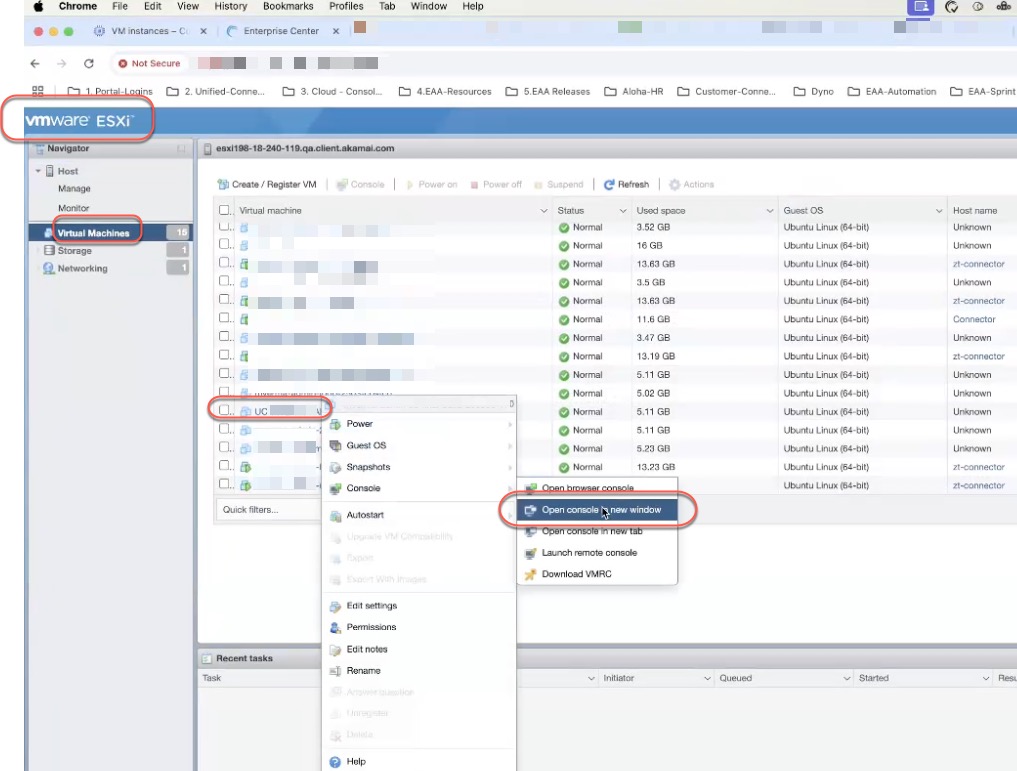
- The Unified Connector serial console launches.
Amazon Web Services (AWS)
- Go to your EC2 instance inside AWS CloudFormation.
- Connect to it.
- Click the EC2 serial console. Click Connect.
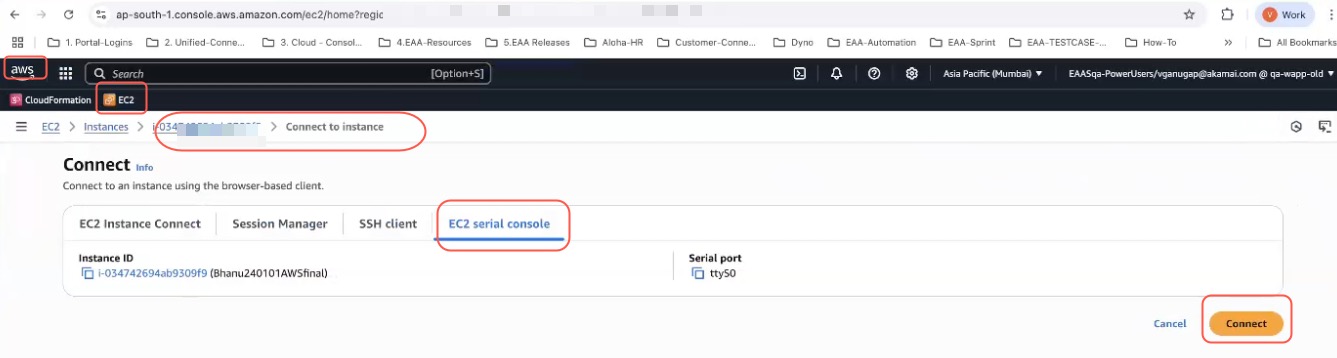
- The Unified Connector serial console launches.
Microsoft Azure
1, Go to your virtual machine inside Microsoft Azure environment.
- Click Connect.
3. Click More ways to connect. Click Go to serial console.
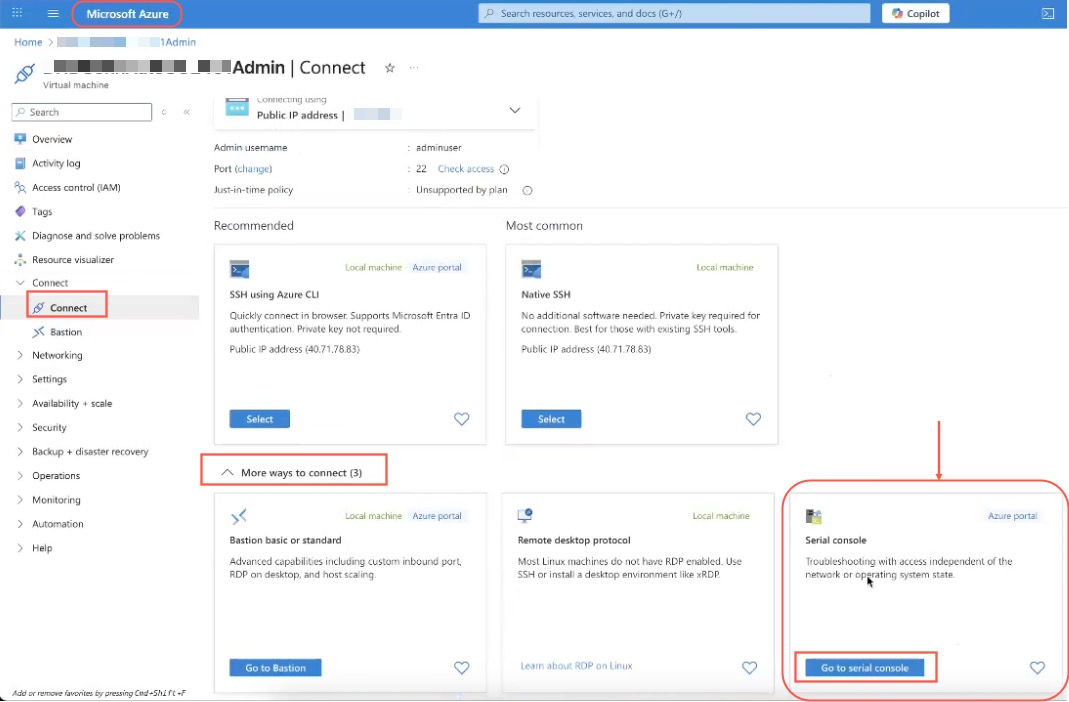
- The Unified Connector serial console launches.
Google Cloud Environment (GCE)
- Go to the Compute Engine of your Google Cloud Environment. (GCE)
- Click VM instances. Select your VM instance
- In the Details tab, select Connect to serial console > Serial port 1 (console)

- The Unified Connector serial console launches.
Hyper-V
Follow the steps as in VmWare section.
OpenStack/KVM
- Go to your virtual instance inside your OpenStack project under Compute.
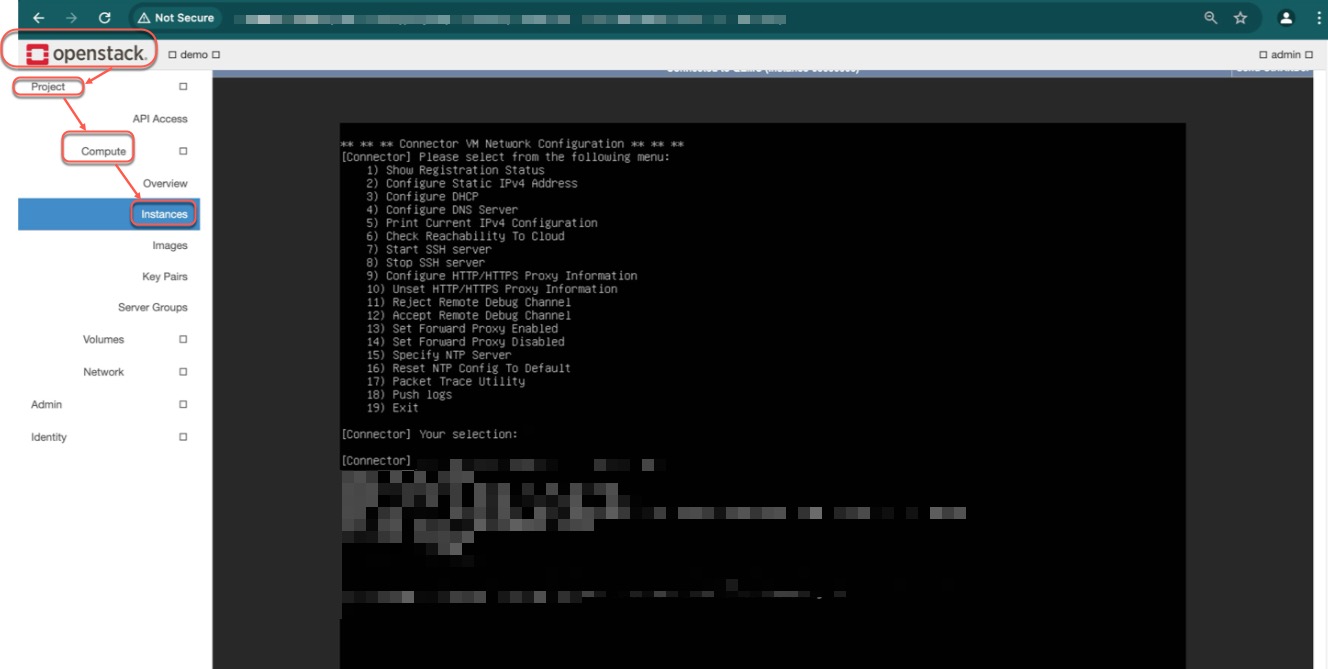
- Click on it and the Unified Connector serial console launches.
Use the Unified Connector Serial Console for Unified Connector Activation
When you connect to your serial console, these menu options are shown:
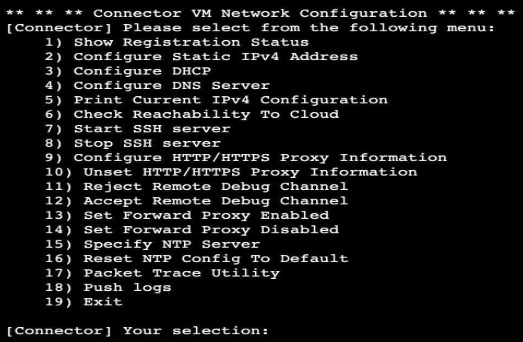
At the prompt, [Connector] Your selection, choose 1) Show Registration Status.
This option can be used to see the status of automatic registration, or use it to enter the registration token for manual registration and then register the connector.
If you use Automatic registration for your unified connector, you see a message if the connector is registered, verification is done, and all unified connector services come up.

If you use Manual Registration for your unified connector, you will see a message that shows till when the connector is valid and it is not in active status. Press ‘y’ and provide the registration token you got from enterprise center on the Connector Pool details page:
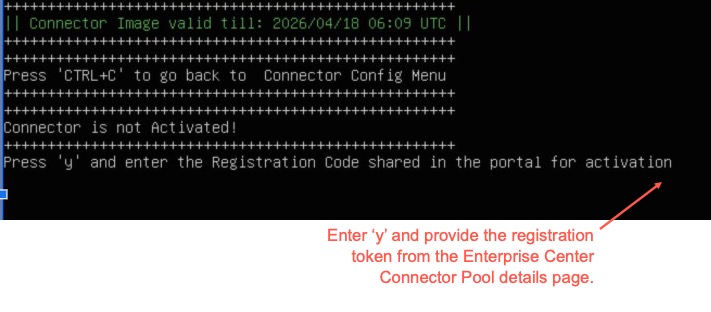
After registration is successful, you will see the success message in the Unified Connector console.
If you go to Application Access > Clients & Connectors > Access & Identity Connectors, and see the Connectors list page, you will see the Unified Connector running successfully:

Pushing logs for debug by Akamai support
This option can be used to retrieve the logs when the admin cannot access the connector directly and the logs are required by Akamai IT to debug or troubleshoot issues.
- Launch the Unified Connector Serial Console in your virtual environment.
- Select 18) Push logs.
- Provide the following information:
Hostname or IP Address. The destination IP address or hostname of SSH enabled machine for log delivery.
Port. The port number to which the logs will be sent.
Remote Destination Path. Provide a destination path where you want the logs to be sent.
Username. Username which Akamai IT must use to login to the connector virtual machine.
Password. Password which Akamai IT must use to login to the connector virtual machine.
Here’s a sample of the push logs serial console output:
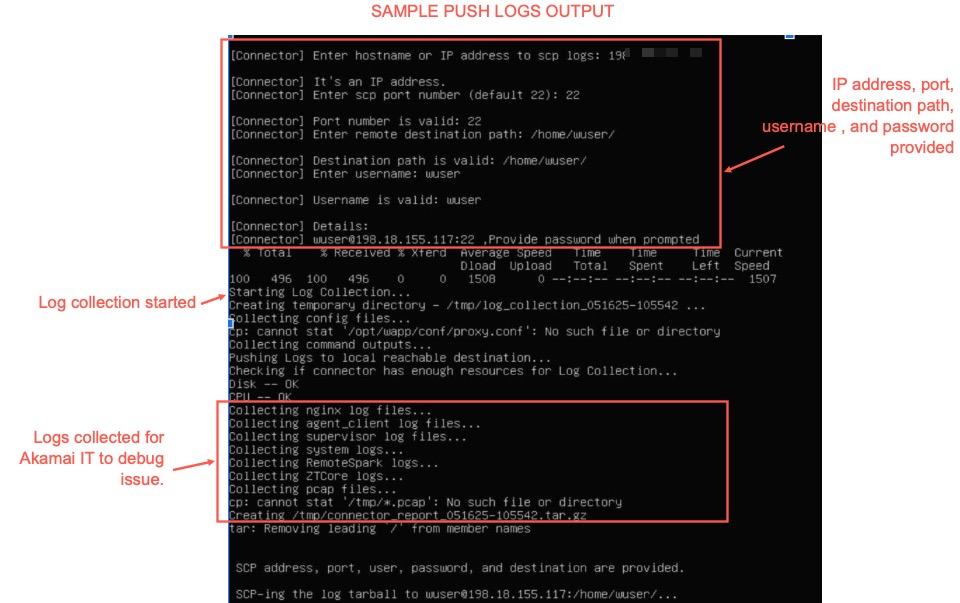
The different files that are tarred as a connector_report*.tar.gz file and sent to the destination path:
Nginx log files
Agent_client log files
Supervisor log files
System log files
RemoteSpark log files
ZTCore log files
PCAP (packet capture) log files - (optional) if you have enable packet capture and a trace is available
Note: The machine must be reachable from the connector.
You can send the connector_report*.tar.gz to Akamai support for debugging further.
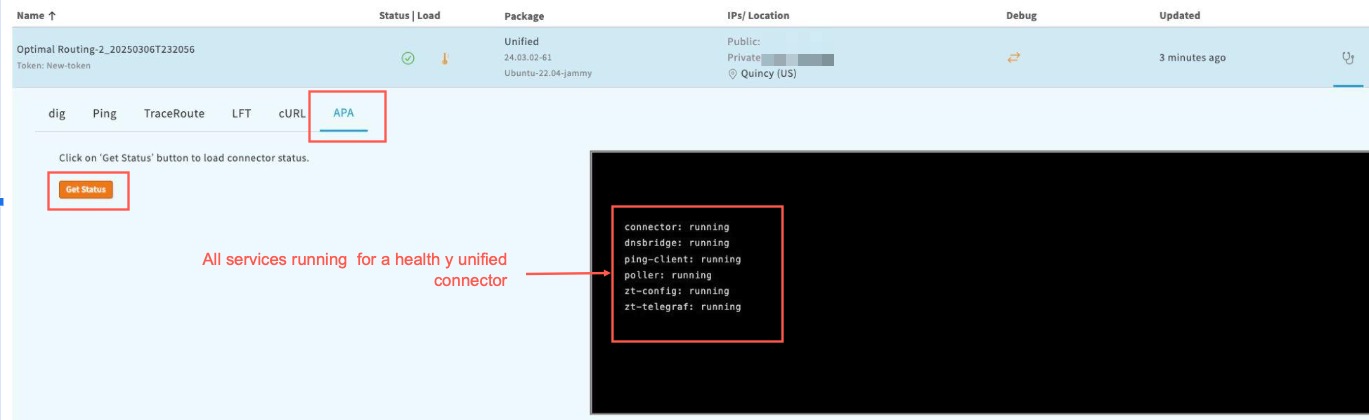
Unified Connector health check
You can check the health of the unified connector using this procedure:
- Log in to the Enterprise Center.
- In the Enterprise Center navigation menu, select Application Access > Clients & Connectors > Connector Pools.
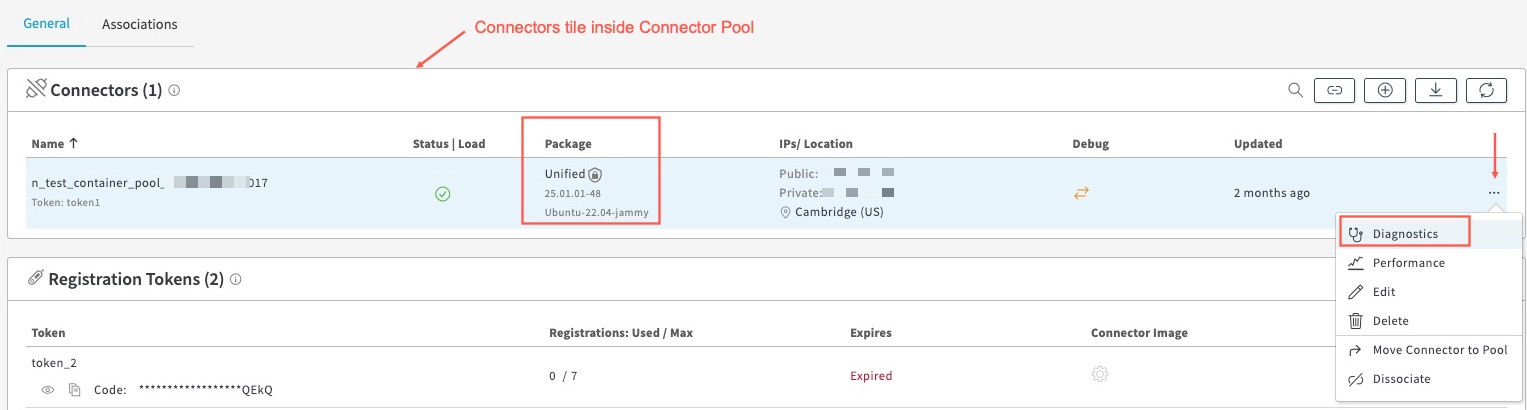
- Select the Connector Pool in which you created the Unified Connector.
- Click Diagnostics next to your connector in the Connectors tile.
- In the panel that opens out, click APA tab, and Get Status.
- If the health of the unified connector is okay, you will see these services running:
Automatic Registration of docker unified connector
Follow this procedure to register your docker unified connector. In this case the registration token is embedded in the docker image.
Deploy the unified docker connector on the host machine using these steps:
- Copy the <docker_image_with_rt.tar.gz> to the Ubuntu host machine
- Load the connector image
sudo docker load -i <docker_image_with_rt.tar.gz> - Check that the image is loaded properly
sudo docker images - Create a docker volume to persist runtime update
sudo docker volume create <Volume_Name> - Spawn the docker Container
sudo docker run --cap-add=NET_RAW --cap-add=NET_ADMIN --restart=always --name <Connector_Name> --volume <Volume_Name>:/opt/ -v /lib/modules:/lib/modules -d <IMAGE_ID> - Confirm that the docker container is running:
sudo docker ps
- Verify the unified docker connector is activated and running successfully - If you go back to Enterprise Center, navigate to the Connector Pools page, click the Connector Pool, go to the Connectors tile and click Refresh the list of connectors associated to the Connector Pool(
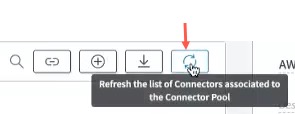 ), you will see the newly installed connector in the connector pool in your data center. This might take a few minutes to show up in the Enterprise Center, while EAA validates the token and its security settings and runs successfully.
Manual Registration of docker unified connector
Follow this procedure to manually enter the registration code when you deploy the docker unified connector.
Deploy the unified docker connector on the host machine using these steps:
- Copy the <docker_image_with_rt.tar.gz> to the Ubuntu host machine
- Load the connector image
sudo docker load -i <docker_image_with_rt.tar.gz> - Check that the image is loaded properly
sudo docker images - Create a docker volume to persist runtime update
sudo docker volume create <Volume_Name> - Spawn the docker Container. Use the -e option to add the REGISTRATION CODE that you copied from the Connector Pool in the Enterprise Center.
sudo docker run -e REGISTRATION_CODE='<registration_code>' --cap-add=NET_RAW --cap-add=NET_ADMIN --restart=always --name <Connector_Name> --volume <Volume_Name>:/opt/ -v /lib/modules:/lib/modules -d <IMAGE_ID> - Confirm that the docker container is running:
sudo docker ps
- Verify the unified docker connector is activated and running successfully - If you go back to Enterprise Center, navigate to the Connector Pools page, click the Connector Pool, go to the Connectors tile and click Refresh the list of connectors associated to the Connector Pool(), you will see the newly installed connector in the connector pool in your data center. This might take a few minutes to show up in the Enterprise Center, while EAA validates the token and its security settings and runs successfully.
If the connector is not running, check that the REGISTRATION CODE you copied from Enterprise Center inside the Connector Pool is correct and you pasted the same value for step 5.
If it is not the same, re-activate the unified connector by repeating step 5. If it still does not work, contact Akamai support.
Troubleshoot Unified Connector issues
Unified Connector not ready and running.
If the connector is not running (no green tick mark) :
a. Check that you have set up your allowlists for allowing specific domains needed for the Unified Connector to communicate to the EAA Cloud. See Allowlist with domains for Unified Connectors.
b. Check if any of the unified connector services are not running. It may be that the connector is not communicating with the EAA Cloud and there are issues. You can let Akamai support know about it.
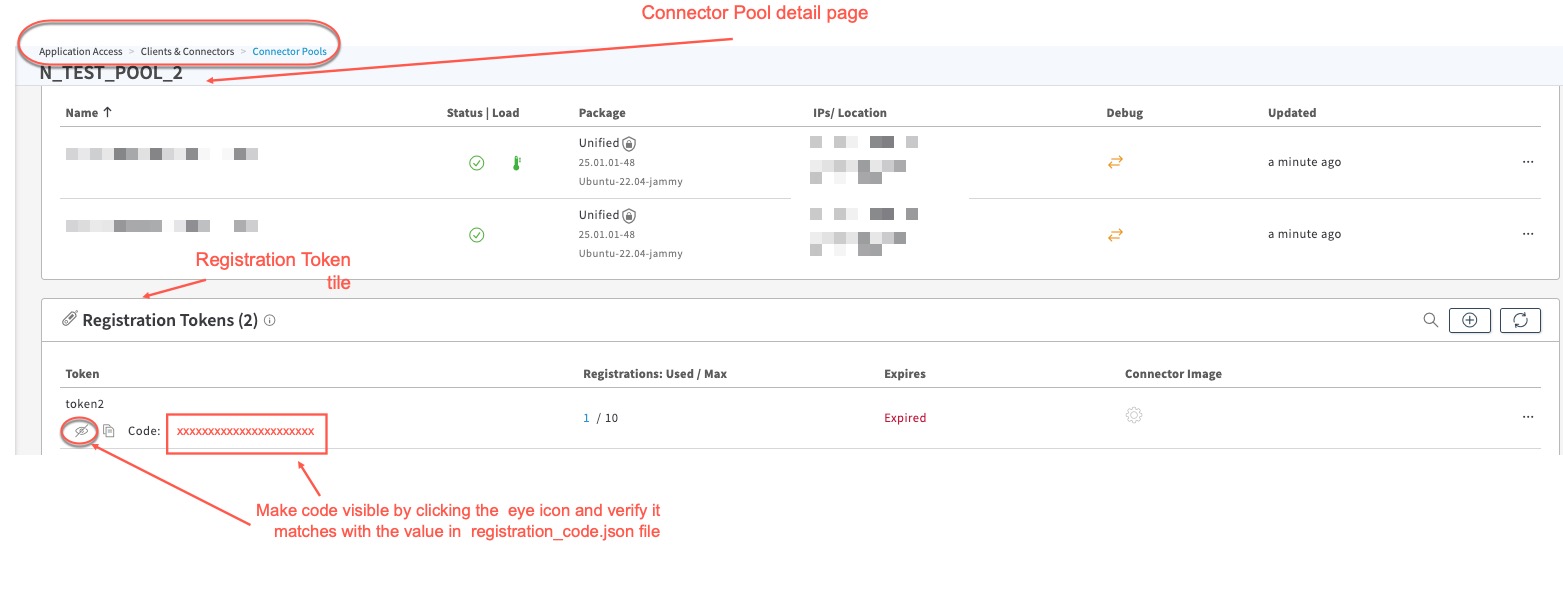
Incorrect Registration Token
After you use the unified connector serial console to register the connector and if your connector is not running, contact Akamai support to validate if the token being used in the connector registration is correct or not.
Note down the registration token you used as follows:
Go to the Connector Pool detail page, then go to the Registration Tokens tile, click the eye icon to make the token visible and note it down.