Temporary lockout on IdP and unlock on Cloud Directory
Some websites allow for multiple login attempts, where you attempt to login with credentials as many times as you want until you are successful. Hackers or bots may try to exploit this by using scripts and dictionary-based force password attacks to gain access to your Enterprise Application Access (EAA) account. To protect your EAA account information, you can limit the number of failed login attempts per user and set a temporary lockout duration. If the failed login attempt is reached within the lockout duration, the user is locked out of the account. The admin can also unlock the locked user from the IdP associated with the Cloud Directory. You cannot unlock a user from other directories like LDAP, AD in this release.
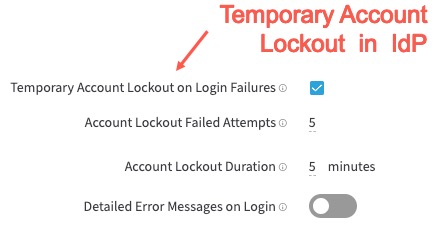
In the Advanced Settings of the Identity provider, you must enable Temporary Account Lockout on Login Failures, to enable the temporary account lockout feature. Additional configuration options, Account Lockout Failed Attempts and Account Lockout Duration appear with default values of 5 attempts and 5 minutes respectively, and Detailed Error Messages on Login is disabled.
If an end-user logs into the IdP with incorrect username or password more than 5 times within the 5 minute lockout duration, every time they are presented with message:
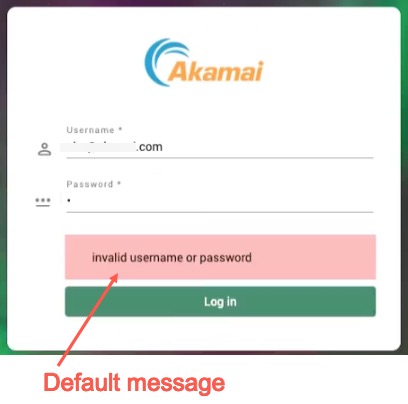
If a hacker tries to log in, he will only see the default message, and will not know if the username is incorrect or the password is incorrect, so it is a more secure default setting.
Even if more than five login attempts are made within the lockout duration, the default message is shown.
However, if you configured the temporary lockout feature in the identity provider as:
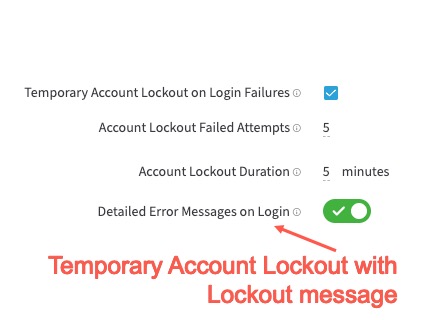
When an end-user logs into the identity provider with the incorrect username or password for 5 times within the 5 minutes, they are presented with the default message, “Incorrect Username or Password”. However, if they try the 6th time within the Lockout duration of 5 minutes, they are presented with the Account Locked message:
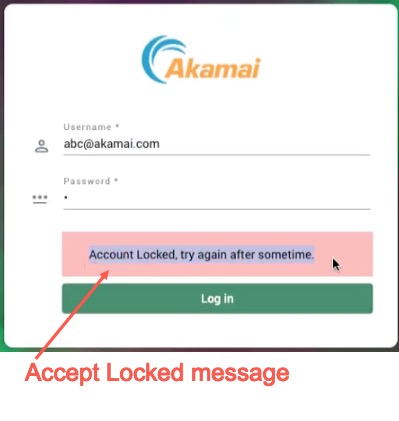
This might be a less secure option, since a hacker might retry again after some time and is not the recommended setting (and therefore the non-default option). However, a genuine user might want to know that the account is locked and can contact the administrator to unlock the account. If the user belongs to a Cloud Directory, the admin can unlock the user.
Temporarily lock a user
If you want to enable temporary lockout of a user with an Account locked message follow this procedure:
-
Log in to Enterprise Center.
-
In the Enterprise Center navigation menu, select Application Access > Identity & Users > Identity Providers.
-
Select your IdP to open it.
-
Go to Settings > Advanced.
-
Select Temporary Account Lockout on Login Failures.
-
In Account Lockout Failed Attempts enter the number of attempts a user is allowed before they are temporarily locked out. The default attempts setting is five.
-
In Account Lockout Duration enter the number of minutes the user is locked out. If no value is entered, the default duration is set to 5 minutes.
-
Enable Detailed Error Messages on Login, if you wish for the end-user to get an Account Locked message when the maximum number of failed attempts are finished in the lock duration. When disabled, the default Invalid username or password message is shown for login failures.
-
Click Save and Deploy, to save and deploy the identity provider
You can unlock the user associated with a Cloud Directory, see Unlock a locked user from Cloud Directory
Unlock a locked user from Cloud Directory
To unlock the end-user, the administrator should go to the Cloud Directory, in Application Access > Identity & Users > Directories, click the Cloud Directory on the Directory list page, and go to the Users tab. Expand the > symbol to see the groups and IdPs associated with the username. You will see, User locked (red lock) in the Locked Status column, and the Login failures should be greater than the Account Lockout Failed Attempts. For this example, it was set to default value of 5. You will see a value more than 5. Click on the three vertical dots and select Unlock User. For the Unlock confirmation dialog box, click Unlock.
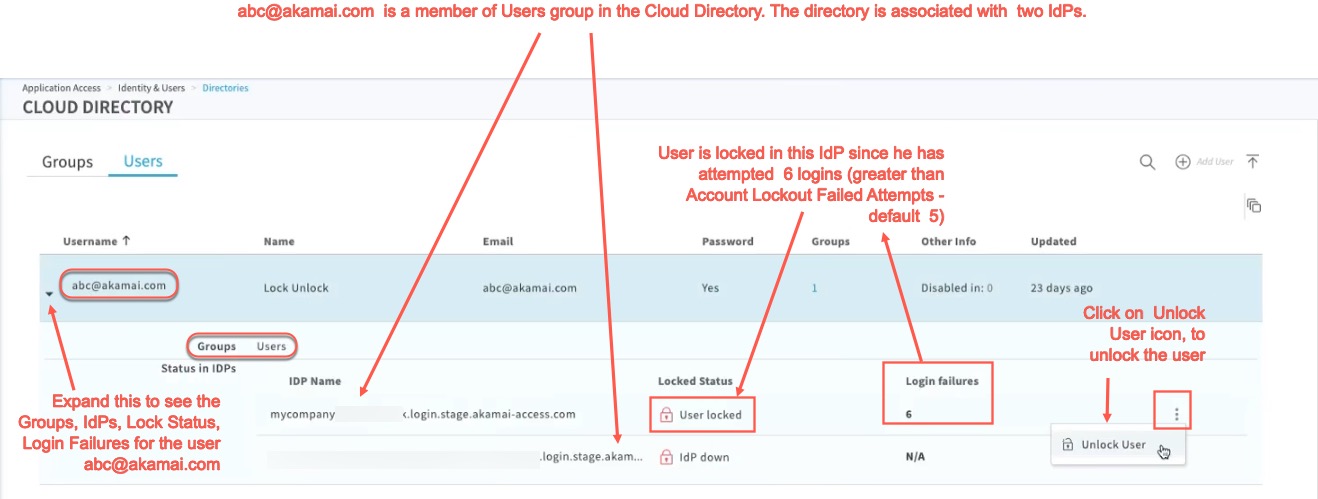
The user is unlocked and can log into the identity provider again. Once the user is unlocked, the Account Lockout Failed Attempts is reset to zero for the end-user.
Note:
- If the IdP is down in the Locked Status column, then the EAA does not count the number of Login failures for the user and it is shown as N/A (not applicable).
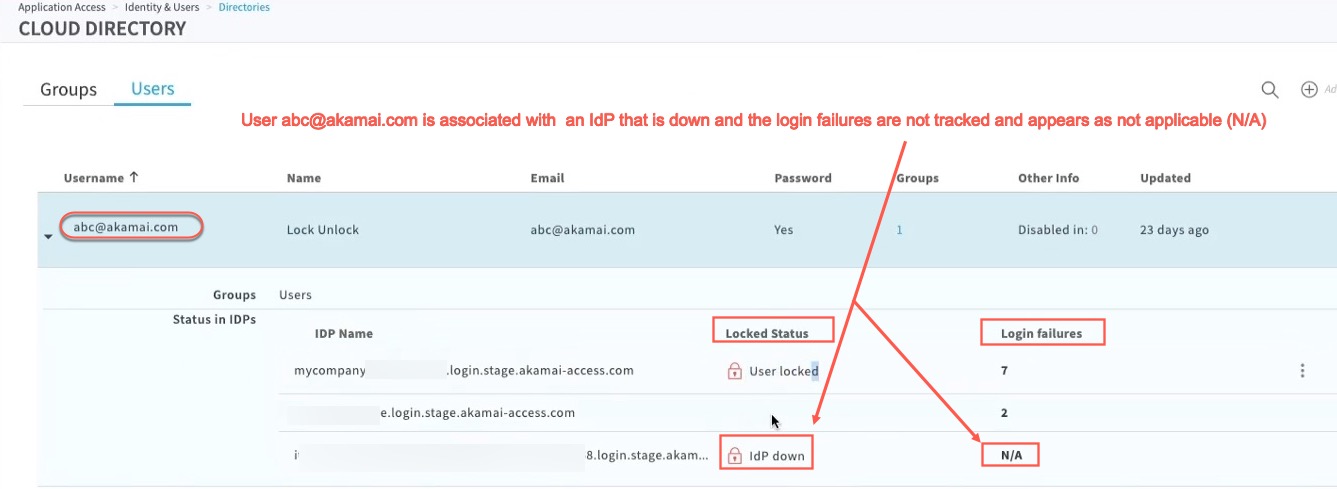
- If the user is associated with multiple IdPs belonging to one Akamai Cloud Zone which is down, then all the IdPs are down, and login failures are not shown. Only one of the IdP which the user is associated with, will be shown. The Locked Status will be IdP down and Login failures will be N/A.
- If the user is associated with multiple IdPs belonging to one Akamai Cloud Zone and at least one IdP is up in the Cloud Zone, then only the Login failures for this one IdP is shown. None of the IdPs that are down as shown in the User tab.
Limitations
- If you reset the password of the locked user, it does not unlock the user. Users can only be unlocked using the Unlock User icon.
- If a user is locked and we recreate the user with the same credentials before the lockout duration expires, the user will remain locked for the IdP.
Updated 7 months ago
