PingOne DaVinci
This integration uses the OIDC protocol. With the OIDC integration, you can use Akamai MFA in your PingOne DaVinci flow, providing the user with two-step authentication.
Add an OIDC integration
Follow this procedure to create an OIDC integration that enables communication between Akamai MFA and PingOne DaVinci.
- Configure your Akamai MFA integration and generate your integration credentials, keys, and secrets:
- In the Akamai Control Center, navigate to the Enterprise Center.
- In the Enterprise Center navigation menu, select Multi-factor Authentication > Integrations.
- Click Add Integration (+).
- In Integration Type, select OIDC.
- In Name, enter a unique name for your integration.
- In Algorithm, select HS256.
- Click Save and Deploy.
You’ve just generated your Signing Key, Client Secret, and Public Key. This data will be available for you on the integration page. Your MFA credentials can be copied anytime and used to set up an Akamai MFA connector for use with your PingOne DaVinci flow.
- The OIDC integration page provides the following information:
- Integration ID. A unique identifier for your OIDC integration with Akamai MFA.
- Signing Key. A private key for signing authentication requests.
- Client Secret. A secret key used to authenticate your OIDC application with Akamai MFA during the exchange of the authorization code to get the ID token.
- Public Key. A public key used by Akamai MFA to verify the signature on authentication requests.
- API Host. The Akamai MFA endpoint where your application sends OIDC authentication requests.
- Token validity. The duration in seconds for which ID tokens are considered valid. The maximum value is 600 seconds.
- Enforce HTTPS. Enable to enforce HTTPS for authorized callbacks.
- Username normalization. With the username normalization enabled, you can allow different username variations -
DOMAIN\username,username@domain, andusername- to be matched with the same user record in Akamai MFA. See Apply username normalization to learn more. - Authorized URLs. The list of URLs from which authentication requests are accepted. You can add a URL by clicking Add URL and specifying its Scheme, Hostname/IP, and Port.
Set up the Akamai MFA connector in PingOne DaVinci
- In the Ping Identity DaVinci console, go to Connectors and add an Akamai MFA connector. Refer to the Ping Identity documentation to learn how to add a connector.
- Click the name of the Akamai MFA connector you created and configure the connector as follows:
- Auth Endpoint.
https://mfa.akamai.com/api/v1/idp/oidc/authorize - Token Endpoint.
https://mfa.akamai.com/api/v1/idp/oidc/token - UserInfo Endpoint.
https://mfa.akamai.com/api/v1/idp/oidc/token - Integration ID. Your Akamai MFA OIDC integration ID. You can find it on your OIDC integration page in Enterprise Center.
- Client Secret. Your Akamai MFA OIDC integration client secret. You can find it on your OIDC integration page in Enterprise Center.
- Signing Key. Your Akamai MFA OIDC integration signing key. You can find it on your OIDC integration page in Enterprise Center.
- Scope.
openid - Application Redirect URL. Enter the URL of your application if you embed the DaVinci widget in your application.
- Auth Endpoint.
Add Akamai MFA to your DaVinci flow
- In the Ping Identity DaVinci console, go to Flows, click the name of the flow you’d like to update, and add the Akamai MFA connector you created to the authentication flow. Refer to Creating an authentication flow and How to create a flow in Ping Identity documentation to learn how to create an authentication flow.
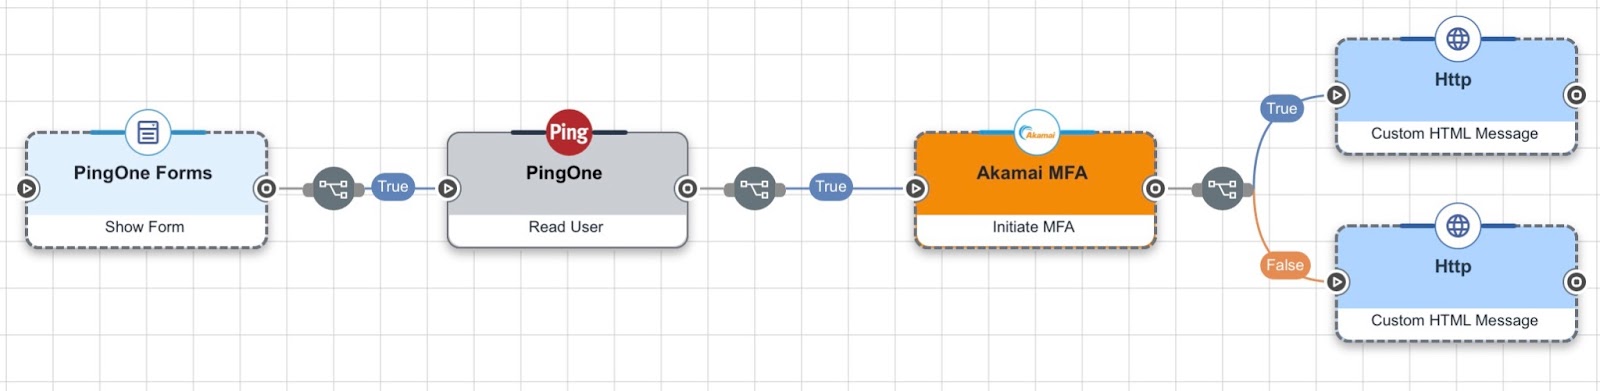
- In your flow, add the Akamai MFA connector after the first factor authentication step. Your flow may look something like the following demo flow:
- Click Try Flow to launch a test run of your updated flow.
Updated about 2 months ago
Did this page help you?