Create IPsec tunnels in Aruba EdgeConnect SD-WAN
Before you begin:
-
Make sure you’ve configured IPsec credentials in SIA. For instructions, see Configure IPsec credentials in SIA.
These are the high-level steps that are required to configure a primary and secondary tunnel between Aruba EdgeConnect and SIA.
To create IPsec tunnels in Aruba EdgeConnect:
-
Verify your configuration:
If your organization uses SIA Client, make sure you disable the client in policies that are associated with the IPsec tunnel locations.
Configure the primary and secondary IPsec tunnels
Complete this procedure to configure the primary and secondary IPsec tunnels in Aruba Orchestrator.
Before you begin:
Make sure the WAN public IP address or addresses for your SD-WAN solution are configured as locations in SIA.
To configure the primary and secondary IPsec tunnels:
-
Create an Akamai service:
-
In Orchestrator, click Configuration > Cloud Services > Services Orchestration.
-
Click Add Service.
-
In the Add Service window, enter a name and prefix for your service. For example, you can use Akamai in the name and the prefix AKA.
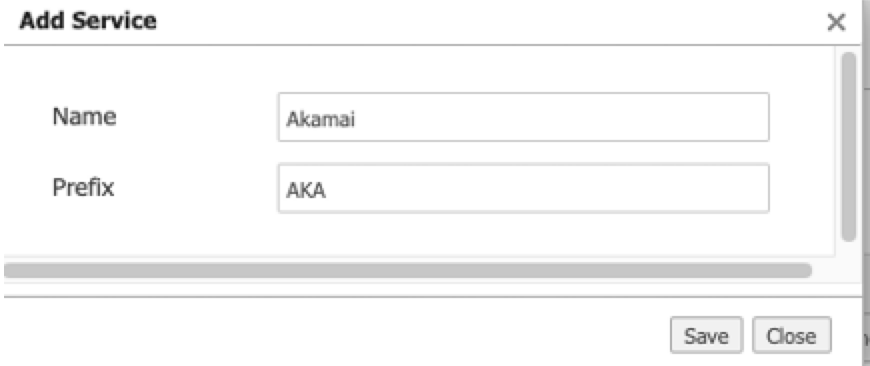
d. Click Save. The Akamai service is created and available on the Service Orchestration tab.
-
-
Configure remote endpoints for the Akamai service:
-
For the Akamai service, click the Remote Endpoint Configuration tab.
-
Click +Remote Endpoint.
-
Configure the secondary tunnel by completing these steps:
Field Step Name Enter Secondary-POP IP Address Enter secondary.ipsec.akaetp.net Interface Label Enter any Note: The any label indicates that Orchestrator will use all of the WAN interfaces that are available in the Interfaces Label for the tunnel configuration.
Pre-shared Key Enter the pre-shared key that you created or generated. d. Click +Remote Endpoint to add another endpoint.
e. Configure the primary tunnel by completing these steps:
-
| Field | Step |
|---|---|
| Name | Enter Primary-POP |
| IP Address | Enter primary.ipsec.akaetp.net |
| Interface Label | Enter any |
| Pre-shared Key | Enter the pre-shared key that you created or generated. |
| Backup Remote Endpoint | Secondary-POP |
-
Configure interface labels:
-
Click the Interface Labels tab.
-
Select the WAN interface labels that your SD-WAN solution is using. The IPsec tunnel configuration is completed in the WAN interface or interfaces that you select. The WAN public IP address must be configured as locations in SIA.
-
Click Save.
-
-
Configure the tunnel settings. These settings are used to build the tunnel to the endpoints you configured:
-
Click the Tunnels Settings tab.
-
Click the General tab.
-
Select IPSec as the mode.
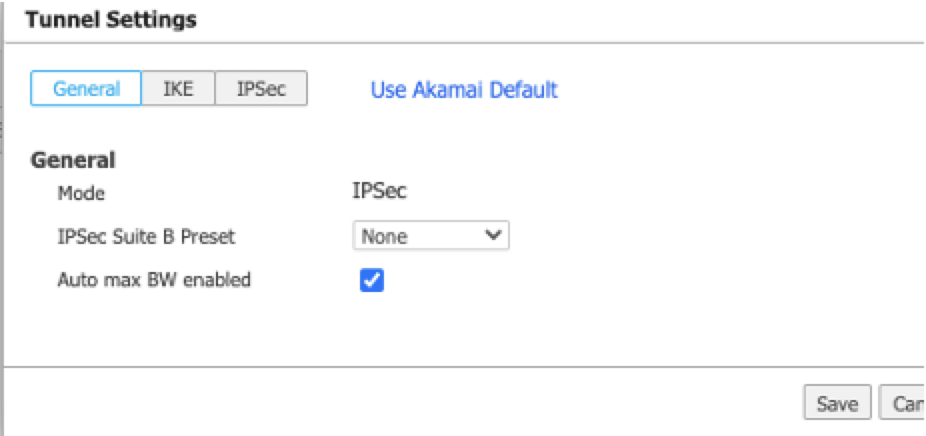
d. Click the IKE tab and configure the IKE settings.
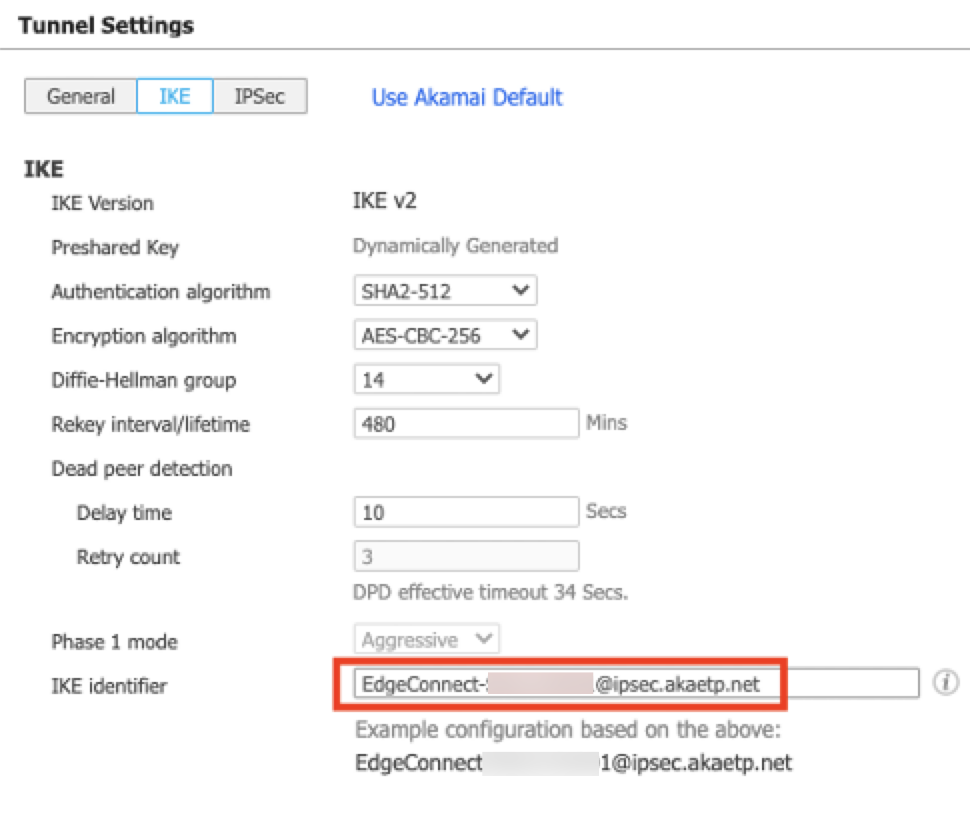
Field Step IKE Version Select IKE v2 Authentication algorithm You can select SHA2-512. For a list of supported algorithms, see Supported cipher suites for IPsec. Encryption algorithm You can select AES-CBC-256. For a list of supported encryption algorithms, see Supported cipher suites for IPsec. Diffie-Hellman group Select 14. Rekey interval/lifetime Select 480 minutes Dead peer detection For the Delay time, enter 10 seconds. For the Retry count, enter 3. IKE identifier Enter the IKE identifier that you configured. For more information, see Configure IPsec credentials in SIA. e. Click the IPSec tab and configure IPSec settings:
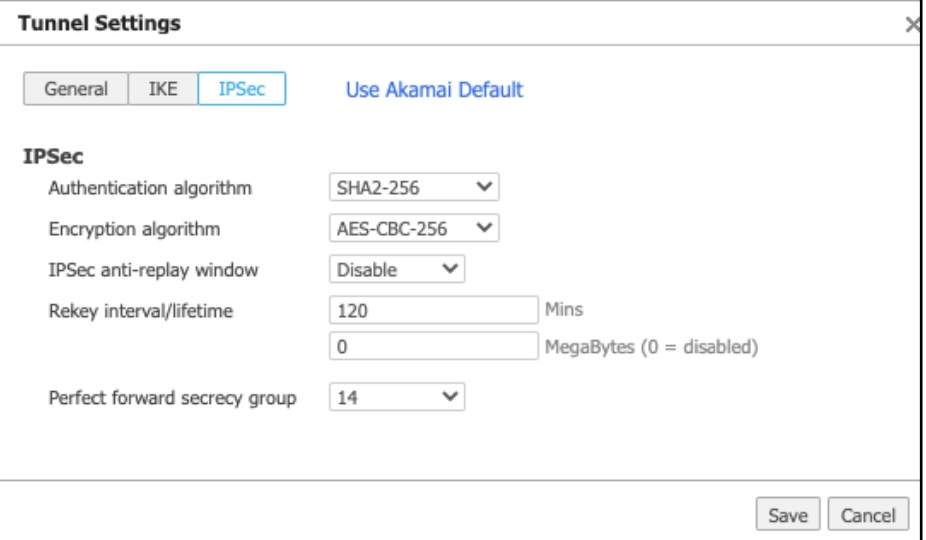
Field Step Authentication algorithm You can select SHA2-256. For a list of supported algorithms, see Supported cipher suites for IPsec Encryption algorithm You can select AES-CBC-256. For a list of supported algorithms, see Supported cipher suites for IPsec IPSec anti-replay window Select Disable. Rekey interval/lifetime Enter 120 minutes and 0 MegaBytes. Perfect forward secrecy group Select 14. f. Click Save.
-
-
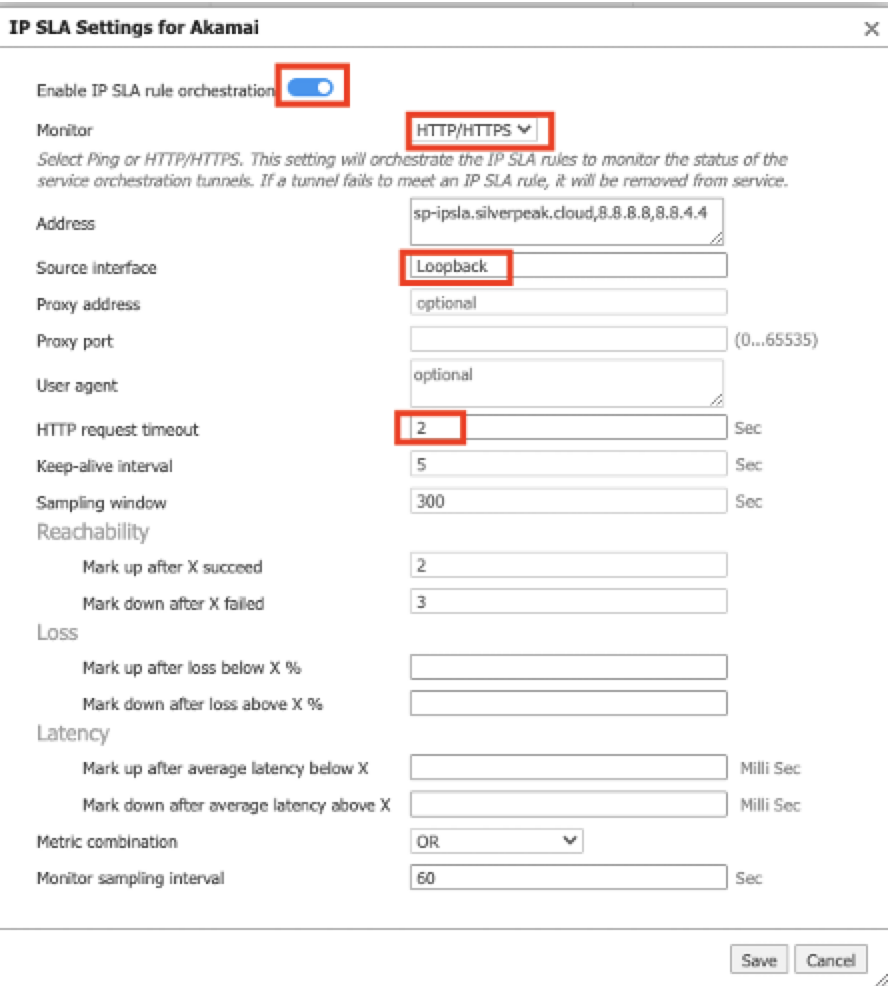
Configure IP SLA settings to monitor tunnel health using the HTTPs probe to sp-ipsla.silverpeak.cloud.
-
Click the IP SLA tab.
-
Turn on the Enable IP SLA rule orchestration toggle and complete these steps:
-
| Field | Step |
|---|---|
| Monitor | Select HTTP/HTTPS. |
| Source interface |
Select Loopback. Note: IP SLA uses this value to source probe traffic to the probe destination address. For the IP SLA profile to reach the SD-WAN appliance, there must be at least one interface on the application that uses this matching label. |
| Encryption algorithm | You can select AES-CBC-256. For a list of supported algorithms, see Supported cipher suites for IPsec. |
| HTTP request timeout | Enter 2 seconds. |
-
In the BIO Breakout tab:
-
Make sure BIO Breakout is enabled. This setting means that the tunnels you created will be added to Business Intent Overlay (BIO).
-
If you need to include an icon, upload a service icon.
-
Click Save.
-
-
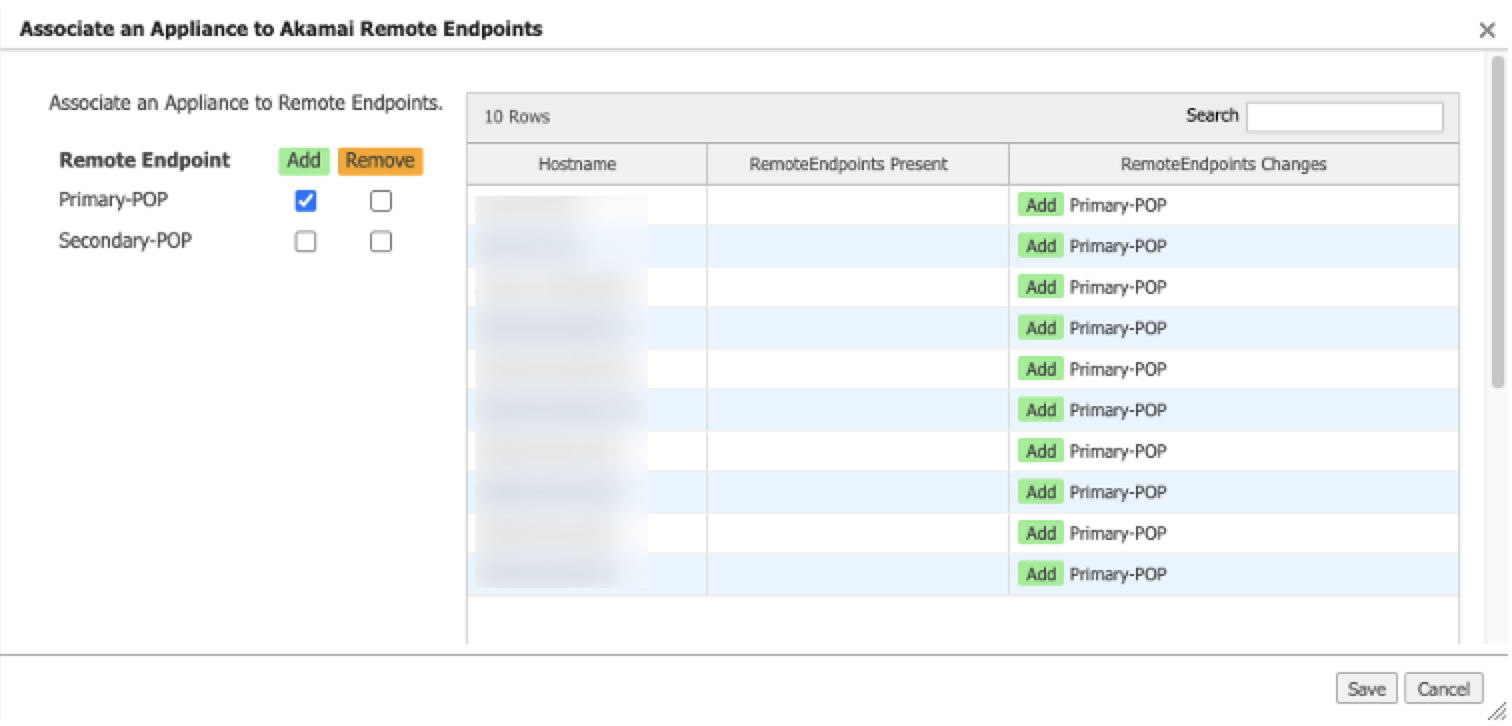
In the Remote Endpoint Association tab, complete these steps to associate your endpoints to the EdgeConnect SD-WAN appliance.
-
In the list of appliances, select the appliances that you want to associate with the endpoints.
-
Click Remote Endpoint Associate.
-
Select Add for the Primary-POP endpoint. This associates both the primary and second endpoints to the EdgeConnect appliance.
-
-
Click Save. Orchestrator pushes the required IPsec tunnel and IP SLA configuration to the EdgeConnect appliances.
Next Steps:
Direct traffic to the Akamai service with Business Intent Overlay. For instructions, see Configure a Business Intent Overlay (BIO).
Configure a Business Intent Overlay (BIO)
A Business Intent Overlay (BIO) specifies how web traffic is routed. Complete these steps to direct traffic from Aruba to SIA.
This procedure describes how to modify an existing overlay. However, you can create a new overlay with similar steps. For detailed instructions on creating a new overlay, see the Aruba Orchestrator documentation.
To configure a business intent overlay:
-
From the Orchestrator navigation menu, select Configuration > Business Intent Overlays. A list of Business Intent Overlays appears.
-
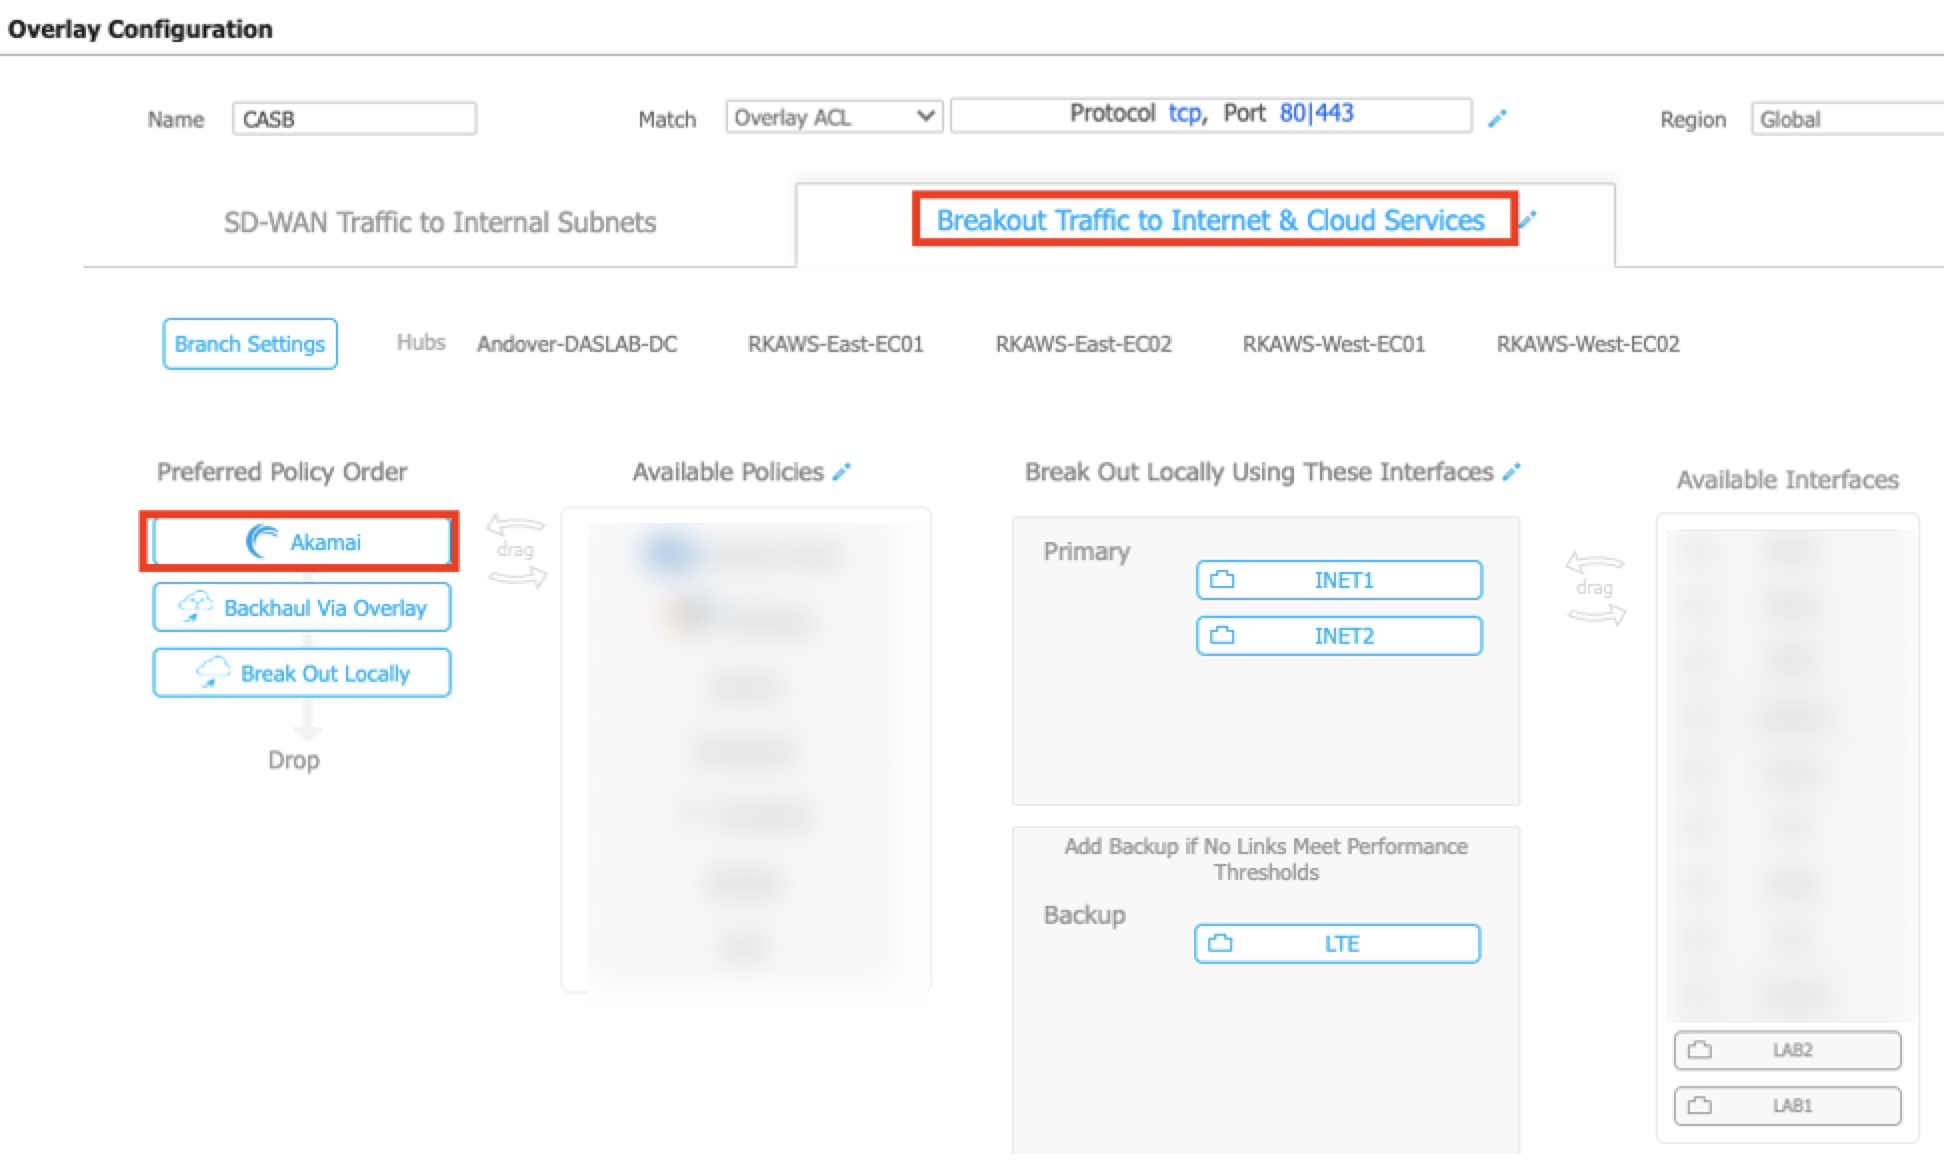
Click the Breakout Traffic to Internet & Cloud Services area for the overlay that you want to use. The Overlay Configuration appears.

-
Click the edit icon for the Match field.
-
Modify the match criteria to use protocol TCP and port 80 and 443.
-
In the Breakout Traffic to Internet & Cloud Service tab, drag the Akamai policy from Available Policies to Preferred Policy Order. Make sure the Akamai policy appears at the top of the Preferred Policy Order.
-
Determine the backup options. If you select Backhaul Via Overlay, Break Out Locally, or both as backup options, this means that traffic is redirected using these policies in case the tunnels to Akamai (SIA) are down. If you don’t want to use a backup option, remove them from the Preferred Policy Order. If you remove backup options, internet-bound traffic is dropped in case the Akamai service is down.
-
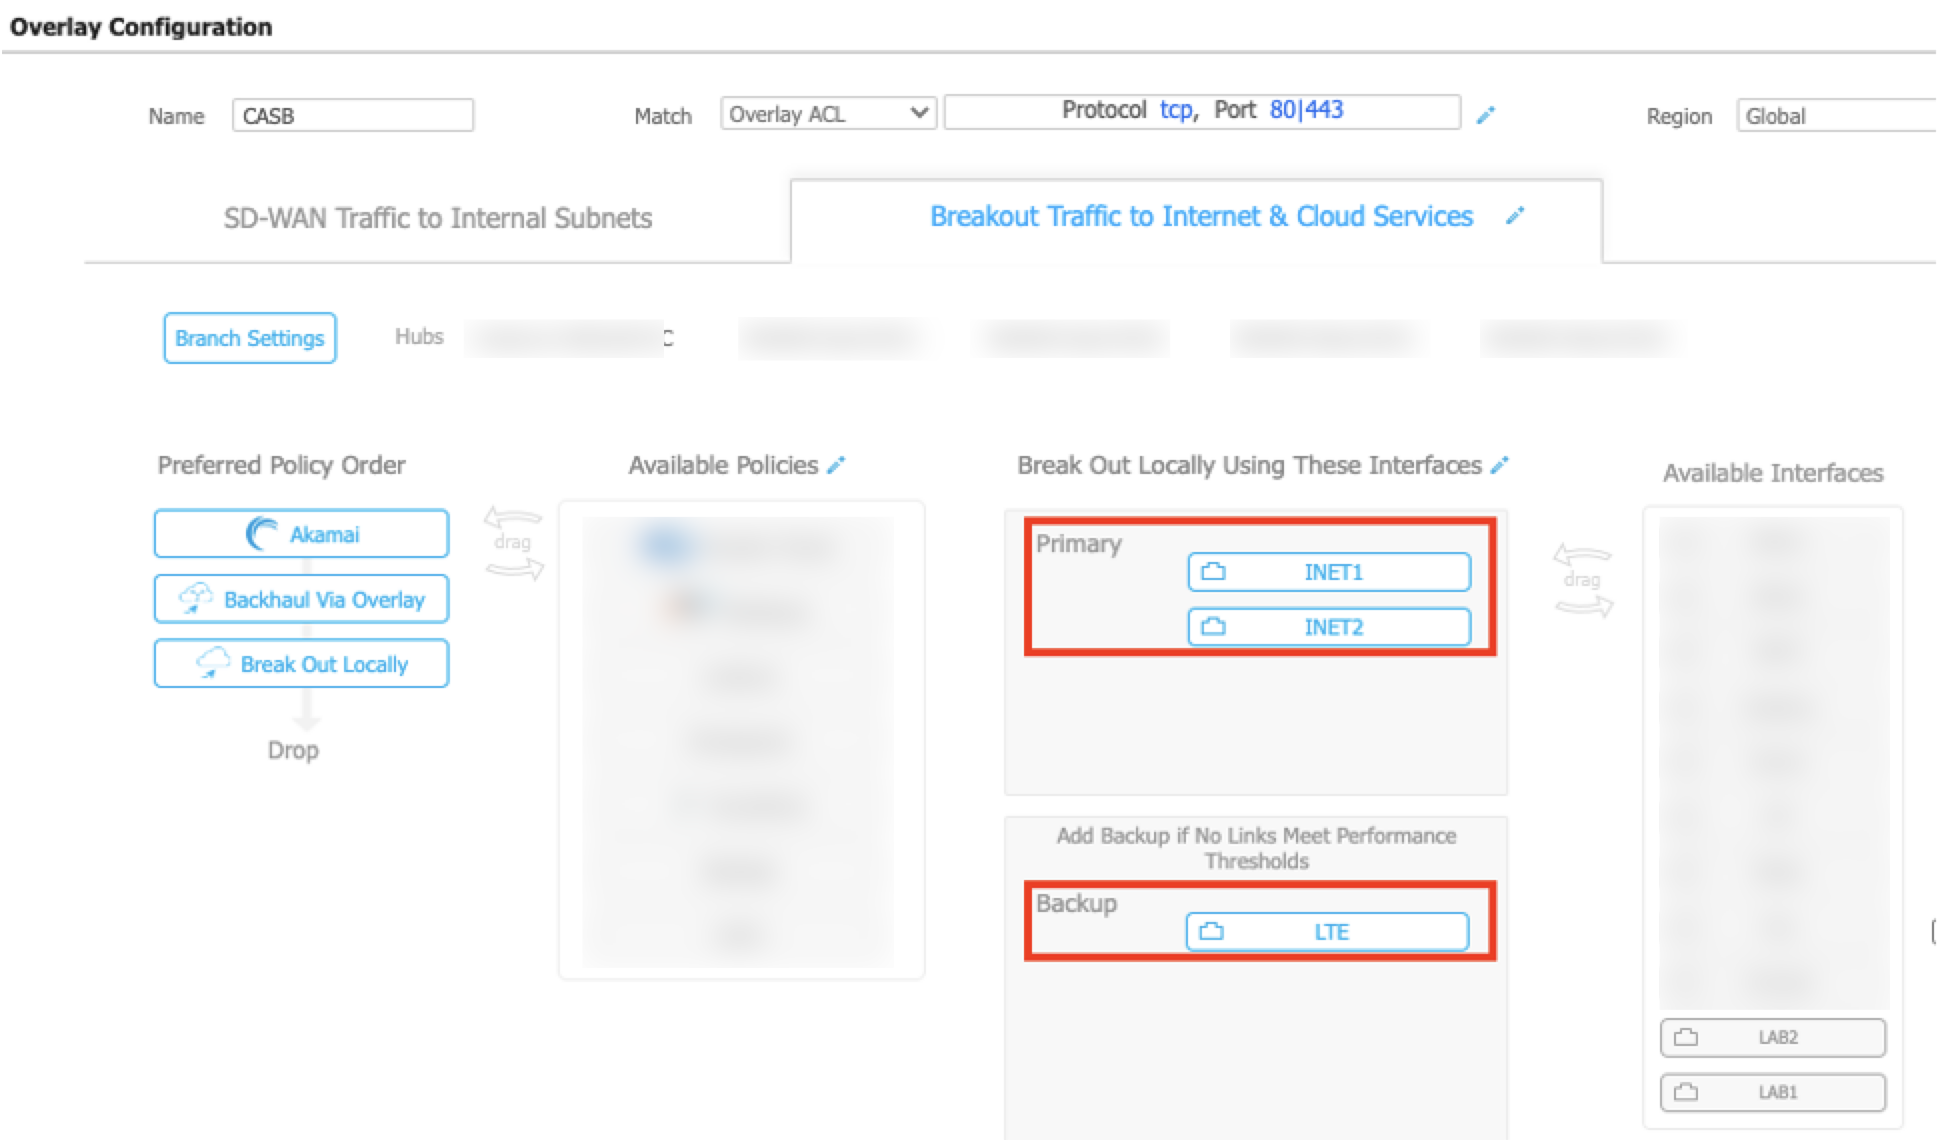
In the Break Out Locally Using These Interfaces area, drag and drop all the primary WANs to the Primary section. Drag and drop all backup interfaces to the Backup section. If you add more than one interface to the Primary section, traffic is load balanced between the two WAN interfaces.
-
To complete the setting changes, click OK.
-
Click Save and Apply Changes to Overlays.
Next step:
Verify your configuration:
-
Verify that the service configuration was pushed to devices. For more information, see Verify the Akamai service configuration.
-
Verify the tunnel status and the IP SLA status. For instructions, see Verify the status of the tunnels and IP SLA.
-
Verify traffic flows on EdgeConnect SD-WAN appliances. For instructions, see Verify traffic flows on EdgeConnect SD-WAN.
Verify the Akamai service configuration
Complete this procedure to verify that the Akamai service you created in Service Orchestrator was pushed to the EdgeConnect SD-WAN appliances.
To verify the service configuration:
-
In the navigation menu, select Orchestrator > Tools > Audit Logs.
-
In the Search field, enter the prefix that you used for the service. For example, AKA. For more information, see Configure the primary and secondary IPsec tunnels.
-
Confirm that the passthrough tunnel has successfully been pushed to the device. A passthrough tunnel configuration is pushed if a label in the Interface Labels also exists on the EdgeConnect SD-WAN appliance.
-
Confirm that the fully-qualified domain names (FQDNs) for NSLOOKUP were applied successfully. FQDNs are used for the primary and secondary tunnels. As a result, the EdgeConnect SD-WAN must be able to resolve them.

-
Confirm that the IP SLA rules were pushed to the appliance. The IP SLA rules are pushed if these conditions are met:
-
The Source Interface label that you created for IP SLA matches the interface that is on the EdgeConnect SD-WAN appliance. For more information on configuring the source interface for IP SLA, see step 5 of Configure the primary and secondary IPsec tunnels.
-
There is at least one overlay in the BIO that is using the Akamai service in the preferred policy order that you configured in Configure a Business Intent Overlay (BIO).
-
Verify the status of the tunnels and IP SLA
Complete this procedure to verify the status of the tunnels and the IP SLA.
To verify the status of the tunnel and the IP SLA:
-
In the navigation menu, select Configuration > Cloud Services > Service Orchestration.
-
Click the Service Orchestration tab.
-
Make sure the Connection Status is Up. This indicates the IPsec tunnel is functioning and the IP SLA probes are working.

-
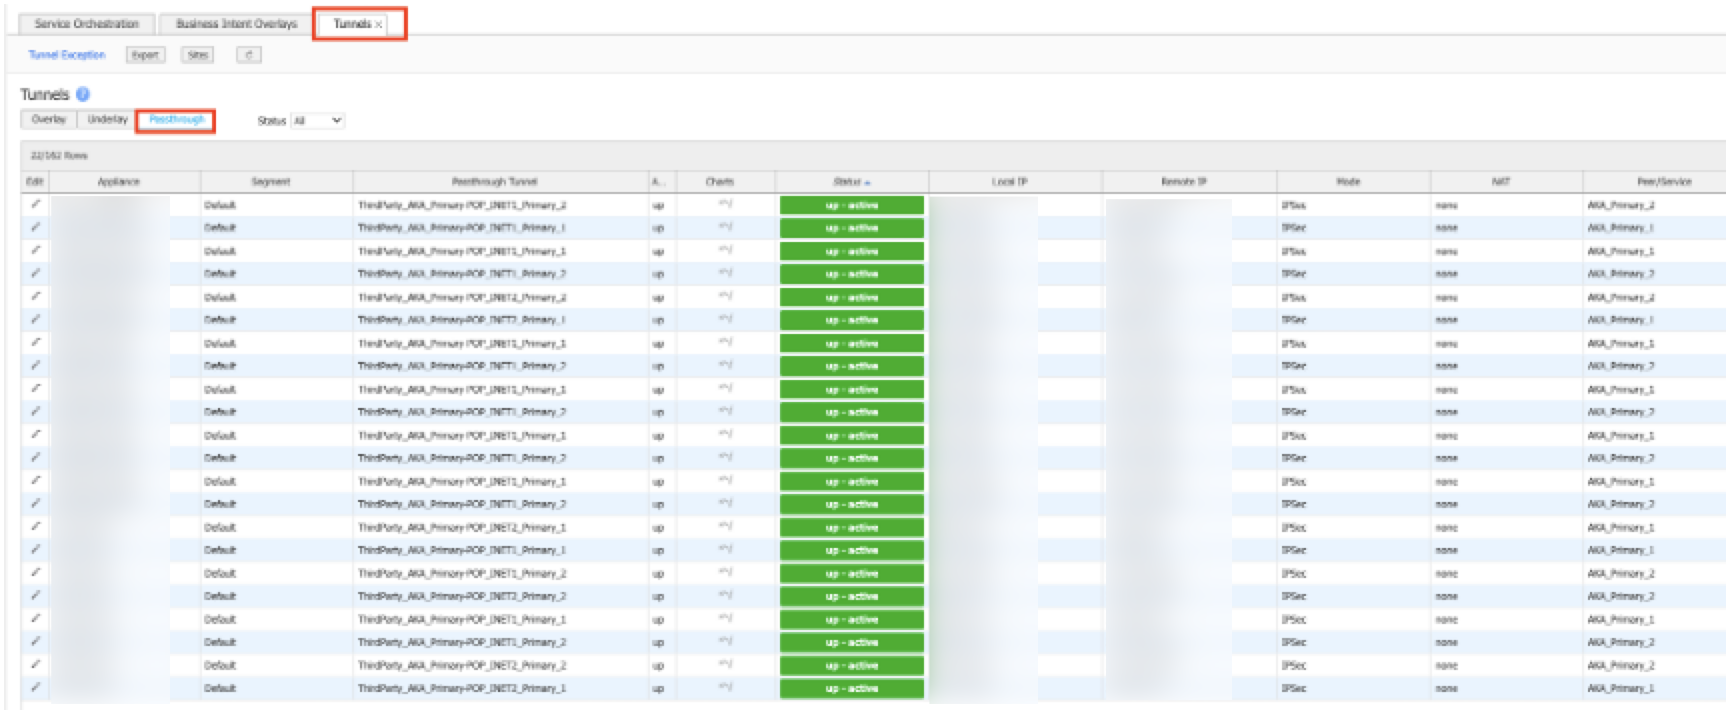
Confirm the status of the tunnels:
-
Next to the Akamai service that’s shown on the Service Orchestration tab, click Tunnels.

A new tab appears with the Tunnel data.
-
Click the Passthrough tab to view data for the passthrough tunnel.
-
Use the Search field to search for the service. For example, AKA.
-
Confirm that the status is up.
-
-
Confirm the IP SLA status:
-
Next to the Akamai service that shown on the Service Orchestration tab, click IP SLA.

A new tab appears with IP SLA data.
-
Use the Search field to search for the service. For example, AKA.
-
Confirm that the status is up.
-
Verify traffic flows on EdgeConnect SD-WAN
Complete these steps to confirm whether traffic is directed to the Akamai service tunnels on the EdgeConnect SD-WAN appliances.
To verify traffic flows:
-
In the navigation menu, select Monitoring > Flows > Active & Recent Flows.
-
Use the provided filter options to filter based on IP address and port of the overlay. Confirm the inbound and outbound tunnels show something like “AKA_Primary-POP_INET1” based on the prefix and the name you provided for the primary tunnel. This confirms that there are inbound and outbound connections through the Akamai service tunnels.
Updated about 3 years ago
