Authorization
Identity and Access in Akamai Cloud is used to manage identities within an account and manage operations that those identities may perform. By authenticating identities and authorizing them to access specific services and entities, Identity and Access ensures that the right identities access the right entities. Identity and Access uses the role-based access control (RBAC) model to authorize operations on entities. To learn more, see Identity and Access in Akamai Cloud.
To find out what permission or role is needed to run a specific Linode API operation, check the Permissions and scopes section for the operation.
- If the operation requires a specific permission, you need to check the Available roles list or run the List available roles operation and look for the role that contains the specific permission and fits the required access the most. Then, assign this role to your user or ask your account administrator to assign this role to you.
- If the operation requires a specific role to run it but no permission, it means that Identity and Access is not natively-enabled for this service yet. To learn more about this case, see Identity and Access for non-natively enabled services.
- For operations that have neither permission nor role specified, continue using grant-based access control.
Authentication
Some of this API's operations are publicly accessible and don't require authentication. However, all operations that affect your account require either a personal access token or OAuth authentication, when using third-party applications.
Personal access tokens
The easiest way to access the API is with a personal access token generated from Akamai's Cloud Manager portal. This token should only allow the level of access needed by the application.
Create a personal access token
Run the Create a personal access token operation.
To create a personal access token:
-
Log in to Cloud Manager.
-
Click your profile name in the top right, and select API Tokens.
-
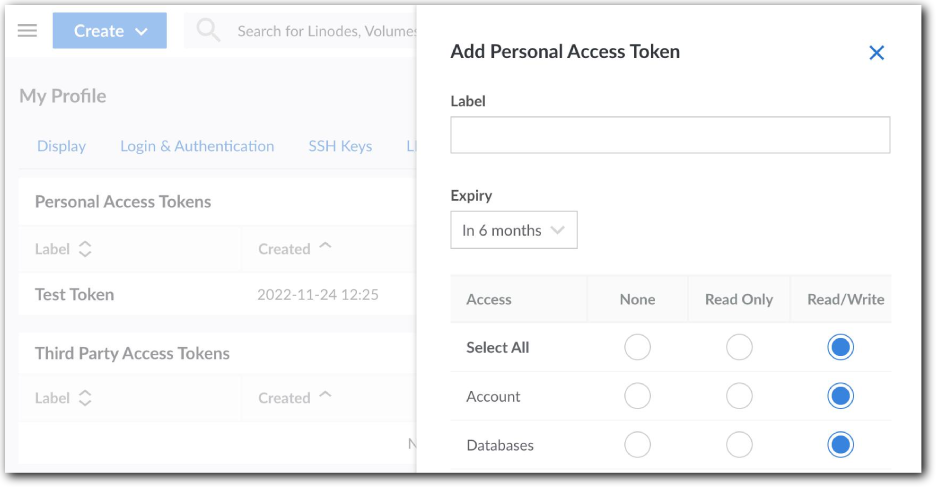
Click Create a Personal Access Token.
-
Set these options:
-
Label. Enter a name for the token that makes it easy to identify and understand its intended use.
-
Expiry. Select an expiration timeline. You can't change this after you create the token.
-
Access. Set the level of access for each API product or service ("category"). Select Read/Write to allow full access to that category. You can't change this after you create the token.
-
-
Click Create Token. A dialog box opens and displays your new personal access token.
The token is only revealed nowSave token details in a safe place, such as a password manager. After closing this prompt, you can't view the token string again.
Revoke a personal access token
If you want to decommission a token or think it may have been compromised, you can revoke it. Once revoked, any application using the token will no longer be authorized to access your account through the Linode API.
Run the Revoke a personal access token operation.
To revoke a personal access token:
-
Log in to Akamai's Cloud Manager.
-
Click your username at the top of the screen and select API Tokens.
-
Find the token you want to revoke and click Revoke.

- Confirm your decision.
Personal access token authentication
| Security scheme type | HTTP |
|---|---|
| HTTP Authorization Scheme | bearer |
The scopes listed in the OAuth model also apply to this security model.
OAuth
If you're designing an application that can authenticate with an arbitrary user, use the OAuth 2.0 workflows we offer here.
If you only need to access the Linode API for personal use, create a personal access token.
Before you begin
To implement OAuth in your application, first you need to create an OAuth client. You can do this with the Linode API. Consider these points when creating this client:
-
The response from the Create an OAuth client operation gives you a
client_idand the clientsecret. Store these values for use in the future. -
Clients can be public or private, and are private by default. You can choose to make the client public during creation.
-
The private client. Use this with applications that can securely store the client
secret. For example, an application running on a secured server that only the developer has access to would use a private OAuth client. This is also called a confidential client in some OAuth documentation. -
The public client. Use this in applications that can't guarantee security of the client
secret. For example, this could be a native app running on a user's computer that can't keep the client secret safe, as a user could potentially inspect the source of the application. So, native apps or apps that run in a user's browser should use a public OAuth client.
-
-
The
redirect_uriis displayed as the Callback URL in Cloud Manager.
For a detailed example of an OAuth 2.0 implementation, see How to Create an OAuth App with the Linode Python API Library.
OAuth authentication
The OAuth authentication workflow is a series of exchanges between your third-party app and Akamai cloud services. The user is authenticated before an application can start making API calls on the user's behalf.
The OAuth 2.0 Authorization Framework (RFC 6749)Our OAuth authorization follows the methodology explained in RFC 6749, with these considerations:
Looking at the diagram in section 1.2 of RFC 6749,
login.linode.comserves as the Resource Owner and the Authorization Server. We refer to this as the login server throughout this section. The Resource Server isapi.linode.com, which we refer to as the API server here.The OAuth spec refers to the private and public workflows we call out here as the authorization code flow and implicit flow, respectively.
The private workflow
-
The user visits the application's website and is directed to login with Akamai cloud computing services.
-
Your application then redirects the user to our login server with the client application's
client_idand requested OAuthscope, which needs to appear in the URL of the login page. See the "OAuth scopes" listing in OAuth reference for details. -
The user logs into the login server with their username and password.
-
The login server redirects the user to the specified redirect URL with a temporary authorization
code(exchange code) in the URL. -
The application issues a POST request to the login server with the exchange code,
client_id, and the client application'sclient_secret:-
Make an HTTP POST request as
application/x-www-form-urlencodedor asmultipart/form-datato:https://login.linode.com/oauth/token -
Include the following parameters in the POST body:
PARAMETER DESCRIPTION client_idYour app's client ID. client_secretYour app's client secret. codeThe exchange code you just received from the redirect.
-
-
The login server responds to the client application with new OAuth tokens. The
access_tokenis set to expire in two hours. Store these values from the response:"access_token": "abc123def456hij789klm""refresh_token": "012nop345qrs678tuv901"
-
Make authenticated HTTP requests to the API for the next two hours by including the
access_tokenin this header with each request:Authorization: Bearer abc123def456hij789klm -
After the
access_tokenhas expired, the application issues a POST request to the login server to request a new one using the therefresh_token:-
Make an HTTP POST request as
application/x-www-form-urlencodedor asmultipart/form-datato:https://login.linode.com/oauth/token -
Include the following parameters in the POST body:
PARAMETER DESCRIPTION grant_typeSet this to the refresh_tokenwhen refreshing access.client_idYour app's client ID. client_secretYour app's client secret. refresh_tokenThe refresh_tokenreceived from the previous response.
-
A response body is returned with a new access_token with a two-hour TTL, as well as a new refresh_token that can be used to repeat the process.
The public workflow
-
The user visits the application's website and is directed to login with Akamai cloud services.
-
Your application then redirects the user to our login server with the client application's
client_idand requested OAuthscope, which needs to appear in the URL of the login page. See the "scopes" listing in OAuth reference for details. -
The user logs into the login server with their username and password.
-
The login server redirects the user back to your application with an OAuth
access_tokenembedded in the redirect URL's hash. This is temporary and expires in two hours. Norefresh_tokenis issued. So, once theaccess_tokenexpires, you need to issue a new one. To do this, the user needs to log in again.
OAuth reference
- Authorization URL.
https://login.linode.com/oauth/authorize - Token URL.
https://login.linode.com/oauth/token - OAuth scopes. A scope specifies the level of access the client is requesting. It refers to the information or functionality that the application can access, and whether read-only or write access is allowed. These are the scopes supported with the Linode API:
| Scope | Description |
|---|---|
account:read_only | Allows access to GET information about your account. |
account:read_write | Allows access to all operations related to your account. |
databases:read_only | Allows access to GET managed databases on your account. |
databases:read_write | Allows access to all operations related to your Managed Database. |
domains:read_only | Allows access to GET DNS Manager domains on your account. |
domains:read_write | Allows access to all DNS Manager domain operations. |
events:read_only | Allows access to GET your events. |
events:read_write | Allows access to all operations related to your events. |
firewall:read_only | Allows access to GET information about your Cloud Firewalls. |
firewall:read_write | Allows access to all Cloud Firewall operations. |
images:read_only | Allows access to GET your Image Servicesimages. |
images:read_write | Allows access to all operations related to your Image Servicesimages. |
ips:read_only | Allows access to GET your IPs. |
ips:read_write | Allows access to all operations related to your IPs. |
linodes:read_only | Allows access to GET Linodes on your account. |
linodes:read_write | Allow access to all operations related to your Linodes. |
lke:read_only | Allows access to GET LKE clusters on your account. |
lke:read_write | Allows access to all operations related to LKE clusters on your account. |
longview:read_only | Allows access to GET your Longview clients. |
longview:read_write | Allows access to all operations related to your Longview clients. |
nodebalancers:read_only | Allows access to GET NodeBalancers on your account. |
nodebalancers:read_write | Allows access to all NodeBalancer operations. |
object_storage:read_only | Allows access to GET information related to your Object Storage. |
object_storage:read_write | Allows access to all Object Storage operations. |
stackscripts:read_only | Allows access to GET your StackScripts. |
stackscripts:read_write | Allows access to all operations related to your StackScripts. |
volumes:read_only | Allows access to GET your volumes. |
volumes:read_write | Allows access to all operations related to your volumes. |
vpc:read_write | Allows access to all operations related to VPC and subnet creation, updating, and deletion |
Authenticate Monitor API operations
The Akamai Cloud Pulse monitoring application offers the Get an entity's metrics operation that you can use to see metric information for a specific Akamai Cloud Manager service. To use this operation, you need to generate a JWE-format token for inclusion in the call.
For use with Object Storage
-
Run the List supported services operation and store the
service_typefor Object Storage. -
Determine how the token will be applied to your Object Storage buckets:
-
Apply to specific buckets on your account. Run the List Object Storage buckets operation and store the
hostnamevalues for the target buckets. -
Apply to all buckets on your account. Skip to the next step.
-
-
Run the Create a token for a service type operation, using the stored
service_typein the call's URL. Build the body parameters, based on how the token is to be applied to your buckets:-
Apply to specific buckets on your account. Include your stored
hostnamevalues as theentity_idsarray:{ "entity_ids": [ "primary-bucket-1.us-east-12.linodeobjects.com", "secondary-bucket-1.us-east.linodeobjects.com" ] } -
Apply to all buckets on your account. Set the request as an empty object:
{}
-
-
Store the
tokenfrom the response. -
Run the Get an entity's metric operation, passing the stored
tokenas a Bearer authorization header. Below is an example using cURL:curl --request POST \ --url https://monitor-api.linode.com/v1/monitor/services/dbaas/metrics \ --header 'accept: application/json' \ --header "authorization: Bearer abc123" \ --header 'content-type: application/json' \ --data ' { "aggregate_function": "min" }
For use with all other services
-
Run the List supported services operation and store the
service_typefor the applicable service. -
Run the appropriate List operation for your service and store the
idfor the target object. For example, if you're looking for metrics data for a Managed Database, run the List Managed Databases operation and store theidfor the target database. -
Run the Create a token for a service type operation, using the stored
service_typein the call's URL and the object'sidas theentity_idin the request body. Store thetokenfrom the response. -
Run the Get an entity's metric operation, passing the stored
tokenas a Bearer authorization header. Below is an example using cURL:curl --request POST \ --url https://monitor-api.linode.com/v1/monitor/services/dbaas/metrics \ --header 'accept: application/json' \ --header "authorization: Bearer abc123" \ --header 'content-type: application/json' \ --data ' { "aggregate_function": "min" }