Create an extended-validated certificate
In this tutorial, you'll set up an extended-validated (EV) certificate that uses DigiCert as the certificate authority. It will use Akamai's secure network to transfer your content between requesting clients and the Akamai edge network.
An extended-validated certificate is the highest level of validation, for this you must have signed letters and notaries sent to the certificate authority (CA) before signing. Wildcard certificates cannot be EV certificates because an EV certificate requires you to be explicit about all the subject alternative names (SANs). This method provides a credential that can be used to indicate in a browser that your certificate is trustworthy. This type of certificate expires after one year.
Before you begin
Make sure you get your technical contact if you haven't done so yet.
1. Create the certificate
- Log into Akamai Control Center.
- Select ☰ > CDN > Certificates.
- Click Create New Certificate. A wizard launches.
- Select Extended Validation (EV) from the Akamai Managed Certificate options and click Next.

- In Select Certificate Settings, select the certificate type and certificate authority and click Next:
- Certificate Type options:
- Subject Alternative Names (SAN)
- Single
- Certificate Authority (CA) options:
- DigiCert
- Certificate Type options:
If a certificate type is greyed out or un-selectable in the UI, it could be because you have an issue with your certificate quota. See the link on the same page in the UI to take a closer look at your contract details.
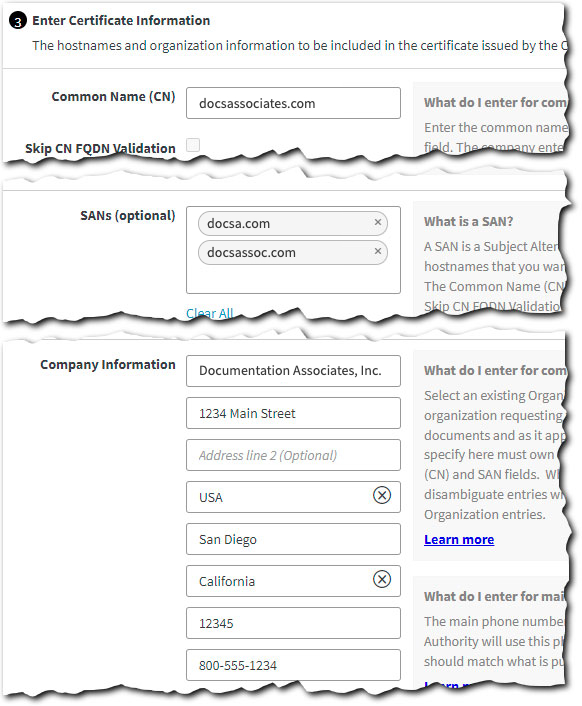
- In Enter Certificate Information, set these options and then click Next:
You can either enter the required information manually or you can select and use an already-validated organization's information.
- Common Name (CN). This is the primary domain that a client uses to access your site or app. If you only have a single domain, this is the only field you need. Your organization needs to legally own this domain and once you submit your certificate in CPS, you can't change its Common Name.
- SANs (optional). Are there alternate domains that a client can use to access your site or app? If so, you can enter up to 99 of them here.
- Company Information. All fields not labeled "optional" are required. Have a look at the in-app instructions and fill in each accordingly.

- Review the Enter Certificate Information details. Click Edit to fix any problems.
- In Enter Company Information If applicable, you can enable the Same as certificate company information checkbox. Then click Next.
- Set these options in Enter Contact Information panel and then click Next:
- Administrator Contact Information. Review the in-app help and enter contact details for your local certificate administrator.
- Akamai Technical Contact Information. This is your Akamai account representative.
- In the Select Network Settings panel, set Deployment Network to Standard TLS or Enhanced TLS based on your requirements. Leave all other options at their default and click Next.
Enhanced TLS versus Standard TLS
The difference in security between Enhanced TLS and Standard TLS is physical, not electronic or software-related. The physical security of the servers is more advanced for Enhanced TLS but the software protection is no different for Standard TLS.
If your site exchanges PII, your certificate needs to use Enhanced TLS.
- In the Root Selection panel, choose a trust chain option based on your requirements.\
Trust chain options
The default option is an Akamai-managed trust chain with a root certificate that Akamai controls. When selected, Akamai updates the trust chain at renewal, resulting in a change to the trust chain. If you don’t select a trust chain, or a trust chain wasn’t selected for your existing certificates, CPS uses the default option.\
These options give you the flexibility to use a trust chain with a specific root certificate:- digicert-g1 (ECDSA: G1, RSA: G1)
- digicert-g2-g3 (ECDSA: G3, RSA: G2)
- digicert-g5 (ECDSA: TLS ECC G5, RSA: TLS RSA G5) For details on DigCert G5 root certificates, see DigiCert Trusted Toot Authority Certificates.
- Click Review. Run through each of the sections, verifying your settings are correct and make sure that each is marked with a green check icon.
- Click Submit.
Your certificate request is submitted and a certificate signing request is sent to DigiCert. When it's ready to progress, your administrator contact and your Akamai technical contact will receive an email.
2. Optionally, push your cert to staging
A newly provisioned certificate is automatically pushed to both the staging network and the production network, simultaneously. It's live and ready to start protecting the client-to-edge network connection. If you need to test your delivery configuration on Akamai's staging network before the certificate is pushed to production follow the steps below to tell CPS to always test on staging before deployment.
-
If necessary, access Akamai Control Center, log in with your primary admin user, and go to ☰ > CDN > Certificates.
-
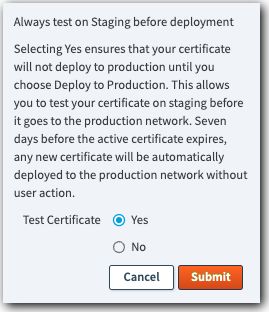
Locate the certificate you just created in the table, click No under Always test on Staging before deployment.
-
Set Test Certificate to Yes and click Submit.

3. Validate your domains
After you submit your enrollment (at the end of Step 1. Create the certificate, above) DigiCert will contact you to validate your organization information submitted with the certificate. When each domain’s validation request is successful, the Administrator Contact will receive an email.
Certificate renewal
An EV certificate has a lifecycle of one year. 90 days before the certificate is due to expire, the renewal process will become available. To complete this renewal process you must make the same validation steps that were required to create the certificate.
Other certificate methods
An extended-validated enhanced TLS certificate may not fit your needs.
| Method | Description |
|---|---|
If requests for your content don't require the exchange of personally identifiable information (PII) consider using a Standard TLS version of your certificate. It is slightly faster and easier to set up than Enhanced TLS. | |
This is a separate method that automates the creation of a TLS certificate, either Standard TLS or Enhanced TLS. Currently, it’s in limited availability. | |
Secure hypertext transfer protocol (HTTPS) has become the standard for access on the Internet. While non-secure HTTP is still supported, it's not recommended. Browsers will present warnings to your users if they connect to a site that doesn't support HTTPS. |
We offer a detailed comparison of each of these security options.
Updated 4 months ago
