Create a third-party certificate
Set up a third-party certificate with a third party as the certificate authority (CA). Akamai's secure network transfers your content between requesting clients and the Akamai edge network.
A third-party certificate has Akamai create a certificate signing request (CSR) which needs to be signed by a third-party certificate authority before it can be uploaded to Akamai for use.
Before you begin
Make sure you get your technical contact if you haven't done so yet.
1. Create the Certificate
- Log into Akamai Control Center.
- Select ☰ > CDN > Certificates.
- Click Create New Certificate. A wizard launches.
- Select Third-Party from the Akamai Managed Certificate options and click Next.

- In Select Certificate Settings your only options for a third-party certificate are selected by default. They are as follows:
- Certificate Type: Third-Party
- Certificate Authority (CA): Third-Party
- Click Next.
If a certificate type is greyed out or un-selectable in the UI, it could be because you have an issue with your certificate quota. See the link on the same page in the UI to take a closer look at your contract details.
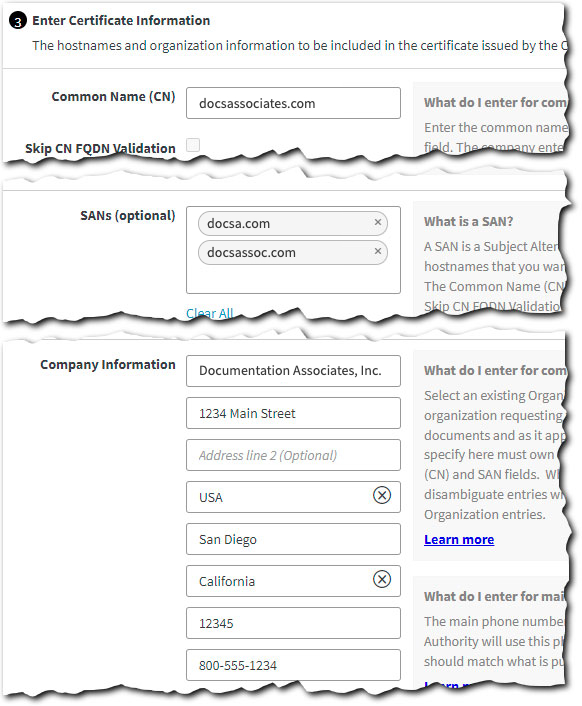
- In Enter Certificate Information, set these options and then click Next:
- Common Name (CN). This is the primary domain that a client uses to access your site or app. If you only have a single domain, this is the only field you need.
Once you submit your certificate in CPS, you can't change its Common Name.
- SANs (optional). Are there alternate domains that a client can use to access your site or app? If so, you can enter up to 99 of them here.
- Company Information. All fields not labeled "optional" are required. Have a look at the in-app instructions and fill in each accordingly.
- Common Name (CN). This is the primary domain that a client uses to access your site or app. If you only have a single domain, this is the only field you need.

- Review the Enter Certificate Information details. Click Edit to fix any problems.
- In Enter Company Information, if applicable you can enable the Same as certificate company information checkbox. Then click Next.
- Set these options in Enter Contact Information panel and then click Next:
- Administrator Contact Information. Review the in-app help and enter contact details for your local certificate administrator.
- Akamai Technical Contact Information. This is your Akamai account representative.
- In the Select Network Settings panel, set Deployment Network to Standard TLS or Enhanced TLS based on your requirements. Leave all other options at their default and click Next.
Enhanced TLS versus Standard TLS
The difference in security between Enhanced TLS and Standard TLS is physical, not electronic or software-related. The physical security of the servers is more advanced for Enhanced TLS but the software protection is no different for Standard TLS.
If your site exchanges PII, your certificate needs to use Enhanced TLS.
- Click Review. Run through each of the sections, verifying your settings are correct and make sure that each is marked with a green check icon.
- Click Submit.
2. Optionally, push your cert to staging
A newly provisioned certificate is automatically pushed to both the staging network and the production network, simultaneously. It's live and ready to start protecting the client-to-edge network connection. If you need to test your delivery configuration on Akamai's staging network before the certificate is pushed to production follow the steps below to tell CPS to always test on staging before deployment.
-
Access Akamai Control Center, log in with your primary admin user, and go to ☰ > CDN > Certificates.
-
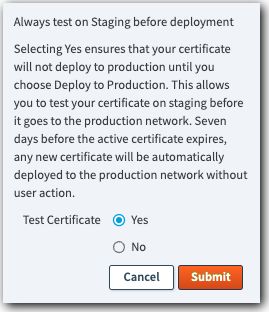
Locate the certificate you just created in the table, click No under Always test on Staging before deployment to change the selection.
-
Set Test Certificate to Yes and click Submit.

3. Download your Certificate Signing Request (CSR)
After you submit your request to Akamai, CPS generates two certificate signing requests (CSRs). One is an RSA and the other is an ECDSA. You have to get at least one of these signed by your third-party certificate authority. To do this:
-
Access Akamai Control Center, log in with your primary admin user, and go to ☰ > CDN > Certificates.
-
Locate the certificate you just created in the table, click on the Actions icon, click Download CSR.
The Download CSR screen appears. -
Choose a Key Type (or both if you want to create a Dual Stack).
- ECDSA. The default selection. ECDSA is recommended as it is the latest standard offering the best security and performance.
- RSA. Legacy standard.
-
Click any of the following:
- Download CSR to download the file.
- Copy CSR code to clipboard to copy the CSR to clipboard.
- View CSR. In the ECDSA Certificate Signing Request/RSA Certificate Signing Request pop up window select all the text including beginning and ending dashes, then press Ctrl+C (or CMD+C on macOS) on your keyboard to copy it to clipboard. Click Close.
CSR restrictions
Downloaded or copied CSRs may only be used to generate and upload one leaf certificate and its corresponding trust chain. CSRs may not be reused once the signed certificates are uploaded. Signed certificates must be uploaded within 11 months of CSR generation.
- Click Next to navigate to the Next Step page that provides you with the information about the next steps.
- Click Done to go back to the CPS landing page.
4. Provide the CSR to the certificate authority of your choice and get a signed Certificate and trust chain from them.
5. Upload your signed Certificate and trust chain to Akamai.
Once your certificate authority signs and sends your certificate and an associated trust chain you need to upload it in CPS. To do this:
-
Access Akamai Control Center, log in with your primary admin user, and go to ☰ > CDN > Certificates. Then click the To-Do link under Receiving certificate column of your certificate. You can also click the Actions icon.

-
Click Upload Certificate and Trust Chain.
The Upload Third-Party Certificate and Trust Chain screen appears. -
To upload an ECDSA or an RSA Certificate:
- Click Upload to navigate to Upload Your Certificate and Trust Chain information screen.
- Select one of the options:
- Copy/Paste. Paste the certificate provided by CA in PEM format.
- Upload. Click Browse to browse to the signed certificate that you received from your CA, or drag and drop the file onto the screen.
- The added certificate(s) appear as {number} Cert Uploaded in the upper right corner of the Add ECDSA Certificate/Add RSA Certificate section. Click it to view the Certificate(s) details.
-
To upload an ECDSA/RSA Trust Chain (optional for existing certificates):
-
Click Upload to navigate to Upload Your Certificate and Trust Chain information screen.
-
Select one of the options:
- Copy/Paste. Paste the certificate provided by CA in PEM format.
- Upload. Click Browse to browse to the certificates that you received from your CA, or drag and drop the file onto the screen. You can select multiple files at the same time.
-
The added trust chain(s) appear as {number} Trust Chain Uploaded in the upper right corner of the Add ECDSA Trust Chain/Add RSA Trust Chain section. Click it to view the Trust Chain(s) details.
The added trust chain(s) appear as {number} Trust Chain Uploaded in the upper right corner of the Add ECDSA Trust Chain/Add RSA Trust Chain section. Click it to view the Trust Chain(s) details.
Certificate or trust chain removal
If you wish to remove an uploaded certificate and/or a trust chain, you can either remove specific ones in detail view windows (i.e. {...} Uploaded items), or remove all of them at once by clicking X in the upper right corners of Add ECDSA Certificate/Add RSA Certificate or Add ECDSA Trust Chain/Add RSA Trust Chain sections respectively.
Should I include a leaf or root certificate in the trust chain?
The trust chain should not include a leaf certificate. CPS rejects trust chain uploads that include a leaf certificate. The leaf certificate should be uploaded separately.
Including the root certificate in the trust chain is not recommended. CPS will present to connecting browsers and TLS clients the leaf certificate and trust chain in their entirety. Browsers and TLS clients expect to receive only the necessary intermediates as the trust chain, and not any root certificates that are already present in their trust stores.
-
-
Certificate(s) and/or trust chain(s) upload triggers validation and returns warnings in case any error is detected. If there are no warning messages, click Done in each section to confirm the uploads.
-
Click Check and Add.
- If an error is returned, upload the corrected certificate again.
- If a success message is returned, you will be automatically redirected to the landing page.
Your certificate still shows the In Progress icon in the Receiving certificate column on the Landing Page. CPS uses the network settings you specified when you created the certificate to deploy the certificate to the network. This may take a few minutes.
-
With the same To-Do link in the UI, acknowledge the warnings presented to proceed.
The To-Do link in the UI is removed once you are done and the certificate is deployed to Akamai's network.
Certificate renewal
The lifespan on a third-party certificate may vary. 60 days before the certificate is due to expire, the renewal process will become available at which time you can follow steps 3. Download your Certificate Signing Request (CSR) through 5. Upload your signed Certificate and trust chain to Akamai.
Updated 22 days ago
