Aspera Upload Acceleration
This client quickly transfers content from your local system to NetStorage using Asperasoft's accelerated transfer protocol, “FASP.”
Aspera Upload Acceleration (Aspera) utilizes a high-speed, third-party client (the "Aspera Client") that has been developed for Akamai by Asperasoft. This protocol consists of two channels:
- Control Channel. This channel grants access to the Aspera binary via an SSH connection.
- Transfer Channel. This channel conducts the transfer via a negotiated port (encrypted or unencrypted) using Aspera's UDP-based protocol.
Aspera client installation
To use Aspera, you need the "Aspera Client" application (or an equivalent).
Download a compatible Aspera Client
This table lists the Aspera Clients that NetStorage supports. Any client not listed is unsupported and may have problems authenticating.
| System | Version |
|---|---|
| Linux (Debian) | v4.4.4.1293 |
| Linux (Red Hat) | v4.4.4.1293 |
| macOS | v4.4.4.1293 |
| Windows | v4.4.4.1297 |
Legacy Aspera versions
Legacy Aspera Clients - Cipher Deprecation
As part of Akamai’s process for improving security, these vulnerable ciphers used by legacy Aspera 3.x clients were deprecated on April 22nd, 2022:
- diffie-hellman-group-exchange-sha1
- diffie-hellman-group14-sha1
- diffie-hellman-group1-sha1
Legacy clients will fail to connect. Upgrade to a supported version.
Install the client
With the client installable obtained, you can perform an install on your local system.
Linux
-
Run the installer via a terminal session based on the Linux distribution in use:
- Linux:
$ dpkg -i aspera-scp-client-[version].deb
- Linux:
-
Follow the prompts to perform the install.
Mac OS X
- Double-click the client installer to begin the installation.
- Follow the prompts to install the client.
Microsoft Windows
- Installation and use of the Aspera Client requires that the current user be Administrator-level. To begin, right-click the install file, select Run as Administrator, and input appropriate login credentials.
- When prompted to Choose Setup Type, click “Typical”.
- In the Aspera Service Account dialog, input the following:
- User name. Input the name of a valid, Administrator-level user for the system (for example, the current login).
- Password. Input the associated password for the user.
These values are not actually used when using the Aspera Client with NetStorage, but they must be defined to complete the installation
- Follow the remaining prompts to complete the installation. Ensure that the “Launch Aspera Client” checkbox is deselected, to stop the client from automatically opening upon completion.
- Navigate to the “bin” folder within Client install directory. For example, with a default install, this would be
C:\Program Files(x86)\Aspera\Client\bin. - Locate the “asperascp.exe” file, right-click it and select “Properties”.
- Select the Compatibility tab, enable 'Run this program as administrator" and click the OK button.
- Launch the Aspera Client (Start > All Programs > Aspera > Client > Client), and input appropriate Administrator login credentials.
- Click Close to complete the process.
Aspera key configuration
With the Aspera client (or equivalent) installed, you need to configure it for use with NetStorage.
Configuration is required in both the NetStorage Groups UI in Control Center, as well as in the Aspera Client (or equivalent).
Generate an SSH key and enable Aspera
You need to generate an SSH key, and then access an applicable upload account to apply the key and enable Aspera Upload Acceleration.
Here, you apply an SSH key to an upload account that has been configured to access the desired storage group.
- The "Public" instance of the key is applied to the account.
- The "Private" instance of the key resides on the system using the Aspera Client, and the two are resolved when connecting.
This process uses a combination of the Aspera Client and the NetStorage Groups UI to accomplish this task. You must have the Aspera Client installed on your local system.
How to generate an Aspera SSH key
The Aspera Client application offers a built-in SSH key generator. For simplicity, we recommend that you use this tool to generate a new key.
- Launch the Aspera Client:
- Linux (Debian/RedHat). From a Terminal Session, issue the
asperascpcommand. - Mac OSX. Navigate to Macintosh HD > Applications > Aspera Client.
- Microsoft Windows. Select Start Menu > All Programs > Aspera > Client > Client, and input appropriate Administrator login credentials.
- Linux (Debian/RedHat). From a Terminal Session, issue the
- Select Tools > Manage Keys...
- Click the button in the upper left corner to create a new SSH key pair.
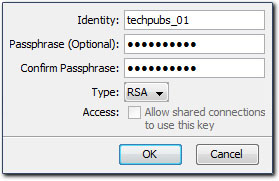
- Input these values:
- Identity. Input a name for the key. Both Public and Private key files will be labeled with this name.
- Passphrase (Optional). If desired, input a passphrase (password) to protect the key. Each time the key is used for access, this value will be requested.
- Confirm Passphrase. Input the same value set for Passphrase (Optional).
- Type. Set to “RSA”.
- Access. Ensure that this checkbox de-selected

- Click OK.
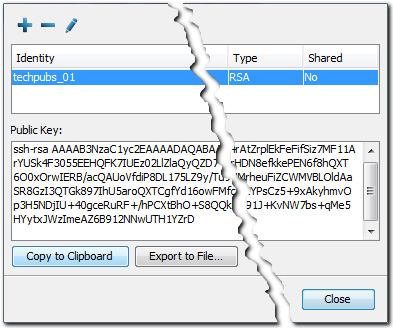
- The new key will display in the table, with the Public instance of it displayed. Leave this window open, as you will use it later in the process.
Individual SSH keys can't be shared between NetStorage upload accounts
You must create individual, separate keys for each upload account using Aspera Upload Acceleration.
Apply the SSH key and enable Aspera
This process assumes you used the built-in SSH key generator in the Aspera Client.
- Open the application. Go to ☰ ⇒ ORIGIN SERVICES ⇒ NetStorage.
- Access the Upload Accounts entity.
- Click the + icon to add a new upload account or edit an existing account.
- In the Access Methods content panel for an upload account, access the SSH and Aspera tab.
- Click the + icon to add an SSH key**.
- Return to the SSH Key window of the Aspera Client interface, select the applicable key and click Edit.
- Once the key loads, click Copy to Clipboard.

- Return to the NetStorage Groups UI in Control Center, and paste the key into the SSH key field.
- Input Notes for the key (optional) and click Add.
- Set the Aspera Upload Acceleration slider switch to On.
- Continue with creating (or editing) the account as necessary and then click Create to save the upload account.

At this point, you need to wait for provisioning to complete. Here are some specifics on what will happen next.
- Did you create a new Upload Account? If so, the Contact Email Address set for the account will receive a verification email including a link you must click. The account will then enter propagation, which takes roughly 60 minutes to complete. After completion (the same email address will receive a confirmation email), you can move on to configure the Aspera Client.
- Did you edit an existing Upload Account? If so, the account will simply enter propagation, which takes roughly 60 minutes to complete. After completion, the Contact Email Address for the account will receive a confirmation email. At this point, you can move on to configure the Aspera Client.
Configure the Aspera Client application
You need to create a “Connection” in the Aspera Client UI.
-
If necessary, launch the Aspera Client:
- Linux (Debian/RedHat). From a Terminal Session, issue the
asperascpcommand. - macOS. In your dock, click Applications then double-click Aspera Client.
- Windows. Select Start > All Programs > Aspera > Client > Client and enter appropriate Administrator login credentials.
- Linux (Debian/RedHat). From a Terminal Session, issue the
-
Click the Connections icon to open the Connection Manager.
-
At the top of the Connection Manager interface, click "" to create a new connection.
-
Select Create a standard connection.
-
Click New Connection and rename it to something unique and easy to recognize. For example, you could use "NetStorage Aspera [CP Code]".
-
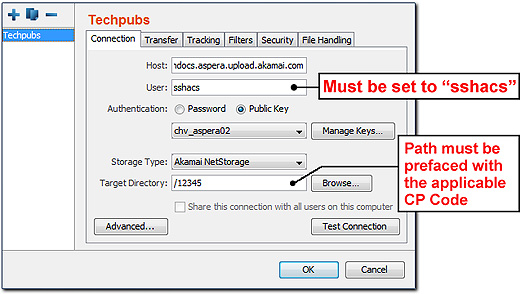
Ensure that the Connection tab is selected and define these fields:
- Host. Use
<Domain name prefix>.aspera.upload.akamai.comfor the storage group you're looking to access. - User. You must input
sshacsin this field. (Do not input your Control Center user login.) - Authentication. Click the Public Key radio button.
- Host. Use
-
Click Manage Keys
-
You should see accessible “Private” keys. Select the one you created earlier.
-
The associated “Public” instance of the key is displayed. Click Close.
-
Set Storage Type to Akamai NetStorage.
-
The Target Directory is where content will be uploaded in NetStorage. Enter the complete path to the desired directory, including the CP code root. This can be any existing subdirectory that's accessible to the upload account.

Increase the Default Target Rate
By default, the Aspera Client has a "Default Target Rate" setting for upload speeds of 45 Mbps. If your environment can support it, we recommended that you increase these values to allow for faster transfer rates.
- If necessary, launch the Aspera Client.
- Select Tools > Preferences...
- Set the Upload/Download instances of the Default Target Rate to a higher value, applicable to your environment.
Don't set the default target rate to a value higher than your data pipe can provide
Take non-Aspera upload acceleration traffic into consideration, as well. Failure to accommodate your environment’s limitations will result in high client-side error rates.
Use your access method
You can use Aspera once your upload account changes have propagated. View usage examples and limitations.
Updated 11 months ago
