Use enhanced TLS (HTTPS)
Enhanced TLS enables the most secure delivery over HTTPS with a level 3 (L3) certificate. It's engineered to meet the needs of sites and content with high-assurance security requirements, such as FedRAMP and PCI compliance. It also supports custom or very old clients that do not send a TLS SNI header, which requires a VIP hosted certificate. To configure NON-SNI support, please reach out to Akamai Professional Services for help.
How Edge IP Binding works with Enhanced TLS
You create a secure property hostname and enable Edge IP Binding. During creation, you also set up your edge hostname which uses the fixed domain, edgekey.net. Once your property is activated, your edge hostname and several Edge IP Binding addresses are used as follows:
-
You set up a CNAME record in your DNS that directs from your actual request URL to the edge hostname. End-user requests to your URL are redirected to the
edgekey.netedge hostname, where your property is read and content is delivered, accordingly. -
You provide the Edge IP Binding IP addresses to your third party. They use them for zero-rated billing and Access Control List (ACL) purposes. Requests to these IP addresses access your property in the same way the edge hostname does.
Understand the connections
There are two connections involved in a request using the Akamai platform:
-
The client to Akamai edge server. This is the initial connection between the end user and the edge server to get your property. To secure this connection, an Enhanced TLS certificate is used that's verified between the client and the edge server. This is the connection you're configuring here, in the property hostname to support Edge IP Binding.
-
The Akamai edge server to origin. This is the connection between the edge server and your designated origin, to get your content and deliver it to the end user. To configure this connection, you set options in the Origin Server behavior in your property. More on this later.
Set up Edge IP Binding with Enhanced TLS
There are multiple ways you can implement Edge IP Binding with Enhanced TLS.
Use the default certificate for Enhanced TLS
This method automatically creates the certificate behind the scenes while you add a new secure property hostname to your property in Property Manager.
Default certificate is Limited Availability
This is an additional service for Property Manager that needs to be added to your contract. However, it hasn't been released to general availability yet. So only a select number of customers can use it. Contact your account representative to see if you're eligible. Otherwise, you need to use a custom certificate.
Create the property hostname with a default certificate
Follow these steps to set up your hostname with the default certificate to use Edge IP Binding:
-
In the Property Hostnames panel, click Add.
-
In the Add Hostname(s) field, enter a value to serve as a label for your property hostname. This label is how you'll associate other aspects of your property to this specific property hostname. The following usage requirements apply to this field:
-
Hostname formatting. A hostname can contain alphanumeric and hyphen characters. It can't contain subdomains and you don't need to include
https://orwww. Just include the domain. For example, if end users request your content athttps://www.payperview.sports.baseball.com, you could set the Hostname topayperview-sports-baseball. During this process, you'll also define an "edge hostname" in the property hostname. Later, you'll set up a CNAME record in your DNS that directs from your actual request URL to this edge hostname. -
Multiple hostnames. Add multiple hostnames by separating each with a space or comma, or include each on a separate line. Duplicate names aren't supported.
-
-
With your Hostname set, click Next.
-
Select the appropriate IP version, based on what your application or site can support, and click Next.
-
To request a new certificate, make sure Automatically request certificates is set to On.
-
Set the Deployment network to Enhanced TLS.
-
Click Validate Certificate Domains to verify that you own the domain of the hostnames you're adding. The list displays the ACME CNAME records you need to add to your DNS.
-
Click Copy all DNS Records. The records are copied in a comma-separated format.
-
Copy the records to your DNS. You'll do more in your DNS with these records, once you finish your property and activate it on the Akamai networks. This is discussed later.
-
Click Next.
-
Select Edge IP Binding as the Mapping Solution and click Next.
If you're using Adaptive Media Delivery or Download Delivery, you'll also have access to the Use Case option, Segmented Media Mode or FOREGROUND, respectively. These are not supported for use with Edge IP Binding.
-
Click Next. A table displays. Make note of the edge hostname values.
-
Read the instructions in the Success message, and click Close when you're done.
The Enhanced TLS certificate will be automatically generated and applied to this property hostname, once you activate it on the Akamai network. See Verify status and finish your property for more information.
Use a custom certificate for Enhanced TLS
This process uses a custom edge certificate, issued either by Akamai's Certificate Provisioning System (CPS) or a third-party certificate authority.
Create an Enhanced TLS certificate
Certificates can take a while to provision, and you need one before you can set up a property hostname to support Edge IP Binding. So, we recommend that you create one first.
Use the Certificate Provisioning System
See the {Certificate Provisioning System user documentation](https://techdocs.akamai.com/cps/docs/create-edit-certs) for instructions on this process. There are multiple phases of the process, and you need to apply specific settings to support Edge IP Binding:
-
When you enter certificate information, you'll set a domain as either the Common Name (CN) or a Subject Alternate Name (SAN). Make note of it, because you need this value later in the process.
-
During the select network setting phase, these options must be set as follows:
- Deployment Network. Set this to Enhanced TLS.
- SNI Only. Set this to Enable SNI. To configure NON-SNI support, please reach out to Akamai Professional Services for help.
-
Set all other options for all other phases of the certificate creation process as desired.
Enhanced TLS certificates can take upwards of three hours to provision. It needs to complete before you can continue. The email address set for the Control Center account that created the cert will receive an email when it's ready.
Use a third-party certificate
Talk to your Akamai account representative for information on supported third-party vendors. Work with a supported vendor to set up an enhanced TLS certificate. Then, you need to:
- Make note of the exact domain used to access it from the third-party vendor.
- Provide the certificate to your account representative.
Create the property hostname with a custom certificate
Follow these steps to set up your hostname with your custom certificate to use Edge IP Binding:
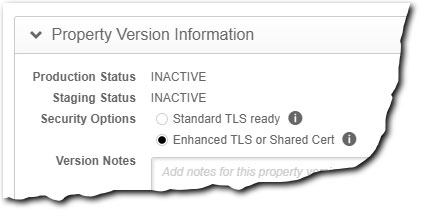
- Select Enhanced TLS or Shared Cert in Security Options.

-
In the Property Hostnames panel, click Add.
-
In the Add Hostname(s) field, enter a value to serve as a label for your property hostname. This label is how you'll associate other settings in your property to this specific property hostname. The following usage requirements apply to this field:
-
Hostname formatting. A hostname can contain alphanumeric and hyphen characters. It can't contain subdomains and you don't need to include
https://orwww. Just include the domain. For example, if end users request your content athttps://www.payperview.sports.baseball.com, you could set the Hostname topayperview-sports-baseball. During this process, you'll also define an "edge hostname" in the property hostname. Later, you'll set up a CNAME record in your DNS that directs from your actual request URL to this edge hostname. -
Multiple hostnames. Add multiple hostnames by separating each with a space or comma, or include each on a separate line. Duplicate names aren't supported.
-
-
With your Hostname set, click Next.
-
Select the appropriate IP version, based on what your site or app can support, and click Next.
-
Pick the enhanced TLS certificate you created in Select Certificate. You can skip this process if you'll be using an existing edge hostname that already had an enhanced TLS certificate applied. (See step 9 for more details)
-
Click Next to continue.
-
Select Edge IP Binding as the Mapping Solution and click Next.
If you're using Adaptive Media Delivery or Download Delivery, you'll also have access to the Use Case option, Segmented Media Mode or FOREGROUND, respectively. These are not supported for use with Edge IP Binding.
-
Your default edge hostname is shown. You can:
-
Use the default (recommended). The value shown in the Edge Hostname column is generated based on domain values you set as your CN or SAN in your enhanced TLS certificate. To use this default, click Submit to finish your property hostname.
-
Select an existing edge hostname or use a custom value. This will update the default edge hostname to a different value. Click the pencil icon (
 ) next to "No Edge Hostname Selected" and pick from the following:
-

| Method | Process |
|---|---|
| Select an existing edge hostname |
|
| Use a custom CNAME target | You'd only select this option if you're not using an edge hostname through Akamai. This is something you work with your account representative to set up and it's only used in very special circumstances. |
-
Click Submit to add the property hostname.
-
Review the Success message and click Close.
The certificate will be applied to this property hostname, once you activate it on the Akamai network. See Verify status and finish your property for more information.
Verify status and finish your property
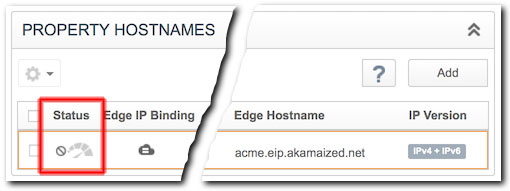
The status of your new Edge IP Binding configuration is shown in the Property Hostnames panel:

-
The Status icon is gray. Activation of your Edge IP Binding addresses is pending.
-
The Status icon is green. Your addresses have been provisioned and are ready. You can use them after your property has been activated on Akamai's staging (testing) or production (live) networks.
It can take from 30 - 40 minutes to generate your Edge IP Binding addresses.
Perform these steps to complete the process:
-
You can optionally add variables.
-
You need to define property configuration settings that include rules to match requests and the behaviors that should be applied. Available rules and behaviors vary, based on the product you're using:
-
There are two connections in a request. The process here addressed the first connection between the end user and Akamai edge servers. You need to configure the second connection between an edge server and the origin server to get content. Set up this connection using the Origin Server behavior in a rule in your property.
-
Activate the property on the staging network where you can test it, and then activate it on production.
-
Set up a CNAME record in your DNS that directs from your actual request URL to the edge hostname you noted.
-
Optionally, you can create the following alerts:
- DNS does not contain an authorized certificate authority.
- Domain validation failed.
- Certificate’s domain is blocked.
- Expired default certificate.
- Expired default certificate removal.
Updated 10 months ago
