3. Get your edge certificate
When delivering through Akamai, a request for your site's domain is rerouted to an edge server that's geographically closest to the requesting client, to help speed up delivery. We'll secure this connection using HTTPS through an edge certificate ("edge cert").
| How long will this take? |
Approximately 2 hours
|
The edge cert process
Here's how an edge cert is used to secure a request from a client to the Akamai edge network:
-
A client—like a browser—requests your site and it's rerouted to an edge server.
-
The edge server sends the certificate to the client. The certificate includes:
- The public key.
- A list of sites where the cert is valid. These are referred to as subject alternate names (SANs).
- An expiration date for the certificate.
- A signature from a certificate authority that proves that the key is legitimate for a SAN listed in the certificate.
-
The client then checks these things:
- Does the signature match the certificate?
- Does the certificate come from a certificate authority it trusts?
- Is the certificate actually for the site it requested?
- Has the certificate expired?
-
If the checks succeed, the client encrypts the items from step 2 using the public key and sends the encrypted data to the edge server. This sets a shared key for the session.
-
The edge server holds the corresponding private key. So, it decrypts the information, reads the shared key, and ultimately proves its identity to the requesting client.
-
Access is granted.
1. Create an enrollment
Here, we'll generate a custom certificate enrollment that uses:
- Let's Encrypt as the certificate authority.
- Domain validation (DV)
- Akamai's secure enhanced transport layer security (TLS) network.
This combination supports the exchange of personally identifiable information (PII) that's typically required for an e-commerce or protected site. We'll use Akamai's Certificate Provisioning System (CPS) interface for this process.
Before you begin
You'll need some things before you can set up this level of secure certificate:
| Requirement | Detail |
|---|---|
Domain owner information | You need to provide some information in your enrollment that Let's Encrypt uses to verify that you own the domain:
|
Akamai technical contact | You need a technical contact, outside of your organization. This should be the person from your Akamai account team that you work with the most. Both your administrator contact and this technical contact will receive communications while the certificate is being validated. Talk to your Akamai account team to get:
|
Create the cert
-
Access Akamai Control Center.
-
Log in with an Admin-level user—such as your primary Admin user.
-
Select ☰ > CDN > Certificates.
-
Click Create New Certificate. A wizard launches.
-
Select Domain Validation (DV) from the Akamai Managed Certificate options and click Next.

-
In Select Certificate Settings make sure these options are enabled and then click Next:
- Certificate Type: Subject Alternative Names (SAN)
- Certificate Authority (CA): Let's Encrypt (This is the only selection for this cert type.)
-
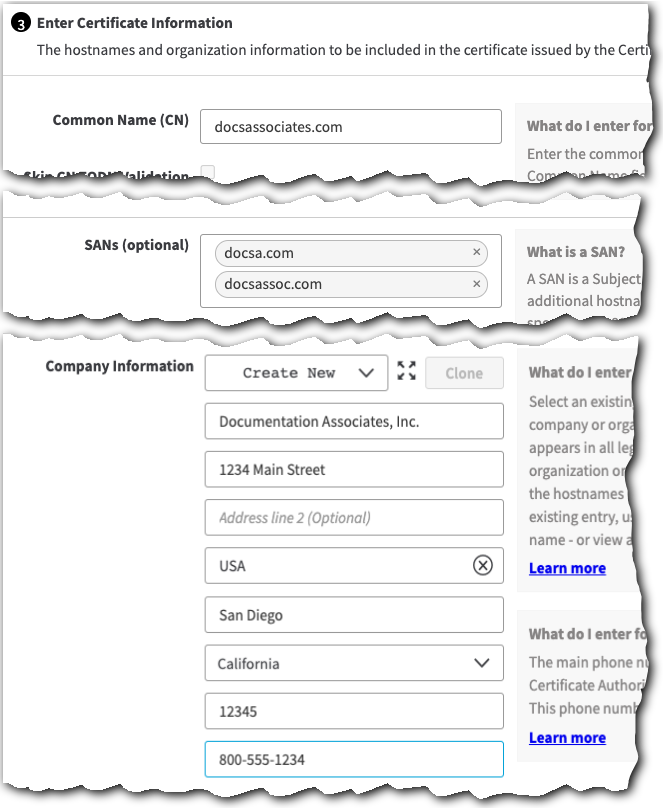
In Enter Certificate Information, set these options and then click Next:
-
Common Name (CN). This is the primary domain that a client uses to access your site. If you only have a single domain, this is the only field you need. Your organization needs to legally own this domain and once you submit your cert in CPS, you can't change its Common Name.
-
SANs (optional). Are there alternate domains that a client can use to access your site or app? If so, you can enter up to 99 of them here.
-
Company Information. Select Create new from the drop-down. Fill each field with all of the domain owner information you gathered making sure that the Main business phone number field includes a number that DigiCert can use to verify ownership of the domain.
-
-
Review the Enter Certificate Information details. Click Edit to fix any problems.
-
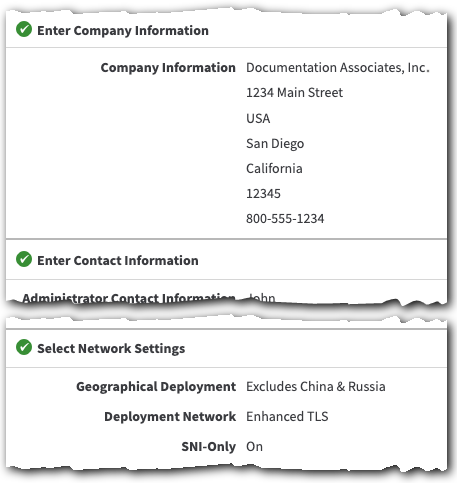
In Enter Company Information, make sure that Same as certificate information is enabled and click Next. If necessary, make any changes and click Next again.
-
Set these options in Enter Contact Information panel and then click Next:
- Administrator Contact Information. Review the in-app help and enter contact details for your local cert administrator. For example, this could be you if you want to be contacted once the certificate is complete, so you can use it later in this tutorial.
- Akamai Technical Contact Information. Fill these fields with the information you gathered for your Akamai technical contact.
-
In the Select Network Settings panel, set Deployment Network to Enhanced TLS. Leave all other options at their default and click Next.
-
Click Review. Run through each of the sections, verifying your settings are correct and make sure that each is marked with a green check icon.
- Click Submit.
2. Push your cert to staging
A newly provisioned certificate is automatically pushed to the production network. It's live and ready to start protecting the client-to-edge network connection. Later in this workflow, we'll be testing to make sure everything with your site is ready. To prepare for this, push your new certificate to the staging network now, so it'll be ready to go when you need to test.
-
If necessary, access Control Center, log in with your primary admin user, and go to ☰ > CDN > Certificates.
-
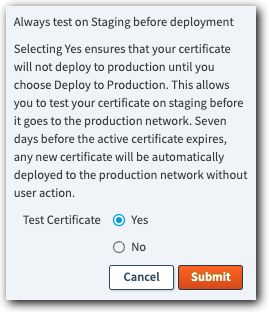
Locate the cert you just created in the table and check the entry under Always test on Staging before deployment:
- It’s set to No. Click it and continue to the next step
- It’s set to Yes. You’re done.
-
Set Test Certificate to Yes and click Submit.
3. Validate your domains
Before Let's Encrypt can sign your certificate, they need to validate that you control all of the domains you set as the CN and any SANs in your cert. You can do this in multiple ways, but we'll use the DNS Token method here because it supports automatic renewal of your certificate.
-
If necessary, access Control Center, log in with your primary admin user, and go to ☰ > CDN > Certificates.
-
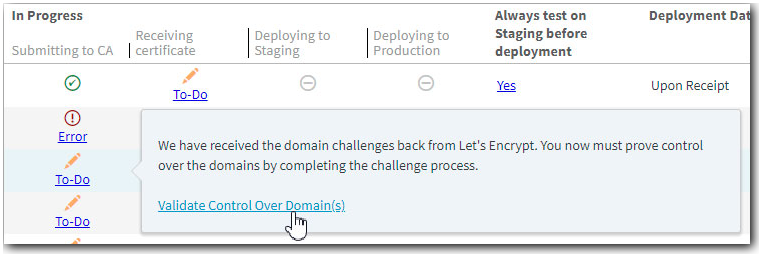
Locate your cert, click To-Do under Submitting to CA, and then click Validate Control over Domain(s).
-
Select a domain from the list.
-
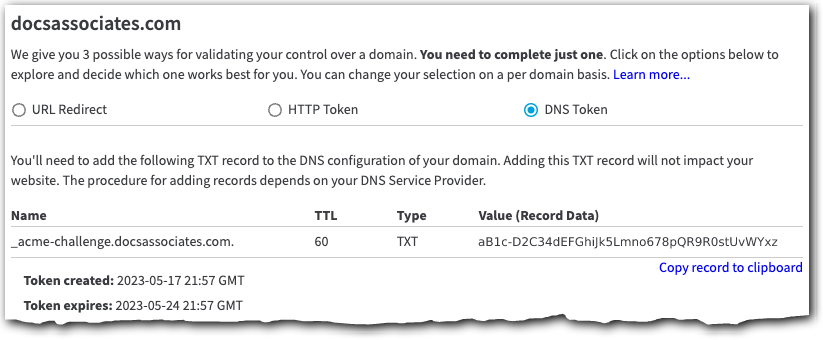
Select DNS Token.
-
Make note of these values:
-
Name. You'll need to create a new record in your DNS configuration, using this value as the name. It should be
_acme-challenge.<your domain> -
TTL. You'll need to set the time to live (TTL) for the record to
60seconds. -
Type. This is a text record, so you'll need to set the record type to
TXT. -
Value (Record Data). This is data you need to include in the record. It's a unique token that Let's Encrypt will verify.
-
The Value (Record Data) token is valid for seven days
Make sure you complete this process before it expires, or you'll have to restart it.
- Update your DNS configuration to include a
TXTrecord, using the values you noted. DNS configuration tools can vary, but it should look like this:

Keep this entry in your DNS
This lets Certbot automatically renew your certificate.
-
Return to this interface, access the same domain again, and click Check status now to push the validation request. Let's Encrypt will begin the validation.
-
Repeat the process for each remaining domain.
-
Return to the CPS dashboard. Deploying to Staging is listed as Pending. Wait a few minutes for it to update. Your certificate is ready and you can proceed when you see:
-
In Progress. Contains a green check.
-
Receiving certificate. Contains a green check.
-
Deploying to Staging. Contains a green check.
-
Deploying to Production. Shows the To Do link.
-

Different validation methods
Along with DNS Token validation, you can use two additional methods in CPS:
- URL Redirect. For more information on this, see the CPS user documentation.
- HTTP Token. We offer an example of this method in the Deliver your first site tutorial.
You can use any of the three methods to validate each domain on the certificate.
Other certificate methods
While it works for this basic workflow, a domain-validated Enhanced TLS certificate may not fit your needs.
| Method | Description |
|---|---|
Custom Standard TLS DV certificate | Are you just looking for a secure, HTTPS connection, but you don't need to exchange PII? Then Standard TLS security is what you're looking for. We offer an example of this same process, using a Standard TLS cert in the Deliver your first site workflow. |
Default DV certificate | This is an automated way to create either a Standard TLS or Enhanced TLS certificate while you create a property hostname for your delivery configuration. Currently, it’s in limited availability. |
Non-secure HTTP (no certificate) | Secure hypertext transfer protocol (HTTPS) has become the standard for access on the Internet. While non-secure HTTP is still supported, it's not recommended. Browsers will present warnings to your users if they connect to a site that doesn't support HTTPS. |
Looking for more security information?
Here's a detailed comparison of the various security options.
Updated 6 days ago
