1. Get access
As a new customer onboarding your site, you need a few things.
Get your Akamai contract
Before you start anything here, you'll work with your Akamai account team to determine the products and services you'll need and get them added to your contract to use Akamai CDN services. This tutorial uses the following:
- Ion. Akamai’s Ion solution helps streamline and secure the delivery of your website or app. It'll be added to this contract. Ion comes with several other web-based interfaces you'll use for this process.
Which Ion version do you have?
You can have one of two versions of Ion on your contract. API operations use the codename values that Akamai established for these versions during development:
- Ion Premier.
SPM- Ion Standard.
FRESCAMake note of the codename for your version of Ion.
1. Get your contract components
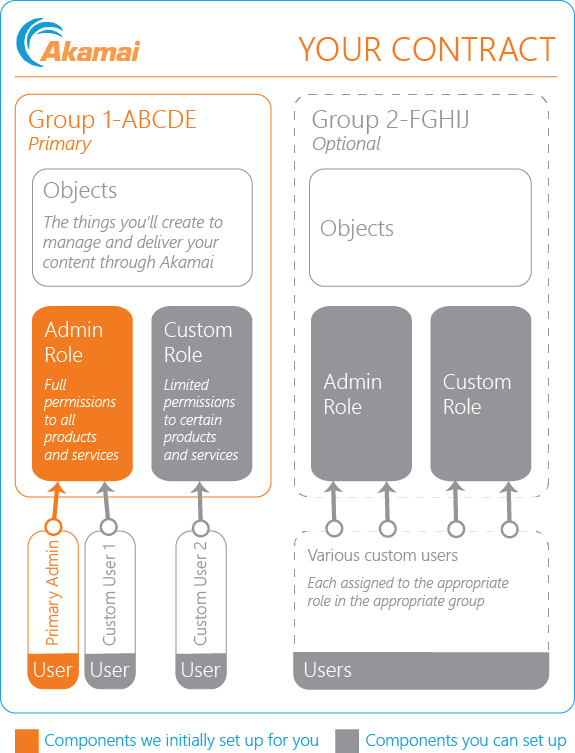
Your account team will set up several base components with your contract that you'll use to interact with the Akamai CDN:
-
Get you your contract's identifier. Your Akamai contract is assigned a unique identifier—its contract ID. You can get this from your account team after they create your contract..
-
Add a primary group to your contract. Use it to organize your objects—the things you'll create and use to deliver your content. This group will also be assigned a unique identifier, its group ID. Be sure to make note of this value, too.
-
Add an Admin role to your primary group. This role grants permission to all products and services on your contract. Work with your account team to come up with a suitable name for this role.
-
Set up a user with the Admin role. The user is associated with an email address and a password you choose. We'll call this your primary admin user.

You can do more with components
You can use your primary admin user to do all the CDN-related things covered in this tutorial. You can also us it in Akamai’s Identity and Access Management tool to do other things. If you're interested, check out Deliver your first site for some basic examples.
2. Get your CP codes
A content provider (CP) code is what Akamai Technologies, Inc. uses to track the use of its CDN services. Your account team will initially get you at least one of these codes for this workflow. You'll use it to create an Ion delivery configuration.
A CP code is comprised of two parts:
-
An integer value. This is a 5-7 digit value that Akamai generates.
-
A unique alphanumeric name. You pick this value.
3. Set up authentication credentials
Before you can get going with any Akamai API, you need to set up authentication credentials for access. Here, we set up an "API client" for the primary admin user with these credentials for all of the APIs you’ll be using.
-
Access Control Center and log in using your primary admin account.
-
Select ☰ > ACCOUNT ADMIN > Identity & access.
-
Under Users and API Clients, click Create API client.
-
Click Quick to create an API client that's associated with the current account.
-
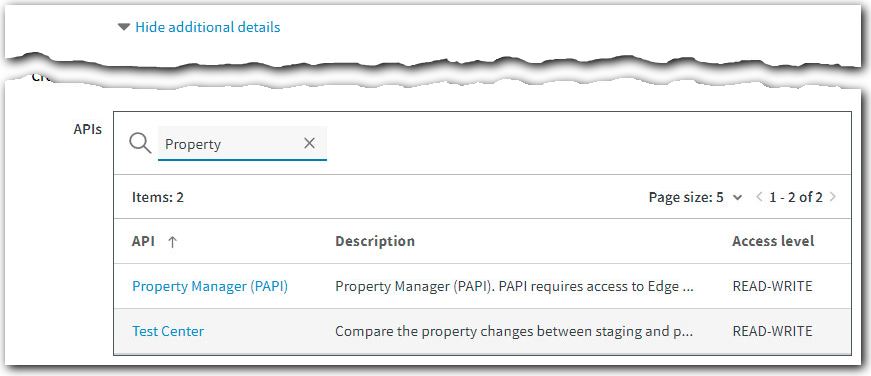
Click Show additional details and have a look at the APIs table. The credential values you create with this API client can be used to access the APIs for all of the Akamai CDN products and services listed in this table. You'll need access to these APIs for this onboarding:
- Identity Management (IDM): User Administration. You can use this API to create and manage groups, roles, and users. The Access level needs to be ADMIN.
- Property Manager (PAPI). This is the tool used to set up your delivery product. The Access level needs to be READ-WRITE.
- CPS. This is the Certificate Provisioning System API. You'll use this to secure the connection between a requesting client and Akamai edge servers. The Access level needs to be READ-WRITE.
- Reporting API. This one is optional. You can use this to generate report data for your website. The Access level needs to be READ-WRITE.

-
Click Hide additional details once you're done verifying.
-
In the Credentials section, click Download. You'll get your credential values stored in the
ID_{account}.txtfile.
You only get one chance to get your "client_secret"
The
client_secretvalue is only available a single time in this interface—right now when you're creating the credential. Make sure you Download the credential now to have a permanent, local record. You won't be able to come back to this interface to get it later.
-
Click Edit API Client to save the credential in a new API client.
-
Open the downloaded file with a text editor and add the value
[default]as a header above all text. Your finished file should look like this:

-
Save the file in your home directory using
.edgercas the full filename. The default home directory location for these operating systems is typically:-
Linux.
/home/{username}/.edgerc -
macOS.
/Users/{username}/.edgerc -
Windows.
C:\Users\{username}\.edgerc
-
Get a cloud computing services account
Later, you'll create multiple compute instances ("Linodes"). These are Linux-based virtual machines in the cloud you'll use to store your website for access by clients—what we refer to as an origin server. First, you need a cloud computing services account to get access to the necessary tools.
Create a cloud computing services account
You'll need to provide billing information
The self-service process requires some form of billing—credit card, PayPal, Google Pay, etc. By signing up for this account, you get a $100 credit towards these services, during your first 60 days. You can use that credit for this tutorial. You can also talk to your Akamai account team about other billing options.
1. Get an access token
The operations you'll perform to create your origin server are run through a separate API—Akamai's cloud computing services API. To authorize requests to this API, you need to set up a personal access token for it.
-
Access Cloud Manager and log in using your cloud services account.
-
Click your username at the top of the screen and select Login & Authentication from the menu.
-
Select the API Tokens tab.
-
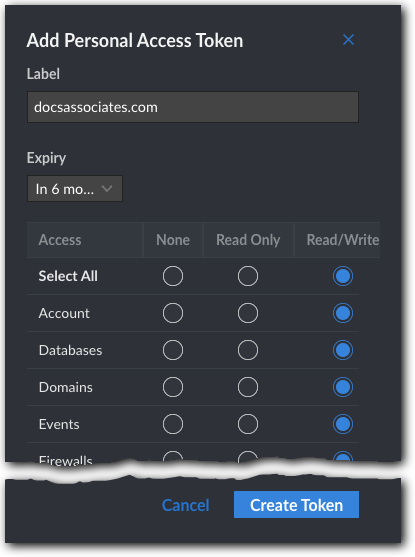
Click Create Personal Access Token and set these options:
-
Label. Give your token a unique name.
-
Expiry. You can shorten the lifecycle for this token, but we recommend that you leave it a 6 months.
-
Access. Ensure that all of the options are set to Read/Write.
-

-
Click Create Token to generate an API token string.
-
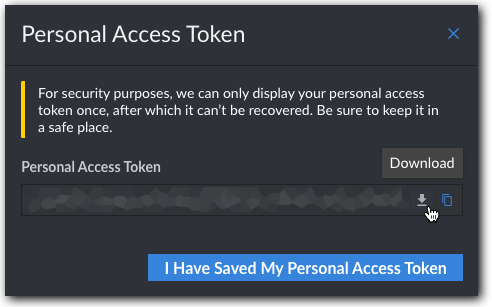
Click
 to download your token as
 personal_access_token.txt. Save it in a secure location.

You only get one chance to get this token, too.
Make sure you store this token. You won't be able to view it here again in Cloud Manager after closing the popup.
- Click I Have Saved My Personal Access Token to complete the process.
2. Review your site
How much storage space does your site currently require? When you create your Linode, you'll need to pick the right size container to hold your site and all of its components.
Updated 2 months ago
