5. Test and go live
You've set up your origin server using three Linodes and a NodeBalancer, and you've moved your site to them. You've created a secure certificate and applied it to an edge hostname for access by requesting clients. And, you've set up your Ion property to streamline delivery of your site.
You're ready to test all of this and then go live with your site on the Akamai edge network.
Test your setup
While it's not required, you should thoroughly test your site.
| How long will this take? |
Approximately 35 minutes
Since testing can vary based on your needs, this doesn't include testing time. Consider at least 30 minutes for this. |
1. Activate on staging
To start, activate your Ion property on Akamai's staging network.
-
Access Control Center.
-
Log in using your primary admin user.
-
Select ☰ > CDN > Properties.
-
Find your Ion property in the table and click its Property Name.
-
In the Version History tab, click Version 1 to access it for testing.
-
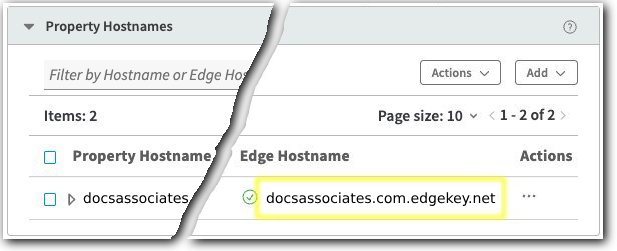
Scroll down to Property Hostnames and note your Edge Hostname. You'll need this later.
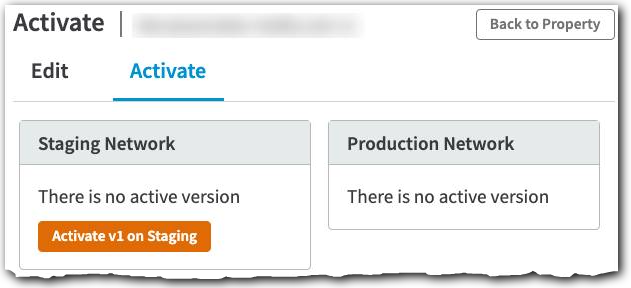
- Click the Activate tab.
-
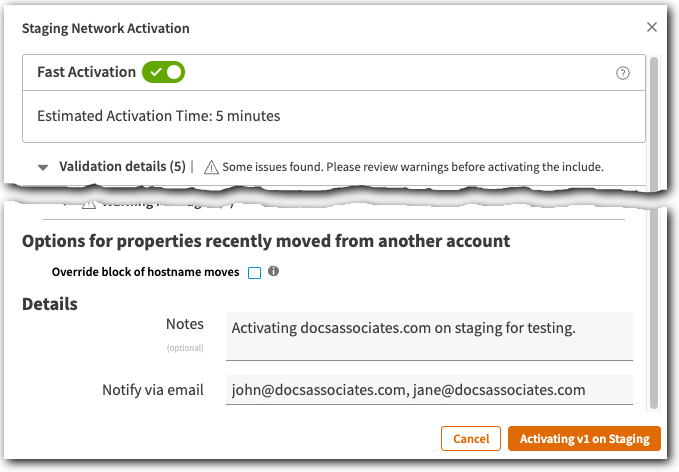
Click Activate v1 on Staging. The Activation window opens. Set these options:
-
Fast Activation. To speed up activation, ensure this is set to On.
-
Notes. You can include a description of this version's activation.
-
Notify via email. This defaults to the email address set for your primary admin user. Separate multiple addresses with a comma (",").
-
-
Click Activating v1 on Staging.
-
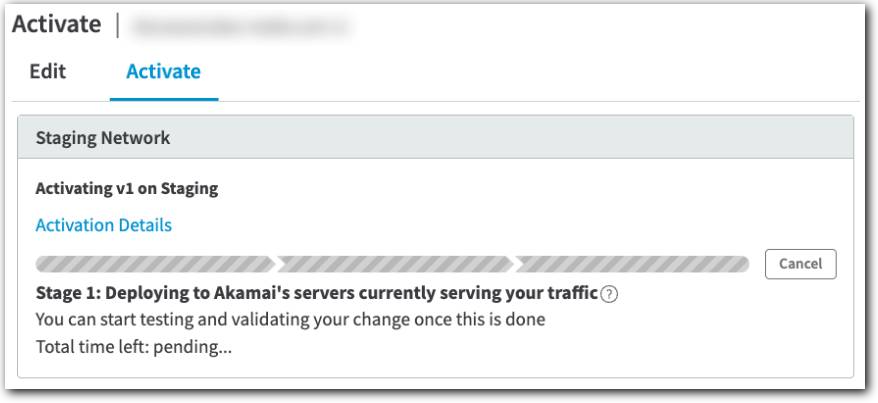
With Fast Activation, your property should be ready in the Estimated Activation Time listed. This can be as quick as three minutes. Now, you can:
-
Monitor the Activate tab to track progress.
-
Click Activation Details. This lets you review settings and information regarding the property.
-
Wait for the confirmation email. Any email set in Notify via email will get an email when the activation is complete.
-
2. Point to edge servers
Temporarily set up your local browser to target an edge server to access your property.
-
You need your hostname's actual IP address. You can get it by appending
-stagingto the edge hostname you noted earlier, and running a command from a Terminal Session or Command Prompt: For example, the appended hostname might look like this:docsassociates.com.edgekey-staging.netO/S Detail Linux/macOS
Open a new Terminal Session and perform a "dig" of your edge hostname. Then, scan the results for an IP address and make note of it.
IPv4-only
dig docsassociates.com.edgekey-staging.netIPv4 + IPv6 dual stack (Returns an IPv6 address.)
dig AAAA docsassociates.com.edgekey-staging.netWindows
Open a new Command Prompt, and perform an "nslookup" of your edge hostname. Then, scan the results for an IP address and make note of it.
IPv4-only / IPv4 + IPv6 dual stack
nslookup www.docsassociates.com.edgekey-staging.net -
Open your local
hostsfile in a text editor.O/S Detail Linux
Check for it in:
/etc. (You'll need superuser access.)macOS
Check for it in :
/private/etc. (You'll need superuser access.)Windows
Check for it in:
\system32\drivers\etc(You'll need Administrator-level access.)
See the relevant user documentation for the default location of the Hosts file for your selected operating system.
-
At the end of the hosts file, add an entry for the actual domain to your website that includes the edge hostname's IP address.
1.23.45.78 docsassociates.com -
Save and close your hosts file. All requests from your local system to your domain will now go to an edge server.
-
This applies to your local system, only.
-
To undo the redirection to the edge server, remove the new entry from your hosts file.
-
-
If you're using macOS X, run this command to flush your DNS cache:
sudo killall -HUP mDNSResponder
3. Install an extension
Akamai delivers Pragma headers with its content. To support these for testing, you need to install a modify headers extension on your browser.
-
Search for "modify header extension for [your browser]" to find the best one.
-
Follow the instructions in the extension to set up a header as follows:
-
Header name: Pragma
-
Header value:
akamai-x-cache-on, akamai-x-cache-remote-on, akamai-x-check-cacheable, akamai-x-get-cache-key, akamai-x-get-extracted-values, akamai-x-get-nonces, akamai-x-get-true-cache-key, akamai-x-get-client-ip
-
-
Save and enable the header.
4. Check your connection
When a browser requests your content on staging edge servers, Akamai adds the X-Akamai-Staging HTTP response header to the request. Look for this header in a request to make sure your browser is pointed to the staging network.
-
Close all browser windows, reopen your browser, and clear the browser cache.
-
Access the Network functionality in your browser:
-
Chrome. Right-click (Command+click on macOS) in the browser window and select Inspect. Click the Network tab. (You may need to click >> to reveal it in the toolbar.)
-
Edge. Press F12, and then press Ctrl+4 to open the Network utility.
-
Firefox. Press Ctrl+Shift+I (Windows) or Command+Opt+E (macOS). This takes you to the Network tool.
-
Safari. If necessary, select Safari > Preferences, click Advanced, then enable Show Develop menu in menu bar. Select Developer > Show Web Inspector and select the Network tab.
-
-
Point your browser to the domain you included in your local hosts file.
-
In the Network section, click the first file listed. (This is typically the domain for your actual site.)
-
Review the response headers. If you see
X-Akamai-Staging: ESSL, you're good. If not, go back to 2. Point to edge servers and make sure you followed the process correctly.
5. You're ready to test
Access your website the same way you normally would to test it.
When testing, use your actual domain for requests—don't use its edge hostname. Edge hostnames are applied automatically by your DNS to reroute requests to the Akamai edge network.
-
Check key functionality, such as logging in, playback, and so on.
-
Once you're satisfied that your property works, remove the hosts file entry you added and then save it.
-
On macOS, flush your DNS cache again with the
sudo killall -HUP mDNSRespondercommand.
Go live
Begin delivering your website or app to your end users through the Akamai edge network.
| How long will this take? |
Approximately 1 hour
This doesn't include update time for your DNS record. More on this in a minute. |
1. Activate your cert on production
To start, push your domain-validated Standard TLS certificate to Akamai's production network.
-
Access Control Center.
-
Log in using your primary admin user.
-
Select ☰ > CDN > Certificates.
-
Select the Active tab.
-
Find your certificate in the table, based on the common name (CN) you set for it.
-
Click Yes under Always test on Staging before deployment, then select No in the pop-up. This enables automatic renewal of your cert when it expires. (You added the Auto Domain Validation behavior to your property for this.)
If you don't complete this step, you'll have to manually renew your certificate on its expiration date.
-
Note the date listed under Staging Network and click it.
-
Click Push to Production and then Yes to confirm.
It may take up to a half hour to deploy your certificate to production. Once it's done, Production Network should list the expiration date you noted, and Staging Network should read: Same as production.
2. Activate your property on production
Next, push your Ion property to the production network.
-
If necessary, access Control Center and log in using your primary admin user.
-
Select ☰ > CDN > Properties.
-
Find your Ion property in the table and click its Property Name.
-
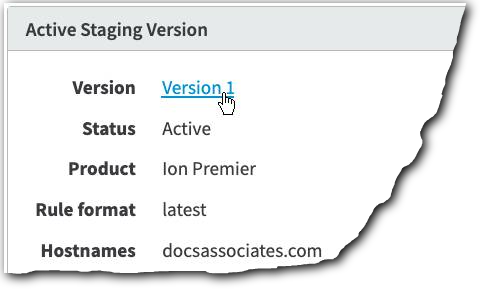
In the Active Staging Version content panel, click Version 1.
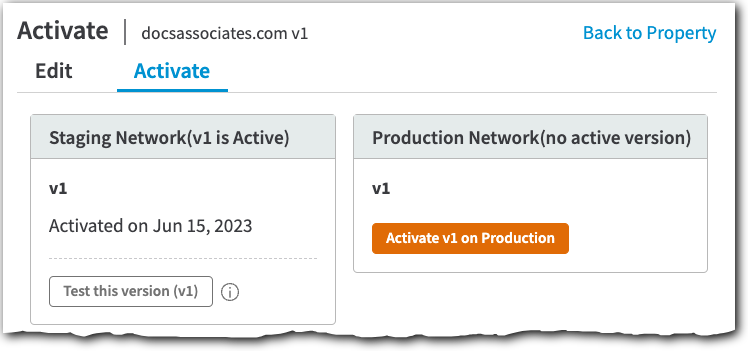
- Click the Activate tab.
-
Click Activate v<#> on Production. The Activation window opens. Set these options:
-
Fast Activation. To speed up activation, ensure this is set to On.
-
Notes. You can include a description of the production version's activation.
-
Notify via email. This defaults to the email address set for the active Control Center user. You can change it or add more. Separate multiple addresses with a comma (",").
-
-
Leave all other options at their default setting and click Activating v<#> on Production.
-
With Fast Activation, your property should be ready in the Estimated Activation Time listed, but typically no longer than 15 minutes. Now, you can:
-
Monitor the Activate tab to track progress.
-
Click Activation Details. This lets you review settings and information regarding the Property.
-
Wait for the confirmation email. Any email set in Notify via email will get an email when the activation is complete.
-
3. Point to your configuration
Next, you need to change the existing DNS record for your site or application to be a CNAME record that points to the Akamai edge hostname. This will reroute requests for your site or app to the Akamai edge network.
Make note of the existing DNS entries for use in troubleshooting.
Before
Here's an example of a generic DNS record for a domain, before you move it to the Akamai edge network. In it, 111.222.3.4 represents the IP address for your origin server:
docsassociates.com. IN A 111.222.3.4
After
Here's an example of that same domain in a DNS record, pointing to Akamai's Standard TLS network:
docsassociates.com. IN CNAME docsassociates.com.edgesuite.net
How long does the DNS change take?
The update to your DNS needs to apply before edge network delivery will start. This depends on the time to live (TTL) you've set for your site's DNS record. In most environments, this is set to one day by default. So, it could take up to 24 hours to reroute requests. To shorten this:
-
Reduce your DNS TTL before you change to the Akamai edge.
-
Revert it back after the change.
You can switch your website or application to the edge network at any time after completing the activation steps and testing. No additional activation or monitoring is required.
Troubleshooting
If you notice a problem after switching your content to the production network:
-
Roll back the DNS change to point your website or application back to your servers.
-
Report the problem to Akamai.
This helps you and Akamai identify the problem in a controlled environment without affecting live end users.
Updated 3 months ago
