1. Get access
As a new customer onboarding your site, you need a few things.
Get your Akamai contract
Before you start anything here, you'll work with your Akamai account team to determine the products and services you'll need and get them added to your contract to use Akamai CDN services. This tutorial uses the following:
- Ion (via Akamai Control Center). Akamai’s Ion solution helps streamline and secure the delivery of your website or app. It'll be added to this contract. Ion comes with several other web-based interfaces you'll use for this process.
Your Akamai contract is assigned a unique identifier: its contract ID. You'll want to make note of this value.
1. Get your components
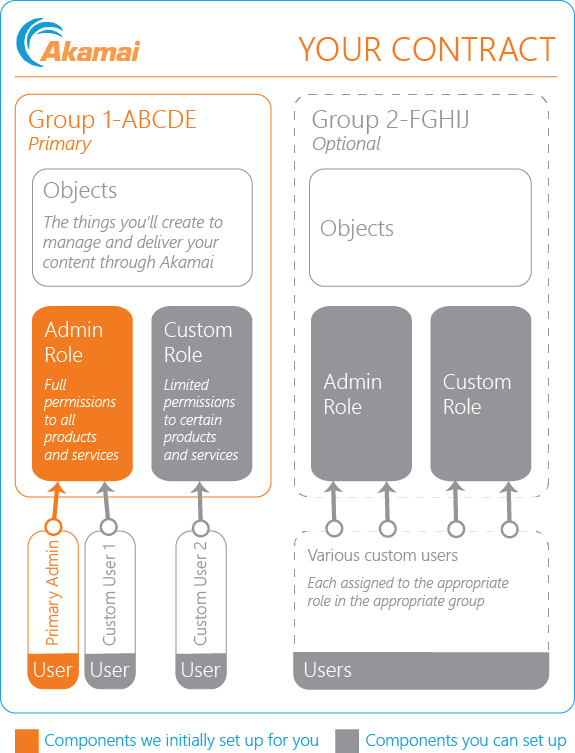
Your account team will set up several base components for you, that you'll use to interact with the Akamai CDN:
- They'll set up a primary group on your contract. You'll use it to organize your objects—the things you'll create and use to deliver your content. This group will also be assigned a unique identifier, called its group ID. Be sure to make note of this value, too.
- They'll add an Admin role to your primary group. This role grants permission to all of the products and services on your contract. Work with your account team to come up with a suitable name for this role.
- They'll set up a user with the Admin role. It's associated with an email address and a password you choose. We'll call this your primary admin user. This is the main user on your account that you can use to manage everything—incuding other users.

You can do more with components
You can use your primary admin user to do all the CDN-related things covered in this tutorial. You can also use it in Akamai’s Identity and Access Management tool to do other things. If you're interested, check out our Deliver your first site guide for some basic examples.
2. Get your CP codes
A content provider (CP) code is what Akamai uses to track the use of its CDN services. Your account team will initially get you at least one of these codes for this workflow. You'll use it to create an Ion delivery configuration.
A CP code is comprised of two parts:
- An integer value. This is a 5-7 digit value that Akamai generates.
- A unique alphanumeric name. You pick this value.
Get a cloud computing services account
Later, you'll create multiple compute instances ("Linodes"). These are Linux-based virtual machines in the cloud you'll use to store your website for access by clients—what we refer to as your origin server. First, you need a cloud computing services account to get access to the necessary tools.
Create a cloud computing services account
You'll need to provide billing information
The self-service process requires some form of billing—credit card, PayPal, Google Pay, etc. You can also talk to your Akamai account team about other billing options.
Review your site
How much storage space does your site currently require? When you create your Linode, you'll need to pick the right size container to hold your site and all of its components.
Updated 3 months ago
