4. Define your property
A property is a delivery configuration that determines how your site or application is delivered to requesting clients. This section of the tutorial uses Akamai's Ion product and Property Manager editor to create and configure your property.
| How long will this take? |
Approximately 20 minutes
Create a delivery configuration in Control Center using recommended settings. |
Before you begin
You'll need some things before you can create your property:
-
Your Akamai contract and primary group. These were set up with your Akamai account team when you went through the get access process.
-
Your domain. You used your domain name when you set up your Linodes and your edge certificate. If you added any other domains to your edge certificate as subject alternative names (SANs), you'll need them, too.
Wait for your certificate to finishIf your edge certificate hasn't gone through all of the phases for completion, you should wait until it does.
1. Create a new property
-
Access Akamai Control Center.
-
Login using your primary admin user.
-
Select + Create > Property.
-
Based on your version of Ion, Premier or Standard, click Create Property in the applicable card. The Setup Ion window is launched.
-
When prompted for how you want to set up Ion, click Property Manager.
-
Enter a Property name. This serves as the filename for the property and how it's displayed throughout Property Manager. This is often the same as your domain name.
-
Select your Akamai contract and primary group.
-
Click Next.
2. Create an edge hostname
Create hostname entries used to redirect requests for your site to Akamai edge servers.
What's an edge hostname?
You provide us with the domain that your customers use to access your site or app, and Akamai appends a specific domain to it. Here's an example:
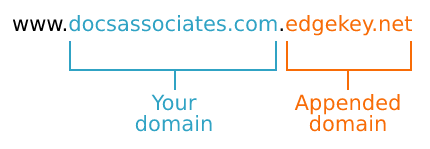
Akamai takes your edge certificate and applies it to the edge hostname to secure it. Later, you'll need to update your existing DNS record for your site or app to be a CNAME record that points to the edge hostname. As a result, a client request to your domain is rerouted to the edge hostname and securely sent to an optimal Akamai edge server where your property is read.
Add a new edge hostname
-
In the Property Version Information panel under Security Options, select Enhanced TLS.
-
In the Property Hostnames panel click + Hostnames, and select Add Hostname(s).
-
In the Add Hostname(s) window, enter your domain to serve as your property hostname, and click Next.
-
On the Domain and Certificate Security screen, select your edge certificate from Select Certificate, and click Next. You do not need to follow any steps in the Prove Domain Ownership section since your certificate has already been verified.
-
On the Edge Hostnames screen, select IPv4 + IPv6 if your IP version hasn't already been specified. Click Submit. Your new edge hostname is added.
-
If you set up other domains as SANs in your certificate, repeat this process for each one.
Your certificate is in the staging networkA property hostname entry displays "Awaiting user input Manage in CPS" in the Certificate column at this phase. This means that your edge certificate is currently only available in the staging network. This is expected. You'll be testing later, and the certificate needs to be in staging.
3. Add your Linodes as a custom origin
Use the Origin Server behavior in your Ion property to include your high availability Linode setup as custom origin servers.
Define your origin hostname
You need to establish a unique name for your origin server. Your Ion property uses it to contact your Linodes to get your site and cache it on the Akamai edge network.
Use a random string for this value—for example, 1hkeh1g76—to conceal your origin server. Then, prepend it to your domain to create your origin server hostname. For example: 1hkeh1g76.docassociates.com
You can only use alphanumeric characters in an origin server hostname.
Add a DNS record
Update your DNS configuration to include a new A record for your origin server. DNS configuration tools can vary, but you want to set the record using these values:
-
Hostname. Your origin server hostname.
-
Type.
Arecord. -
TTL. Set an applicable time to live for Akamai edge servers to request content from your origin server.
-
IP address. The IP address of your NodeBalancer.
Set up the origin server behavior
Apply some settings to set up your Linodes as your origin servers.
-
In the Property Configuration Settings panel, click the Default Rule.
-
In the Origin Server behavior, set these options. Leave all others at their default:
-
Origin Type. Select Your Origin.
-
Origin Server Hostname. Enter the origin hostname you created.
-
Cache Key Hostname. Set this to Incoming Host Header to best support your Linode.
-
Verification Settings. Select Choose Your Own.
-
Trust. Select Specific Certificates (pinning).
-
-
The Specific Certificates (pinning) options are revealed. Click Add Certificate, and set these options:
-
Select Retrieve From Origin.
-
Hostname / IP. Enter the IP address that you noted for your for your NodeBalancer.
-
HTTPS Port. Set to 443.
-
-
Click Add Certificate(s) once you've entered your NodeBalancer IP and set your HTTPS port.
- Make sure Ports settings are as follows:
- HTTP Port. Set to 80. This enables communication between your Ion property and your Standby #1 and Standby #2 Linodes via your NodeBalancer.
- HTTPS Port. Set to 443
- Under Enhanced Debug, disable debugging.
4. Set rules and behaviors
Configure other rules in the Property Configuration Settings to optimize the delivery of your site. Ion automatically includes several sub-rules and behaviors in the Default Rule that are preset to help with this. This step covers some common rules that you should specifically set up for your property.
Set up your CP code
You need to add a CP code to your Ion property to track the delivery of your website or app through the Akamai edge network. This CP code will also let you generate reports for the content you deliver with this property.
-
Open the Augment insights sub-rule in the Default Rule.
-
Click the Traffic reporting child rule to open it.
-
You should have had at least one CP code for Ion set up when you originally worked with your account team. Click the Content Provider Code field, and select it.
Enable mPulse RUM
mPulse is a real user monitoring (RUM) solution that collects and analyzes detailed information about your users' experience whenever they visit your site. mPulse is used with other Ion features to help accelerate delivery.
-
Open the Augment insights sub-rule in the Default Rule.
-
Click the mPulse RUM child rule to open it.
-
Ensure Enable is set to On.
-
Leave all other options set at their default.
See the Ion user documentation for more information about mPulse.
Enable HTTP/3
HTTP/3 helps reduce latency and resource consumption. It retains the HTTP/1.1 and HTTP/2 concepts, but it moves away from the traditional transmission control protocol (TCP) transport layer. Instead, it uses the IETF QUIC protocol that handles streams by itself. This supports improved performance and a faster connection setup.
-
Open the Accelerate delivery sub-rule in the Default Rule.
-
Click the Protocol optimizations child rule to open it.
-
In the HTTP/3 behavior, ensure that Enable is set to On.
HTTP/3 doesn't replace HTTP/2To accept HTTP/2 requests, the HTTP/2 behavior is also required. To accommodate this, HTTP/2 is automatically enabled for new Ion properties.
Enable Adaptive Acceleration
Adaptive Acceleration improves HTML page load performance by prepositioning content. It uses Akamai's learning engine that's powered by real user data gathered via mPulse. It provides site acceleration and can incrementally improve the rendering process by up to 5%.
-
Open the Accelerate delivery sub-rule in the Default Rule.
-
Click the Adaptive acceleration child rule to open it.
-
Set the following options, and leave all others at their default:
- Beacon Data Source. Select mPulse.
- Automatic Server Push, Automatic Preconnect, and Automatic Font Preload. Set these to On.
For more on Adaptive Acceleration, see our tutorial in the Ion user documentation.
Enable Caching
Caching your website content on edge servers brings it closer to end users to help speed up delivery. You should add some form of caching to your Ion property.
-
Select the Offload origin sub-rule in the Default Rule.
-
Set the Caching option to Cache and set Maxage to at least 10 minutes. This gives your Linodes enough time to index and access your content if it changes.
-
Under Cache HTTP Error Responses, set Enabled to On and Max-age to 30 seconds. This gives your Linodes enough time to address and log errors.
-
Select the HTML pages child rule. Set the Caching option to Cache and Maxage to at least 10 minutes to match your settings for standard caching.
Add Auto Domain Validation
Your edge certificate has a lifecycle of 90 days, after which it needs to be renewed. Add Auto Domain Validation to your Ion property to automate this renewal.
-
Select the Default Rule in your Ion property.
-
Click Add Behavior, and select Standard property behavior.
-
In Search available behaviors, search for and select Auto Domain Validation from the list.
-
Click Insert Behavior. The behavior is added to your Default Rule
Auto domain validation applies to all of the edge hostnames you've set in your Ion property that use an Enhanced TLS, domain-validated certificate. The renewal process automatically starts 16 days before their 90-day lifecycle ends.
What about the other rules?
Leave all other rules and behaviors at their default settings. A new Ion property includes several rules that are preset as a best practice, and others are optional. If you need to make changes later on, you can create a new version of your property later and activate it.
For complete details on all of these rules and behaviors, see Define property configuration settings in the Ion user documentation.
Save your Ion property
Once all the recommended settings have been applied, scroll to the bottom of the page, and click Save.
Updated 4 months ago