Apache2 quick config
Here's a quick example of how to configure your Apache2 web server for use in this tutorial. We'll be using the primary Linode you created. The process assumes you haven't modified the LAMP stack that was installed through the Marketplace.
| How long will this take? |
Approximately 15-20 minutes
Update your DNS, add your domain to your Apache2 web server, and test access to it. |
1. Get your public IP
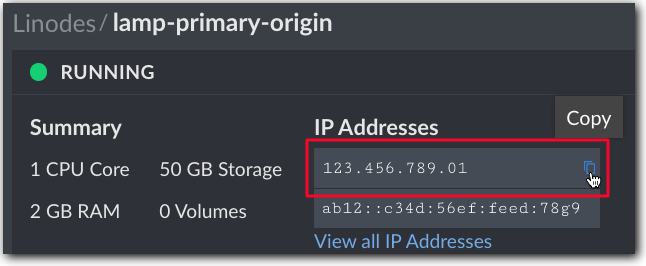
You'll need the public IP address for your primary Linode. If you don't know it, you can quickly get it:
-
From Cloud Manager, select Linodes (
 ).
). -
Locate your primary Linode.
-
Make note of the IPv4 version address listed under IP Addresses. (You can also mouse-over the public IP and click
 to copy it.)

2. Create a DNS entry
You need your domain to point to the IP address of your primary Linode. To do this, you need to update your DNS with an A record entry. For example, if you were using a domain provider like Google Domains, you would log into your DNS control panel and add a new custom record:

3. Update Apache2
Now, make a few changes to the default Apache2 web server installation to set it up for your domain.
- Back in Cloud Manager, click Launch LISH console for your primary Linode.

-
At the prompt, enter
rootfor the login and the Root Password you set when creating the primary. -
Navigate to the default directory Apache2 uses to store website files:
cd /var/www -
Create a new directory for your site, using your domain name to make it easy to recognize, and then navigate into it. (We'll be using our example domain
docasssociatesthroughout this tutorial.)mkdir docassociates.com cd docsassociates.com -
Create a new
index.htmlfile to serve as your site's root page.nano index.html -
In the nano editor that launches, create a simple HTML layout for use. Later, you can overwrite this page with your site's actual
index.htmlhome page.<html> <body> <h1>Welcome to Documentation Associates!</h1> </body> </html> -
Press Ctrl + X, followed by Y then Enter to save and exit nano.
-
Navigate to the directory where sites are managed in Apache2:
cd /etc/apache2/sites-available -
Create a new configuration file for your domain:
nano docasassociates.com.conf -
In the nano editor, set up the configuration file like the sample below. Replace
ServerAdminwith the email address of the person serving as your web site admin, and ensure that your domain is set in place ofdocsassociates.com, where applicable.<VirtualHost *:80> ServerAdmin jdoe@docsassociates.com DocumentRoot /var/www/docsassociates.com <Directory /var/www/docsassociates.com> Options Indexes FollowSymlinks AllowOverride All Require all granted </Directory> ErrorLog ${APACHE_LOG_DIR}/error.log CustomLog ${APACHE_LOG_DIR}/access.log combined <IfModule mod_dir.c> DirectoryIndex index.html index.php </IfModule> </VirtualHost> -
Press Ctrl + X, followed by Y then Enter to save and exit nano.
-
Activate the site using the config file you just created:
a2ensite docsassociates.com.confYou'll see a message stating that you need to restart apache2. Don't do this just yet.
-
Run
lsto view all of the config files in\sites-available. You'll probably see results like this:000-default.conf default-ssl.conf 123.456.789.01.ip.linodeusercontent.com.conf docsassociates.com.conf 123.456.789.01.ip.linodeusercontent.com-le-ssl.conf -
You need to make sure that all the
*.conffiles, except for the new one you just created are deactivated from Apache2. Run thea2dissitecommand for each one:a2dissite 000-default.conf a2dissite default-ssl.conf a2dissite 123.456.789.01.ip.linodeusercontent.com.conf a2dissite 123.456.789.01.ip.linodeusercontent.com-le-ssl.confSome of these files may return a message of
Site <name> already disabled. This is OK. -
Run this command to restart Apache2, to apply your updates:
systemctl reload apache2
4. Test it
Launch a browser and enter your domain in the search bar. If you did everything correctly, you should see the simple home page you set up!

I got a 404
If you don't see your page, it might be because your DNS entry hasn't processed yet. Give it a few minutes and try again. If it still doesn't work, make sure that you set up your
Arecord entry with the right domain and IP address for your primary Linode.
Updated 10 months ago
