1. Set up identity and access
Initial setup
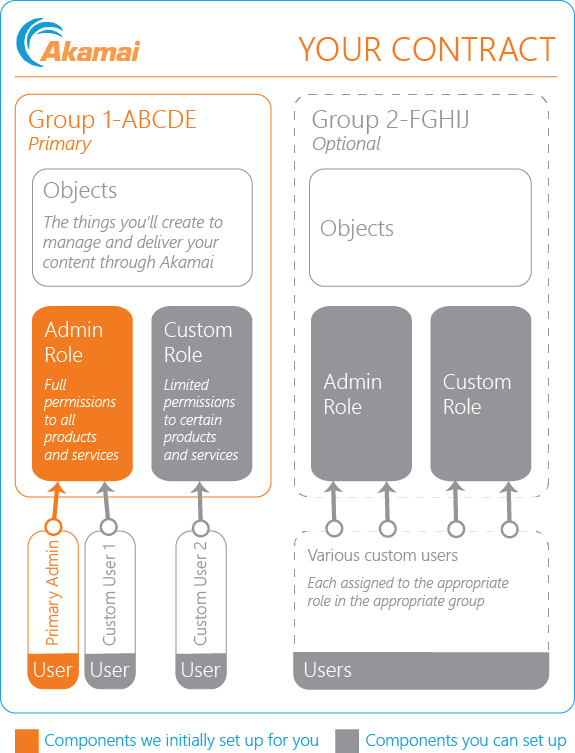
As a new customer, you work with your Akamai account team to set up several things you'll need to get going.
1. Get your contract
Your account team will start by helping you determine all of the Akamai products and services you'll need to deliver your content and add them to your contract. This tutorial includes at least these products:
- Ion. Akamai’s Ion solution helps streamline and secure the delivery of your website or app.
- NetStorage. This tutorial uses Akamai NetStorage as the origin server to store your deliverable content—all of the assets for your website or app. If you prefer to use a different type of origin server, such as a Linode instance or object storage bucket, see our Prepare your origin server documentation.
Your contract will be assigned a unique identifier—its contract ID. You'll want to make note of this value.
2. Get your primary group, role, and admin user
Your account team will:
- Add a primary group to your contract so you can organize your objects—these are the things you'll create and use to deliver your content. This group will also be assigned a unique identifier, its group ID. Be sure to make note of this value, too.
- Add an Admin role to your primary group that grants permission to all Akamai products and services on your contract. Work with your account team to come up with a suitable name for this role.
- Set up a user that's been assigned this Admin role. It's associated with your email address and a password you choose. In this tutorial, we call this your "Primary Admin" user.

3. Get your CP codes
A content provider (CP) code is what Akamai uses to track the use of its services. Your account team will initially get you at least two of these codes that you'll need for this tutorial—one for use with Ion for your delivery configuration (also known as a property) and another for NetStorage as your origin server. Each CP code is comprised of two parts:
- An integer value. This is a 5-7 digit value that Akamai generates.
- A unique alphanumeric name. You pick this value.
You'll use these later in this onboarding process.
More with groups, roles, and users (optional)
You're actually ready to go to the next phase. You can use your primary admin user to do everything here to set up delivery.
Skip to the next onboarding phase
However, you can also use your primary admin user in Akamai’s Identity and Access Management tool to do other things. Let's look at a couple of simple tasks you can perform to add more users.
Set up another Admin user
Here, we'll duplicate your primary admin so another person in your organization can also be an administrator in your primary group.
-
Access Akamai Control Center.
-
Log in using your primary admin user.
-
Select ☰ > ACCOUNT ADMIN > Identity & access.
-
On the Users and API Clients tab, click Create User.
-
In Add user information, enter details for your new user, using all of the fields marked "required." Leave all other options at their default.
Include only the username in the Verify email field. Leave the "@domain" out.
-
You can open the Advanced (optional) section and fill out details as you like.
-
In the Assign roles section, click Clone user permissions of... and choose the name associated with the primary admin user.

- Click Submit.
Once the new user is ready for use, the email address you set for it will receive a confirmation email. Have the new user access https://control.akamai.com and log in using the email address. They'll be prompted to generate a new password.
Set up a user with a different role
Here, we'll set up a role that limits access to various products and services in your primary group. Then, we'll set up a user to use this role.
-
Access Akamai Control Center.
-
Log in using an account with administrator access, like your primary admin user.
-
Select ☰ > ACCOUNT ADMIN > Identity & access.
-
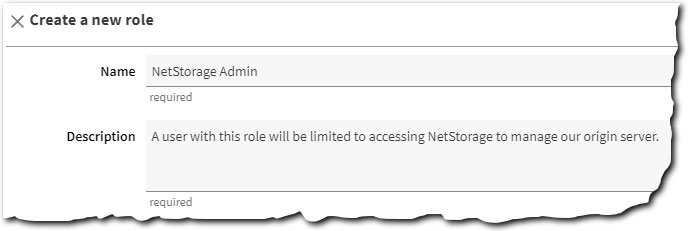
Select the Roles tab and then click Create role.
-
Give a Name to the role and type a quick Description to help identify it. For example, we could set up a role to limit access to only the NetStorage product.

-
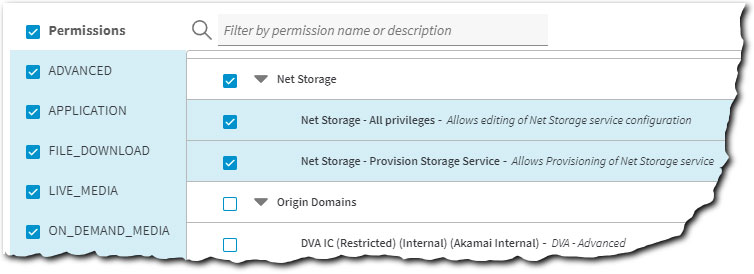
Filter Permissions by selecting the applicable ones or leave Permissions selected to leave all of them listed.
-
Scroll through the list of services and select the ones you want this user to access.

-
Click Save.
-
Select the Users and API Clients tab and then click Create User.
-
In Add user information, enter details for all of the fields marked as "required." Leave all other options at their default.
-
You can open the Advanced (optional) section and fill out details as you like.
-
In the Assign roles section, locate your primary group and click the Role unassigned - choose role (optional) field.
-
Select the role you just created, based on its Name and Description.

- Click Submit.
Once the new user is ready for use, the email address you set for it will receive a confirmation email. Have the new user access <<PORTAL_URL>> and log in using the email address. They'll be prompted to generate a new password.
Advanced groups, roles, and users
Along with these simple tasks, you can create more groups to organize different objects and customize access to them via new roles and associated users. See the Identity and Access Management user docs to learn more.
Updated 3 months ago
