1. Set up identity and access
Initial setup
As a new customer, you work with your Akamai account team to set up several things you need to onboard.
1. Get your contract
Your account team will start by helping you determine all of the Akamai products and services you need to deliver your content and add them to your contract. This tutorial includes these products:
- Ion. Akamai’s Ion solution helps streamline and secure the delivery of your website or app.
- NetStorage. This tutorial uses Akamai NetStorage as the origin server to store your deliverable content—all of the assets for your website or app. If you prefer to use a different type of origin server, such as a Linode instance or object storage bucket, see our Prepare your origin server documentation.
Which Ion version do you have?
You can have one of two versions of Ion on your contract. API operations use the codename values that Akamai established for these versions during development:
- Ion Premier.
SPM- Ion Standard.
FRESCAMake note of the codename for your version of Ion.
2. Get your primary group, role, and admin user
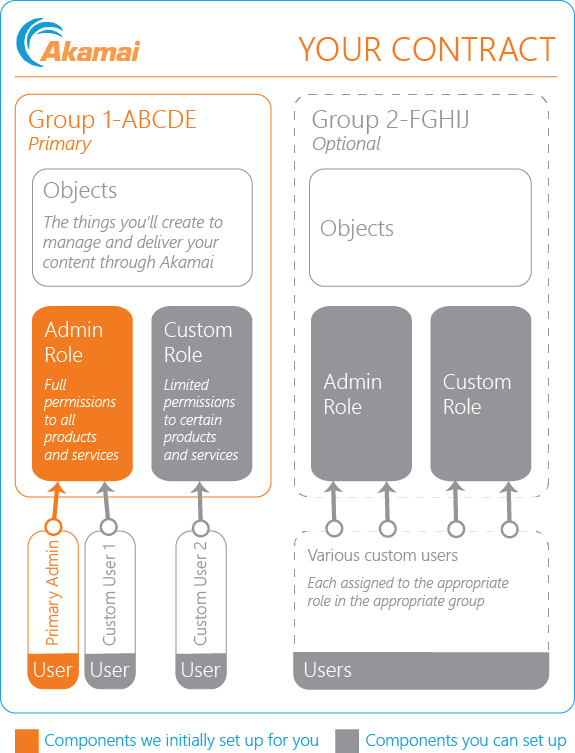
- Your account team adds a primary group to your contract so you can organize your objects. Objects are the things you create and use to deliver your content.
- They add an Admin role to your primary group that grants permission to all Akamai products and services on your contract.
- Finally, they set up a user that's been assigned this Admin role. It's associated with your email address and a password you choose. In this tutorial, we call this your "Primary Admin" user.

3. Get your CP codes
A content provider (CP) code is what we use to track usage of Akamai services. Your account team initially gets you at least two of these codes that you need for this tutorial—one for use with Ion for your delivery configuration (property) and another for NetStorage as your origin server. Each CP code is comprised of two parts:
- An integer value. This is a 5-7 digit value that Akamai generates.
- A unique alphanumeric name. You pick this value.
You need these later in this onboarding process.
4. Set up authentication credentials
Before you can get going with any Akamai API, you need to set up authentication credentials for access. Here, we set up an "API client" for the primary admin user with these credentials for all the APIs used in this tutorial.
-
Access Control Center and log in using your primary admin account.
-
Select ☰ > ACCOUNT ADMIN > Identity & access.
-
Under Users and API Clients, click Create API client.
-
Click Quick to create an API client that's associated with the current account.
-
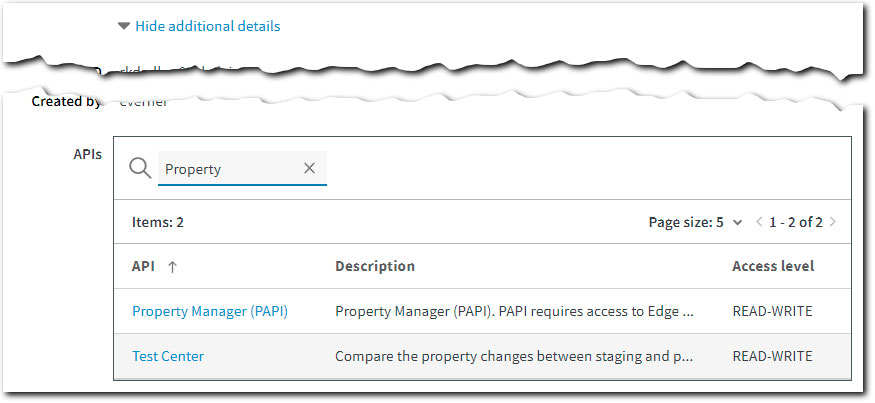
Click Show additional details and have a look at the APIs table. The credential values you create with this API client can be used to access the APIs for all the products and services listed in this table. You need access to these APIs for this onboarding:
- Identity Management (IDM): User Administration. You can use this API to create and manage groups, roles, and users. The access level needs to be ADMIN.
- Property Manager (PAPI). This is the tool used to set up your delivery product. The access level needs to be READ-WRITE.
- CPS. This is the Certificate Provisioning System API. You use this to create a certificate to secure the connection between a requesting client and Akamai edge servers. The access level needs to be READ-WRITE.
- NetStorage. The access level needs to be READ-WRITE.
- Reporting API. This one is optional. You can use this to generate report data for your website or app. The access level needs to be READ-WRITE.

-
Click Hide additional details once you're done verifying.
-
In the Credentials section, click Download. This gets you the
ID_{account}.txtfile, where your credential values are stored.
You only get one chance to get your "client_secret"
The
client_secretvalue is only available a single time in this interface—right now when you're creating the credential. Make sure you Download it to have a permanent, local record. You won't be able to come back to this interface to get it later.
-
Click Edit API Client to save the credential in a new API client.
-
Open the downloaded file with a text editor and add the value
[default]as a header above all text. Your finished file should look like this:

-
Save the file in your home directory using
.edgercas the full filename. The default home directory location for these operating systems is typically:- Linux.
/home/{username}/.edgerc - macOS.
/Users/{username}/.edgerc - Windows.
C:\Users\{username}\.edgerc
- Linux.
You're ready to start calling Akamai APIs!
More with groups, roles, and users (optional)
You're ready to go to the next phase. You can use your primary admin user along with the API client you created to do everything covered here.
Skip to the next onboarding phase
However, you can also use the Identity Management: User Administration API to do other things. Let's look at a couple of simple tasks you can perform to add more users.
Set up another Admin user
Here, we clone your primary admin so another person in your organization can also be an administrator in your primary group.
1. Get the user name
You need the uiUserName value for the user you want to clone.
2. Clone the primary admin
Now, you create a new user. Clone the admin access from the primary admin and customize other settings for the new user.
3. Log in with the new user
Once this new user is ready, Akamai sends a confirmation email that includes a one-time password. That new user needs to access https://control.akamai.com and login using their email address and the one-time password to verify access. Once logged in, the new user can:
- Change their password from the one-time one.
- Set up their own authentication credentials in an API client.
Set up a user with a different role
Set up a role that limits access to various products and services in your primary group. Then, set up a user to use this role.
1. Get the primary group's identifier
Each group on your contract has a unique identifier assigned to it. This includes the primary group that Akamai creates for you.
2. Get the roles identifiers
Each Akamai product or service has a unique role identifier assigned to it. You need the identifiers for each of the products you want to be included in the role.
3. Create the new role
With the role identifiers in hand, you can create the role.
4. Create a new user and apply the role
Now you can create a new user and apply the role you just created.
5. Log in with the new user
See Log in with the new user, above.
Advanced groups, roles, and users
The API operations here have been customized for these specific tasks, but there are other operations in the Identity and Access Management API. For example, you can create more groups to organize different objects and customize access to them via new roles and associated users.
Updated 3 months ago
