3. Set up your origin server
This tutorial uses Akamai's secure, cloud-based NetStorage service as the origin server to house your website or app's deliverable content. NetStorage simplifies the management of your content and makes it easy to deliver it over the Akamai network. NetStorage also ensures your content is readily accessible by replicating it in multiple locations across the Akamai content delivery network.
See Other origin server methods for alternative origin server options.
| How long will this take? |
Approximately 3 hours and 30 minutes
|
Do you need an origin certificate?
You're protecting the connection between a requesting client and Akamai edge servers with a secure certificate for HTTPS. You might think you need to do the same to protect the connection between edge servers and your origin server.
Since this tutorial uses NetStorage as your origin server, this is not the case. Connections to it are served over Akamai’s natively secure network via Standard TLS.
Set up NetStorage
There are a few things you need to do to set up NetStorage.
Did you get NetStorage?
When you first worked with Akamai, your account team should have added NetStorage to your contract and given you at least one content provider (CP) code for its use.
1. Install the IBM Aspera Desktop Client
We've worked with IBM Aspersoft to develop a client that makes the transfer to NetStorage easy and fast. Download it and get it installed on the system that will be transferring your website content to NetStorage. Later, we'll refer to this as your local system.
| System | Version |
|---|---|
| Linux (Debian) | v4.0.0.182279 |
| Linux (Red Hat) | v4.0.0.182279 |
| macOS | v4.0.0.182279 |
| Windows | v4.0.0.182279 |
Install on Linux
-
Run the installer from a terminal session, based on the Linux distribution in use:
- Debian:
$ dpkg -i aspera-scp-client-[version].deb - Red Hat:
$ dpkg -i aspera-scp-client-[version].rpm
- Debian:
-
Follow the prompts to perform the install.
Install on macOS
-
Double-click the downloaded installer file.
-
Follow the prompts to install the client.
Install on Windows
To install and use the IBM Aspera Client, the active user needs to be an Administrator.
-
Right-click the install file, select Run as Administrator, and enter appropriate login credentials.
-
When prompted to Choose Setup Type, click Typical.
-
In the Aspera Service Account dialog, input the following:
- User name. Input the name of a valid, Administrator-level user for the system (for example, the current login).
- Password. Input the associated password for the user.
You don't use these values when using the IBM Aspera Client with NetStorage. They're just required to complete the install.
2. Create an SSH key
You'll use a secure shell (SSH) key to validate and protect your connection to NetStorage. An SSH key consists of a pair of files—a private key and a public key. The private key is stored on your local system. Later, you'll apply the public key in NetStorage. Whenever you try to access NetStorage, the two keys are compared to each other. If they match, you're in.
Since we'll be using the IBM Aspera Desktop Client, it's easiest to create the key in that client.
-
Launch the IBM Aspera Client:
- Linux (Debian/RedHat). From a Terminal Session, run the
asperascpcommand. - macOS. Open Applications in the dock. Locate the IBM Aspera Client app and double-click it.
- Windows. Select Start Menu > All Programs > Aspera > Client > Client, and enter the appropriate Administrator login credentials.
- Linux (Debian/RedHat). From a Terminal Session, run the
-
Select Tools > Manage Keys...
-
Click
 . Set these values to create a new SSH key and then click OK.
- Identity. Enter a name for the key. Both the public and private key files will be labeled with this name.
- Passphrase (Optional). For added security, you can set a password to protect the key. If you include one, you'll need to provide it each time you access NetStorage.
- Confirm Passphrase. Enter the same value.
- Type. Set this to RSA.
- Access. Ensure that this checkbox is deselected.
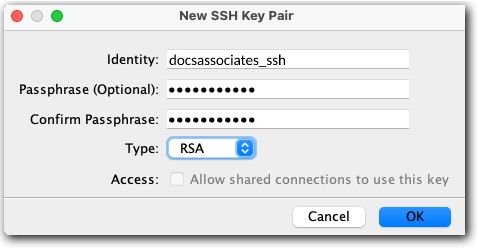
- Your key is created and the public instance is shown in the SSH Keys window. Leave this window open. You'll come back to it later in this process.
3. Create a storage group
This is where you'll upload and store your website or app content for delivery.
-
Access Akamai Control Center.
-
Log in with a user that has access to NetStorage—such as your primary admin user.
-
Select ☰ > ORIGIN SERVICES > NetStorage.
-
Click + Add Storage Group. The Add Storage Group wizard launches.
-
Enter a Storage Group Name. This can be any value you want, but you should use something that's easy to identify.
-
Enter a unique name in Domain Name. Notice how the value is appended to several domain values below it. These domains let you access the storage group, using those transfer protocols.
-
Leave the other options at their default and click Next.
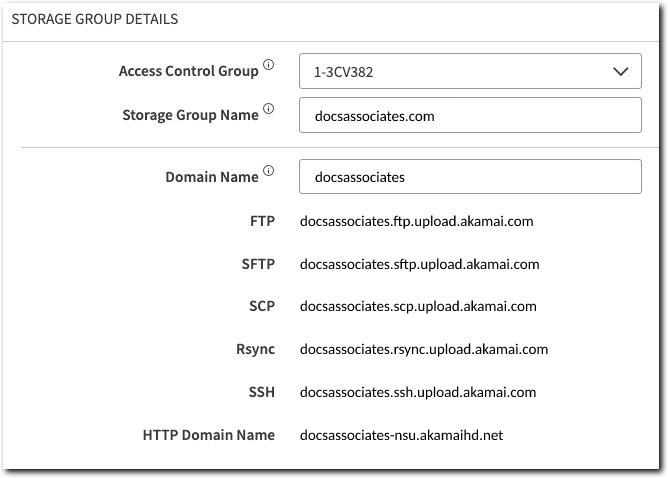
- For Geo Replication Settings, pick the geographic areas where your content will be replicated for the best overall access.
Both upload and client access apply
Where are the majority of your clients that will be requesting your site or app? Where are you uploading content from? You don't want your Zones too far from either. If you pick a suitable combination you should see the message, Valid zone combination.
| Zone | Geography |
|---|---|
| AU | Australia |
| IN | India |
| JP | Japan |
| KR | Korea |
| SG | Singapore |
| asia | All of Asia |
| europe | All of Europe |
| global | Not recommended. If you choose this, we can't guarantee where the replica will be. |
| us | All of the United States (Pick this to include Canada, Latin America, and South America) |
| useast | Eastern United States |
| uswest | Western United States |
-
Click Next.
-
Leave Additional Domains at the default settings and click Next.
-
In Directory Settings, click + Upload Directory.
-
During initial setup, you got a CP code to use with NetStorage. Select Choose from Existing CP Codes. The numeric value assigned to that CP code should appear in the field.
-
Leave all other options at their default setting and click Save.
-
Notice how the new Upload Directory entry shows
/{Your NetStorage CP code}as the Directory Name. This will be the name of the root directory in your storage group. Click Next to continue. -
Leave Automatic Purge settings at their default and click Next.
-
Review the Summary and make note of these values:
- Storage Group Name. You'll use this later when you set your origin server in your property.
- Domain Names. Each entry here includes the Domain Name you set when creating the storage group. It’s listed as the prefix for each value. You'll use it to configure the IBM Aspera Desktop Client.
- Upload Directory. This is your NetStorage CP code's numeric identifier. You'll use this multiple times—to tie your upload account to this storage group, and later when you set your origin server in your property.
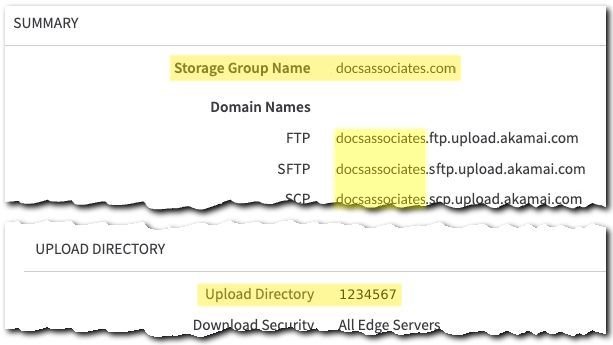
- Click Create.
The new storage group is listed in the table, with its Propagation Status listed as  . You'll need to wait until it finishes propagation before you can continue. The email you set up for your primary admin user will be notified when it's ready.
There's more to storage groups
What you just went through was to get you up and running with a storage group. There are several other settings you can apply. Have a look at the NetStorage user documentation on storage groups if you want to know more.
4. Create an upload account
An upload account gives you access to your storage group, so you can upload content to it. In this account, you can set up various access methods based on popular transfer protocols. The IBM Aspera Desktop Client makes securing your connection to NetStorage, and the actual transfer easy. Here, you’ll set up your upload account to use the Aspera Upload Acceleration access method.
-
From the NetStorage interface, access the Upload Accounts entity (
 ).
). -
Click + Add Upload Account. The Add Upload Account wizard launches.
-
Set UPLOAD ACCOUNT settings:
- Id. Enter a name for your upload account. This can be anything you want, but make it something that's easy to recognize.
- Contact Email Address. Enter an email address for notifications regarding this upload account. You could just use the email address you set up with your primary admin user.
-
Set ADDITIONAL CONTACT INFORMATION settings, then click Next.
- Add New Contact. Select this option.
- First Name. Enter the first (primary) name for the person who owns the Contact Email Address.
- Last Name. Enter the last name (surname) for this person.
- Email. Enter a backup email address for this person.
- Phone. Enter the phone number for this person.
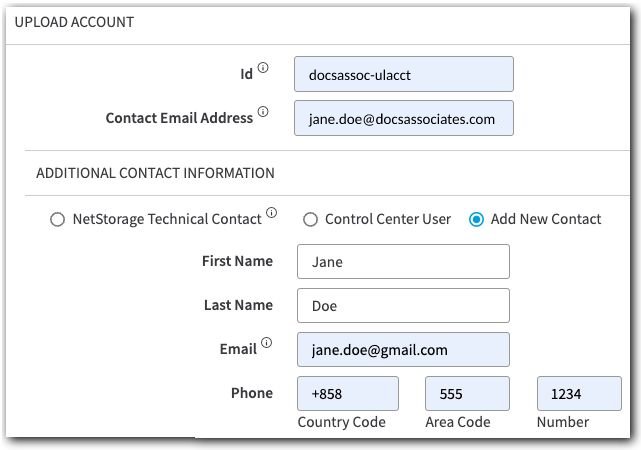
-
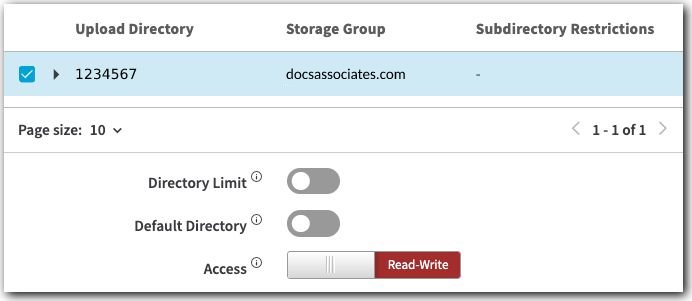
Now, you need the upload directory for your storage group. Find its CP code name in the table and click its checkbox to select it.
-
Make sure the Access slider is set to Read-Write and click Next.
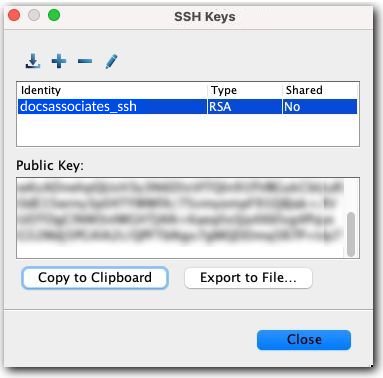
- Return to the SSH Keys window in the IBM Aspera Desktop client and click Copy to Clipboard to copy the public key. Click Close, but leave the IBM Aspera Desktop client open. You'll come back to it again in this process.
-
Go back to the Add Upload Account wizard in Akamai Control Center. In the Access Methods options, click + Add SSH key:
- SSH Key. Paste your copied public key here.
- Notes. You can optionally enter some notes for this key.
-
Click Save.
-
Click the Aspera Upload Acceleration slider to enable it
 and click Next.
 -
Leave all of the Advanced Options settings at their default and click Next.
-
Review the Summary:
- Id. Make note of this value for help in identifying your Upload Account.
- NETSTORAGE ACCESS METHODS. Make sure that both SSH and Aspera Upload Acceleration are listed as Enabled.
- UPLOAD DIRECTORY. Make sure that the Storage Group you created (and its Upload Directory) are listed.
- ADVANCED SETTINGS. Ensure that Read Write Privileges is set to Read/Write.
-
Click Create.
The new upload account is shown, with its Propagation Status listed as  . You'll need to wait until it finishes propagation before you can continue. The Contact Email Address you set up for the upload account will be notified when it's ready.
Wait until your upload account is ready
Propagation can take from 1 - 2 hours. Before you continue, wait until you receive the confirmation email for your upload account. You can't actually upload content to NetStorage until it's ready.
There's more to upload accounts
Just like with the storage group, we only covered the basics for an upload account. There are other configuration settings you can apply, and other access methods you can use to transfer content. Check out the NetStorage user documentation on upload accounts if you want to learn more.
5. Configure the IBM Aspera Desktop Client
There are a few settings you need to apply in the client to set it up for use.
-
Return to the IBM Aspera Desktop Client app.
-
Click Connections in the top right.
-
Click
 to create a new connection. A connection named New Connection is added.
 -
Double-click the New Connection entry. Give it a new name that's easy to recognize. For example, you could use NetStorage Aspera.
-
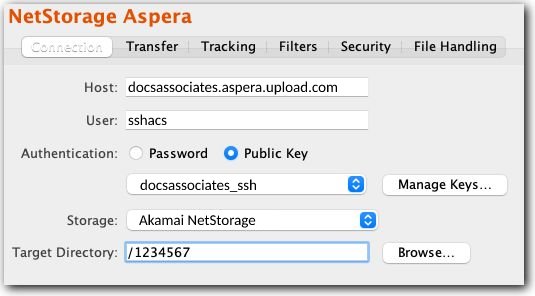
Select the Connections tab and set the following options:
- Host. This is where you need the Domain Name you set for your storage group. Set this to
<Domain Name prefix>.aspera.upload.akamai.com. - User. Set this to
sshacs. This is the default, required user name for secure access to NetStorage. - Authentication. Select Public Key and select the SSH key you created earlier from the drop-down.
- Storage. Set this to Akamai NetStorage.
- Target Directory. You need the (CP code) name of your Upload Directory. Set this to
/<Upload Directory>.
- Host. This is where you need the Domain Name you set for your storage group. Set this to
- Leave all other settings at their default and click OK to add the connection.
6. Upload your content to NetStorage
Use the IBM Aspera Desktop Client to add your website or app content to your storage group. It's pretty easy to use:
-
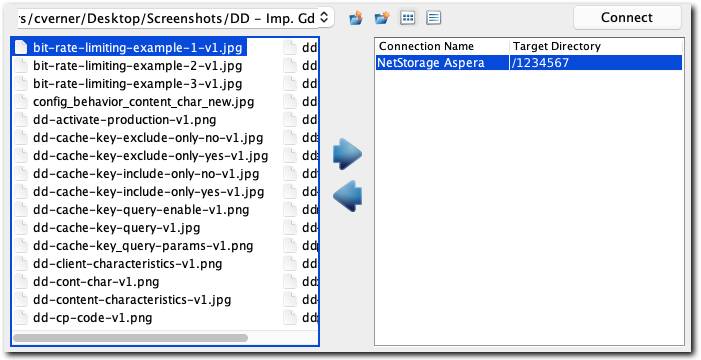
If necessary, click Transfer in the top left.
-
Navigate to the directory housing your site or app using the left panel.
-
Select folder or file content and click the right arrow
 to begin the transfer.
Once all of your site assets are uploaded, you're ready to move on to the next phase of the process.
Other origin server methods
NetStorage offers a relatively simple method to host your deliverable content with Akamai. However, Akamai supports other origin server configurations, including:
| Origin server type | Description |
|---|---|
| Your origin server (the custom origin) | This applies if you already have your own custom origin server that you'd like to use. |
| The third-party origin server | This applies if you're using another cloud-based storage provider for your origin server, like Amazon Web Services or Google Cloud Interconnect. |
See our Prepare your origin server guides for more information on using different types of origin servers, such as a Linode instance or object storage bucket.
Updated 2 months ago
