2. Set up a secure certificate
When delivering through Akamai, a request for your site or app's domain is rerouted to Akamai edge servers that are geographically closest to the requesting client, to help speed up delivery. You should secure this connection using HTTPS. We'll start by creating a standard transport layer security certificate ("standard TLS cert") that uses a pair of encryption keys, one public and one private. Later, we'll assign this certificate to your domain by creating an edge hostname.
| How long will this take? |
Approximately 2 hours
|
Here's how the standard TLS cert fits in to secure the request:
-
A client—for example, a web browser—makes a request for your site and it's routed to an edge server.
-
The edge server sends the cert to the client. The cert includes:
- The public key.
- A list of sites where the cert is valid. These are referred to as subject alternate names (SANs).
- An expiration date for the cert.
- A signature from a certificate authority that proves that the key is legitimate for a SAN listed in the cert.
-
The client checks the following:
- Does the signature match the cert?
- Does the cert come from a certificate authority it trusts?
- Is the cert actually for the site it requested?
- Has the cert expired?
-
If the checks succeed, the client encrypts the items from step 2 using the public key and sends the encrypted data to the edge server. This sets a shared key for the session.
-
Since the edge server holds the corresponding private key, it can decrypt the information, read the shared key, and ultimately prove its identity to the requesting client.
1. Create a custom cert
We'll set up a domain-validated (DV) cert that uses Let's Encrypt as the certificate authority. The cert will use our secure, Standard TLS network for transfer. This cert is relatively easy to set up, it's available to all Akamai delivery customers, and it applies to most delivery scenarios. We'll use Akamai's Certificate Provisioning System (CPS) interface to create it.
Do you need to exchange personally identifiable information?
Personally identifiable information, or PII, describes sensitive data like credit card information, personal identification numbers, or medical data. If your site exchanges this kind of information, you'll need the heightened security that an Enhanced TLS connection offers. See Other certificate methods for more information.
Before you begin
You need a technical contact, outside of your organization. This should be the person from your Akamai account team that you work with the most. Someone you designate as your local administrator contact and this technical contact will receive communications while the certificate is being validated. Talk to your Akamai account team to get:
- A first and last name
- A valid, Akamai domain email address
- A phone number
Create the cert
-
Access Akamai Control Center.
-
Log in with an Admin-level user—such as your primary Admin user.
-
Select ☰ > CDN > Certificates.
-
Click Create New Certificate. A wizard launches.
-
Select Domain Validation (DV) from the Akamai Managed Certificate options and click Next.

-
In Select Certificate Settings make sure these options are enabled and then click Next:
- Certificate Type: Subject Alternative Names (SAN)
- Certificate Authority (CA): Let's Encrypt
-
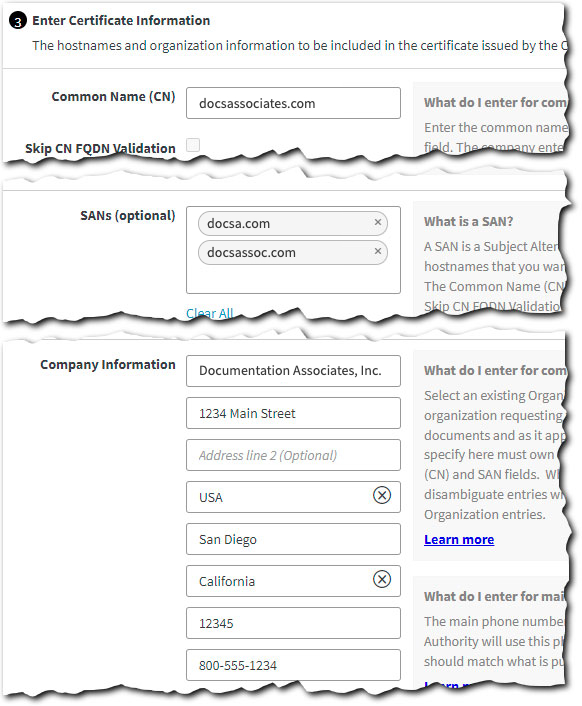
In Enter Certificate Information, set these options and then click Next:
-
Common Name (CN). This is the primary domain that a client uses to access your site or app. If you only have a single domain, this is the only field you need. Your organization needs to legally own this domain and once you submit your cert in CPS, you can't change its Common Name.
-
SANs (optional). Are there alternate domains that a client can use to access your site or app? If so, you can enter up to 99 of them here.
-
Company Information. All fields not labeled "optional" are required. Have a look at the in-app instructions and fill in each accordingly.
-
-
Review the Enter Certificate Information details. Click Edit to fix any problems.
-
In Enter Company Information, make sure that Same as certificate information is enabled and click Next.
-
Set these options in Enter Contact Information panel and then click Next:
-
Administrator Contact Information. Review the in-app help and enter contact details for your local cert administrator.
-
Akamai Technical Contact Information. This is your Akamai technical contact.
-
-
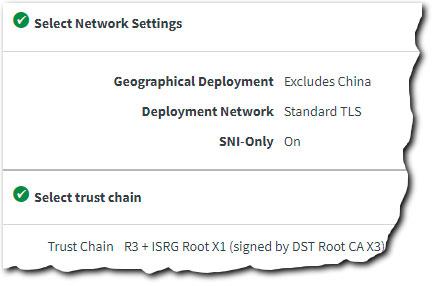
In the Select Network Settings panel, set Deployment Network to Standard TLS. Leave all other options at their default and click Next.
Did you notice the Auto Domain Validation note?
Once you select Standard TLS as the Deployment Network, a new message appears, talking about the "Auto Domain Validation" behavior. You should add this to the configuration you'll set up to deliver your content. More on this later.
-
In Select trust chain, leave this set to the default option.
-
Click Review. Run through each of the sections, verifying your settings are correct and make sure that each is marked with a green check icon.
- Click Submit.
Your cert request is submitted and a certificate signing request is sent to Let's Encrypt. When it's ready to progress, your Administrator Contact will receive an email.
2. Push your cert to staging
A newly provisioned certificate is automatically pushed to the production network. It's live and ready to start protecting the client-to-edge network connection. Later in this tutorial, we'll be testing to make sure everything with your site is ready. To prepare for this, push your new certificate to the staging network now, so it'll be ready to go when you need to test.
-
If necessary, access Akamai Control Center, log in with your primary admin user, and go to ☰ > CDN > Certificates.
-
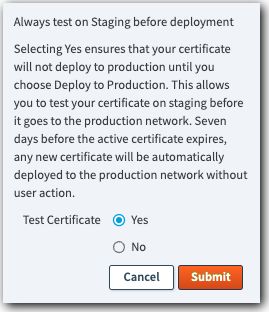
Locate the cert you just created in the table, click No under Always test on Staging before deployment.
-
Set Test Certificate to Yes and click Submit.
3. Validate your domains
Before Let's Encrypt can sign your certificate, they need to validate that you control all of the domains you set as the CN and any SANs in your cert. You can do this in multiple ways, but we'll use the HTTP Token method here because it doesn't have additional requirements.
-
If necessary, access Akamai Control Center, log in with your primary admin user, and go to ☰ > CDN > Certificates.
-
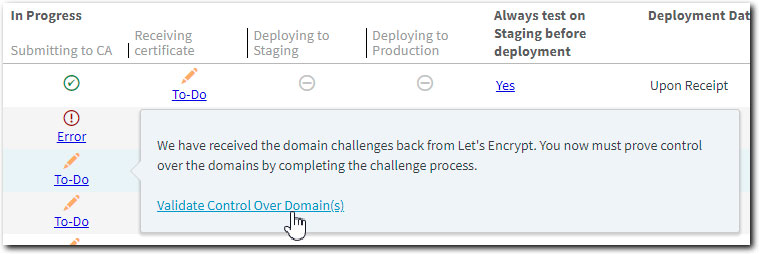
Locate your cert, click To-Do under Submitting to CA, and then click Validate Control over Domain(s).
-
Select a domain from the list.
-
Select HTTP Token.
-
Under Your domain / folder / filename (path), note the complete path after your domain. This is where you'll store the file with the token.
-
Copy the complete token under Content of the file (token).
-
Create an HTML file that contains the copied token. Save it on your website using the complete path you noted, and name it using the last value in that path.
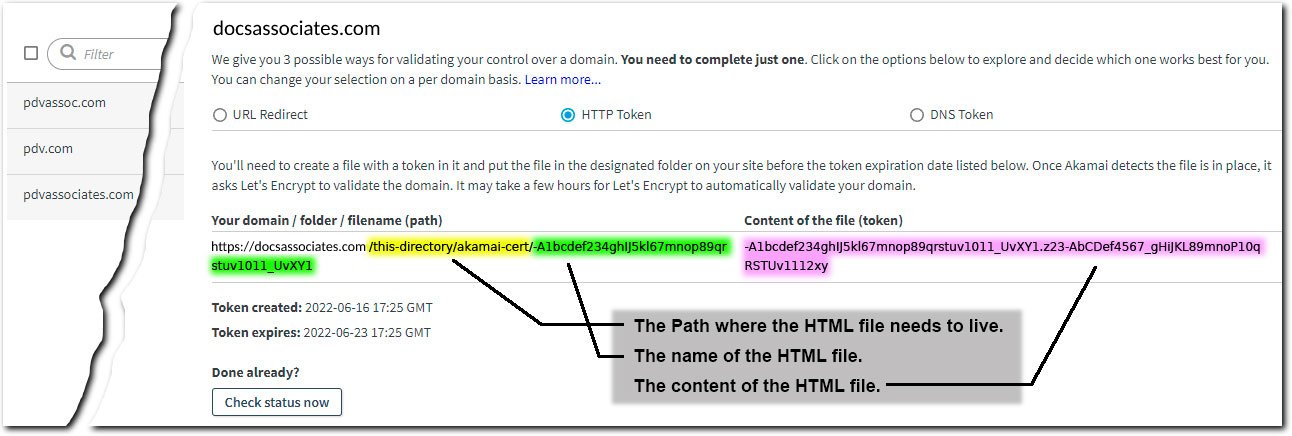
The token created for this process is valid until the date and time shown under Token expires. Make sure you complete step 7 before it expires.
-
Once you’ve set up the file on your site, you can access it here again and click Check status now to push the validation request.
-
Repeat steps 3-8 for each remaining domain.
When each domain’s validation request is successful, the Administrator Contact will receive an email. Plus, the “To-Do” link will be removed from the dashboard in this interface. You’re ready to go!
Different validation methods
Along with HTTP token validation, you can use two additional methods in CPS:
You can use any of the three methods to validate each domain on the certificate.
Other certificate methods
While it works for this tutorial, a domain-validated Standard TLS certificate may not fit your needs.
| Method | Description |
|---|---|
Do requests for your content require the exchange of personally identifiable information (PII)? If they do, you’ll need the heightened regulatory compliance that Enhanced TLS offers. | |
This is a separate method that automates the creation of a TLS certificate, either Standard TLS or Enhanced TLS. Currently, it’s in limited availability. | |
Secure hypertext transfer protocol (HTTPS) has become the standard for access on the Internet. While non-secure HTTP is still supported, it's not recommended. Browsers will present warnings to your users if they connect to a site that doesn't support HTTPS. |
We offer a detailed comparison of each of these security options.
Updated 2 months ago
