JSON web token (JWT) validation
JSON web token is an open standard (RFC 7519) that defines a compact and self-contained method for securely transmitting JSON-encoded information between parties. With Akamai, you can use JWTs to quickly identify and authorize API consumers who send requests to your API.
A JWT contains information about an entity in the form of claims and combines three elements encapsulated in JSON objects:
-
Header. Contains information about the cryptographic operations applied to the JWT's header and payload.
-
Payload. Contains the actual statements represented as claims that two parties exchange. API Gateway supports the use of both pre-defined reserved claims and custom claims.
-
Signature. Ensures the proper identification of the request sender and protects the request from being tampered with.
JWTs are stateless, which means that incoming JWT requests can be validated on the spot. You don't have to store session states on the server and load user information from a database or cache. This immediate validation increases the scalability of your API and provides an overall faster client-server experience.
Akamai verifies JWT signatures at the edge, which negates the need to go back to origin for verification and offloads your identity provider. This behavior also contributes to improved security by allowing edge servers to filter out unauthorized requests before they can reach your origin infrastructure.
API Gateway supports the use of RSA private/public key pairs for JWT signature verification. This ensures the data in the JWT payload has not been modified by third parties. Your identity provider first signs a JWT by using a private key. API Gateway then verifies the integrity of the JWT by using a public key that you upload via the JWT validation settings page.
Based on your JWT claim configuration, API Gateway checks the token for presence of reserved and custom claims you specified as required. API Gateway also validates the value of each claim for which you enabled validation. If all required claims are present and all expected values are correct, JWT validation succeeds and API Gateway allows the entity issuing the JWT to access your API.
For more information on the JWT standard, see the JWT specification.
JWT validation is one of the two protection methods that API Gateway provides. Alternatively, you can use API keys as a means of improving security. To optimize the performance of your system, it's best to implement one protection method per API configuration.
JWT claims
Claims constitute the payload part of a JSON web token and represent a set of information exchanged between two parties. The JWT standard distinguishes between reserved claims, public claims, and private claims. In API Gateway context, both public claims and private claims are considered custom claims.
-
Reserved claims. A set of optional predefined claims (per RFC 7519) that serve as a starting point for your JWT claims configuration. Reserved claims that you can configure in API Definitions include:
iss(issuer),exp(expiration time),nbf(not before),sub(subject), andaud(audience). For details on each reserved claim, see JWT reserved claims. -
Public claims. Custom claims that you can define by using all alphanumeric characters and the following characters: [-_]. To prevent collisions between public claim names, you can either register them in the IANA JSON Web Token Claims registry, or use a collision-resistant name, for example: a universally unique identifier (UUID), or an object identifier (OID).
-
Private claims. Custom claims that you can define by using all alphanumeric characters and the following characters: [-_]. Private claims usually contain information that is specific to your organization, such as an internal user ID. Unlike public claims, private claims are subject to collision as they are not registered, and should be used with care.
JWT validation methods
On the JSON web token (JWT) validation page, you can specify how to validate incoming JWTs. You may do it either by uploading both a public primary and backup RSA key manually, or by loading them dynamically from a JSON web key set (JWKS) file.
-
Manual RSA key upload. This validation method requires you to upload a primary RSA public key to verify incoming requests and a backup RSA public key for use during key rotations. The RSA keys that you upload typically have an expiry date, which means you will need to upload new RSA keys periodically.
-
Allowed JWK URLs in JKU. The allowed list for the values found in the claim JKU. JKU, or JWK Set URL is a URI that refers to a resource for a set of JSON-encoded public keys, one of which corresponds to the key used to digitally sign the JWS. You have two options to validate JWT.
- You can provide the URL. The API Gateway will then ignore existence of JKU claim (it may or may not be specified) and will fetch public key directly from provided URL.
- You can provide the JWK hosts. If the JKU claim exists and matches the allowed hosts, API Gateway fetches the key specified in the JKU.
For additional details on the JWKS specification, see RFC 7517.
For authentication details, see Configure JWT validation.
Configure JWT validation
JSON web token (JWT) validation maximizes identity provider offload and lets you authorize users who send requests to your API. You can enable protection for the entire API, choose specific JWT reserved claims that you want to verify at the edge, and exempt individual resources from requiring validation.
APIYou can also complete this task by using the API Endpoints API. Run the Edit JWT settings operation. Learn more about Akamai's APIs.
-
On the API Definitions page, in the Registered APIs section, click the ellipsis icon (...) associated with the API configuration you want to configure JWT validation settings for.
-
From the menu, select Manage versions.
-
In the Version history panel, click the ellipsis icon (...) associated with the API configuration version you want to configure JWT validation settings for, and select View/Edit version.
-
From the list of delivery options, select JSON web tokens (JWT).
-
On the JSON web tokens (JWT) settings page, set the Enable JWT switch to Yes.
By setting this switch to Yes for the first time, you enable JWT validation for all resources associated with your API. -
From the JWT location menu, select the location for the JWT in the HTTP request.
-
In the location name field, enter a name for the JWT location.
where location is either Header, Cookie, or Query parameter. -
Upload keys manually:
- In the Primary RSA public key area, click Choose file and upload the primary RSA public key for the JWT signature verification.
- Optionally in the Backup RSA public key area, click Choose file and upload the backup RSA public key for use during key rotations.
-
In the Clock skew amount (0-60 seconds) field, enter a value between 0 and 60.
Clock skew amount specifies the allowed time difference (in seconds) between the server and client clocks when validating the exp and nbf claims. The recommended default value is 5. -
Optional: Configure JWT claims.
- To configure registered JWT claims, see Configure reserved JWT claims.
- To configure custom JWT claims, see Configure custom JWT claims.
-
Optional: If you want to validate only particular resources, specify them in the Enable JWT validation for resources section by setting their corresponding Validate JWT switches to Yes.
If you decide to reset JWT settings for all resources to the API level at any point, you can click Reset to API settings. You can also control which individual resources inherit the top-level settings by selecting their Inherit check boxes. -
Click Save.
Configure reserved JWT claims
Reserved claims constitute the payload of a JWT and contain information such as time constraints for accepting a token or the parties involved in the processing of a token. You can specify which claims are required and which claim values must be validated in incoming API requests.
Before you begin, ensure that you enabled JWT settings at the API level.
Ensure that you are familiar with the available reserved JWT claims. For details, see JWT reserved claims.
-
On the JSON web tokens (JWT) settings page, in the Claims section, click Add claim and select the reserved claims that you want to add to your configuration.
You can only add one instance of each reserved claim. -
Optional: If you want to treat the iat claim as the nbf claim, enable the Treat iat as nbf switch.
The iat claim indicates the time a JWT was issued at. Normally, it serves an informational purpose, but you have an option to make it act as the nbf claim. The nbf claim identifies the time before which the token is not accepted for processing. If you decide to enable this switch, the iat claim will act as nbf regardless of the presence of nbf in the JWT. -
Specify the mandatory claims by setting their corresponding Required switches to Yes.
If you set a claim's Required switch to Yes, it means that this claim must be present in an incoming JWT. Otherwise, JWT validation fails and API Gateway rejects the request that included the token.
If you enabled the Treat iat as nbf switch, the iat is automatically required. You can still mark the nbf claim as required and tell edge servers to check for the presence of both claims in incoming JWTs. If required, both iat and nbf must pass the validation for API Gateway to accept a request.
-
If applicable, specify whether you want to validate the values of aud, iss, and sub claims by setting their corresponding Validate value switches to Yes.
-
If applicable, specify the Claim type of iss and sub claims.
The available claim types for iss and sub claims are String and Regex. When you decide to match a claim's value against a regular expression, enter the regular expression in the corresponding Claim value field. This allows you to broaden the number of acceptable issuers or subjects specified in incoming tokens. -
If applicable, for claims whose values you want to validate, fill in the fields in the Claim value column:
- For the aud claim, enter the allowed JWT audiences.
- For the iss claim, enter the allowed JWT issuer.
- For the sub claim, enter the allowed JWT subject.
The values of the above claims are case sensitive.
What you should see
Reserved claims example
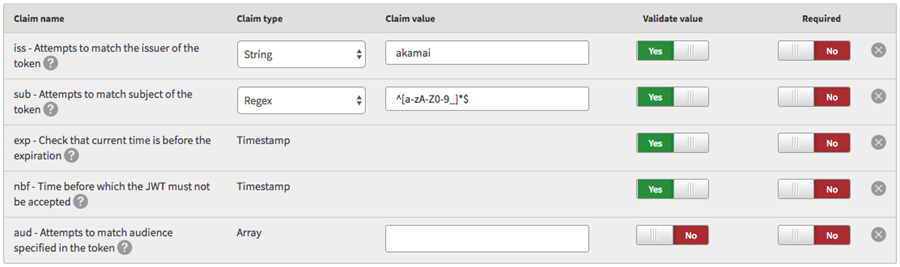
The figure shows a sample reserved claims configuration:
-
The
issclaim contains a string value ofakamai. The presence of this claim in a JWT is optional. However, if the claim is present, its value must beakamai. Otherwise, the JWT fails the validation and API Gateway rejects the request that included the token. -
The
subclaim contains a regex value of^[a-zA-Z0-9_]*$. The regex matches all alphanumeric characters and underscores. The presence of this claim in a JWT is optional. However, if the claim is present, its string value must be matched by the regex. Otherwise, the JWT fails the validation and API Gateway rejects the request that included the token. -
The
expandnbfcontain a predefined timestamp value. The presence of these claims in a JWT is optional but their values are validated. -
The
audclaim is not required and it does not contain a specific value. This means that it may or may not be included in a JWT without any impact on the request validation.
JWT reserved claims
The following table lists the optional reserved claims that you can set on the JWT Settings page in API Gateway.
| Claim name | Description |
|---|---|
exp | The exp claim identifies the expiration time on or after which the token is not accepted for processing. The client’s current date and time must be earlier than the expiration date and time listed in the exp claim. The Clock Skew Amount field lets you specify up to 60 seconds of leeway for the validation of this claim. |
nbf | The nbf claim identifies the time before which the token is not accepted for processing. The client’s current date and time must be later than or equal to the not-before date and time listed in the nbf claim. The Clock Skew Amount field lets you specify up to 60 seconds of leeway for the validation of this claim. |
iss | The iss claim identifies the issuer of the JWT. This value is case sensitive and must be a string value. |
sub | The sub claim identifies the subject of the JWT. This value is case sensitive and must be a string value. |
aud | The A valid multiple-entry example: A valid single-entry example: |
iat | The iat claim identifies the time the JWT was issued at. You can use this claim to determine the age of a JWT. You can also treat this claim as the nbf claim by enabling the Treat iat as nbf switch. |
Configure custom JWT claims
In API Definitions, you can create and validate your own custom JWT claims. This allows JWTs to include any JSON-encoded data that is not already covered by the available reserved claims. For example, a claim named dept can include information about the claim issuer's department in your organization. You can specify which claims are required and which claim values must be validated in incoming API requests.
Before you begin, ensure that you enabled JWT settings at the API level.
-
On the JSON web tokens (JWT) settings page, in the Claims section, click Add claim and select Custom for each custom claim that you want to add to your configuration.
-
Specify the mandatory claims by setting their corresponding Required switches to Yes.
If you set a claim's Required switch to Yes, it means that this claim must be present in an incoming JWT. Otherwise, JWT validation fails and API Gateway rejects the request that included the token. -
Specify the Claim name of each of your required custom claims.
Custom claims refer to both private claims and public claims. For details on each type, see JWT claims.You can choose any name you like, but because JWTs should be as compact as possible, the recommended maximum value of a claim name is 8 characters. In addition, every claim name that you define must be unique.
-
Specify whether you want to validate the values of your custom claims by setting their corresponding Validate value switches to Yes.
-
Specify the Claim type of each custom claim whose value you want to validate.
The available claim types for custom claims are String, Integer, Boolean, Regex, and Array.
When you decide to match a claim's value against a regular expression, enter the regular expression in the corresponding Claim value field. This allows you to broaden the number of acceptable values specified in incoming tokens.
To test your regex, use a free online regex validator such as regex101.
If you set the Claim type to Array, all items that you enter in the corresponding Claim value field must be present in a JWT for the validation to be successful.
-
For claims whose values you want to validate, fill in the fields in the Claim value column.
What you should see
Custom claims example

The figure shows a sample custom claims configuration:-
The
deptclaim contains a string value ofIT. The presence of this claim in a JWT is required and its value must beIT. Otherwise, the JWT fails the validation and API Gateway will reject the request that included the token. -
The
rolesclaim contains an array of two items:adminanddev. The presence of this claim in a JWT is required and it must contain the exact two items mentioned. If only one of these items is present, the JWT fails the validation and API Gateway rejects the request that included the token. -
The
internalclaim contains a boolean value oftrue. The presence of this claim in a JWT is required and its value must betrue. If the value is false, the JWT fails the validation and API Gateway rejects the request that included the token. -
The
bldgclaim contains an integer value of4. The presence of this claim in a JWT is NOT required for successful validation. However, if the claim is present, its value must be4. Otherwise, the JWT fails the validation and API Gateway rejects the request that included the token.
-
Updated 5 months ago