Create an MSL5 stream
Add a stream
-
Log in to your MSL5 account and select ☰> Streams.
-
Click on the Add Stream button.
-
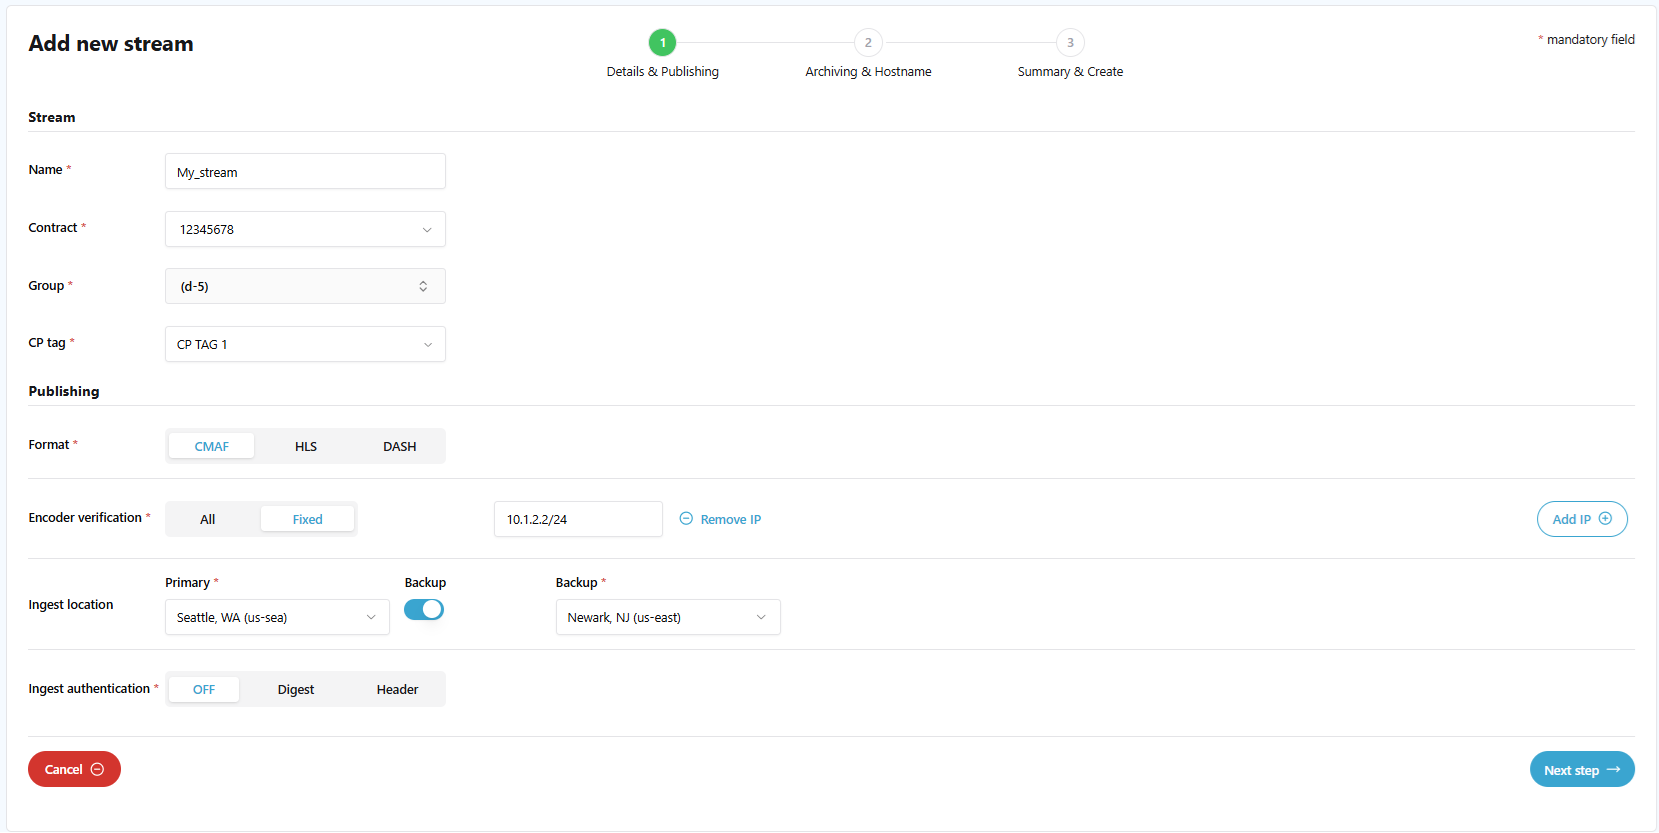
In the Details & Publishing section, configure the following.
-
From the Contract drop-down, select the contract.
The stream will be charged against that contract. -
From the Group drop-down, select a group.
The group manages user access and visibility to the stream (e.g., read/write permissions). The Group drop-down menu displays the Group IDs imported from Akamai via SAML login.
The next release will provide an option to enable auto-sync for “Group Name” and “Group ID”, so that the group options listed here will be displayed as “Group Name”.
-
From the CP tag drop-down, select the CP tag.
The stream will be charged against that CP tag for the selected contract.
If you have not created a CP tag, refer to CP tags for more information. -
Select the input Format:
- HLS: This refers to Apple HTTP Live Streaming.
- Enable Low Latency (LL-HLS): (Optional) Turn on the toggle to enable low-latency HLS streaming. Please note that this feature is currently in Beta for this release and requires certain criteria to be met, such as a compatible encoder and CDN setup. (Refer to MSL5 Origin Low-Latency HLS ingest requirements and AMD property setup for LL_HLS for detailed information.)
- Segment Template: This template is required to configure when enabling LL-HLS. In the template, you need to describe the filename pattern for the stream segments. (Refer to MSL5 Origin Low-Latency HLS ingest requirements for detailed information.)
- Enable Low Latency (LL-HLS): (Optional) Turn on the toggle to enable low-latency HLS streaming. Please note that this feature is currently in Beta for this release and requires certain criteria to be met, such as a compatible encoder and CDN setup. (Refer to MSL5 Origin Low-Latency HLS ingest requirements and AMD property setup for LL_HLS for detailed information.)
- DASH: This refers to Dynamic Adaptive Streaming over HTTP.
- CMAF: This refers to Common Media Application Format.
- HLS: This refers to Apple HTTP Live Streaming.
-
Select one of the Encoder Verification options.
- Fixed. Allows only fixed encoder IPs. Specify the encoder IP addresses in the Enter Allowed IP addresses field. Enter IP addresses in the following format
xxx.xxx.xxx.xxx or xxx.xxx.xxx.xxx/xx.
For example,192.51.100.100or192.51.100.100/20. You can enter up to 270 comma-separated IP addresses. - All (not recommended). Enables all encoder IP addresses to broadcast the stream.
- Fixed. Allows only fixed encoder IPs. Specify the encoder IP addresses in the Enter Allowed IP addresses field. Enter IP addresses in the following format
-
From the Ingest Location drop-down menu, select a region. You can specify the geographical entry point for content. If needed, enable the Backup toggle to select the backup location for the ingestion. Ensure that the backup ingest location is different from the primary ingest location.
-
Select one of the Ingest Authentication options if needed.
- Digest
- Header
Digest option for Ingest Authentication
Selecting this option will use HTTP digest authentication to publish ingest streams securely. It enhances the availability of the Media Services Live origin and prevents unauthorized users from tampering with published media or executing replay attacks.
-
From the Ingest Authentication, click on the Digest button.
-
Select one of the Hash algorithm options from the menu.
- SHA512. A cryptographic hash function that when applied to the provided input results in a 128-digit hexadecimal number that is highly unlikely to match the value produced for a different input.
- SHA256. The Secure Hash Algorithm SHA256 is a type of cryptographic hash function that generates a 256-bit (32-byte) hash. A cryptographic hash is like a signature for a text or a data file.
- SHA512_256. SHA-512/256 is derived from SHA-512, but it produces a truncated output of 256 bits, making it more suitable for certain applications where a shorter hash is preferred.
- MD5. The MD5 message-digest algorithm is a widely used hash function producing a 128-bit hash value.
-
In the Username field, enter a username between 4 and 50 characters long.
-
In the Password field, enter a password between 4 and 50 characters long, and contains an uppercase letter, a number, and a special character. You can set a password for the stream only when it is not active on production.
-
In the Confirm password field, enter the password again.
-
(Optional) Add more credentials by clicking Add credential.
-
Click Next step.
Header option for Ingest Authentication
Selecting this option will use an HTTP header to validate ingest source streams at the entry point. It requires a configured key string to authenticate incoming streams.
-
From the Ingest Authentication, click on the Header button.
-
Configure the following:
-
HTTP Header: The header must contain a maximum of 40 alphanumeric characters, is case insensitive, and allow “-” and “_”. The default value is X-MSL-Ingest-Key.
-
Key #1 (Optional): The key value must be 16-64 alphanumeric characters and is case sensitive.
-
Key #2 (Optional): The key value must be 16-64 alphanumeric characters and is case sensitive.
Up to two keys can be configured for the HTTP header for Ingest Authentication.
-
-
Click Next step.
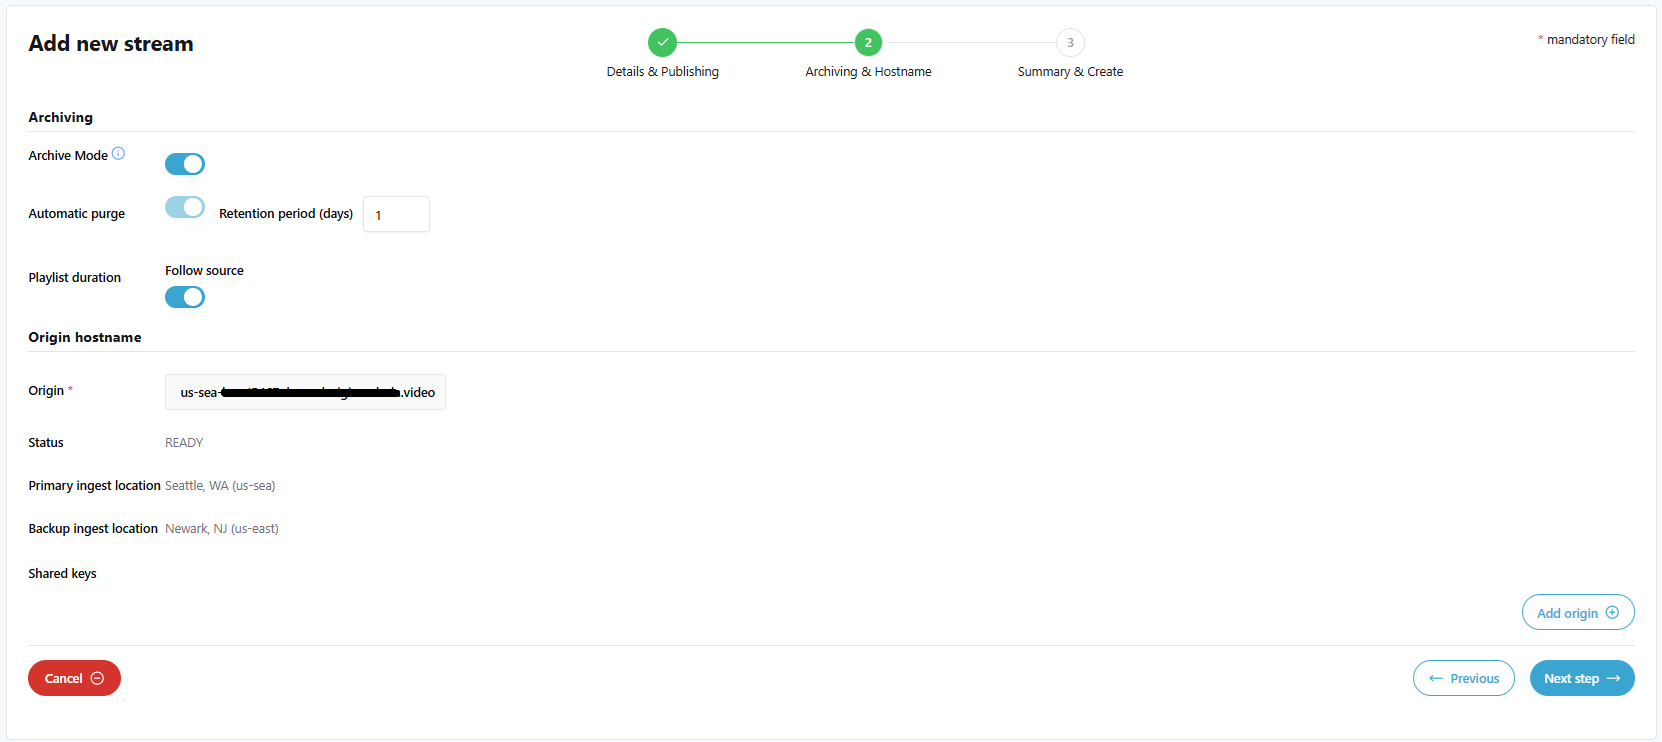
Set the Archiving and Hostname details
-
In the Archiving and Hostname window, complete the required fields.
-
To configure the Archive Mode, adjust the toggle as follows:
- On. When this toggle is turned “on”, MSL5 archives streams as Instant TV and Live2VOD content in HLS, DASH, or CMAF formats according to the configured Retention period (days).
- Off. When this toggle is turned “off”, no archiving is performed. The Retention period (days) option is unavailable and all previously archived content will be removed.
Note: Instant TV and Live2VOD applications are only supported when the Archive mode is set to “ON”.
-
In the Retention period (days), specify the number of days to store the archive for Live Clips (up to 62 days). For example, setting this to 10 days means the system will delete archived content after 10 days.
-
To configure the Playlist Duration, adjust the “Follow Source” toggle as follows:
- On. When this toggle is turned “on”, the Playlist Duration length will follow the source automatically, requiring no additional configuration. “Follow Source” is the default option for Playlist Duration.
- Off. When this toggle is turned “off”, you can specify a value between 1 and 720 minutes for the Playlist Duration length.
MSL5 will also enable playlist passthrough for Live streams by default when "Follow source" is turned on. But, if you use Instant TV or Live2VOD or choose to change the playlist duration, MSL5 will regenerate the playlist and standardize the ordering and formatting of playlist tags and attributes to keep manifests consistently aligned to a common schema.
- From the Origin menu, select an Origin. If you have not created an Origin, see Set up the MSL5 origin for more information.
- Click Next step.
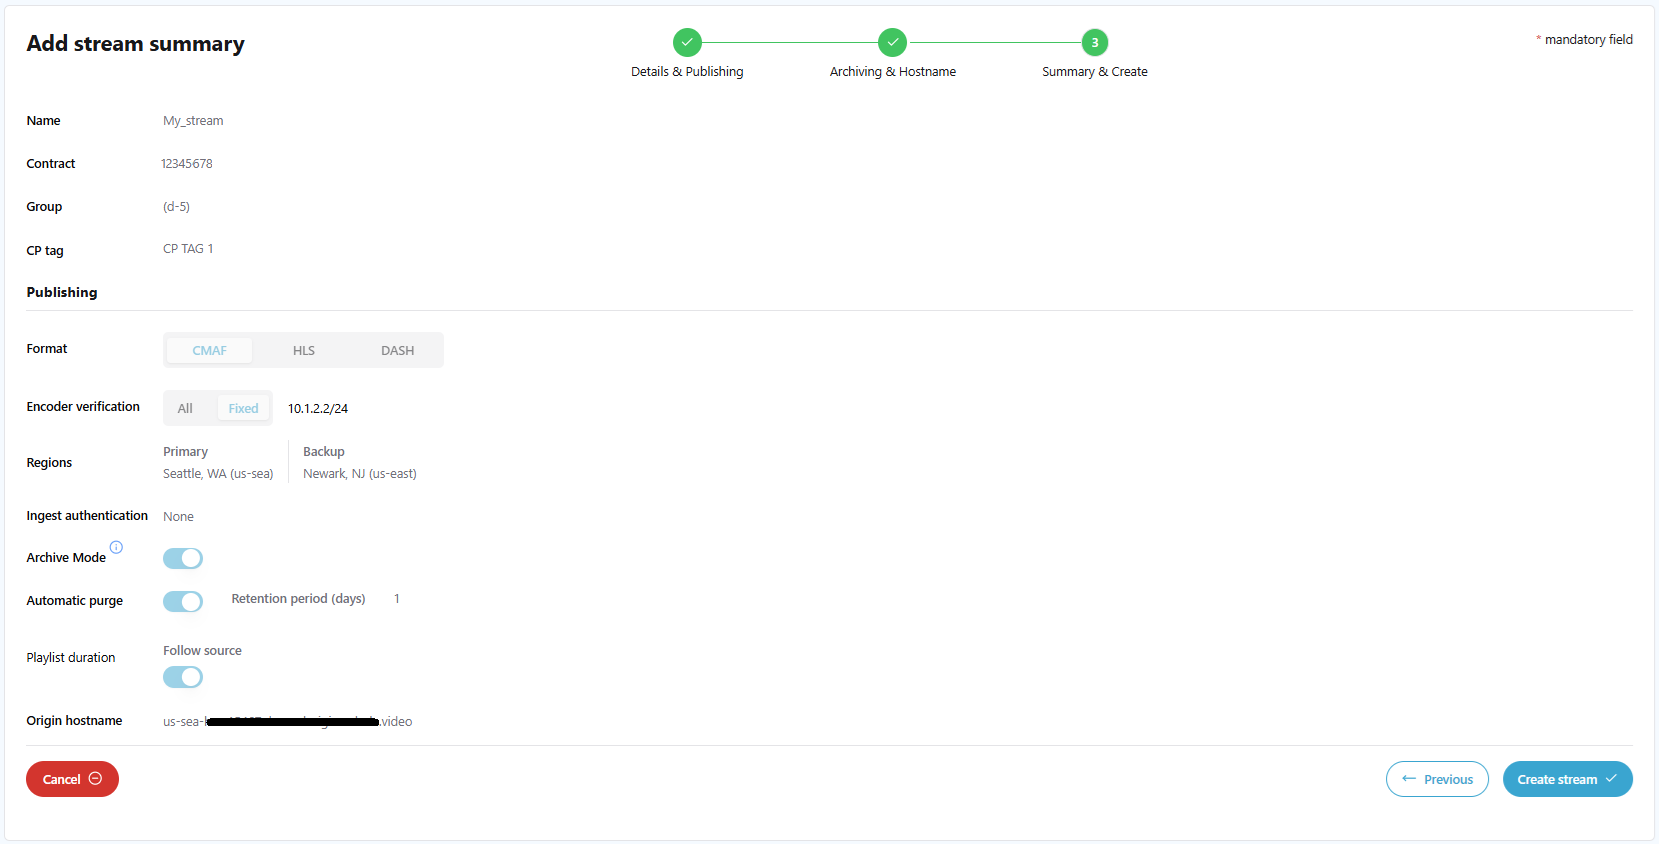
Review and complete the stream
-
In the Summary & Create window, review the parameters for your stream.
-
If you need to modify the parameters, return to the previous window by clicking the Previous button.
-
Click Create stream to configure the stream with the specified settings.
Your stream is now on the list of streams on the MSL5 main page.
MSL5 imposes a service quota/soft limit on number of streams that can be created by a single account. Refer to Stream creation limits for more information.