Add a configuration
Next in the process, you need to create your Cloud Wrapper configuration, to determine how to use its capacity as your cache.
Before you begin
Review these points before you get started.
-
You need a compatible delivery product. You need a delivery configuration ("property") set up and actively delivering content on Akamai's production network. See the guidelines for optimizing your property.
-
Your contract needs capacity. After you determined your requirements, your account team should have set up Cloud Wrapper locations and capacity on your Akamai contract. You should have also set up the property that's delivering your content on that same contract. Verify this contract has capacity inventory.
-
Support for web delivery products is Limited Availability. Support for Cloud Wrapper with Dynamic Acceleration and Ion is in Limited Availability. Talk to your account team about access.
-
Required for Cloud Wrapper support with IVM. If you're using the Cloud Wrapper option in Image and Video Manager (IVM), you need to complete this process and activate the configuration, before the feature will start working.
Web and media products can't use the same footprint
If you configure a footprint and then add it to an Ion or Dynamic Site Acceleration (web) property, you can't use the same footprint with Adaptive Media Delivery, Download Delivery, or Object Delivery (media) properties.
Implementation

To add a new configuration, follow these steps:
-
Go to ☰ > ORIGIN SERVICES > Cloud Wrapper.
-
Select the Configurations entity.
-
Click Add Configuration.
-
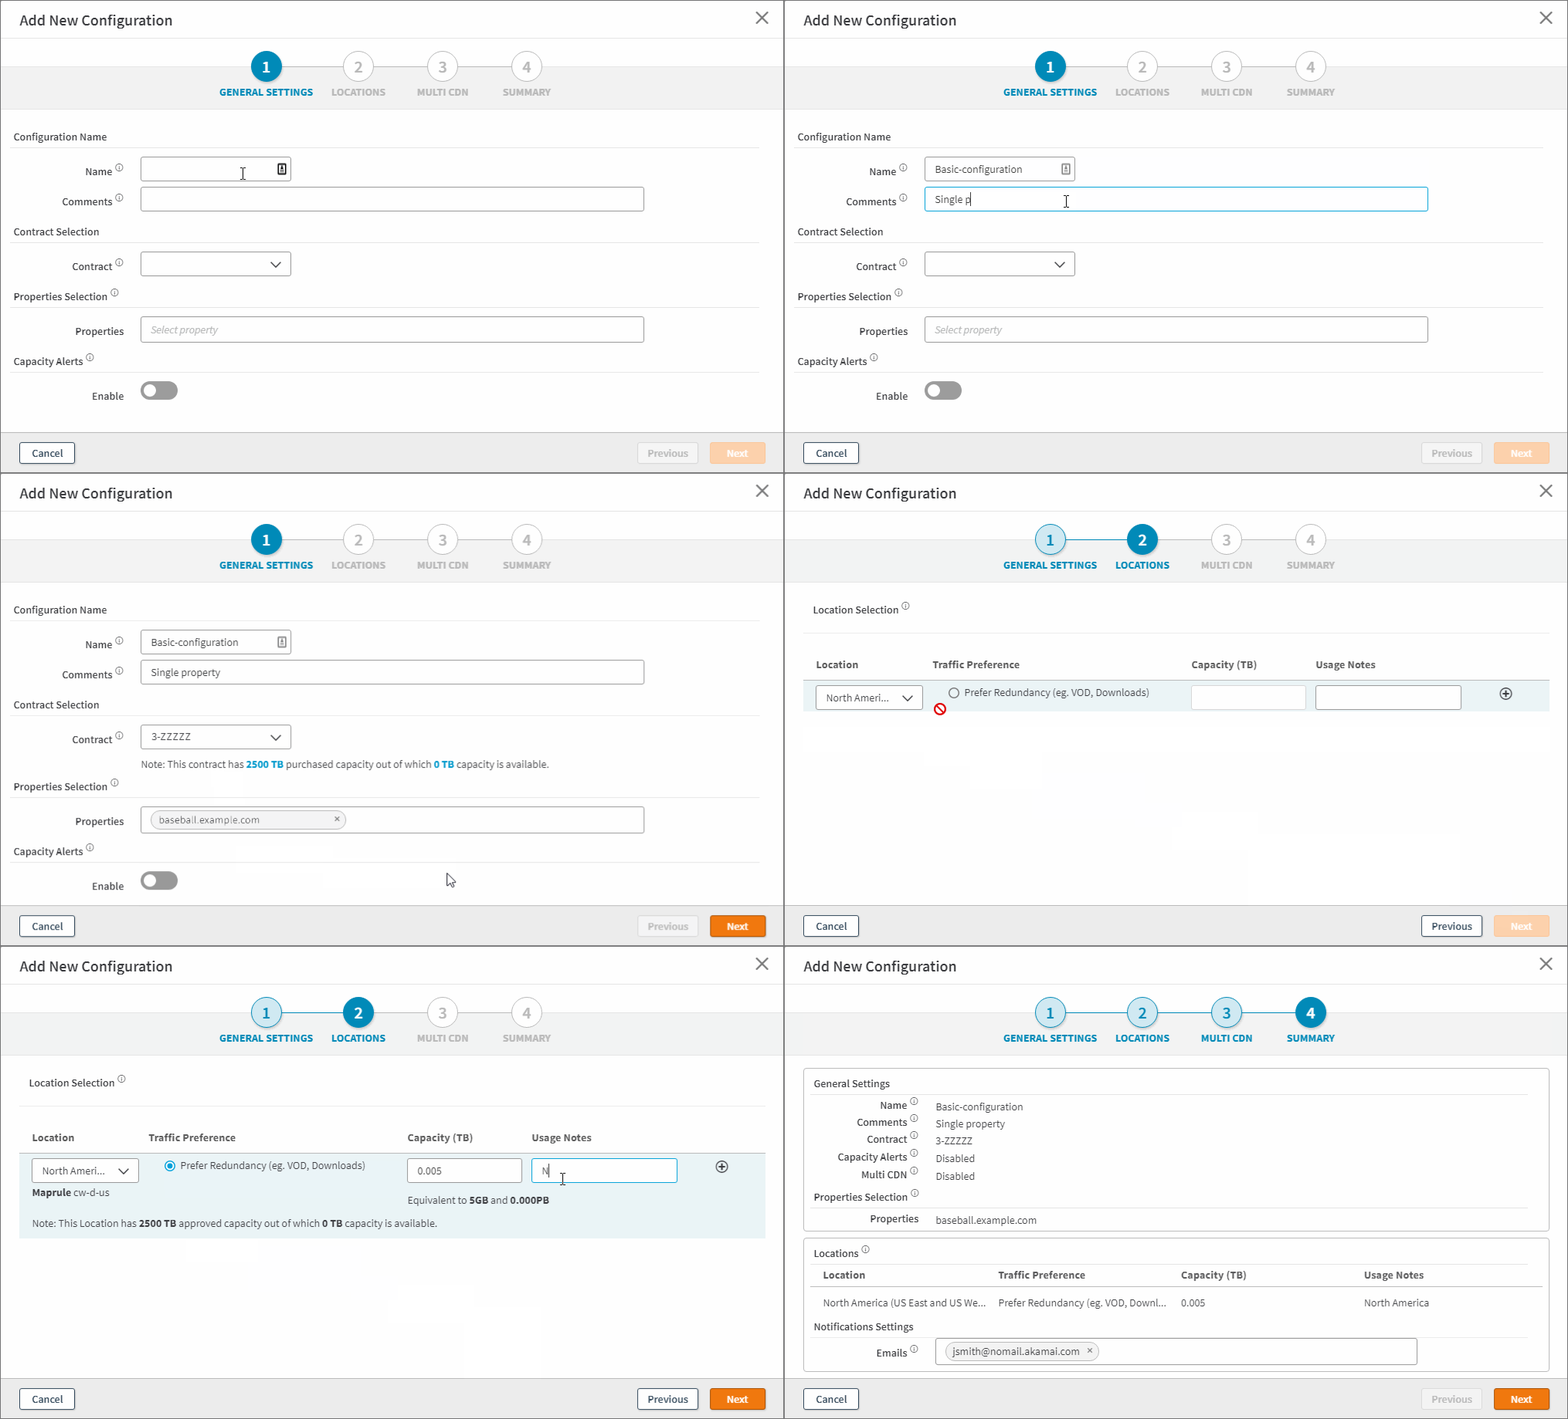
Set options in each window of the wizard:
1. Apply GENERAL SETTINGS
Define some basics for your configuration.
| Option | Description |
|---|---|
Name | Give your configuration a unique name to differentiate it. |
Comments | Optionally add notes to help identify the configuration during later use. |
Contract Selection | Select the Cloud Wrapper contract you're assigning this configuration to. |
Properties Selection | Select the delivery configurations ("properties") to include in the Cloud Wrapper configuration. The list of available properties is contingent on:
Contact your account team if the properties you expect to see aren't listed. You can also pre-populate many of these fields by creating a configuration from an analysis report. |
Capacity Alerts | Enable this to be alerted when your quota usage passes your configured threshold. You set this threshold with your Akamai account team when setting up your Cloud Wrapper instance. Emails are sent to the address you've set for your Control Center user. |
2. Set LOCATIONS
Define the locations to distribute your Cloud Wrapper capacity:
| Option | Description |
|---|---|
Locations | Select a geographic region to use. Depending on your workflow, decide if you want it closer to the origin server where you store your content, or to the clients that are requesting it. |
Traffic Preference | Set this based on the type of content you'll be delivering through this cache:
|
Capacity (TB) | Set the amount of cache space to allocate for the Location you selected. |
Usage Notes | Include any additional information to help you identify the purpose of this configuration. |
3. Set up MULTI CDN (Optional)
Enable and customize third-party content delivery network (CDN) access to Cloud Wrapper.
Multi-CDN support is currently only offered with Akamai's Adaptive Media Delivery, Download Delivery, and Object Delivery products.
-
Set Enable Multi CDN to On.
-
Select the Properties associated with your contract to include in this configuration.
-
Click Extract Origin Details to extract Origin settings associated with your selected properties.
-
You can assign an Origin ID to help identify it later.
-
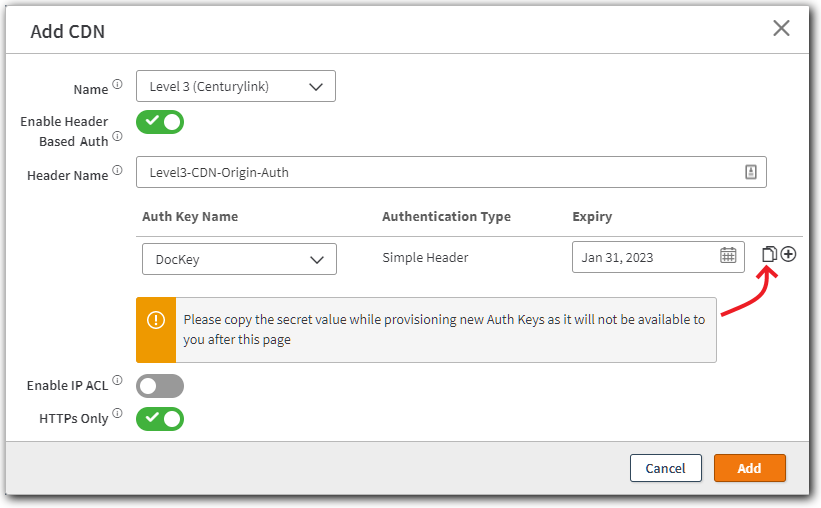
Click Add CDN. The Add CDN window launches.

| Option | Description |
|---|---|
Name | Select the CDN provider that you currently use. |
Enable Header Based Auth | Enable this to use Simple Header authentication. Later, you'll use the Secret
Rotate a key before expiration You need to create a new auth key prior to key expiration, then delete the old auth key. |
Enable IP ACL | Enable this to specify a list of IP addresses that your CDN generates requests from. Cloud Wrapper will restrict access to only these IP addresses. IP ACL is not a substitute for authentication. To further enhance your origin security, use them in combination with authentication methods such as authentication tokens. Prevent denial of traffic Consider these points:
|
HTTPs Only | Enable this to only accept HTTPS connections. Both HTTP & HTTPS connections are accepted when disabled. |
- Review Multi CDN tasks for additional processes you need to complete to set up this support.
4. Review the SUMMARY
View your summarized configuration:
-
Assign email addresses to be notified about the status of your configuration.
-
Click Submit.
-
Decide if you want to Activate now, or Activate Later.
You can edit an existing configuration as necessary, but it can't be activated.
Updated 9 months ago
