
Video Manager Powered by Cloudinary
This behavior turns on support for Video Manager Powered by Cloudinary. This behavior uses Cloudinary’s Video API to integrate directly into your Akamai delivery workflow, with features like encoding, compression, and dynamic video optimizations.
Use this guide to prepare, turn on, and configure the Video Manager Powered By Cloudinary behavior and use Cloudinary as your origin for delivering video assets.
The Video Manager Powered by Cloudinary behavior is in Limited Availability. To enable it, contact your Akamai account team.
Before you begin
The following are prerequisites for using the Video Manager Powered by Cloudinary in your rule configuration:
- Set up a Cloudinary account, and have access to your Cloudinary cloud name.
- Obtain your Cloudinary Shield Key Eval value.
- Create an access key in Cloud Access Manager.
The Image & Video Manager (Videos) behavior is incompatible with the Video Manager Powered by Cloudinary behavior.
Create an access key
Follow the steps to create a new access key in Cloud Access Manager (CAM). This key signs requests forwarded to the Cloudinary origin and is often referred to as your “Shield Key”. When you create your key, set the following values:
- Access Key Details
- Name: Your shield key name. For example:
Cloudinary Shield Key - Contract: Your contract ID
- Group: Your group
- Authentication Method:
AVM Cloudinary - Cloudinary Shield Key: Your Shield Key
Evalvalue
- Name: Your shield key name. For example:
- Network Security
- Deployment Network: Select the same PCI compliance option as your property (
PCI-CompliantorNon-PCI-Compliant)
- Deployment Network: Select the same PCI compliance option as your property (
Locate your shield key in CloudinaryYour Cloudinary shield key can be found in your default upload presets by navigating to: Settings > Upload > Upload Presets > Shield Key > Eval. Then, copy the value in the Eval field.
If you don’t have an upload preset containing a shield key, contact your Cloudinary representative.
Create variables (optional)
Optionally create and define PMUSER_CLOUD_NAME and PMUSER_TRANSFORMATION variables in your property configuration. These variables are used by rules to define Cloudinary-specific values and can be helpful if you plan to use the Advanced URL Rewrite option:
- Create or navigate to your property’s editable draft version.
- Under Property Variables, click +Variables twice to add two new blank variables.
- Enter a name and value for each new variable:
PMUSER_CLOUD_NAME: Your Cloudinary cloud name valuePMUSER_TRANSFORMATION: Specify the default transformation or leave it blank
- Under Security Settings, select Visible.
How it works
With Cloudinary enabled, requests are routed through your Akamai delivery configuration to provide a secure, controlled integration point. Requests then get forwarded to Cloudinary’s platform, also optimized using Akamai. Using auto-upload mapping, Cloudinary processes, and serves requests using your configured video storage.
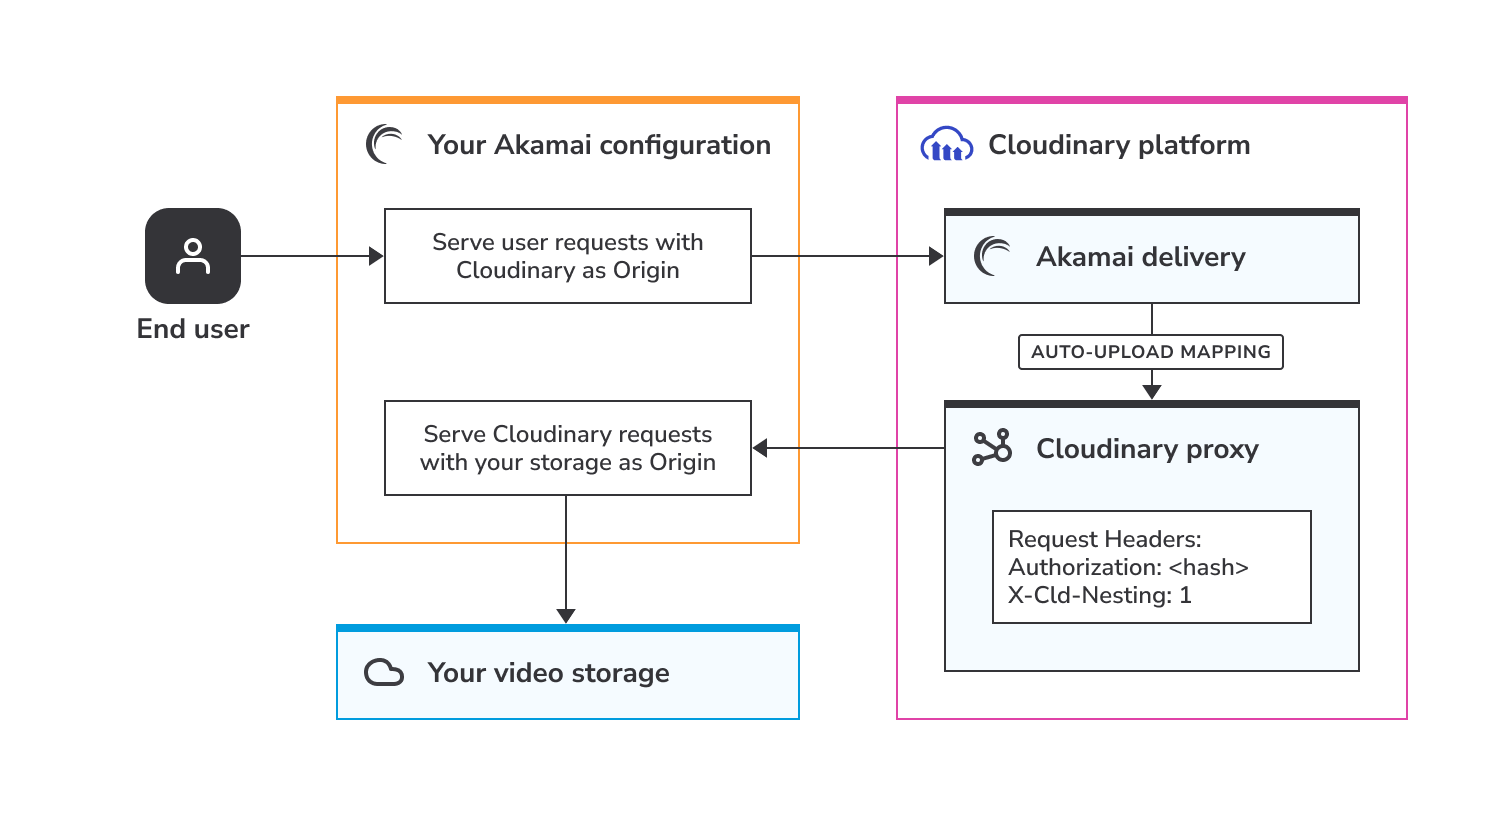
You can add this behavior multiple times in your rule configuration under mutually exclusive match conditions, but you can’t add it twice for the same request flow.
Supported file extensions
The following table shows the allowed file extensions you can use to match for specific video types.
| Video type | File extension |
|---|---|
| HLS | m3u8 ts aac mp3 vtt webvtt key hls |
| DASH | mpd init iso dash m4s |
| HDS | f4f f4m f4x bootstrap drmmeta |
| Smooth | csm ism isma ismc isml ismv |
| Image (video to image outputs) | heic heif jp2 jpeg jpg jxl jxr png webp |
| Progressive audio/video | 3g2 3gp asf avi dv f4a f4v flv gif m4a m4p m4v matroska mj2 mka mkv mov mp4 mp4a mp4v mpeg mpegts mpg mxf ogg webm wmv mts qmx qt rm wvm |
| Cloudinary packaged audio/video variants | mp4da mp4dv webmda webmdv |
| Other (legacy/playlists/subtitles) | m4f m4i m3u m3ub sidx srt subtitles |
Features and options
| Field | What it does |
|---|---|
| Enabled | Enables the behavior. |
| Shield Key | Specifies a Cloud Access Manager access key to sign requests to Cloudinary. |
| Content Provider Code | Specifies one of your CPCodes to use for Cloudinary traffic or to create a new one. |
| URL Rewrite | When enabled, rewrites the request URL to the Cloudinary URL format. |
| Advanced URL Rewrite | Enables the option to manually specify a custom path. |
| Advanced URL Rewrite Path | When Advanced URL Rewrite is On, manually enter the path you want to attach to the outgoing forward request. This field is required when Advanced URL Rewrite is enabled. |
| Cloud Name | When URL Rewrite is On, enter the Cloud Name used to prefix the incoming path. This field is required when URL Rewrite is enabled. |
| Transformations | When URL Rewrite is On, configure an optional list of transformations to include in the URL. This field is optional. |
Advanced URL Rewrite
The Advanced URL Rewrite option lets you manually specify a custom path that you can attach to the outgoing forward request:
- When configuring your behavior options, make sure URL Rewrite is set to On.
- Set Advanced URL Rewrite to On.
- The Advanced URL Rewrite Path field appears. Here, enter the path you’d like to use in the outgoing forward request. For example:
cloud-name/video/upload/{{builtin.AK_PATH}}
Implementation
You have multiple ways to use the Video Manager Powered by Cloudinary behavior that determine how you set it up:
- Basic setup. A standalone rule that matches on specific video file extensions and interacts directly with Cloudinary as origin.
- Advanced setup. A parent rule matching on specific video file extensions, and child rules used to implement more granular video asset delivery like Responsive breakpoints and Retrieve video assets from origin.
This behavior can't be in your default ruleWhether using the basic or advanced setup, your Cloudinary behavior cannot be created within your default rule. When adding it, create it as a new rule in your configuration.
Basic setup
In your rule configuration, create a new rule to serve all requests for your video assets.
- In your rule configuration, click +Rules to add a new rule.
- Select Blank Rule Template, and give it a name. For example, “Cloudinary” or “Video”.
- Add the following conditions as your match criteria, replacing the example file extensions with your own:
File Extensionis one ofmp4movavim3u8mpdm4smp4dv
- In the rule, click +Behavior, and select Standard property behavior.
- Search for, and add the Video Manager Powered by Cloudinary behavior.
- Set the following behavior option values:
- Enabled:
On - Shield key: Your key value from Cloud Access Manager
- CP code: Select your CP code
- URL Rewrite:
On - Advanced URL Rewrite:
Off - Cloud name: Your “cloud name” value from Cloudinary
- Transformations: Your Cloudinary transformations values
- Enabled:
Advanced setup
Make a new parent rule in your rule configuration that matches the specific video file extensions to be delivered:
- In your rule configuration, click +Rules to add a new rule.
- Select Blank Rule Template, and give it a name. For example, “Video”.
- Add the following conditions as your match criteria, replacing the example file extensions with your own:
File Extensionis one ofmp4movavim3u8mpdm4smp4dv
Once your parent rule has been created, you can add in child rules depending on the advanced features you need to configure. See configuration steps for Responsive breakpoints or Retrieve video assets from origin.
Responsive breakpoints
This optional setup lets you resize and cater videos based on the devices being used to view them. A responsive breakpoint is the point at which a certain video size is triggered for delivery.
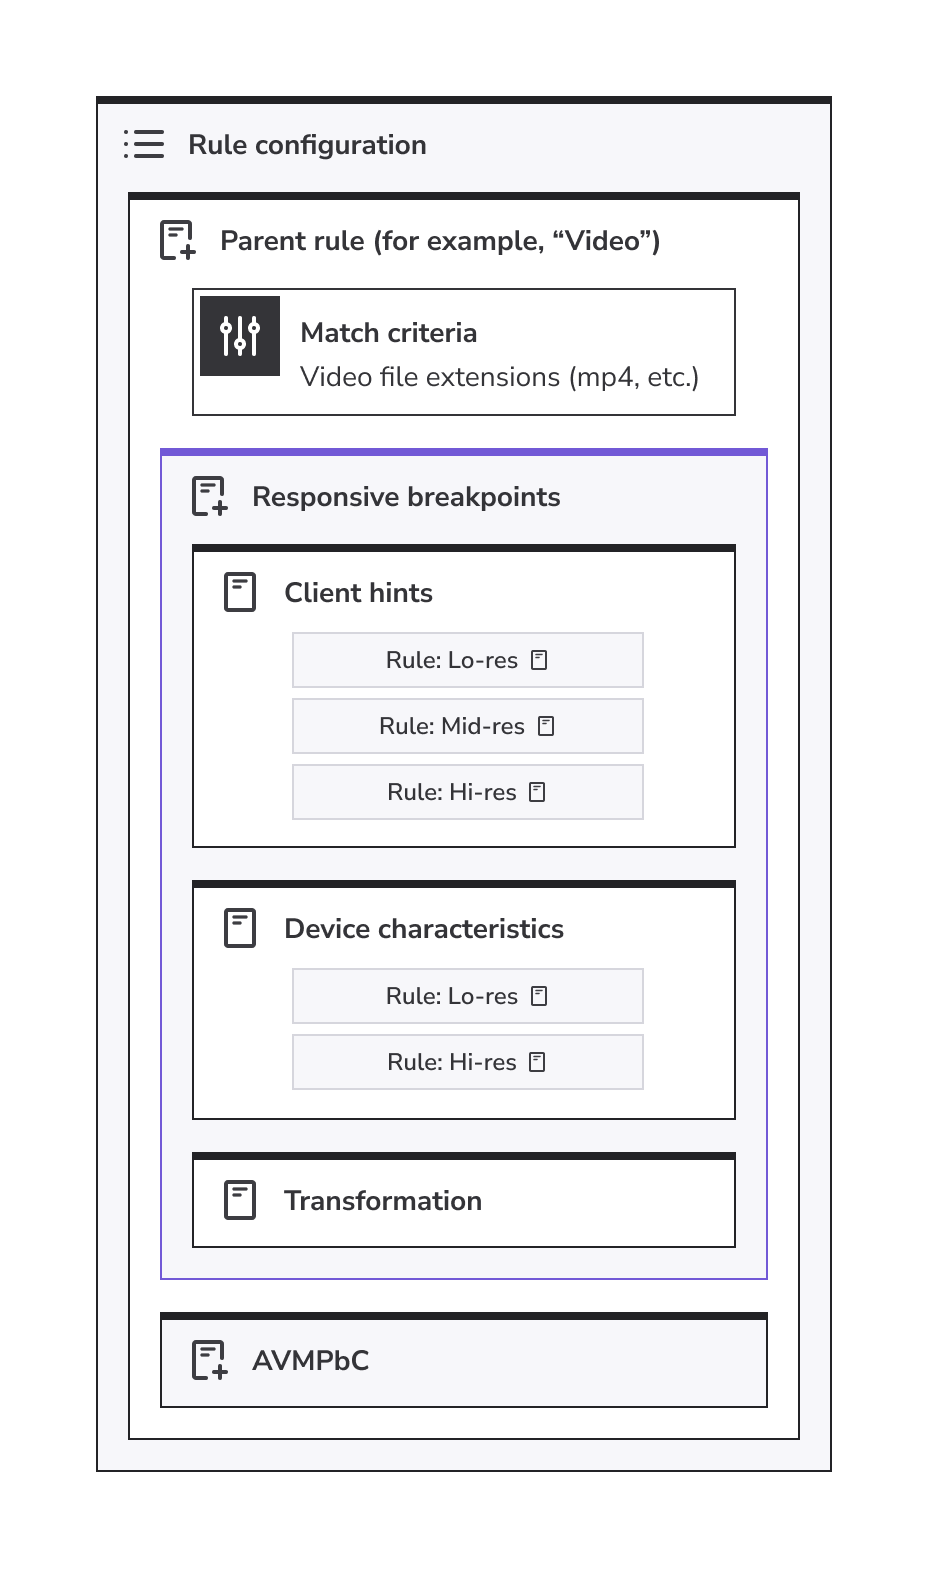
To build out a responsive breakpoints setup, you use a combination of Client-Hints and Device Characteristics rules to resize videos, including format and quality, using derivative sizes that you configure. This is done by creating a Responsive Breakpoints rule within your parent “Video” rule that contains child rules to determine and define resolution details and optimize video delivery. An ideal rule configuration for responsive breakpoints should resemble the following hierarchy:
Setup
Create dimension and width variables
Create and define PMUSER_VIDEO_DIM and PMUSER_VIEWPORT_WIDTH variables in your property configuration. These variables are used by child rules to define video characteristics values.
- Create or navigate to your property’s editable draft version.
- Under Property Variables, click +Variables twice to add two new blank variables.
- Enter a name for each new variable. For example,
PMUSER_VIDEO_DIMandPMUSER_VIEWPORT_WIDTH. - Leave the initial values blank.
- Enter the following descriptions based on the variable you’re defining:
PMUSER_VIDEO_DIM: Holds the final video dimensionPMUSER_VIEWPORT_WIDTH: Holds the width of the viewport
- Under Security Settings, select Visible.
Rule configuration
Responsive breakpoints rule
Within your parent Video rule, create a new Responsive breakpoints rule to act as a parent for the Client-hints, Device characteristics, and Transformation rules.
- From the Video rule, click the options ellipses and select Child Rule to add a new rule.
- Select Blank Rule Template, and name it “Responsive breakpoints”.
- Leave the match criteria blank, or enter optional values to trigger the responsive breakpoint.
- Add a new behavior by clicking +Behavior, and select Standard property behavior.
- Select the Set Variable behavior, and set the following behavior values:
- Variable:
PMUSER_VIDEO_DIM - Create Value From:
Expression - Expression:
1920 - Operation:
None
- Variable:
Client-hints child rule
Create a Client-hints child rule within your Responsive breakpoints rule. This rule is used to determine and set the video viewport width.
- From your Responsive breakpoints rule, click the options ellipses and select Child Rule to add a new rule.
- Select Blank Rule Template, and name it “Client-hints”.
- Add the following conditions as your match criteria. The match criteria is used to detect the client-hint’s viewport width:
Request Headerofsec-ch-viewport-widthexists.
- Add a new behavior by clicking +Behavior, and select Standard property behavior.
- Select the Set Variable behavior, and set the following behavior values:
- Variable:
PMUSER_VIEWPORT_WIDTH - Create Value From:
Extract - Get Data From:
Request Header - Header Name:
sec-ch-viewport-width - Operation:
None
- Variable:
Next, create three individual child rules within the Client-hints rule, each corresponding to a level of video resolution to be delivered. For example, “Lo-res”, “Mid-res”, and “Hi-res”.
Lo-res child rule
- Match criteria:
VariableofPMUSER_VIEWPORT_WIDTHis less than or equal to854 - Set Variable behavior:
- Variable:
PMUSER_VIDEO_DIM - Create Value From:
Expression - Expression:
854 - Operation:
None
- Variable:
Mid-res child rule
- Match criteria:
VariableofPMUSER_VIEWPORT_WIDTHis between855,1280 - Set Variable behavior:
- Variable:
PMUSER_VIDEO_DIM - Create Value From:
Expression - Expression:
1280 - Operation:
None
- Variable:
Hi-res child rule
- Match criteria:
VariableofPMUSER_VIEWPORT_WIDTHis greater than1280 - Set Variable behavior:
- Variable:
PMUSER_VIDEO_DIM - Create Value From:
Expression - Expression:
1920 - Operation:
None
- Variable:
Device characteristics child rule
Create a Device characteristics child rule within your Responsive breakpoints rule. This rule is used to determine resolutions for mobile and non-mobile device delivery.
- From your Responsive breakpoints rule, click the options ellipses and select Child Rule to add a new rule.
- Select Blank Rule Template, and name it “Device characteristics”.
- Add the following conditions as your match criteria:
Request Headerofsec-ch-viewport-widthdoes not exist.
Next, create two individual child rules within the Device characteristics rule for determining how to deliver video content to both mobile and non-mobile requesting devices. For example, “Mobile” and “Non-mobile”.
Mobile child rule
- Match criteria: If
Device characteristicsis_mobileTrue - Set Variable behavior:
- Variable:
PMUSER_VIDEO_DIM - Create Value From:
Expression - Expression:
854 - Operation:
None
- Variable:
Non-mobile child rule
- Match criteria: If
Device characteristicsis_mobileFalse - Set Variable behavior:
- Variable:
PMUSER_VIDEO_DIM - Create Value From:
Expression - Expression:
1920 - Operation:
None
- Variable:
Transformation child rule
Create a Transformation child rule within your Responsive breakpoints rule. This rule adds a limit resize to the transformations variable (PMUSER_TRANSFORMATIONS) you created during the Before You Begin step. A limit resize sets the maximum width and height of the video to PMUSER_VIDEO_DIM while retaining the aspect ratio.
- From your Responsive breakpoints rule, click the options ellipses and select Child Rule to add a new rule.
- Select Blank Rule Template, and name it “Transformation”.
- Leave the match criteria blank.
- Set Variable behavior:
- Variable:
PMUSER_TRANSFORMATIONS - Create Value From:
Expression - Expression:
c_limit,h_{USER.PMUSER_VIDEO_DIM},w_{USER.PMUSER_VIDEO_DIM} - Operation:
None
- Variable:
AVMPbC rule
At the same level as your Responsive breakpoints rule, create a new rule called “AVMPbC” (Akamai Video Manager Powered by Cloudinary). This rule is used to define the Video Manager Powered by Cloudinary behavior in your rule configuration.
- From your Video rule, click the options ellipses and select Child Rule to add a new rule.
- Select Blank Rule Template, and name it “AVMPbC”.
- Leave the match criteria blank.
- Search for, and add the Video Manager Powered by Cloudinary behavior.
- Set the following behavior values:
- Enabled:
On - Shield key: Your Shield Key name (for example, “Cloudinary Shield Key”).
- CP code: Select your CP code
- Rewrite URL:
On - Cloud name: Your “cloud name” value from Cloudinary
- Transformations: Your Cloudinary transformations values
- Enabled:
Retrieve video assets from origin
This is an optional step to enable Cloudinary to automatically fetch video assets from your origin using the auto-upload mapping function (see How it works). This section shows how to set up auto-upload mapping in Cloudinary and edit your Akamai configuration to serve requests for video content using your storage as the origin (for example, NetStorage, Object Storage, or a custom origin).
This step is unnecessary for supported private storage like Amazon S3, Google Cloud Storage (GCS), and Akamai Block Storage. For more details, see Upload from a private storage URL.
Setup
Create a strong hash for Cloudinary authentication, and set up auto-upload mapping in your Cloudinary console.
Step 1: Generate a strong hash
Using the hash generator of your choice (for example, IT-Tools token generator), create a strong hash value. This value is used to authenticate requests from Cloudinary.
As a best practice, generate a hash string of at least 48 digits using mixed alphanumeric characters.
Step 2: Configure Auto-Upload mapping
In your Cloudinary console, configure auto-upload mapping using Cloudinary’s official documentation: Auto Upload (Video Tutorial). Once you get to Add Mapping, return to this section and use the provided examples for your Source URL Prefix and Target folder values.
-
Source URL Prefix. When providing a value for Source URL Prefix, use the below string. Replace
www.example.com/productswith the URL and path of your origin, and replace<hash>with the hash value you created.{"prefix": "www.example.com/products","headers": {"authorization": "<hash>"}} - Target folder. Under the Target folder value, provide the name of the folder where videos should be stored in Cloudinary. For example, your root folder
/.
If you're using a custom target folder location in Cloudinary, use Advanced URL Rewrite to define your path.
Step 3: Test on the staging network (optional)
The Cloudinary platform accesses Akamai’s production network by default. If you want to test your configuration on the staging network first, modify your Source URL Prefix value in Cloudinary so prefix is associated with your staging edge hostname (for example, www.example.com.edgesuite-staging.net/products), and add a host header value pointing to your origin URL and path (for example, "host": "www.example.com/products").
Your Source URL Prefix for testing on staging should resemble the following:
{"prefix": "www.example.com.edgesuite-staging.net/products","headers": {"host": "www.example.com/products","authorization": "<hash>"}}Once you’re ready to activate your configuration on production, make sure to change the Source URL Prefix to the string you entered in Setup: Step 2.
Origin Server behavior configuration
Configure your Origin Server behavior according to your video origin setup using the following settings as guidelines:
- Origin Type:
Your Origin - Origin Server Hostname: Your origin URL and path. For example,
video.example.com. - Forward Host Header:
Origin Hostname - Cache Key Hostname:
Origin Hostname - Origin IP Version:
IPv4-Only - Supports Gzip Compression:
Yes - Send True Client IP Header:
Yes - True Client IP Header Name:
True-Client-IP - Allows Clients to Set True Client IP Header:
No
Example of NetStorage as origin type
If you’re using NetStorage for your video origin, consider using the following settings in your Origin Server and Caching behaviors:
- Origin Server behavior
- Origin type:
NetStorage - NetStorage Account:
<example account>
- Origin type:
- Caching behavior
- Caching option:
Cache - Force revalidation of stale objects:
Serve stale if unable to validate - Maxage:
60 seconds
- Caching option:
Updated about 1 hour ago