Filters
Use reports filters to specify details about your web business that meaningfully limit the report data.
Choose required filters in every report. If you don't select optional filters, all associated data for that filter is returned.
If you exceed the filter selection limit, a pop-up appears and you can run the report anyway or schedule to email it. The filter selection limit may vary depending on the report type. Selecting a report type adjusts the filter panel to show the relevant filters.
If you switch between different Traffic reports (for example, from Today’s Traffic to Traffic, or from Traffic to URL Traffic), the filter settings you applied in the first report will carry over to the next report. This applies to filters of the same type and with the same filtering options.
Filter panel
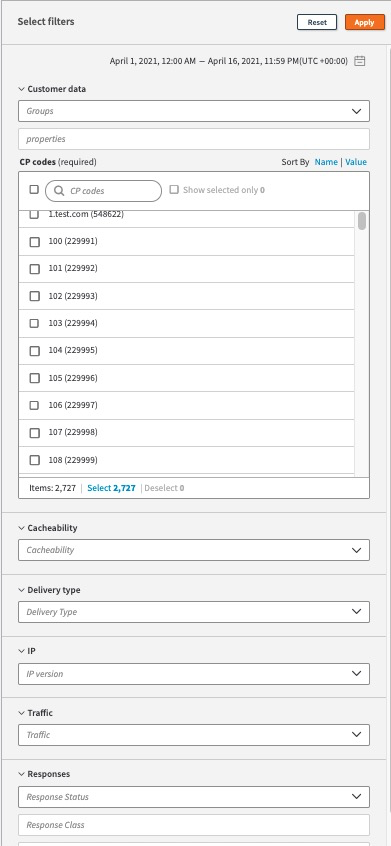
With the filter panel, you can select filters in a variety of ways and see an overview of your selections for the report you're currently viewing.

The filter panel lets you do a range of things.
-
Select custom or predefined date range.
-
Select filters one by one using check boxes.
-
Search in any text field. As you type you can see a list of options. The
Itemsmenu shows you how many items are currently in the list. -
Multi-select filters in one category by using the Select option. For example, if the panel displays
Items: 3, the panel also shows optionSelect 3. You can click Select to choose selected filters at one time. -
Deselect multiple filters in one category using the Deselect option. For example, if you selected three options, the panel displays
Deselect 3. You can click Deselect to remove selected filters at one time. -
Clear all selected filters by clicking Reset.
-
Build the report view based on your selections by clicking Apply.
-
Import or export CP codes by clicking icons next to
Sort by. -
Select a property, which narrows the list of CP codes in the filter panel to the CP codes associated with that property.
The property filter lists only active properties containing some active CP codes.
Select filters for your report
Filters lets you fine-tune the data you see in your report. Choose required filters in every report. If you don't select optional filters, all associated data for that filter is returned.
Before you begin, select a report type to see the relevant filters in the filter panel. Filter panel opens automatically.
-
Choose at least one item for each required filter.
-
If needed, select additional optional filters.
-
Click Apply.
The report view updates the data for the filters you selected.
Select multiple filters at once
Use filters to fine-tune the data you see in your report. Filter names can contain both words and numbers and can be difficult to sort. You can search on any part of a filter name and then select all filters that match at one time. Choose required filters in every report. If you don't select optional filters, all associated data for that filter is returned.
Before you begin, select a report type to see the relevant filters in the filter panel. Filter panel opens automatically.
-
In the search field, start typing keywords that match your search criteria.
Results matching your text show up in the list. -
Select at one time all results matching your search, by clicking Select
X, whereXis the number of filters selected. -
Click Apply.
All results that match your text are selected and show check marks.
The report view updates the data for the filters you selected. You can also click DeselectXto remove the filter selections.
Reset filters
Use filters to fine-tune the data you see in your report.
Before you begin, select a report type to see the relevant filters in the filter panel, and any previously selected filters making the Reset functions effective.
To reset your filters, choose one of the following options:
- In the filter panel, click Reset.
- At the top of the report, click Clear all.
The report view removes all filters and associated data. Choose required filters in every report. If you don't select optional filters, all associated data for that filter is returned
Updated 9 months ago
